Arched corners are used for finishing rooms. They have two main functions:
- decorative;
- protection of corners from damage.
Arches, as an element of architecture, appeared in ancient times for one reason: there were no reinforced concrete beams, and wooden lintels did not last long. Recently, the fashion for decorating doorways with arches has returned. Plastic corners protect sharp edges from accidental damage, abrasion and from people passing by.
Types of corners for finishing arches
According to the place of use, corners are divided into:
- those that are installed on plaster;
- corners that are glued under the plaster.
The first ones have a wider range: they are made of different materials and can be of almost any color. The latter have special holes for better adhesion to the surface. They come in both metal and plastic.
Functions of corners:
- alignment of external arched corners;
- protection of corners from accidental damage;
- surface decoration.
Wallpaper tends to peel off from the base over time. A doorway trimmed with decorative corners will hold them on the wall and also give the room a finished look.
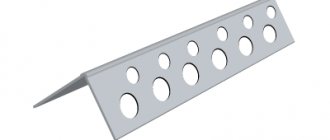
Perforated corner for strengthening corners and slopes.
What is a corner for an arched opening?
Nowadays, instead of traditional rectangular doorways, arches are often installed, through which the connection of adjacent rooms is ensured. Along with them, rounded niches and partitions with a unique design are erected in the walls. They allow you to create an original design in the room.
When carrying out such work, it is simply impossible to do without the use of corner elements with a rigid structure. Their installation allows you to protect the cut. Therefore, it is important to find a material that will provide not only protective properties, but also be suitable for finishing structures. It is well known that it is the finishing of doorways that wears out faster - the wallpaper breaks off and the paint wears off.
However, this problem has a simple solution. It is necessary to install corners for the arch and the finish will last for a long time. An element such as a corner provides protection against wear , and it also eliminates the occurrence of mechanical damage in the opening. Its use also allows you to emphasize the smoothness of the lines and the very shape of the structure. In addition to this, we note that the arched corner provides the structure with a more elegant look. These decorative elements are made from different materials:
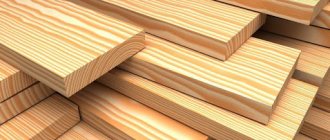
- plastic;
- traffic jams.
In practice, the most common use is a plastic corner. The main function of this product is decorative. Along with it, it provides protection to the structure. Just like the casing, this element protects wallpaper and paint from abrasion.
One of its shelves has a one-piece perforated design. As for the other, it consists of trapezoidal segments, which also have perforations. The use of this design provides the ability to easily bend the material to the desired radius. By using them during work, it becomes possible to form various bends. Thus, using arched corners, it is possible to process both a round element as part of a suspended ceiling, and openings with a complex shape.
Materials for making plastic corners
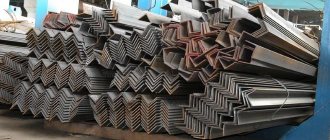
If we classify products by material, then there are two types of corners for arches:
- metal;
- plastic.
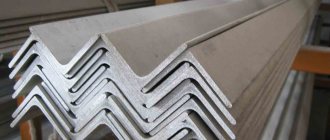
Metal ones are only perforated for plaster. They serve to strengthen and prepare external corners for final finishing. They have to be cut when used.
On curved surfaces, when a perforated corner metal profile is bent, bumps appear, and the round arch becomes polygonal. Therefore, when strengthening openings, a plastic perforated corner profile is used. It is attached with glue or screwed to the wall.
Perforated corners are made from plastic for finishing corners and slopes. They are flexible and inexpensive. Products are made of PVC or polyurethane. They hold their shape well when bent. The corners are so soft that they can be used to finish curved surfaces with a minimum radius. Also, products made from PVC and polyurethane plastic are more durable and do not fade.
Methods for installing arched corners
Installation begins with surface preparation. Regardless of what the arch is made of (brick, drywall or other materials), the preparatory stage must first be carried out. It is also necessary to strengthen the surface of the opening before gluing the decorative corners. Let's look at how to glue a plastic corner to an arch in two situations:
- In a new building, where the walls are only plastered and not finished with anything;
- In a residential building with finished walls (painted, wallpapered).
Methods for installing arched corners
Methods for installing arched corners
Methods for installing arched corners
In the first case, the scope of work is small, it can be easily completed even by novice builders:
- Products are attached to brick walls with plaster or quick-drying putty.
- The corner is screwed to the drywall with screws, glued with liquid nails or placed on gypsum putty.
- At the next stage, the installation site is plastered, sanded, painted or wallpapered. After this, decorative protective corners are installed.
In the second case, when the opening has already been made and the wallpaper is pasted, more complex work has to be carried out. Procedure:
- First, you need to carefully draw a parallel line on both sides of the arch the width of the perforated corner. To do this, you can make a template from a plank.
- Remove excess plaster from both sides of the corner with a putty knife.
- Secure the perforated corner using one of the above methods (with nails or glue).
- Putty and level the walls in one plane.
- After puttying work, check the plane with a straight, long ruler or slat. There should be no gaps between it and the wall.
If the plane is level, proceed with the sticker.
If the walls are crooked, the corners will need to be spread out.
Nuances you need to know about:
- To fix the perforated profile in the opening, prepare spacers from wooden planks.
- First, the upper part (along an arc) of the profile corner is installed and the places at the lower points are marked with a pencil on the wall.
- Then the lower pieces of the corners on the right and left are installed and fixed.
- After the lower profiles are secured, the upper part is installed. Due to the elasticity of the plastic, the profile will press against the base and will not fall.
- Another fixing option is to glue a corner to the wall with masking tape, if the wall surface allows this.
If in some places the perforated corner moves away from the surface, press it and fix it with a self-tapping screw, and only then treat it with putty. If the screw is sticking out above the surface, ignore it. After the putty has set, you can unscrew it and seal the hole.
Arched corner pvc flexible
Decorative and plaster corners for arches for wallpaper
The arch in the interior serves both as decoration and determines the quality of the apartment’s renovation. Its shape and finish highlight the style. The location in a high traffic area requires protection of the protruding elements of the opening. Decorative corners for wallpaper will help to beautifully emphasize the shape and strengthen the arch; decorative corners for wallpaper will help create a holistic image. They can also be used on painted surfaces.
Corners for arches for wallpaper
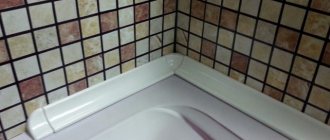
Clear lines and protection from destruction are obtained thanks to the edging
Wallpapered and painted outer corners are the first to begin to deteriorate. As people pass by, they cling with their shoulders and legs, and hit the protruding elements with various objects. I advised my friend, who was finishing his renovation, to stick up a corner for wallpaper. In his house, figured arches separate the kitchen and dining room, zone the large living room, and separate the hallway from the corridor.
Finishing the arch with corners
The pasted edges of the arch without additional finishing are visually blurred and merge with the background. The easiest way to make a line clear and turn it into interior decoration is with the help of a decorative profile. It is flexible, made from:
Decorative plastic profiles are used more often than others. It is painted during manufacture. Has a uniform cut tonality. It bends easily and hides surface defects and irregularities.
Metal corners are used for edging arches in modern techno, hi-tech, art deco, and avant-garde styles. They are made of aluminum strip 0.3 - 0.8 mm thick with a decorative coating:
The surface can have any color. The most popular ones are steel, black metal and mirror ones.
Cork wallpaper corners are rarely used. It is mounted on arches with a large arch radius. They are used in interiors with wallpaper and panels made of similar material. A profile made from natural bark is more expensive than plastic and metal materials.
Arched profiles are divided according to purpose:
- perforated plaster;
- decorative.
For corners whose rotation is greater or less than 90 0. special flexible corners are produced from laminated cardboard and plastic.
Perforated profile for arches
Arch and corners for it under wallpaper
The corner of the arch can be finished if it is smooth, without changes and does not go to the side. To do this, special perforated corners are installed during putty:
One side of the profile consists of segments. When bent, they easily fan out or compress, taking the desired shape, and adhere to the surface of the arch and figured multi-level ceiling. When putting putty they serve as beacons. Attach them:
- construction stapler;
- nails;
- adhesive composition.
When renovating indoors, plastic corners are mainly used. Outside the house it is more practical to use metal ones. Cardboard is rarely found on sharp and obtuse corners under wallpaper in the interior.
The use of a plaster profile makes the lines of the arches correct and the transitions of the planes clear. The trellises and paint lie flat. At the same time, perforated profiles strengthen the corners and protect the finishing material from destruction and chipping.
Variety of decorative corners
Corners for wallpaper for arches
You can choose corners for wallpaper that match or contrast. It all depends on the style and desire to emphasize the arch line. Plastic corners created for arches have different sides:
There is no specific standard regulating the size of the sides. Each manufacturer produces a wallpaper corner in a width ratio that it considers convenient. In addition, the profile length ranges from 2700 mm to 3000 mm. Equilateral corners are also used to decorate the arch. They start from a side size of 10 mm and end with 50 mm. Their thickness is 1 – 1.4 mm. Wider trims are custom made for a specific arch.
The thickness of the plastic profile for finishing arches is usually one millimeter. This is enough so that the wallpaper corner can hide unevenness and remain flexible. In addition to plain colored ones, they can be painted to match various types of wood, metal, and stone.
Attention! When purchasing, pay attention to the bending radius. Its minimum size by which a decorative corner can be bent without destroying it and creating extreme stress.
What size and color to choose for a certain style
Arch in the interior of the apartment
You can make the corners neat without highlighting the arches in the interior using a narrow profile matched to the background color of the wallpaper. A contrasting dark edging will emphasize the shape of the opening and concentrate attention on it. For folk and natural styles, decorative plastic wood-look corners are used.
The smaller the room and the arch, the narrower and more inconspicuous the corner should be. Contrasting bright finishes make the interior expressive and visually reduce the space.
The tone profile should match one of the three colors most often used in wallpaper designs.
Installation of decorative arched corners
Corners for the arch to the room
The decorative arched corner is installed last during renovation, when the wallpaper is glued and dry. It can be attached in various ways:
- self-tapping screws into holes with a cone for the heads;
- carnations with cut off heads;
- adhesive composition for plastic;
- liquid Nails.
I use self-tapping screws when decorating interiors in loft and industrial styles. In this case, they are elements of thematic design.
I never use nails. If they become clogged, the plastic may crack. Even if the caps are cut off, traces of the fasteners are visible. It is difficult to match the mastic exactly to the tone of the finish and to disguise the nails.
Attention! Remove strips of wallpaper half the width of the profile and glue the corners directly to the putty.
Arch and corners for wallpaper
I install the corners for the arch with glue mainly on painted surfaces and thick washable wallpaper.
- I cut the wallpaper on both sides of the corner with a sharp knife.
- I cut and check the fit of the dry profile. I mark the middle of the corner and arch.
- I adjust the joints. I'm rechecking their alignment.
- I apply a small amount of glue to the middle of the profile.
- I start gluing from the middle. I press the corner and secure it with tape to the wall.
- After the glue dries, I remove the tape.
- arched corner;
- assembly adhesive intended for plastic or cork material;
- decor;
- metal nails without heads;
- hermetic treatment;
- glue or liquid nails;
- rubber mallet.
Advice! If the length of the profile is not enough to completely cover the arch, add it symmetrically on both sides. This will look more aesthetically pleasing than the usual “sharpening” in one place.
I use liquid nails most often when finishing glued arches. Preparation is similar to gluing. I only apply liquid nails pointwise, press for a few seconds and move further - from the middle to the right, then to the left and down. The quick hardening of the composition does not require fixation with tape and long pressing with hands.
We also recommend reading:
Wallpaper with trees on the wall will create an amazing atmosphere of peace and relaxation. Mold under the wallpaper appears on the walls with black spots. Stone-effect wallpaper and a combination of bright colors in the room. Do-it-yourself liquid wallpaper, finishing of various surfaces and the main advantages of the material. Choosing wallpaper for a room: features of choosing the material.
The nuances of using flexible decorative arched corners
Various decorative elements are used to decorate the interior of a home. Recently, the use of various entrance design options has become popular. One such solution is arches. When decorating them, arched corners are used. If we talk in more detail about these elements, we will highlight two types: plastic and metal.
If you use them when decorating the entrance, the arch will look more aesthetically pleasing. The use of corners will also have a positive effect on its service life. In addition, the corners significantly facilitate the work of plastering the doorway. Also, with their help, you can simplify your task of forming and strengthening structures of curved shapes created from the outside.
What is a corner for an arched opening?
Nowadays, instead of traditional rectangular doorways, arches are often installed, through which the connection of adjacent rooms is ensured. Along with them, rounded niches and partitions with a unique design are erected in the walls. They allow you to create an original design in the room.
When carrying out such work, it is simply impossible to do without the use of corner elements with a rigid structure. Their installation allows you to protect the cut. Therefore, it is important to find a material that will provide not only protective properties, but also be suitable for finishing structures. It is well known that it is the finishing of doorways that wears out faster - the wallpaper breaks off and the paint wears off.
However, this problem has a simple solution. It is necessary to install corners for the arch and the finish will last for a long time. An element such as a corner provides protection against wear . and it also eliminates the occurrence of mechanical damage in the opening. Its use also allows you to emphasize the smoothness of the lines and the very shape of the structure. In addition to this, we note that the arched corner provides the structure with a more elegant look. These decorative elements are made from different materials:
In practice, the most common use is a plastic corner. The main function of this product is decorative. Along with it, it provides protection to the structure. Just like the casing, this element protects wallpaper and paint from abrasion.
One of its shelves has a one-piece perforated design. As for the other, it consists of trapezoidal segments, which also have perforations. The use of this design provides the ability to easily bend the material to the desired radius. By using them during work, it becomes possible to form various bends. Thus, using arched corners, it is possible to process both a round element as part of a suspended ceiling, and openings with a complex shape.
Flexible arched corner in the decoration of the opening
One of the advantages of this material is its plasticity. It can be used to finish openings of niches and windows of various sizes. Along with this, it can be used to finish curved structures. Segments having a trapezoidal shape allow one side of the corner to move to the outer radius of the inner one. These products are used mainly to create shapes, as well as to protect the surfaces of curved shapes of architectural elements.
Using flexible corners you can create a smooth silhouette. Due to the fact that the length of these elements can reach up to 3 meters, it is possible to perform fastening without forming a traditional seam. This has a positive effect on the aesthetic appearance of the created structure. One of the advantages of arched plastic corners is that their installation procedure is simple and takes little time to complete. The corners are fixed to the plasterboard structures of the segments, which are cut into shelves with steel staples. During the work, a construction stapler is used. When the installation of the structure is completed, it is covered with a layer of putty. At the final stage, the surfaces are ground.
If during work you have a need to use flexible corners, then you can easily buy it in a specialized store or at the construction market.
Finishing arches with corners
Currently, there are several options for finishing rounded openings. The finishing method using an arched plastic corner is distinguished by its simplicity and practicality . The color of the material used during work can be any, which allows it to be combined with the decoration elements of the room.
To carry out the work you will need:
Preparing the surface for installing the corner
The first thing to do is to clean the arch from dirt and dust. Before you begin installing the finish, you should degrease the mounting area with special compounds. This work is necessary to ensure that the installation is reliable.
If the opening is simply covered with a layer of plaster, then you need to ensure that it does not crumble during work. There should be no cracks on it, and the plaster itself should be smooth. If there are any defects - chips and cracks . then in this case it is necessary to remove the damaged layer and then apply a new one. When the plaster has dried, it is necessary to clean it from dust. Work on installing an arched corner can only be carried out in a room that is warm and free of drafts.
Attaching the finishing corner to drywall and other surfaces
A special adhesive composition is used to attach the finish. Or liquid nails can be used. The material is applied to the inside of the corner. Since it will also act as an interior decoration, you need to select its color a tone lighter or darker than the prevailing decoration in the room. In this case, a certain contrast will be created. An opening designed in this way will take on an original appearance.
Now it’s worth talking separately about the installation of finishing materials made of plastic and cork for the decorative volumetric structures existing in the room.
Cork corner
Among all the finishing materials offered to consumers, one of the most environmentally friendly is cork. One of its advantages is a high degree of elasticity. Its installation can be done on your own. The most important thing is to take measurements of openings seriously. If errors are made during this work, it will no longer be possible to correct the dimensions of the finished parts. And this can lead to curvature of surfaces.
Before installing the finish, it is necessary to treat the surface of the walls. It must be cleaned of dust and other contaminants. In addition, it is necessary to degrease it. The glue should be applied to the inside of the cork material. When this is done, you must wait at least 20 minutes. This is necessary so that the adhesive composition is well absorbed into the material.
When installing the plug, it is necessary to press it to the surface over the entire contact area of the structure. Pressing down the material should be done carefully, laying it over the entire surface of the opening. The cork should transfer the applied adhesive composition to the wall surface to the maximum. During operation, the formation of air bubbles must be avoided. When gluing is completed, you need to tap the corner with a rubber hammer to make it fit more firmly. There may be some adhesive coming out at the edges. Using a soft cloth, it must be removed immediately. When the installation of the material is completed, you must wait at least 2 hours for maximum adhesion of the adhesive to the wall surface.
Plastic corner
Plastic corners are most widely used when finishing openings. Most consumers choose them for the following reasons:
- acceptable price;
- practicality;
- wide range of colors.
Before performing work using them, the wall surface must be cleaned of dirt. The material itself is degreased from the inside. An adhesive composition intended for plastic is applied to the inner surface of the corner, and then the corner is pressed tightly to the installation site. The material is fixed in the desired position and then left for two hours until the composition sets.
If a heavy weight material was chosen for finishing, then in this case the best fasteners are thin nails without heads. You can fix them with a regular hammer, but without hammering them in completely. This work should be done carefully to prevent the formation of cracks.
The arch is undoubtedly one of the important decorations of a modern home. When the structure is created, it is necessary to perform high-quality finishing. To carry out this work, the best solution is to use a special arched corner. The installation of this decorative element is quite simple, so you can do it yourself . without resorting to the help of specialists. The variety of materials is quite large, so you can choose a suitable corner for your arch. By following the work technology, you will be able to correctly secure these elements in the opening.
Application of an arched corner
Decorative arched corners: photos in the interior
When it comes to arranging an arched opening. There may be several options. Plaster, wallpaper, various types of panels - everything can serve as the main finishing material. But if it is necessary to resolve the issue of the safety of this very material in places of transition from one plane to another, use an arched corner. In terms of design, these are the most basic, but highly versatile products.
What is an arched corner
At their core, arched corners, on the one hand, are an element of protection for wall decoration, and on the other, a decorative element in the interior of the entire room. Mainly used for leveling rounded corner areas of door or window openings. But, thanks to their design, they can also be installed on straight (horizontal or vertical) sections of the wall. In addition, during the main work, some of them are used as construction material.
When plastering right angles, metal or plastic perforated strips perform a dual role: they serve as a reinforcing element of the corner, plus they are a 90° standard. A right angle is the main indicator of high-quality finishing of the treated surface. There is also a cork corner. But this is a simple decoration element without any additional fastening properties.
When working with plasterboard, corners, often metal, are used, to some extent, both as fastening for adjacent sheets and as a material that ensures ideal adhesion of the putty to the plasterboard.
Types of corners for an arched opening
Depending on the place of use, corners are divided into two types:
- those that are installed under plaster;
- and decorative ones for finishing, which need to be glued on top of the plaster.
The first ones are perforated. For better adhesion to putty, they have holes on each strip. Plus, one side of the corner is made in the form of separate petals, which allows you to apply a long strip (up to 3 meters) to the bend of an arch of any diameter. We can say that this is a flexible building material of universal use in a particular area. It can be either metal or plastic.
The latter have a wider range. They can be made of metal, PVC, cork and be white, colored, plain or with a wood pattern. The surface on such products is smooth, there are no perforations. Some modifications of the corner elements for the arch have one side that is smooth and solid, and the other in the form of petals. Design decisions determine the appearance.
What is the appeal of an arched corner
If we take into account all the advantages in the complex, both technical and “human”, arched corners are the most profitable option in arranging door and window openings.
- On the one hand, they hide possible shortcomings of the corner surface, and on the other hand, they favorably highlight a part of the arch that is invisible under normal conditions or the entire arched opening as a whole.
Possible ways to attach an arched corner
Reliable fastening of the strip in place is a fundamental factor in a practical and aesthetically attractive door arch opening. There are 4 ways to attach a decorative element:
Glue landing
The best option for securing the corner in place. The fastening procedure is as follows:
If you glue the “decoration” in this way, everything will turn out clean and relatively quickly.
Fastening with liquid nails
The option is similar to the previous one: apply glue, bend, attach, glue, fix. But there may be problems here. Liquid nails dissolve certain types of plastic.
Fastening with self-tapping screws or nails without heads
Self-tapping screws are rarely used for decoration. But the installation process is simpler, in three steps: bend, attach, secure. The option is more for flexible perforated strips for plaster.
Cork corner
Cork is a little more difficult to glue, but it looks much richer than its PVC counterparts. Everything is done in a certain sequence. First, apply a layer of glue to the surface, let it sit for 20 minutes, bend the corner, place it in place, press it evenly and firmly, and remove excess glue.
Before gluing, the materials and surface must be prepared for the procedure. The sequence is:
- Flexible arched corner Decorative and plaster corners for arches for wallpaper An arch in the interior serves as both decor and…
- Decorative arched corner Decorative and plaster corners for an arch for wallpaper An arch in the interior serves as both decor and…
- How to glue a plastic corner to wallpaper How to properly glue a corner Repairing or starting to create an interior in a house is related to the issue of arranging…
- Aluminum corner for tiles Types of external corners for tiles and features of their application How to install an aluminum corner under the tile…
How to glue a flexible corner onto an arch
Before you start gluing, you need to accurately measure the opening and the length of the corner. Measure the perimeter of the opening from the baseboard with a margin of 2-3 cm on each edge (just in case). Please note that the perimeter of the opening will be at least 5 meters, and corners longer than 3 meters are not sold. Thus, it will not be possible to cover it with one piece. To begin, attach the flexible corner to the arch and start marking from top to bottom.
Plastic protective corners.
The lower ends of the corner should be at the same distance from the floor. You can level them with a water level. If it is not there, then take marks from the floor. We will assume that it is horizontal. Even if he is not, the human eye will not be able to perceive it. The seam between the corners will be visible in any case: if one end is lower than the other, then aesthetically this design will lose.
How to glue a flexible corner onto an arch
How to glue a flexible corner onto an arch
How to glue a flexible corner onto an arch
How to glue a flexible corner onto an arch
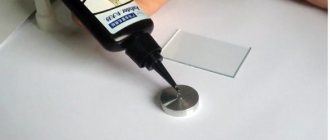
What and how to glue plastic corners to the corners of the walls?
For this purpose, liquid nails or other universal PVC glue are used. There is nothing complicated in the process itself. First, apply a continuous line of glue about 5 mm wide on one side and spread it over the entire plane of the corner with a spatula or other available material. Repeat the procedure on the other side. Wait about 5 minutes and press it firmly against the wall. Secure the first part of the decorative corner with tape. Please note that soft pads must be placed under the spacers: fabric, polystyrene foam, polyurethane sponges or other available materials. If you forget to do this, there is a risk of damaging the surface of the decorative corners. While the first part is drying, measure the remaining distance and glue the last pieces of the profile on both sides.
Adhesive for PVC plastic corners.
During gluing, excess glue may be squeezed out and come out. Wipe it immediately with a wet cloth and check the residue after a while. If there are any, use your fingers to roll them into balls and remove them.
Remember that it is better to use a metal square to mark and cut off excess material. It is more accurate than wood.
Attaching the finishing corner to drywall and other surfaces
A special adhesive composition is used to attach the finish. Or liquid nails can be used. The material is applied to the inside of the corner. Since it will also act as an interior decoration, you need to select its color a tone lighter or darker than the prevailing decoration in the room. In this case, a certain contrast will be created. An opening designed in this way will take on an original appearance.
Now it’s worth talking separately about the installation of finishing materials made of plastic and cork for the decorative volumetric structures existing in the room.
Cork corner
Among all the finishing materials offered to consumers, one of the most environmentally friendly is cork. One of its advantages is a high degree of elasticity. Its installation can be done on your own. The most important thing is to take measurements of openings seriously. If errors are made during this work, it will no longer be possible to correct the dimensions of the finished parts. And this can lead to curvature of surfaces.
Before installing the finish, it is necessary to treat the surface of the walls. It must be cleaned of dust and other contaminants. In addition, it is necessary to degrease it. The glue should be applied to the inside of the cork material. When this is done, you must wait at least 20 minutes. This is necessary so that the adhesive composition is well absorbed into the material.
When installing the plug, it is necessary to press it to the surface over the entire contact area of the structure. Pressing down the material should be done carefully, laying it over the entire surface of the opening. The cork should transfer the applied adhesive composition to the wall surface to the maximum. During operation, the formation of air bubbles must be avoided. When gluing is completed, you need to tap the corner with a rubber hammer to make it fit more firmly. There may be some adhesive coming out at the edges. Using a soft cloth, it must be removed immediately. When the installation of the material is completed, you must wait at least 2 hours for maximum adhesion of the adhesive to the wall surface.
Tools for work
Prepare the following tools and additional materials:
- square;
- stationery knife;
- water level;
- masking tape;
- wooden planks;
- rags to remove excess glue;
- metal scissors or hacksaw.
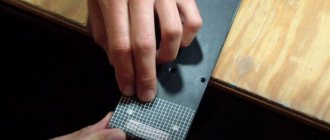
If there is no square, but only a school ruler, then remember your geometry lessons from high school. Draw a right triangle on anything with sides of 3 and 4 centimeters and a diagonal of 5 centimeters. Or take a school arithmetic notebook and draw a right angle in it, and then transfer all the measurements to the surface. If the amount of work is small, then several cuts can even be made with a hacksaw blade, holding it in your hand.
To ensure an even cut, apply a metal square to the surface. Its side will be a guide and will not allow the hacksaw blade to go to the side. The cut must be strictly perpendicular to the longitudinal axis, otherwise the seam will be visible.
Although arch corners are not a mandatory element of room design, they are recommended to be used in order to give the interior a finished look.