DIY car tipper lift
Homemade tipper lift for a car: photo and description of production.
Greetings! I started to put the body in order, to make it more convenient, I made a homemade lift-tipper.
Since the Audi is a heavy and large car, the material was also required.
So, you need 4 pieces of pipe 40x40 mm, wall thickness 3 mm, length 2 m. The rest is improvised means - two corners, the size is not important and two pieces of channel for the upper and lower stops.
After the first test, a meter-long remainder of the pipe had to be welded between the two pipes that lift the car for strength. Thus, the structure acquired the necessary rigidity. We obtain the draft force using a 3-ton hydraulic jack. The holes in the vertical beam have a diameter of 12 mm and go in increments of 10 cm, since the stroke of the jack is 11 cm. This is how it all works:
I placed the lift under the front spar and, by rearranging the lower stop and the upper stop pin, I easily raise the car by about 40 degrees, after which it becomes convenient to carry out the necessary manipulations on the bottom and sills.
And there is something to do here. There used to be a rear jack here. It looks scary, but in fact everything can be solved.
Well, they fixed it. Everything is butt and continuous seam. The metal was taken from an old door from C4. During the welding process, VAG lard melts and fills our patch from the inside, providing anti-corrosion. We’ll do the same on the outside later. There is a similar problem in front:
In general, it turned out to be a convenient device for car repairs.
Raising and lowering the car takes about fifteen minutes, including smoke breaks. It all holds up quite securely; I placed wheel chocks under the wheels, and a suitable stump under the rear for insurance. I recommend to everyone!
Source
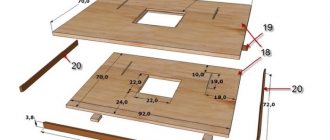
Drawings and overall dimensions
Before starting to manufacture the unit, it is necessary to study in detail the existing samples of stands for engine repair. The sample is selected to suit the immediate needs of an amateur car mechanic. The availability of materials and dimensions for ease of work in a small garage are assessed. The permissible load weight is calculated in accordance with the type of engine that is to be repaired.
Based on the results of a study of existing structures, a sketch drawing of the most optimal version of a cantilever-type tilter was developed. Overall dimensions in the diagram are given in millimeters.
In the sketch, the designations D 60 and D 52 correspond to diameters of 60 and 52 mm.
How to make a car tipper with your own hands
During the operation of the vehicle, over time there will be a need to gain normal access to the underbody of the vehicle. To overturn a car, it is often necessary to involve several people at once, and this procedure is quite labor-intensive and complex. On the other hand, a special car tipper greatly simplifies this whole process, so you can handle everything even alone. The device not only makes the task easier, but also makes tipping the machine safer.
But since it’s quite difficult to buy such a device, and you don’t want to waste extra money, we’ll talk about how to make a car tipper with your own hands. Drawings, photos, dimensions - you will find this and other necessary information in our article.
What to prepare
In order to make a car tipper with your own hands, we will need the following:
In general, the design of the device is distinguished by its simplicity both in manufacture and in use. You can verify this by reading the drawings and videos of do-it-yourself car tippers. At the same time, it is very important, even at the stage of drawing up diagrams, to check the equipment for parameters related to load capacity, safety and lifting angle.
For materials to make a car tipper with our own hands, we will need metal pipes with a rectangular cross-section.
It is important that the material is very durable, has good corrosion resistance and can support the weight of the vehicle.
It is worth noting that before using a car tipper, it is important to inspect the tool for the presence of certain defects. If there is visible damage, the device will be unsafe to use.
How to make a car tipper with your own hands: drawings and assembly process
To ensure that the vehicle tipper can function properly, a winch or jack of any type is used. The second option is more popular (and all vehicle owners probably have jacks at their disposal). Any lifting equipment is suitable, including rack-and-pinion, hydraulic or worm-type mechanisms.
In our article you can see drawings of a do-it-yourself auto tipper. Particular attention should be paid to the jack heel. It is important that it has a large margin of rigidity and strength. It is this element that bears the most loads. The heel should be made from a metal sheet, the thickness of which reaches about 5-7 millimeters.
The same applies to the platform that rests on the bottom of the car. Therefore, for its manufacture they use a 5-7 mm sheet of metal, which is given maximum stiffening ribs. The lower platform, support corner and beam are also made from metal profiles.
If we look at the drawings of a do-it-yourself car tipper , we will see that the lower platform is an immovable element made of one profile pipe that will be located on the ground. The support corner is made of two pipes connected by small sections of metal profile every 20-30 centimeters. It can move vertically along a guide rail. A series of holes are made in the latter, with which you can fix the tipper in the desired position. When the lifting is completed, the platform can be secured with a bolt. In addition, the platform and the support angle are also connected with a bolt.
How to install the device
It is important not only to correctly carry out the work on manufacturing the tipper, but also to install the mechanism properly. First you need to stretch the support platform under the bottom of the vehicle. The heel should be on the side that will rise. We introduce a support corner from above, which is secured with a bolt to the platform. The support beam is then inserted into the device. Before doing this, the caps should be removed from the wheels to which the beam is adjacent.
The heel is installed between the platform and the support corner. The rail must pass through all three elements. It acts as a guide and fixator. The bottom of the rail is screwed to the platform using a bolt. Next, lubricate the profile with grease to make it easier to move along the rail. Only then do we install the element, moving it slightly under the bottom of the car.
Why does the engine break down?
Of course, we all want our vehicle to serve us for a long time and at the same time be in excellent working condition all the time. However, this only happens in fairy tales, and in practice, even new cars taken from branded showrooms need repairs after just a few years. And what can we say when the owner does not spare his “iron horse”? In general, many factors contribute to the failure or incorrect operation of one of the main parts of a car - the engine.
So, let's look at the main mistakes that lead to such disastrous consequences. As already mentioned, the most negative impact is the incorrect operation of the vehicle, for example, the use of unsuitable fuel or low-quality technical fluids. Untimely replacement of the oil and timing belt and constant overload of the vehicle will also have a negative impact. Neglecting the engine’s need to warm up in the cold season will be even more destructive. And what can we say about malfunctions after mechanical impact due to an accident?
Sopranoo0 › Blog › DIY hub tippers
The bottom of my Okushka was a little rotten in the area of the front right arch and it was necessary to somehow treat this place. It was wildly inconvenient to clean rust from the pit, much less cook it.
I couldn’t really find any drawings on the Internet, so I had to think for myself. I cut out a template for the installation platform for the hub from thick cardboard based on the dimensions of the central hole and drilling of the Oka disk and brackets for them.
Next, from the remains of the 40th 4mm corners, I welded a base 70cm long.
Using the template, I cut out 2 mounting platforms from 4mm sheet steel. The central hole was cut by welding.
And 4 brackets from the same 4mm sheet.
The brackets must be identical to each other, otherwise the platforms will bend poorly. After cutting the brackets, I welded them together and clamped them in a vice so that they would not move relative to each other, I trimmed them with a grinder and drilled 10mm holes.
Then I cut 4 mounting eyes for the brackets from a 4mm strip and drilled 10mm holes.
I welded the eyes to the corners of the base of the tippers at a distance of 10cm from the edge.
I welded the brackets with the mounting platforms and fastened them to the base with 10mm bolts. I placed a washer between the eye and the bracket for easy rotation of the latter so that the metal does not rub against each other.
Then I used 20 corners to fix the longitudinal corners at the base at a distance equal to the width of the installation platform. All tippers are ready.
They withstood the eye with ease. At the first capsize there was not much creaking, but then everything was fine.
I placed a wooden plank to limit the angle of the car's collapse. I marked marks on the corners; later I will weld metal plates there in place of the board. I didn’t weld it right away because I didn’t know the optimal angle at which the car would stand on its own on the tippers without additional supports.
I added the iron stops purely symbolically for additional insurance, but the car stands on its own on the tippers.
Source
Points for and against
Owning your own car lift is not only quite convenient, but also somewhat economical. The benefits cannot be felt immediately, but they will make themselves known. The device can be purchased, but many car owners recommend making a car tipper with your own hands. This will help you not only save money, but also free space in the garage, which is sometimes far from enough. To be honest, assembling this device on your own will not cost much less than purchasing a ready-made system from scratch or even a used one.
Checking the functionality of the mechanism
The do-it-yourself car tipper
is a collapsible structure. First, the jib and cross member are placed under the car. Then the racks are attached to them and the jib begins to be lifted with a winch. At the same time, the car rises. To reduce the pressure of the tipper on the vehicle, it is recommended to install small wooden planks at the contact points.
You can also get car insurance. Then it will be possible to remove the tipper when the machine is in an inclined position.
Source
Description of design
A car tipper for a car, a drawing and photo of which are presented below, it works using a jack:
You can take any lift that is in the garage. The maximum possible angle for safely raising the side of the vehicle is 45 degrees.
The heel for the jack should have as many stiffening ribs as possible, which will give it additional strength. This is an important point, since during operation of the tipper the part moves along the rail, experiencing loads in the region of 2.5 tons. A heel is welded from sheet metal (5 - 7 mm).
We make a tipper for a car with our own hands: a drawing of the design described below
The same applies to the platform that will rest against the bottom of the car - we make more stiffeners, we use metal with a thickness of 5 - 7 mm. Additionally, you will need a metal corner and a square profile. The bottom platform, support corner and support beam are made from the same profile.
The lower platform is a stationary part made of one metal profile that will lie on the ground. The support angle consists of two elements connected to each other by short sections of metal profile and moves up and down along the guide rail. The latter has a number of holes for fixing the tipper at the desired angle.
Bottom platform and support angle assembly
The row of holes that you see on the sides of the support angle serves to fix the platform on which the bottom of the machine will rest. When raising/lowering the car, it moves along the part in one direction or another. At the highest point, when the rise is completed, the platform is fixed with a bolt. The platform and the support corner are fastened together with a bolt.
Important: to prevent the machine tipper from falling to the sides, a support beam is inserted into its part opposite the heel, which is two pieces of a square-section metal profile. The length of the part should be approximately 4 meters. For convenience, take two 2-meter segments, inserting their ends into each other.
Key characteristics of engine repair stands
The most important parameters that will help you buy the right stand for engine repair include:
- Load capacity. Test stands for passenger car engines usually have a maximum load capacity of up to 500 kilograms.
- The range within which the grip is adjusted. Good models of universal engine stands should be designed to grip units of various sizes. Therefore, the wider this range, the better.
- General dimensions and weight.
Learning to work with an engine repair stand
1. Before starting work, check for cracks, cracked seams, and missing damaged parts.
2. Monitor the reliability of fastening elements.
3. After completing the repair, wash the stand from dirt and keep it in a dry place to prevent rust and corrosion from forming on it.
4. Keep the moving parts of the stand clean and lubricated. In March, the project “Examination of modern Russian equipment for car services” took place in the city of Chelyabinsk. Leading owners of automobile services took part in it.
The expert group was headed by the head of the Department of Automobile Transport, Valery Nikiforovich Prokopyev. For 90 days, research was carried out on the equipment produced by Avtotechsnab. There were three stages in total: at the initial stage, experts assessed the lifts, at the second stage, tire fitting stands, and the third - disassembling and reassembling the engine.
The stands were evaluated according to two criteria:
- versatility at work;
- ease of use of the stand.
In Soviet times, there was no variety of cars like we see now.
And naturally, the stand for repairing engines, rear axles and other elements did not have versatility. At this stage, there are many models of both passenger and freight transport.
Therefore, it is not uncommon for a car service center to install several stands or one universal one to meet market needs.
Types of engine repair stands
Naturally, a universal stand for engine repair is the most rational. But, unfortunately, not many stand manufacturers can offer universal stands to modern car service centers.
in this matter one step ahead of many. For a couple of years, it has been producing stands for disassembling and reassembling power units of domestic and foreign production.
And at the beginning of 2008, the company’s engineers completed the development of the R-500E stand, which replaced the R-500 on the market.
Vyacheslav Iglov, head of the technical service station, member of the expert group, said: “Original adapters are what ensure the high versatility of the stand, which allows you to hang any type of engine on the stand up to a weight of half a ton. Many stand manufacturers install only 2 degrees of freedom: up-down, right-left.
The motor can be rotated as many degrees as desired and fixed at an angle in the desired position.
The engine repair stand even has a special compartment for collecting technical fluids that may leak from the engine during repairs.
The R-1250 stand, which has just begun to be sold on the Russian market, was also subject to expert evaluation. It also has good characteristics, but the load capacity of the stand is up to 1.25 tons. This engine repair stand is the answer to consumer requests from auto repair shops. Thus, the P-500E and P1250 stands cope with the task assigned to them perfectly.
The second group of stands that were evaluated are stands R-770E and R-776E, which are used for disassembling and assembling engines, gearboxes, rear axles, weighing up to 2 tons. Of course, special adapters have been developed for the stands to work with any type of motor, both Russian and foreign made.
Adapters provide easy installation of motors, and the worm gear allows you to rotate the motor in any direction and fix it in the desired position.
During the event, a ZIL rear axle and a Kamens engine were installed at the R-776E stand.
Fazylov Mars, deputy head of the automobile station, had no idea what we were planning to place at the stand. After installation, the stand spun and locked perfectly in the desired expert position. I think the stand is superior to many competitors. The R-776E is quite versatile and easy to use.”
After three months of studying stands for engine repair, the expert group rendered a verdict, which was pronounced by Valery Nikiforovich Prokopyev: “The characteristic feature of all equipment is, firstly, their ergonomic sophistication, strength, reliability, and safety during use. At the same time, the price is also pleasing, 1.5 - 2 times less than foreign analogues. We wish them the best of luck in selling their excellent products to the market.”
Types of lifts, their cost
A screw electromechanical system made in China will cost from one hundred to one hundred and twenty thousand rubles. Self-assembly of such an analogue will require expenses for the engine, screws, gearbox and load-bearing frame, which in total will amount to no less. The effect of a self-assembled tipper is possible if we create a fairly simple structure from those materials that have not been used for a long time . All we have to do is develop the drawings according to which the assembly will be carried out.
Lifting devices are divided into the following types:
For ordinary car enthusiasts with standard-sized garages, such systems are of little interest. They are too bulky and take up a lot of free space:
Working with the stand
Before starting operation, be sure to carry out a visual inspection of the system. If any defects are discovered that could damage the equipment during maintenance, they must be corrected. If upon inspection there are no such defects, you can begin work.
For a good and long service life of the structure, it is necessary to monitor its condition. It is necessary to check the reliability of the fixing fasteners each time you use it, regularly lubricate all moving parts and store the unit in a dry place. The possibility of direct contact with precipitation and moisture should be excluded.
You should not load the stand above the actual calculated weight, so as not to drop the engine due to breakdown. During operation, the structure must be placed on a stable surface. It is also worth using a fixing pin for the rotating mechanism
Work should be done carefully and carefully
You need to make sure the load is centered. The unit must be firmly secured with brackets. You should definitely follow safety precautions so as not to damage the engine or get injured. With proper care and proper use, the stand will last for many years.
If there is a stand for disassembling and assembling the engine, repair work is carried out efficiently and conveniently. Self-assembled installations can significantly save money on the family budget for the purchase of several models. Every home craftsman, if desired and has the appropriate tools, will be able to assemble a stand suitable for many types of mechanisms.
Difficulties in making a lift
The cost of a finished car lift is high, but a self-made version can damage a person working under it if the design is unreliable. The weight of the car should not exceed more than a ton; if the structure falls on a person, irreversible injuries can occur.
A homemade car lift is made according to prepared drawings, or versions of finished products are used. In the latter case, one has to rely on the author's high computational skills. Incorrect calculation of the base or one of the fastened units can lead to irreversible consequences, at best, damage to the lifted unit.
Options for homemade tilter designs
There really aren't many options. In the West, complex and bulky home-made structures are known, like a crane beam, almost with hydraulic drives.
In domestic conditions, car enthusiasts assemble the simplest structures from what is at hand. Of the homemade tilters for the engine, two-support and cantilever versions are known. The last design is the easiest to manufacture. Its characteristics are sufficient to carry out major repairs of almost any passenger car engine weighing from 150 to 250 kg.
Tipper assembly
This design is considered not only simple, but also universal. With its use, you can perform a lot of work related to car repairs. The whole system is so simple that it does not require detailed comments. You just need to determine the dimensions of the profiles and their optimal length. For such systems, it is best to use square profiles with a cross-section of twenty by twenty. And if the car weighs about two tons, the profile size should be twice as large. For example, it shows what starting materials should be prepared:
The entire tipper system is placed on a rigid structure with a triangular shape. The main goal is to change the length of one of the sides of the triangle so that the car rises to the desired angle. You can work with a jack or a simple winch, lifting the car, as shown in the photo:
The adjustable rack has markings and drilled holes, with the help of which it is possible to fix the vehicle at the desired angle. But remember that such systems are made taking into account the size and weight of your machine:
Features of the engine stand design
Of course, you can do without any tilters and disassemble the Zhiguli engine on a box or on a workbench, if you have one. But there will always be a risk that the motor will slip out and fall on your feet or on the floor; you always need to call someone for help, it’s always inconvenient. Some of the drawings shown on the page are designed specifically for VAZ engines, and some are universal. But they all work for their owners and make engine repair easier.
Read more: Universal low and high beam headlights
The main thing that needs to be achieved is stability and rigidity. Not everyone graduated from a university with an “A” in strength of strength materials and technical mechanics, so we will give some main points as a basis for building with your own hands or changing the dimensions indicated in the drawings. There are also many options for tilters that attach the engine to only one console. This causes increased stress on one rack. This design also has the right to exist, but subject to certain conditions.
In any case, the stand will be made of profiles, it does not matter whether it will be a square pipe, a powerful angle or an I-beam. At the junction of two profiles, a certain amount of movement cannot be avoided.
In this case, an ordinary triangle will come to the rescue, which is the most rigid and indestructible figure. Consequently, it is necessary to unload the central post as much as possible, and this can only be done with the help of slopes, so that the maximum load falls on the support triangle.
It is very important to correctly position the center of gravity and relieve the lower frame from bending loads. Here, too, several braces will have to be included in the design.
The center of gravity must be located so that it is possible to rotate the engine without problems, but at the same time the entire structure remains stable. You need to take into account both the weight of one cylinder block and its weight together with the cylinder head, flywheel and crankshaft.
Assembly
First you need to make a shoe. To make it, you will need sheet iron (3-4 mm), as well as a metal rod with a diameter of about 12 mm. The rod needs to be welded into the sheet; it will be used to secure the jack.
The rear beam is assembled from corners. You will need 4 parts, rods are attached to them. Please note that this assembly should be easy to disassemble.
The platform is made of sheet steel. Don't forget to fold the sides down. A board covered with rubber is attached to the upper side. It is also necessary to weld stiffening ribs on the lower part. Otherwise, the site may not withstand the load. The rear assembly is easiest to make from sheet steel 3-4 mm thick. 2 blanks are cut out of steel, which are simply connected with a thin strip by welding.
Rack
We make it from a 32 mm corner with a length of 1540 mm (you will need 4 pieces in total). You will also need 4 36 mm corners of the same length. We assemble the corner into a square using welding seams 30-40 mm long. When assembling we use clamps. After connecting the corners, you need to drill holes in the lower part of 26 mm in diameter, retreating 31 mm from the edge. This will leave you with 5mm left for welding the metal rod inside the structure. Next, drill 13mm holes:
How to properly prepare a garage
If you are planning to assemble a car tipper yourself, make sure that your garage will meet the necessary conditions. Otherwise, you won’t be able to use your structure indoors – there won’t be enough free space. Then you will have to work outdoors, which is not very pleasant in cold weather, and not always safe. But more on that later. In a word, if the height of the garage does not exceed the height of the car by one and a half, or better yet two meters, it is better not to build a serious tipper. And there must be free space around the perimeter of the lifting device so that there is an opportunity for normal maintenance of the machine. And if you are planning to make your work easier and create a tipper that runs on electric current, then the voltage in the garage should have three phases. So, site preparation should depend on the following factors:
Working with the stand
Before starting operation, be sure to carry out a visual inspection of the system. If any defects are discovered that could damage the equipment during maintenance, they must be corrected. If upon inspection there are no such defects, you can begin work.
For a good and long service life of the structure, it is necessary to monitor its condition. It is necessary to check the reliability of the fixing fasteners each time you use it, regularly lubricate all moving parts and store the unit in a dry place. The possibility of direct contact with precipitation and moisture should be excluded.
You should not load the stand above the actual calculated weight, so as not to drop the engine due to breakdown. During operation, the structure must be placed on a stable surface. It is also worth using a fixing pin for the rotating mechanism
Work should be done carefully and carefully
You need to make sure the load is centered. The unit must be firmly secured with brackets. You should definitely follow safety precautions so as not to damage the engine or get injured. With proper care and proper use, the stand will last for many years.
If there is a stand for disassembling and assembling the engine, repair work is carried out efficiently and conveniently. Self-assembled installations can significantly save money on the family budget for the purchase of several models. Every home craftsman, if desired and has the appropriate tools, will be able to assemble a stand suitable for many types of mechanisms.
Tipper for auto drawings
Some motorists who have been using their cars for a long time prefer to repair their cars themselves instead of contacting service centers.
In the case of minor breakdowns, you can get rid of them in your own garage, but to repair the chassis or body, special equipment is required.
In a garage environment, a tipper may come in handy.
: Auto tipper, roller N°2 CAM
Such equipment is rarely used at service stations, and the factory version is quite expensive. At the same time, you can try to make a car tipper with your own hands according to the drawings - it’s economical, and you can always choose the most suitable option.
There are a lot of original ideas on the Internet, and before making a device for a machine, you must make sure that it meets all technical requirements, namely:
So, let's look at all the components of the tippers in detail, and also tell you how to make them and assemble them together.
Rear connector
For it you will need sheet metal 3-4 mm thick. We assemble an element from two halves with a metal strip between them. The front part should be left open, and a jumper should be welded to the bottom part.
Front connection node
To assemble it you will need:
On the corner we mark 6 cm from the center in both directions and keep the shelf at this distance. In the center of the corner we drill a hole with a diameter of 16 mm, which is needed to connect the lower beam, taking into account the size of the bolt head. After this, we bend the corner into a U-shape. It is better to connect the parts together with the stand.
Be careful that the pipe does not burn out when checking. The entire front connecting assembly is movable, that is, the U-shaped corner along the edges with pipes must rotate on a metal rod.
Top beam
Tippers
For this we will need:
- two 32 mm corners 171 cm long;
- sheet metal strip 64 mm wide;
- several bushings.
We assemble the corner into a U-shaped profile, that is, a channel. On one side in the middle we weld a metal insert 3-4 mm thick and 16 cm long, which is needed for using different jacks. We weld the plate on top with tacks, sew everything together and get a rectangular profile.
We weld the insert to the plate, and on the reverse side we jam the profile with a metal plate 4-5 mm thick, scalding around the perimeter and cleaning it. We weld a sleeve of the following dimensions to the end in the middle:
- length 35 mm;
- internal diameter 20 mm;
- external 35 mm.
In front of the upper beam we weld two guides for the jack with holes for the jack stopper. You need to insert an M8 bolt with a nut into them. We also weld a bushing with rollers and a safety pin on the top part.
Security measures
It is very important that when the tipper is operating, the site is protected on all sides from wind gusts. The fact is that an overturned car creates a lot of windage, and a moderate wind is enough to turn it over. Before starting work, do not forget to prepare the car - empty the interior and luggage compartment, remove the battery, and eliminate the possibility of leakage of fuel from the fuel tank, oil and brake fluid. An overturned vehicle must be secured with additional supports.
Tipper installation
We stretch the support platform for the car tipper with our own hands under the bottom of the car. In this case, we place the place for fixing the heel for the jack on the side that must be raised. We insert a support corner on top and fasten it to the platform with a bolt. Next, we assemble and insert the support beam into the fixture. First, remove the caps from the wheels to which it will be adjacent.
The heel for the jack is inserted between the platform and the support angle, then a rail with a number of through holes is vertically inserted through all three parts. It serves as a guide and retainer for the top of the inverter. The lower end of the rail is screwed to the platform with a bolt. We lubricate the sections of the support corner profiles along which the platform will move with grease and only then install it, moving it under the bottom of the car.
Next, attach a jack to the tipper and begin lifting. After the desired height is reached, a cotter pin is inserted into the vertical rail through the hole located directly under the support angle. It will prevent the car from falling if something happens to the jack. The following describes in detail how to install a homemade car tipper with your own hands.
Source
How to install the device
It is important not only to correctly carry out the work on manufacturing the tipper, but also to install the mechanism properly. First you need to stretch the support platform under the bottom of the vehicle. The heel should be on the side that will rise. We introduce a support corner from above, which is secured with a bolt to the platform. The support beam is then inserted into the device. Before doing this, the caps should be removed from the wheels to which the beam is adjacent.
The heel is installed between the platform and the support corner. The rail must pass through all three elements. It acts as a guide and fixator. The bottom of the rail is screwed to the platform using a bolt. Next, lubricate the profile with grease to make it easier to move along the rail. Only then do we install the element, moving it slightly under the bottom of the car.
A jack is then attached to the tipper and lifting begins. Having reached the desired height, we fix it with a cotter pin inserted into the hole.
So, we discussed how to make a tipper with your own hands. The production process, like the device itself, is quite simple, as a result of which no special difficulties should arise here. At the same time, you should be very careful in the manufacture of this mechanism so that the tipper turns out to be reliable and safe in its operation.
Video on how to make a tipper with your own hands:
Source