According to safety requirements, an external staircase with more than three steps, and an internal one - two, must have a fence. Working with metal is more difficult than working with wood, but welded railings are no less popular. Since the design of metal stair railings is simple, welding of railings can be performed by craftsmen with little experience.
Which railings to choose
Fencing not only made of wood, but also metal, glass, and composite materials, if they suit the style, go well with a wooden staircase. After all, a wooden staircase is not necessarily classic; it can have any design from a rough “rustic” to an ultra-modern high-tech or techno style. Therefore, first of all, you need to start from the appearance of the structure, and only after that decide whether you can make and install the railing yourself.
Wooden staircase with metal railing and PVC handrails Source titaniumstairs.com
Homemade or ready-made
The simplest and fastest solution is to buy ready-made railings as a set or as a set of individual parts and install them on the finished staircase. The speed and complexity of installation will depend on the material and design of the fences.
The cheapest products are made of wood, which you need to cut and adjust to the location yourself. They may have mounting grooves and holes, but balusters have a standard length and smooth end edges. An oblique cut along their upper part will have to be marked and made with your own hands so that the slope of the handrail matches the slope of the stairs.
Standard wooden parts for stairs Source expo-sib.ru
Combined prefabricated fences do not require adjustment; their installation is simple and thought out to the smallest detail. These kits include handrail holders that attach to the top of the balusters and can be adjusted to angle. In addition, you can purchase flanges for attaching support posts, adjustable turns for handrails, holders for posts and wall handrails, connecting elements and other components that can be used to assemble fences of any length and complexity. They are made of stainless steel or steel with an anti-corrosion coating, and the main elements - racks, crossbars, posts, handrails - can be metal, wood, or even acrylic glass.
Prefabricated wood and metal fencing Source barryhandyman.co.uk
Custom-made railings will cost much more, but their advantage is the original design and parameters that meet the customer’s wishes. You can only save money by installing it yourself.
The most budget-friendly solution would be to manufacture and install all the elements of the stair railing yourself. But only if you have all the necessary tools for this, since you won’t be able to make a staircase railing using only an axe, a hacksaw and a hammer.
In addition, at home you can only make wooden or metal railings.
Metal or wood
The choice of material is related not only to the preferences of the residents of the house, but primarily to the skills of the craftsman.
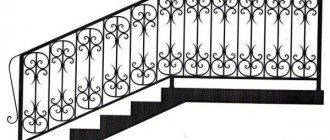
Metal fencing can be forged or welded. They are strong, durable, elegant, and can give the stairs a light and airy look. But only people who have extensive experience working with such material and the appropriate tools can make them themselves. And they are unlikely to need outside recommendations.
Forged railings Source metaldecorby.ru
But it’s easier to work with wood. This is what is usually chosen for self-design, since it is the easiest to make handrails on the stairs from this pliable material. And if you don’t aim at carved pillars and turned balusters, you can get by with the tool that most men who know how and love to work with their hands have. As a last resort, individual decorative elements can be ordered from a carpenter.
Wood selection
If you read further, it means that the choice has been made in favor of wood. But now you need to decide on its species, taking into account factors such as the cost of wood, its hardness, resistance to weather and biological influences, expressive texture, and strength.
Note! The strength of the material is of great importance, since your safety depends on the reliability and durability of enclosing structures.
According to standards, railings must be designed for a load of at least 100 kg per linear meter Source twimg.com
- The most inexpensive species are spruce, pine, birch, and aspen.
- The easiest to process are all conifers, alder, and aspen.
- Rot-resistant and recommended for external stairs - pine, larch, oak, beech.
- The strongest and most durable are hardwoods: oak, ash, walnut, beech. They are distinguished by the most beautiful wood structure.
Less suitable than others for the manufacture of all parts of stairs, including railings, are soft hardwoods - birch, alder, aspen. Their only advantage is their ease of processing. But loose wood is unstable to humidity and temperature changes; it dries out, warps, and rots. These shortcomings can be mitigated with the help of antiseptic impregnations and protective coatings, which will have to be updated regularly.
Another important criterion for choosing a material is its degree of humidity. It should not be higher than 12-16%, otherwise the structural parts will begin to bend, deform and crack during natural shrinkage. Therefore, damp wood is first kept in a dry, ventilated place, and used only after the humidity level has normalized.
Humidity is measured with a special device - a moisture meter Source kedrovdom.ru
Advice! Stair railings are best made from the same type of wood from which the staircase itself is made. This will help avoid uneven deformations and simplify external finishing with paints and varnishes.
Design selection
Before you make a handrail for the stairs from wood with your own hands, you need to draw a sketch of the future fences and decide on their parameters.
The main structural elements that take on the load are support pillars and handrails. The pillars are installed at the beginning and end of each flight of stairs, as well as in the gaps if the length of the flight exceeds 150 cm.
The space between the supporting elements must have filling. Most often these are balusters - vertical posts that are installed at regular intervals and serve as additional supports for the handrail. But the filling can be different, for example:
- solid , made of tempered glass, monolithic polycarbonate, plywood, lining, etc.;
- lattice - made of crosswise slats, thin bars or branches;
Lattice fencing option Source ligneus.ru
See also: Catalog of companies that specialize in the design and installation of small architectural forms
- horizontal - from several slats mounted parallel to the handrails;
Horizontal filling of railings Source stroimpilim.ru
- combined - usually, without strict rules about what and how to combine.
Solid lattice filling Source perilamaster.ru
But the design of the railing, regardless of its design, must meet the basic requirements and standards:
- The height of the handrail from the plane of the steps and platforms is about 90 cm, with a small tolerance in one direction or the other.
- The cross-section of the support pillars is at least 10x10 cm (or the same diameter for round-section supports);
- The cross-section of intermediate vertical posts (balusters) ranges from 40 to 85 mm, it depends on the length of the span - the longer it is, the more massive they should be.
- The maximum diameter of the handrail , providing a comfortable palm grip, is 60 mm.
- The maximum distance between horizontal or vertical filling elements is 20 cm.
Advice! If there are small children in the house, it is better to do the filling vertically in increments of no more than 15 cm. Horizontal elements increase the risk of injury, since you can climb up them and fall.
General requirements for the design of interfloor stairs Source stroimpilim.ru
Staircase calculations
If you decide to build a wooden staircase with your own hands, think through the nuances of construction: Determine its dimensions, calculate the number of steps and supports.
It is important to first imagine the function of the staircase: connecting floors or accessing the attic. (Information about attic self-insulation can be found here)
It's also easy to draw the diagram yourself. They usually lead down straight stairs. It connects the first floor with the second floor and reaches a height of several meters. For reasons of comfort, the angle of inclination of the structure should be 30-40 degrees.
So, for your convenience, we present the basic calculations of the elements of stairs (using the example of a wooden structure):
The base length is 3.5-4 m; the flight of stairs is 2.5 m; staircase width 30 cm; height of the stairs is 15-20 cm.
Necessary calculations
Determining the height of the stairs. The average value from ceiling to floor is 250 cm. To this is added the thickness of the ceiling between floors. The average is 35 cm. We understand this: 250+35=285 cm
to calculate the number of levels: The height of the staircase is divided by the height of the step. The last value (for example, the height of the steps) is better taken as the average value of 17 cm. We understood this: 285 cm / 17 cm = 16.76 cm = 16.76 cm = 16.76 cm
The value is rounded up. There are 17 steps in total.
Determine the width of the step. The permissible width of the step (flat fit) can be in the range of 22-40 cm. In Russian practice, the following formula is used to calculate the width of the step and the rise (step): a + b = 47 cm, where a is the height of the step, b is the width of the step. We got it: 47-16.67=30.3 cm.
The value is rounded to the nearest 30 cm. - This is the step size.
The width of the stairs should be a multiple of the width of the stairs. In our case, this value can be 60 cm, 90 cm, 120 cm, etc. Calculate the length of the stairs. The length of the staircase corresponds to the product of the number of steps and the width of the staircase. We got it: 17*30= 480 cm
calculates the length of the longitudinal beam. Calculations are based on the Pythagorean theorem: the sum of the fields of the legs corresponds to the square of the hypotenuse. This is A²+B²=C². In this formula: A is the height of the stringer, B is the length of the ladder, C is the length of the longitudinal beam. We got it:
230400 + 81225 = 311625 The root of this number is 558.23 cm. You can round it up to 560 cm.
Tip: If it is difficult to make a geometric calculation, you can draw a ladder for the appropriate size paper and measure the angle and length of the base.
How to make the necessary parts
How to make a railing for a wooden staircase depends on the availability of machines and woodworking tools. Few home craftsmen have a lathe or milling machine, which is used to make shaped posts and balusters.
Making balusters on a lathe Source qmill.ru
Therefore, you need to carefully consider the project taking into account your capabilities. It is advisable to have at least an electric jigsaw, a hand router, a grinder, and a screwdriver. These tools can be rented.
For each part, a sketch is made to scale indicating all dimensions.
Video description
How to make a round handrail using a manual milling machine, watch the video:
For a rectangular beam, only the upper part is turned, or grooves are made using a manual milling machine for easy grip on the side edges.
You can make a simple and convenient handrail with your own hands Source for good people.rf
If you make a rectangular recess in the lower part of the handrail along its entire length to fit the size of the railing bar, during installation it will be easier to fix it in place, hiding the fastening points. More about this in the next part.
Filling
Making and fitting the filling between the supports and handrails is the most difficult part. The simplest option are balusters and horizontal crossbars.
If it is impossible to turn figured balusters, they can be made round or rectangular in plan, giving relief with a hand router. There is another interesting option - making flat figured balusters. They are cut out of the board with a jigsaw along the lines transferred onto it from the stencil.
Design options for flat balusters Source stroyopttorg53.rf
Such elements of filling the fences are attached to the side of the ladder on the vertical plane of the bowstring. Or tenons in the form of a trapezoid are cut out in their lower part, and counter grooves for them are cut out at the ends of the steps. After installation, the ends are covered with decorative strips.
If you are making three-dimensional balusters and plan to mount them on studs or dowels, then you need to drill sockets for them at the ends of the products.
Advice! The length of the balusters must be made with a margin, since during installation they will have to be trimmed, bevelling the upper part of the railing, and the lower part, if it will not stand on the step, but on the bowstring.
Such holes are also needed at the ends of horizontal crossbars. Or spikes, for which corresponding grooves are hollowed out in the supporting pillars.
Lattice filling is easier to do locally, fitting parts to each other and supporting structures.
For filling, you can use other materials, for example, stainless steel pipes, securing them on the outer edge of the supports using special clamps.
Installation stages
Materials:
hacksaw; level; rod measuring 100 x 200 mm; Railings 70 x 70 mm for the production of railings; Plates for the construction of stairs (thickness - 30 mm); Nails and hammer.
- Before starting work, treat the wood with antiseptics and dry completely (within 48-72 hours);
- Even a small porch needs a foundation. This increases the stability of the stairs and reduces the processes of decay. Typically, the column foundation is installed under a wooden veranda. Metal pipes or structures made of asbestos, logs, concrete blocks or bricks are used as support pillars. Holes up to 80 mm are drilled under the supports, at the bottom of which a sand and gravel mixture is filled. It should be noted that metal supports must be treated with special anti-corrosion inhibitors before being immersed in the ground;
- Then you need to prepare bowstrings or stringers - these are the main load-bearing elements of the staircase to which the steps are attached. The grooves are made in bowstrings (or longitudinal beams), and the steps are cut out. The beams are attached to the walls of the building (taking into account the width of future steps) and nailed. The bottom edges of the beams must be attached to the support posts;
- The panels are then cut to specifications for future steps and processed using a planer or sander. Reinforce the steps from bottom to top. Seams should be secured with self-tapping screws or nails;
- After installation, the structure is covered with boards and only after that can it be used to make handrails;
- Railing posts are mounted on all steps. This element is attached with self-tapping screws. A regular square beam can be used as a railing, but it is best to use shaped balustrades. At the top of the balustrade, the balustrades are "hidden" under the balustrades and are also secured with screws;
- Then the conductor is treated with a primer with antiseptic properties (2-3 layers). It is recommended to install a canopy on the veranda, the surface of which should cover the entire area of the veranda.
Recommendation! Wooden porch stairs can be stained or painted, but the surface (clear) must be applied to seal the result.
The surface of the stairs should be well sanded and then covered with a layer of glaze. After stain treatment, the coating must be thoroughly dried. Only after this can clear varnish be applied. If you wish, you can paint the stairs (this article explains how and how to do it).
Watch a video on how to make a staircase to a porch from logs:
Page 2
Modern cabins and private houses have 2 or more floors, and the highest of them can be residential and non-residential premises. Either way, you need a ladder.
It is already quite difficult to build a reliable intermediate or attic staircase from concrete or metal structures, which cannot be said about a wooden staircase.
In this article you will learn what types of wooden stairs exist, what is their difference, and what material is used to make the spans. In addition, each of you can build a wooden staircase to the second floor - the article provides examples of calculations and photographs.
How to install railings
Before you make a handrail for a staircase with your own hands, you need to apply markings to it: mark the installation points of all vertical structural elements on the landings, steps or bowstrings.
The installation sequence depends on the features and type of fencing, but usually it begins with the installation of support posts.
Installation of pillars
The reliability and aesthetics of the entire enclosing structure depend on the precise positioning of the pillars. Their marking begins from the extreme points: the lower one is installed on the first step of the staircase or on the floor in front of it, and the upper one on the last step or on the floor behind it. It can be common for staircase railings and a balustrade covering the opening in the floor.
If the staircase has a 180-degree turn, two pillars are installed on the intermediate platform: the upper one for the lower span and the lower one for the upper one.
Support pillars on a turning staircase Source tildacdn.com
When turning 90 degrees, one common support is sufficient. Its position on the site is determined using long slats laid along the edges of the steps of adjacent flights of stairs. The pillar is installed at the point of their intersection.
The method of fastening depends on the type of pillars. If they are hollow, a boss is first attached to the floor - a piece of timber 15-20 cm high, the cross-section of which coincides with the size of the internal cavity of the support. To do this, screw a pin into the floor or step, drill a through hole along the axis of the boss and place it on the pin. For stable fixation, the walls of the bosses are lubricated with thick wood glue, and sealant is applied to the lower end of the post, after which the post is placed on the boss.
Massive pillars can be secured in different ways:
- On one large diameter dowel installed in the step and in the center of the support.
- On several small dowels installed evenly over the area of support of the post.
- On a stiletto heel.
- On a furniture screed.
In all cases, fasteners and holes in the post are lubricated with glue before installation. To increase the support area and hide the joint with the adhesive seam or the hole for installing the screed, the lower part of the post is framed with a plinth.
Features of installing railings for stairs
Railings are responsible for the safety of movement and are also a decorative element in the interior.
Installing railings is a controversial process. Due to the different materials from which the railings are made, installation is carried out differently. Railings are made of plastic, wood, metal, glass and combinations. We dedicate today's article to an overview of different methods of installing railings. Together with us you will learn what materials they are made from, how they are designed, and in what areas they are used.
Video description
Another method of fastening using a zip bolt is shown in the video:
Installation of balusters
The method of fastening the balusters depends on the location of their installation:
- on the steps;
- on the top edge of the bowstring;
- on the outer side plane of the bowstring.
In any case, the attachment points on the supporting base are first marked. Then a handrail is temporarily attached between the posts or a cord is pulled along the bottom edge of the handrail, and the vertical distance between it and the marking points is measured. In this way, the height of the balusters is determined along the center line.
When installed on steps, the lower part of the balusters is trimmed, and the upper part is cut so that they all have the same bevel, corresponding to the slope of the handrail. The accuracy of the cut can be ensured by temporarily securing all the elements on the steps, aligning them vertically and pulling them together with a common guide. After that, each baluster is marked and a line is drawn on it along the guide - a marking for cutting.
From below they are attached to dowels, furniture confirmations, studs, bolts or other suitable fasteners. During final installation, it is lubricated with glue.
Video description
You can study the technology of marking and installing balusters on steps using the video:
When installing on a string, the baluster posts must be cut at an angle and at the bottom. The easiest way to do this is to use a template. One of the balusters is applied to the bowstring, aligned vertically, and a cut line is drawn along the inclined line of the bowstring. The remaining cuts are made according to this template.
Since it is impossible to screw the posts onto studs on an inclined plane, they are placed on dowels or balusters are used. These are even strips, the width of which is equal to the thickness of the bowstring. After marking the position of the balusters, they are screwed to the baluster from the bottom to the end, and then the finished structure is attached to the string between the support posts.
Railing with baluster Source lotos-stair.ru
Advice! It is better to make holes for dowels or pins at the ends of the balusters before making an oblique cut - this makes it easier to center them and drill exactly along the axis. The depth of the holes should be such that after trimming it remains sufficient for installing fasteners.
Installation of handrails
Handrails must be attached to both posts and balusters.
The handrails can be attached to the support posts using dowels, but this is a rather complicated method, since the holes for the dowels must be made with a certain inclination relative to the horizontal line, and for this you need a groove router with the ability to fine-tune the position of the sole.
Therefore, the handrail is usually fixed with self-tapping screws, screwing them from below or through the post into the end through a pre-made mounting hole. They are subsequently puttied or covered with decorative plugs.
Through fastening with self-tapping screw Source pratique.fr
Basic requirements for fencing
First and foremost, railings must be safe and useful. Their task is to support a person during descent and ascent, and to prevent falling from the porch. Still, aesthetics is also considered an important factor. To fulfill the assigned tasks, the railings are built in accordance with certain rules:
- The material of the fence and steps must be the same or well combined. You can often find beautiful porches made from several materials: stone and wood, metal and plastic, aluminum and glass.
- The strength of the fence must be sufficient for a point load of 100 kg.
- The railings are made comfortable and ergonomic. Their surface can be easily grasped by a medium-sized palm; the upper part of the railing has a cross-section of about 40x70 mm. The material chosen for the handrail is pleasant to the touch, does not cool down in winter and does not heat up under the sun. The surface is polished, leveling protrusions and burrs.
- The height of the fence must be at least 90 cm - this is a requirement of building regulations. If there are small children in the house, you need to make an additional handrail for them at a level of 50-60 cm.
- The handrail rests on two pillars. These are the supporting structures of the porch; they should be more durable and have reliable fixation.
- Balusters are installed between the support posts. Their task is to prevent a person from falling out through the side surface of the porch. According to SNIP, no more than 15 cm of gap must be left between balusters.
Video description
The method of attaching the handrail to the railing strip is described in detail in the video:
The second installation method is on dowels. To disguise the fastening, it is also advisable to make a groove in the lower part of the handrail with a depth of 5-6 mm and a width equal to the cross-section of the upper end of the balusters. The dowels are first glued into the posts, and before installing the handrail on them, their protruding ends are also lubricated with glue.
Note! Many specialists in the installation of wooden stairs refuse dowels, the manufacture and gluing of which takes a lot of time. Modern adhesive compositions make it possible to do without them, providing a strong connection of wooden elements without additional fasteners.
If you need to install a wall handrail, it is most reliable to secure it on special metal brackets. They come in different types, which makes it easy to choose the right model.
Bracket for attaching handrail to wall Source portlandstaircompany.com
Protective and decorative treatment
When deciding how to make a wooden stair railing yourself, we must not forget about protecting the wood and preserving its beauty. All manufactured and cut-to-size parts are treated with impregnation with moisture-repellent and antiseptic properties before installation.
Upon completion of installation, cracks, chips and other defects are repaired with wood putty, after which the surface dries, the surface is sanded and decorative compounds are applied. This can be stain, glazing or covering paint, glaze, colored wax, oil, acrylic or polyurethane varnish.
Briefly about the main thing
Manufacturing and installing stair railings is not an easy task, but it can be solved using different methods. The simplest one is to buy and install ready-made railings, just adjusting them to fit your design. It is much more difficult to do everything yourself, but this can be done if you carefully think through the project, stock up on the necessary tools and patience. In the absence of professional equipment, posts, balusters and handrails are made using hand-held power tools, and for installation the most suitable fastening option is chosen: using dowels, steel hardware, glue or using auxiliary strips.
Ratings 0
General procedure
To make smooth and durable railings with your own hands, you need to draw a drawing with dimensions and calculate the required amount of material. We need to think about how the balusters will be installed. If you are planning a tenon connection, then to grind it you will need to increase the size of the baluster board.
If there are two balusters on one step, then the length of one of them will have to be reduced (since the staircase rises continuously). Exactly how many centimeters the support needs to be reduced depends on the inclination of the stairs.
The manufacturing process can be divided into the following stages:
- taking measurements on the stairs, measuring the width of the tread of the steps (where the foot steps), calculating the number of balusters and the distance between them, the length of the railing;
- drawing up a sketch. On it, each part is numbered and the dimensions of all the main elements are indicated;
- sawing bars to fit balusters;
- turning parts manually and on a machine to give them the desired shape, polish them;
- production of handrails;
- production of pedestals (support pillars);
- installation of parts on the stairs.
The cabinets are cut from thick bars. They are often decorated with balls at the end or decorative carvings. A regular pole with a cap on top will also look good. They are secured to the floor with thick screws.