There is often a need to use a welding machine in your home. Purchasing a finished unit will have a significant impact on the family budget. You can find a way out of this situation by making your own welding machine from an old microwave oven.
The financial costs are minimal, and the possibilities are quite sufficient to solve household problems. The main thing is that the microwave oven transformer is in working condition. It is this microwave unit that will be able to provide a stable supply of electricity for welding metal parts.
Removing the transformer
An unnecessary microwave oven can easily be found among friends, neighbors, or among your own old trash. Our people are accustomed to storing used equipment just in case, in order to build something out of it with their own hands.
A small microwave oven is enough. In most cases, a power of 800-650 W is sufficient. If the microwave power value is higher, the capabilities of the welding machine will increase.
The transformer has two different windings. One is primary, has a larger number of turns, and is used when connecting to a centralized electricity supply network.
The other winding, the secondary winding, has fewer turns. To make a welding machine with your own hands, it is not needed. The craftsman’s task is to carefully remove it from the microwave transformer.
In order not to damage the primary winding, which is located very close to the secondary, you can lay and fix a metal plate or ruler between them.
After this, the unnecessary part can be cut off with a hacksaw without fear of damaging the turns of the primary winding. You can very carefully cut off everything unnecessary with a chisel. Carefully check the strength of your hands so as not to damage the microwave blocks that need to be saved for the welding machine.
The procedure should be repeated on the other side, carefully removing the filament winding. After cutting, you need to pull out all the wires of the secondary winding from the transformer body until both niches are completely free. It makes cleaning the microwave transformer easier by drilling out all the excess with a drill.
Sometimes the windings are located very close to each other. You can carefully remove them only by disassembling the core and then re-gluing it with your own hands.
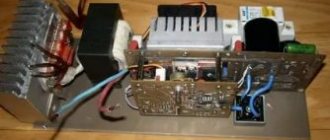
My homemade microwave welding
Hello!
I don’t pretend to be very skilled, I don’t have any turning or milling skills (not yet), so I work as best I can 
In general, I decided to make my own spotter from a microwave, what happened, see the photo - the tip electrodes are from soldering irons with a diameter of 13 mm, into which copper pins are screwed - also tips from soldering irons with M8 threads.
The body is made of plywood with a lid made of 1mm steel (in the 3rd photo with the lid - the first version with long profiles).
The welding is not 100% finished - I’ll still paint it, maybe I’ll improve something else.
At the beginning there were 2 turns of wire on the secondary 50mm (many people recommend 70mm, but I barely had enough space in the core) - I didn’t weld two pieces of 1mm steel, only two pieces of 0.5mm and a wire up to 3mm. The secondary voltage was 1.5 volts and consumed approximately 1.8 kW from the network.
I re-disassembled the trans - removed the insulation from the wire and made the insulation with fabric insulating tape - 3 turns fit in, the voltage became 2.5 volts, power consumption - 3.9 kW.
We also had to reduce the length of the profiles; at the beginning they were almost half a meter long - it turned out that so much was not needed.
The cooling was done with a fan from an old computer, it has a current of 0.3A (somewhere between a modern computer fan - 0.2A and a welding fan - 0.45A).
For the fan I installed a 12 volt trans and a diode bridge.
The second photo shows an example of welded two pieces of steel 1mm each (1-2 seconds are enough, you don’t need to press hard, it’s almost like a knife into butter, but in the first case you had to press hard)), just for fun, I welded two pieces 1mm + 4mm - welding time about 5-7 seconds and doesn’t hold up well. So this is no longer a task for her, I think she can cook up to two pieces of 2mm each.
I plan to use it not on the stream, but for home purposes, for example, I recently welded a broken soldering iron stand from thin wire.
Heating comes from the electrodes then, the secondary heats up, and the primary from contact with the secondary in a trance, as I understand it, 10 points at a time can be done without a break...
Questions:
I also want to weld wire - 2 pieces of 3mm - this will take it, I checked it in the first version...
But the question is this: two sharpened electrodes do not hold the wire well, if I make the lower electrode replaceable - flat, not sharpened - will the welding quality somehow deteriorate?
As for the fan power supply, I used a 12V fan and a trans with a diode bridge... I suspect that this is unnecessary
There was no fan for 220 V, and there was no place to wind the winding for the fan on the trans (although there the voltage would probably drop greatly during welding).
Maybe you can somehow simply power the fan from 220 through some kind of quenching capacitor + diode bridge?
Will such a fan be of any use to her at all?
There was also a problem with isolating the switch from the microwave - I had to fence several pieces of plastic - I haven’t even glued this “case” together yet, otherwise you will definitely get into a phase sooner or later - isn’t there a better solution?
What else can be improved in this welding? Increase reliability?
I think there is no need to increase the power, the current one is enough for me...
And I’m also interested in criticism from experienced people - what are the shortcomings?
Modified November 16, 2015 by eugene_o
New winding
In the resulting niches, a new secondary winding is made from enameled or large-diameter copper wire. The minimum cross-sectional size should be 1 cm.
The wires may not be solid, but multi-core. An important indicator for a microwave welding machine is the total diameter of the wires. They need to be laid tightly, leaving no gaps.
The exact cross-sectional size and the required number of turns can be calculated using special tables or using online calculators, focusing on the dimensions of the core and the required output power. Some craftsmen select the wire for the welding machine experimentally. The ends of the winding should be well secured with lugs.
The transformer removed from the microwave is ready for use in a new capacity. It will be able to supply a current whose strength reaches 1000 A, which is quite enough for a home unit. The main part for resistance welding was made with our own hands from an old microwave oven.
If you need a more powerful welding machine, you will have to remake two transformers. The connection of two transforming blocks is carried out in series.
It is important to connect windings of the same name, otherwise a short circuit will occur. The correct operation is checked by markings or using a voltmeter. When both microwave transformers are connected, the current strength should be checked.
It should not exceed 2000 A. Large values will cause an overload of the home electrical network, and the welding machine will either not work at all or will burn through the metal.
Transformer assembly
The main element of any resistance welding machine is a transformer, which can be taken from an old but working microwave. In order for a homemade welding device to be able to connect steel sheets up to 1 mm thick, a transformer with a power of at least 1 kW is required. If you need a more powerful resistance welding machine, you will need two transformers.
Step-up transformer from a microwave oven
To make equipment for contact welding with your own hands, you need to take not the entire transformer from the microwave, but only its magnetic circuit and primary winding. The secondary winding is carefully removed from the transformer, and the shunts that are located on both sides are removed from it.
We cut off the secondary winding with a chisel (chisel) or saw it off with a hacksaw.
Shunts are removed
The new winding for the microwave transformer is made from stranded wire with a cross-section of at least 100 mm2 (or a diameter of more than 1 cm). It will be enough to make 2-3 turns. If the wire has too thick insulation, you can remove it and replace it with fabric insulating tape. If two transformers are used at once, then the secondary winding for them is made common, but it is very important to correctly connect the leads from their primary windings.
Transformer with new secondary winding
The next stages of making resistance welding from a microwave with your own hands are the installation of controls, the manufacture and connection of electrodes, the installation of the internal part of the equipment in a reliable case, which can also be taken from broken household appliances.
Another great video on the topic:
Case manufacturing
There are several options for manufacturing a housing for a welding machine. Some craftsmen make the body out of wood. However, it is most convenient to use welding from a transformer from a microwave if you place the device in a case from the computer system unit. Finding an old “system unit” is not difficult. They also accumulate in many homes when replacing outdated equipment with new models.
The legs are screwed onto the body fragment with ventilation holes at the bottom. You can take support legs from an unnecessary VCR, player, or any other equipment.
A window should be cut out in the side of the welding machine body and covered with a dielectric plate made of any heat-resistant insulating material. Due to the fact that the terminals on the plate will heat up, the plate should not melt.
Using a computer case is convenient for several reasons:
- it has an on and off button;
- on the case there is a ready-made socket for connecting to the network, to which all that remains is to connect the converted transformer from the microwave;
- ventilation cells provide effective cooling of the contents of the case. The fan can also be taken from an old PC;
- The design has a decent appearance.
It makes sense to install an LED indication on the thermal insulation plate. This will help you easily notice the condition of the welding machine.
Electrodes
To figure out how to make a welding transformer from a microwave, it is very important to highlight the topic of electrodes.
Assembling a spot welding machine from a microwave.
The parts are multifunctional and can:
- compress the sheets being joined;
- supply current to the area to be welded;
- remove heat.
When selecting an electrode, it is necessary to take into account its shape, size and other parameters. They are the ones who determine whether the weld will be of high quality or not. There are several types of geometric shapes of the parts in question - straight and curly.
A straight line is often used, since thanks to it it will be possible to easily get into even the most difficult area where welding work needs to be carried out.
To choose the right electrodes for a microwave welding transformer, you need to carefully study the relevant GOST standards, which indicate all the parameters regarding the necessary parts from 10 to 40 millimeters.
The copper rod used as an electrode must have a diameter several times larger or be the same as the diameter of the wire with which the specialist will work.
To prevent the electrodes from actively oxidizing during their operation, they must be secured to the working wire using soldering.
In any welding equipment, electrodes tend to wear out frequently and quickly during operation. To avoid such unpleasant moments in work, it is best to constantly sharpen them to the shape of a sharpened pencil. This can be achieved using a file.
Selecting Electrodes
To correctly select resistance welding electrodes, it is useful to look at GOSTs, which stipulate all the required parameters. Straight-shaped electrodes provide convenient access to the site of the future seam. The diameter of the copper rods cannot be less than the diameter of the working wires.
It is better to make the connection by soldering. This will reduce the likelihood of oxidation during operation. Due to the fact that electrodes are inevitably consumed during welding, they need to be sharpened in a timely manner.
In ideal condition, the electrode ends should have the shape of a sharpened pencil. The result of working on a microwave machine after gaining some experience will be indistinguishable from factory resistance welding.
Electrode preparation
For them, use copper rods or soldering iron tips.
Their diameters strictly correspond to the cross-section of the wires, which should be as short as possible to avoid power losses. It is more effective to solder electrodes to reduce the resistance at the crimp point on the contacts.
To make them replaceable, do not solder the wire-to-tip connections themselves. Connect them with a bolt method by drilling holes of the same size. It is better to use copper nuts and bolts, which have less resistance.
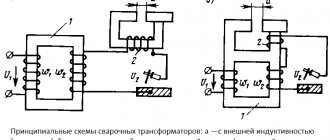
How to determine the terminals of transformers of the same name
If the terminals of the windings of the connected devices are not marked, then it is necessary to identify among them those of the same name in order to connect them to each other. This problem can be solved in the following way: the primary and secondary windings of two or more transformers are connected in series, voltage is applied to the input of such a combined device, and an alternating voltage voltmeter is connected to the output terminals (terminals from series-connected secondary windings).
Depending on the direction of connection, the voltmeter may behave differently:
- show one or another voltage value;
- show no voltage at all in the circuit.
If the voltmeter produces any voltage, it means that there are opposite terminals in the connection circuit of both the primary and secondary windings. When the windings are connected in such an incorrect way, the following processes occur in them: the voltage supplied to the input of the primary windings of two connected transformers is reduced by half at each of them; The voltage increase occurs on the secondary windings, each of which has the same transformation ratio. The output voltmeter will register the total voltage, the value of which is equal to twice the input value.
We determine the terminals of the transformers in this diagram
If the voltmeter shows a value of “0”, then this means that the voltages coming out of each of the series-connected secondary windings are equal in value, but have different signs, thus they cancel each other out. In other words, at least one of the pairs of windings combined into a circuit is connected by terminals of the same name. In this case, the correct connection of the circuit elements is achieved by changing the order of connecting the primary or secondary windings, focusing on the readings of the voltmeter.
The principle of operation of a spot welding machine from 220V
Look at the picture at the finished unit.
In order for the metal to melt, a very large amount of current must be applied to it. The degree of tension is not important here. 3 Volts or even less is enough. It is not advisable to carry out various experiments with indicators. Homemade welding machines made from a microwave oven transformer have long been tested. They have been tested numerous times and are therefore quite reliable.
The power of the transformer must be selected depending on the thickness of the workpieces. Eg:
- Up to one millimeter - power 1000 Volts.
- Two mm - 2000 volts.
- Three mm - 5000 Volts.
The primary winding must be selected based on the power of the device. Making a transformer yourself is very problematic, so it is advisable to use a ready-made one that fits in a microwave. This unit has its own characteristics:
- The radiating element will require a high voltage - several thousand volts. But the current level will not matter;
- The power on the windings will be the same. If a person wants to increase the number of turns on the secondary winding, then the voltage will increase, but the current will decrease;
- the transforming elements located in the microwave oven have a power of 3000 Volts or slightly less. To perform spot welding, this is quite enough.
The necessary components can be purchased at radio stores. They also use the insides of an old microwave oven. The result is a current power of 1 kA. This value is enough to melt the metal at the contact points. The result is a good connection between several parts. For this purpose, a 3 kW transformer is used.
Manufacturing of electrodes
The spot welding process occurs when the electrodes are short-circuited. The following are used as electrodes:
- tip from a professional soldering iron;
- copper rods with a diameter of 10–20 mm.
Before work, the electrodes are sharpened into a cone shape. You can use special tungsten rods.
During welding work, the electrodes become dull and wear out. With constant use of a spot welding machine, they will need to be changed and sharpened. Therefore, the electrodes are attached and centered using bolts. To eliminate voltage losses at contact points, all other parts are made monolithic or connected by welding. For subsequent fastening of the secondary winding, a terminal is soldered to the ends of the cable.
The movable upper lever must be unlocked in the non-operating position to provide access to the product. For girth use a rubber band or a rigid spring. Electrodes are attached to the levers, trying to achieve precise alignment.
A pulse button is installed on the top part; it is connected to the primary winding of the transformer, where the current value is lower. When making the device, you can use the button installed on the microwave door. Cables are connected to the electrodes. To prevent future breakage and damage, they are secured to a bracket.
The levers are chosen to be half a meter long - such dimensions make it easy to install parts and do not require much effort during operation. For ease of operation of the lever, a handle is attached to its upper part. You can use an old soldering iron blank. To ensure stability, during the welding process the lower arm of the machine is clamped on the table using a clamp.