What to sew from
As previously noted, most materials for tilde can be found in any home:
- The doll's body is sewn from opaque fabric without a pattern in beige tones. It is acceptable for it to be white, but then the lady’s dress should be of a different shade. It's better if the fabric stretches. But this is not a necessary condition. Therefore, you can use flannelette, fleece, knitwear, even finely woven linen, etc. The main thing is that the material is dense and does not come apart at the seams.
- For the upper part of the dress (“swimsuit”), use any non-stretchy, non-transparent fabric. These can be not only natural materials, but also synthetic ones. For example, satin, crepe satin. You can use pieces from unnecessary curtains (not tulle), a petticoat, scraps of a blouse. Yes, at least the top part of a child’s white sock. The main condition is that the material is hole-free, clean and without signs of wear.
- For a full skirt, tulle or organza, collected in several layers, is best suited. Even if you don’t have them on hand, they are inexpensive in stores. The only negative is that you have to buy 0.5 m at once - they don’t sell less (unless it’s a specialized tulle ribbon). Long lace will also work. You can make a tutu from the same fabric as the “swimsuit”, although you will have to drape it or make a petticoat.
Technical capabilities
Do-it-yourself Vga adapter
The main use of ballerinas remains cutting sheet material. The ability to adjust the diameter allows you to use one tool for several purposes. Two or more cutting elements allow you to obtain a high-quality processed surface.
Almost any sheet material used in construction, repair and decoration can be processed with a circular drill. Carbon steel gives the structure strength. Special coatings are used to protect against corrosion.
The price range depends on the material of construction and cutting part, manufacturer, size and number of cutting elements.
Design and principle of operation
Do-it-yourself woodworking machine
The design of a circular drill is quite simple and mainly consists of three parts:
- a drill responsible for centering the device;
- a fastening rod of a certain length on which the cutting elements are installed;
- cutters equipped with a device for attaching them to a rod, their number ranges from one to three.
This design is used on single and double cutter models. If there are three cutting elements, then in this case the cutters are fixed on a round disk, and to change the radius they move along the grooves. Additionally, some models can be equipped with a protective cover that protects the working person from flying chips or sawdust. It also protects the worker from being hit by fragments when the device is destroyed.
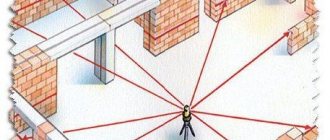
Now let's see how to drill. The central drill needs to be drilled at a pre-designated point. If the materials are durable, for example, iron, tiles or laminate, then it is better to first mark the drilling location with a regular drill. This is done for convenience so that the “ballerina” does not slip on the surface and scratch the top layer.
Next, we cut a path of the radius we need
Again, here you need to pay attention to the material in which the holes are drilled. If it is a tile, then to prevent damage to the facade surface you need to drill at low speed and lubricate the tile with water or machine oil
This will prevent damage to the tiles and the scattering of fragments. Tile panels must be laid on a flat surface, otherwise they will crack under force.
If the tile is already attached to the walls or floor, then you only need to cut through it, and then replace the “ballerina” with a concrete drill. When drilling laminate or veneer, it is difficult to go through the top layer, but then it goes easier. There are no special instructions for wood, iron, plastic and drywall. The last stage is removing the cut out objects.
In addition to the basic instructions, there are a few additional nuances.
- In no case should you put pressure on the tool or lean on it with your whole body: this can damage the device and split the material in which the hole is made;
- “impact” or “perforator” modes cannot be used, only drilling;
- there is no need to let the “ballerina” overheat: high temperatures can deteriorate the coating of the incisors;
- if drilling is difficult, then you should add speed.
To protect your health when working with a device for drilling circular holes, you need to follow simple rules:
- Before starting work, you need to check whether all components of the device are securely fastened;
- You should wear goggles or a mask to protect your eyes;
- clothing should not contribute to getting into the rotating elements;
- If possible, be sure to install a protective grille on the ballerina.
Wood crown: conditions for proper use
For a tool to function properly, it must be used correctly. This means compliance with the standards and requirements of technical specifications, use in accordance with the intended purpose and compliance with the rules during work:
a drill with a crown attachment cannot operate continuously for a long time, as it heats up significantly. It is necessary to either equip the tool with an additional cooling system, or take a 15-minute break after every 30-40 minutes of work;
You should choose drills for core bits with high power and a comfortable handle.
Manufacturers do not produce special crowns for drywall; wood cutters are used for drilling this material. The power of a power tool with torque may be much lower than the optimal value for drilling, for example, beech; When working with bits, you should consider the way the shank is connected to the cylinder. If flat soldering is used, it is necessary to avoid lateral loads on the device and be sure to take breaks in work to prevent overheating and the appearance of defects at the joint
In the case when the shank is inserted into the seating part of the bit and soldered, an additional support appears - a shoulder, as a result of which the strength of the connection becomes significantly higher; You need to pay attention to the price of wood crowns. You cannot intensively use an attachment purchased for 50-70 rubles and count on a long period of its full operation
For this type of tool, price and resource are directly dependent.
With proper use, the tool will last much longer.
Any tool requires skillful use. When working with crown attachments, it is not so much experience that is important as awareness regarding the technical capabilities of the device and the intended application. The market offers hole saws for both amateur craftsmen and professionals
It's important to make wise choices
What is a wood ballerina
DIY wood patina
A circular adjustable ballerina drill is a device that is designed for drilling round holes of large diameter. The tool has a simple design. It consists of a shank with a transverse rod on which movable carriages with cutters are attached. The rod has markings according to which you can set the required spread of the cutters relative to the center of the intended hole. A core drill is fixed in the middle of the shank. It serves as a centering element and support when drilling.
In addition to designs with two cutting elements located symmetrically, there are ballerinas with one cutter or even three. In the latter case, they are located on the base in the form of a disk with grooves.
Ballerina for wood and other drills: review of designs and features of use
Everyone who works with wood with their own hands sooner or later has the need to make perfectly even large holes. A standard drill will not help here, and using a jigsaw does not always allow you to maintain the optimal shape and quality of the edge.
It is in such a situation that the ballerina mentioned in the title is used, as well as some other devices. We will talk about them in this article.
These devices will be useful where a conventional drill will not help.
How to choose and what to pay attention to
Choosing a high-quality circular drill is quite easy
The main thing is to know the main points that you should pay attention to first, but also not to lose sight of the little things
The design is a very important point: a wood ballerina comes with one chisel or two or more. For frequent use, it is better to purchase an option with two or three cutting elements. It is easier to work with such devices and the quality of the processing performed will be at an acceptable level.
It would not be superfluous to be able to replace individual parts. Inexpensive circle drills can have a solid shank with a permanent center drill and rod.
Metal, its quality determines its strength and ability to withstand workloads. High-quality tools are made from high-strength steel or alloys. The shank and cutter holders are shaped using a machine tool. The rod is usually stamped and made of the same metal.
Cheap options often use soft metal or alloys, which can be brittle. Under load, parts may become deformed or break. Such a tool will not last long and it will also be difficult to achieve accuracy from it.
The quality of workmanship, the main feature is the absence of backlashes and distortions. All parts must fit together and be securely fastened with fixing screws.
The markings of a high-quality ballerina's barbell are stamped. Sometimes the divisions are highlighted with bright paint for better visibility.
Cutters and high-quality cutting elements are made from hardened tool steel. They are secured to the holders with rivets or soldering. Solid cutters with holders (made of the same metal) quickly become dull and are not durable.
Manufacturer, when choosing any tool and consumables, preference should be given to well-known and long-proven brands and brands. The most common are Topfix, Stayer, Irwin, Strum.
Purchasing an adjustable circular drill for use at home, or if you need to drill several holes, is completely worth it. This eliminates the need to purchase an expensive tool that may only be needed a few times.
Description of ballerina on plasterboard 30-300 mm
The ballerina for wood 30-300 mm or the adjustable circular drill for wood 30-300 mm has a very durable design, so it can withstand even intense dynamic loads. They are used not only on wood and materials based on wood components (fibreboard, chipboard, wood boards, timber, logs, etc.), but also on materials such as plasterboard, various rubber and polymer materials (paronites, plexiglass, polycarbonates, etc. ).
The manufacturer reserves the right to change the country of production, characteristics of the product, its appearance and completeness without prior notice to the seller. Check with managers for information!
Types of ballerinas
For woodworking
In a home workshop, when working with wood material, you may need a tool for cutting round holes. These tools include a drill, which in everyday life craftsmen who work with wood or wood-based materials call a ballerina. The exact name of this device is a circular drill.
The design of the tool is a bracket, along the axis of rotation of which the drill is fixed. It marks the center of the hole and provides rotational support for the entire fixture. At the edges of the bracket there are two carriages in which the cutters are fixed. The bracket rod is marked, so the carriage with cutters can be installed with high precision. Before starting work, the lateral incisors are moved apart to the required distance. They are pressed to the bracket with screws.
There are other modifications of the woodworking ballerina with one, two or three cutters. The bracket can be replaced with a disk, in special slots of which cutters are placed to adjust the diameter. A hole can be drilled straight or at an angle in the axis into which a cutter is inserted, adjusted with a locking screw. It provides the size of the diameter of the resulting circle.
The tail of the axis can be round or specially shaped for fixation in the SDS chuck. To remove a straight or rounded chamfer, where necessary, knives of various shapes are used.
In addition to wood, the material with which this device works can be drywall, plastic, rubber, tile, or metal.
Drilling drywall
For installation of various equipment in plasterboard with a diameter of up to 100 mm, a ballerina for plasterboard is designed. It is a leg with a centering tip, above which there is a mount for the rod, rotating around its axis. In order to hold the tool, at the end of the central post there is a handle with a notch along the side surface. At the other end of the rod there is a disk cutter.
The device works as follows:
- a tool is drilled in the center of the proposed hole;
- the rod is set at the distance of the required radius;
- The specified hole is cut using circular movements, the edges of which do not require finishing.
The advantage of a ballerina drill for drywall, compared to other tools for the same work, is that:
- the device quickly cuts a hole;
- the disk cutter does not require sharpening;
- despite the intensity of work, all devices do not become loose;
- The rod mount prevents the cutter from moving randomly, changing the cutting geometry.
Tile tool
During construction or renovation work, it may be necessary to make a round hole in the tile. This is necessary for installing a socket, switch, leading plumbing pipes or other elements through the wall.
To work with tiles, single-cut, double-cut and three-cut annular drills are actively used.
The use of these devices promotes a perfectly even cut of tiles without chipping the enamel. By arranging and fixing the cutters at the required distance, you will get a hole of the required diameter and size. Using a circular drill will significantly save time and reduce labor costs. The operation of the instrument is similar to how a ballerina dances.
Drilling process steps:
- On the face of the tile, mark the center of the hole.
- Fix the tile.
- Place the cutters or cutter in the desired position.
- Treat the cut area with machine oil.
- Start carving at low speed.
- To finish the carving, you need to turn the tile over to the other side and continue drilling.
- Use a file to finish the edges of the hole.
Technical capabilities and types of ballerina drill
The spread of the cutters, which determines the drilling diameter, depends on the model of the wood ballerina. Manufacturers offer tools with the following expansion ranges (in mm):
- min 30, max 120;
- min 40, max 200;
- min 40, max 300;
- min 40, max
Reliable instrument manufacturers use only high-strength steel or alloys to make wood ballerinas. This allows the drill to be used for processing both soft and hard wood-based materials.
The drill has a limit on the thickness of the part - 15-20 mm. Attempting to drill through a larger thickness will result in poor quality finishing of the edges of the recess. Limitations are related to the length of the incisors. The maximum permissible drilling depth is indicated on the original packaging of the tool.
The ability to securely fix the tool allows you to use the ballerina drill in limited space - for example, inside assembled furniture, as well as on a curved surface. Particular attention is required when drilling surfaces with a decorative coating - laminated or veneered.
The possibilities for using wood drills are expanded due to modifications with one, two and three cutters:
- Single-cut. The cutter is fixed with a screw on a special bracket. The asymmetry of the design causes strong beating of the instrument.
- Two-incisor. Classic model.
- Three-incisor. The cutters are mounted on a round disk and move along special slots. The scale is applied. The work of the cutters is synchronized.
The use of cutting edges of different shapes also expands the types of processing - removing a rounded or straight chamfer, etc.
Circular drill device
A ballerina drill for wood is made from carbon, tool, and alloy steels, which are not suitable for processing hard materials: metal, tile, porcelain stoneware. But they cut drywall and plastic easily.
The two-incisor ballerina looks like an ordinary compass. But the design is much more complex. The bracket and cylindrical shank are manufactured in one piece. There are two holes in the bracket. A centering drill is installed in one. A rod is installed in the second. Both are secured with screws.
To set the required diameter, the cutters move along the rod. It has a vernier scale on it. The tool holders are also secured with screws. The incisors are shaped like a knife. The oblique edge of the cutter should be directed in the direction of rotation, clockwise.
If the drill becomes dull during operation, it can be easily replaced. If the cutters are dull, then, having the skills to work on a sharpening machine, you can refill them. The shank of the structure is fixed in the chuck of an electric drill. It is worth remembering that the small power of a power tool may not be enough to work with a ballerina, unlike metal drills.
Feather drill for wood
These drills have a diameter from 10 mm to 55 mm. They are often used to work with fiberboard, chipboard and not very thick boards, because they do not have a chip outlet like a twist drill. As a result, creating a deep hole is extremely inconvenient. There is a centering point. The shank has a hexagonal shape for a tighter clamping in the chuck. This drill bit is ideal for cutting into a door lock.
In addition, the advantage of feather drills is their low cost. Screw drills are much more expensive.
The work must be done at the following speeds:
- for holes from 10 to 25 mm – 1500 rpm for hard wood, 2000 rpm for soft wood
- for holes over 30mm – 1000 rpm for hard wood, 1500 for soft wood.
The length of the drill reaches 15cm. if there is a need to make a deeper hole, it is worth buying an extension that will help make a hole of 400-450 mm.
Adjustable tool overview
Ballerina design
A variety of drills are used to make holes in wood, as well as in wood-based panels (plywood, OSB, fiberboard/chipboard). In this case, the diameter of the groove being formed is limited by the diameter of the drill itself, so that very often the capabilities of standard devices are insufficient.
The solution in such a situation is to use a ballerina - a special drill with movable cutting elements. It has a rather complex design, but at the same time significantly expands our capabilities in drilling holes.
Photo of the most common model
The main elements of the device are:
- The central part, which includes a small diameter twist drill, a “body” in which the cross rod is fixed, and an end piece for clamping into the drill chuck.
- A horizontal bar (often with millimeter markings) along which the cutting elements move.
- Two cutters secured to the rod with hex screws. In preparation for work, the cutters are moved apart to the required width and clamped in a strictly vertical position.
- Ballerinas can also have a simpler design: an L-shaped movable cutter is attached to the central part. However, most often such devices are used not for processing wood, but for drilling tiles or clinker tiles.
Model for tiles with one cutter
An important factor determining the quality of a ballerina is the material from which it is made. Professional tools that are used for processing hardwood are made of high-strength steel with an anti-corrosion coating, and the cutters are equipped with carbide surfacing.
The price of ballerinas without coating is usually lower, but they do not last long, since cheaper metal is used for their production.
Use for drilling holes
One of the obvious benefits of adjustable wood drilling jigs is their ease of use.
The work of making a hole is carried out as follows:
- On a board or sheet of plywood we mark the center of the future groove.
- Using a hex wrench, loosen the mounting screws and install the cutters on the rod so that the distance between them corresponds to the desired diameter. At the same time, we make sure that the cutting elements are positioned strictly symmetrically.
- We tighten the screws with a wrench, fixing the cutters on the rod in the selected position (the distance for most models is from 30 to 120 mm).
- We insert the ballerina into the drill chuck.
- We place the drill at the mark opposite the center (it can be marked with a punch or passed with a drill of a smaller diameter), after which we begin processing. We increase the pressure on the drill gradually so that the load on the cutting edges does not increase.
After the hole is made, we remove the ballerina with a piece of wood or plywood from it. The edges must be filed to remove burrs.
Screw drill for wood
Such a drill is also called an auger drill because its working part is similar to an auger, which makes it possible to effectively remove waste and chips during operation.
Such drills have a number of advantages:
- the length of the drill can reach 600 mm, but the most popular and in demand option is 450 mm. These drills create holes even in very thick materials. At the same time, work productivity meets the highest standards
- Waste is removed very well during operation, so the drill does not overheat and has a long service life
- the diameter can be from 3 to 52 mm, which is quite enough to carry out most work. To ensure the best performance, you need to keep an eye on the rpm speed. There are instructions on the packaging of the drills that tell you what drill diameter is suitable for the specific type and thickness of wood.
- The presence of a hexagonal shank makes it possible to securely fasten the element in almost all cartridges.
This drill must be used carefully to prevent bending during work.
Step by step lesson #2
If you want to spice up the decoration a little, try using a suitable photograph or drawn image of a real ballerina as the base:
Print two mirror copies of the same picture (you can rotate it 180 degrees around the vertical axis using almost any graphics editor). Cut and glue them together so that the finished figure is double-sided. We used this vintage image (clicking on the image will open the photo in full size, which you can use in your work):
While the base dries, cut out two identical rectangles from thick paper. Fold them like an accordion, then bend the resulting workpiece in half:
Glue the edges of the paper to each other on the inside of the folded accordion. When opened, the resulting “fans” should completely cover the hem of the drawn ballerina. Now you need to glue the blanks to the figure. Slightly unscrew the outer edges of the accordion and give the pack a curved shape. Apply a little glue to the edges and press them to the edges of the base. Glue the second “fan” on the other side of the figure.
To give the pack even more volume, you can attach another thin tissue paper on top of the first skirt:
To make a pendant, poke a small hole in the top of the figurine and thread gold or silver thread through it.
Ballerina made from napkins
And finally, the most unusual lesson! If you have a piece of thin wire and a napkin on hand, you can make a model like this:
To begin, twist the wire into a basic silhouette of a man with his arms raised.
Next, divide a regular table napkin into layers (usually there are 2 or 3). If there was a bright design on the front side, use this layer for something else, it will not work for our project.
Set aside a few untouched layers of paper and tear the rest into strips about 3 cm wide
It is very important to do this by hand and not with scissors. Take the wire “skeleton” and start wrapping it with strips of paper
As the paper covers the figure, apply colorless office glue diluted with water over it.
By wrapping several additional layers of paper around the upper part of the body, make a slight thickening to make the figure of the toy ballerina more reminiscent of a human. After the figures are completely dry, you can start dressing.
Fold one of the set aside squares as if you were going to cut a snowflake out of it (see previous instructions), measure the desired length of the dress and trim off the excess paper from the wide side. It's better if you make the cut line slightly wavy.
Holding the paper at the intersection of all the folds, tightly roll and unfold the workpiece clockwise several times, and then do the same in the opposite direction:
Two-layer skirts look more delicate, so don’t be lazy to repeat this procedure with another layer of paper napkin.
After carefully making small holes in the paper for the ballerina's head and arms, put the dress on her. Using a white thread, tie it at the waist
And this is what happened:
If you still have any questions, watch this video for greater clarity and for new ideas:
https://youtube.com/watch?v=HXjznuqWpXU
How to make a ballerina out of paper
First of all, you will need to choose the silhouette of a beautiful ballerina to cut out. The Internet is full of options. To make the figure voluminous, the skirt (tutu) is made separately.
What you will need:
- ready-made templates;
- sheets of paper (white, colored);
- scissors;
- pencil, eraser (circle);
- felt-tip pens, pencils or paints (to color the paper silhouette);
- rope or ribbon (if the craft is for a Christmas tree).
Manufacturing process
The step-by-step master class will begin with choosing a suitable picture. There are several options. The first is that you need an ordinary white silhouette, a colored ballerina or a real person. The last option is used when a person’s face cut out from a photograph is glued onto a finished paper craft. The craft is placed inside a holiday card or made into a Christmas tree toy. An original New Year's gift.
For a colored ballerina, you can either choose a picture of a dancer and print it out and cut it out. Or take a regular white outline and then color it using markers or paints. It is not necessary to carefully draw the details; light strokes are enough, especially if the author is not a very skilled artist. You can put such a ballerina on a postcard with your own hands. All that remains is to fill out the wishes inside.
To make the image two-dimensional and viewed equally on both sides, print two identical, but mirrored pictures. Then glue them together with the wrong side. Then the figure will be double-sided. Excellent Christmas tree toy.
Pack. The dress looks more impressive. The easiest way is to cut out a paper snowflake for the pack. Carefully make a small hole in the center or cut to the center to attach the snowflake skirt to the ballerina silhouette. Then glue the cut out part. This tutu looks beautiful and gives the dancer’s image a special charm.
White silhouette or black? If you want to make a garland of several silhouettes of ballerinas, you don’t have to make them white. Take sheets of colored paper and choose colors that match each other. Two or three for contrast. For example, white-black-blue or green-red-gold. By the way, if the garland will be a festive decoration, it is better to take classic colors.
Then the craft will convey the spirit of the event. Carefully attach the cut out ballerinas to a thread and hang them together on one ribbon or strip. Or tie it to one long thread. Then it will seem that the dancers are floating weightlessly.
https://youtube.com/watch?v=tShap4a1pUc
Paper ballerina - an elegant decoration and an original souvenir
Making paper crafts has been very popular lately, because with the help of the simplest paper you can make very unusual and beautiful things with your own hands. For example, a seemingly simple ballerina without any bright decorations, simply cut out of white paper, can become an interesting decoration for a New Year tree or a birthday, can decorate a banquet wedding hall, or simply become a souvenir for your best friend. If, on top of that, your friend turns out to be a ballerina or a devoted fan of this art, a DIY paper ballerina will be the most amazing gift.
- Using a simple process of cutting out a ballerina from paper, you can decorate a window very beautifully and interestingly before the New Year. To do this, just cut out a template or stencil and stick it on the window using tape or PVA glue.
- You can make a paper ballerina three-dimensional and use them to create a real aerial ballet, soaring high under the ceiling.
- You can make an unusual New Year's garland from several paper ballerinas. To do this, print out templates of ballerinas from paper on a printer, come up with bright and interesting outfits for them and place them on a cord or beads, then hang them on the Christmas tree or on the wall.
- Snowflakes are the main decoration of the New Year tree and the New Year's interior of an apartment or house. Sometimes, together with your child, you want to come up with the most unusual and fabulous snowflake that cannot be found anywhere else similar. In this case, you can make ballerina snowflakes that can easily decorate any room or Christmas tree.
- If you have been interested in paper crafts for a long time, you can make a paper ballerina using the quilling technique. As a result, you will have an original and bright souvenir or Christmas tree decoration in your hands.
- To create beautiful paper ballerinas, you don't need to go to the store for intricate materials or search for something on the Internet for a long time. It is enough to have on hand several sheets of white paper, some waste organza or other airy fabric, scissors, various templates or stencils and, of course, your imagination and inspiration.