Installing the door leaf involves attaching the hinges, which are holders. To carry out the work without damaging the door, experts recommend using special templates. In addition, each door is equipped with a lock, the installation of which can also cause problems for an inexperienced technician. A lock template can make installation much easier. What kind of equipment is this and how to make it yourself, read on.
Ready-made tool for inserting various locks and hinges
Features of the device
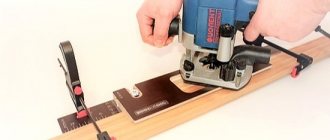
If you have never used a template for inserting door hinges and locks before, you should first become more familiar with the device. The part is a blank, one might say, a matrix, which has a cut-out window with a shape that matches the elements of the fittings. The tool is also called a jig. Fix it on the frame or sash in the place where the insertion is supposed to take place. The edges of the window define the contour of the future recess. The sampling can be done with a router, drill or chisel, without fear of damaging the wood outside the matrix.
The device helps to quickly insert fittings, but does not always bring benefits. Buying a template for one-time use is expensive. The tool is more suitable for craftsmen who often deal with inserting hinges and locks. If you wish and have the ability to work with wood, you can make a jig yourself. You just need to find the exact drawing, cut out the parts from it and assemble them into a single structure.
Tips on how to choose the right router
When choosing a router for your home, think about the purpose of its use. To ensure that the tool does not remain collecting dust on the shelves in the garage, it is better to choose a multifunctional device. It will allow you to carry out urgent work, and will also be useful in unplanned situations after a while.
Pay attention to the body. It must be free of cracks and chips. In case of any defect, the seller is obliged to replace the product. All components of the machine should work without jamming. There should be no backlash or gaps greater than those provided by the manufacturer.
Often the main light in the room is not bright enough. A router with LED backlight will allow the user to work from any side relative to the workpiece. This function will relieve the strain on your eyesight; there will be no need to concentrate your gaze on the light and dark points of the room.
You should not buy a weak device and operate at the most powerful speeds. When working with a power tool, there should always be a reserve of speed. It should be left at 15-20% of the motor's capacity. Translating into numbers, we get that a milling cutter with a power of 11,000 revolutions is recommended to be used at no more than 9,000. Such operation will extend the life of the machine.
If you don’t know how to choose a hand router, what kind of wood to work with, what shapes to make, you should contact a consultant in the store. He will select the necessary equipment based on your budget and machine requirements. Thus, the buyer will save money without overpaying for an expensive router.
Don't miss: Sliding interior doors: types and installation features
The power cable must be long enough. This will not hinder the operator's movements. It is better if the cord is frost-resistant. Even in mild frost it will not harden, burst or cause discomfort in handling.
After securing the cutter in the collet chuck, make sure it is completely secured. You should also carefully select cutters; do not install disproportionate attachments. They will not engage tightly. At high speeds there is a risk that they will fly out and could injure someone.
Observe safety precautions while working. It is prohibited to use the equipment without personal protective equipment. The workpiece must be securely fastened. It is prohibited to blow away or sweep away shavings with the palm of your hand. Sawdust must be removed using a vacuum cleaner or sweeping brush.
When storing the device, avoid direct sunlight. Room humidity should not exceed 65%. Many models are supplied in a special case or box. If you don’t have a storage container, you can make it yourself using available materials.
All milling cutters have a strong body and a dive scale, but still they are not insured against accidental falls. If this happens, you should adjust the immersion scale so that in future use there are no problems with the size of the depth of the holes or the thickness of the groove to be removed.
Principle of use
The template is easy to use. Before starting work, check the size of the tool window and the dimensions of the hinges. If everything matches, proceed to marking. On the door frame and sash, draw the outline of the hinges with a pencil. A template is applied to the future insertion site and securely fixed with screws. The boundaries of the matrix window must coincide with the marking lines. Now all that remains is to use a router or chisel to select a groove of the required depth. At the end of the work, the conductor is removed, moved to the marking location of another loop, and all the steps are repeated.
The lock can also be installed using a template for installing hinges, if it is the right size. The device is attached to the end of the sash. If the size does not match, you will have to purchase or make a special jig for inserting locks. The steps are the same as when installing awnings. Using the template, a recess corresponding to the size of the lock is selected at the end of the sash. In addition to the router and chisel, you can use a drill for insertion. Another sample will be needed on the post of the box for the lock strike plate.
Types of cutters
Depending on the type of work and the expected result, cutting attachments for an electric milling machine are divided into two main groups: edge and groove. The former are necessary in the manufacture of carved parts and edges. With the help of the second, grooves, recesses and recesses of various sizes are cut out.
The groove cutter for inserting a lock, in turn, can be figurative, used for processing panels, or spiral, which results in through recesses for handles in the interior door.
Making a template
If you decide to construct a device with your own hands, you will need a template diagram for inserting hinges and locks. You can find a drawing on the Internet or borrow a tool from familiar builders and draw every detail with a pencil on paper.
When the diagram is ready, production begins:
- The parts are cut out of MDF, plywood, thick plexiglass or sanded board. The first element is cut out a rectangle measuring 380*190 mm.
- 6 holes are drilled along the smaller edges of the part. There should be 3 of them on each side. The holes are maintained at an equal distance relative to each other, as well as to the center of the rectangle.
- A window measuring 135*70 mm is cut out in the middle of the rectangular blank.
- The limiter is made from a piece of slats, attaching a block to one end. The part is fixed to the rectangular blank with self-tapping screws.
- To change the size of the window, two rectangular blanks measuring 130*70 mm are cut out. On the larger side, two cuts are made, between which a distance of 70 mm is maintained. The overlays are applied to the smaller sides of the rectangular slab with a window.
- One overlay is cut out to a larger size - 375*70 mm. Two cuts are made on the larger side, with a distance of 300 mm between them. The workpiece is applied to the larger side of the rectangle with a window.
- All details are ready. All that remains is to assemble a template for inserting hinges and locks with your own hands using screws. Overhead plates adjust the size of the window.
Additional tools and recommendations for them
To install a lock on an interior door, you must use a tape measure. It helps to accurately measure the required distances.
You need to buy sets of drills in stores that sell door fittings. But you can look for them in furniture stores, construction markets, and home improvement and repair hypermarkets. The choice depends on personal preference. Important: the drill must be thicker than the lock. If some tools are missing, and you need them urgently, you should contact services that rent out equipment.
In some cases, a hammer drill can be of great benefit. It is needed to level and enlarge the opening. Using a hammer drill, holes are drilled where the anchor dowels will be placed. When purchasing or renting a screwdriver, you should find out whether the necessary attachments are included in the kit. If you have to process hard-to-reach areas, unravel platbands or trims, sometimes you need to prepare an electric jigsaw.
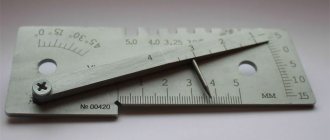
When choosing pencils and markers for marking the canvas, you need to avoid buying products with very hard rods. They will leave traces that will be extremely difficult to get rid of. To more accurately measure all dimensions, you need to use a tape measure with a tape 3 or even 5 m long. A caliper will help you determine how deep you need to cut the lock. To more accurately orient the locks, eliminating distortions, you need to use a bubble level.
But since the locks are usually installed on a small part of the door, you will have to use a steel ruler. It is much stronger than wood and plastic and can withstand even accidental impact from a tool. Using metal test squares, angles are measured. This device is also needed to tune an electric instrument. You definitely need to prepare a set of screwdrivers, especially since it will also be useful when installing hinges.
Sawing tools deserve special attention. A miter saw is used when you need to accurately cut trims and bars. Ordinary hacksaws and even high-quality jigsaws can split the edges of parts. They will become uneven, and this will not allow the lock to be fully installed. To cut the additional strip, use circular saws.
Don't miss: Dimensions of a door frame for an interior door: algorithm and formulas for calculating sizes, requirements for door measurements
You should also prepare: a mounting gun for supplying foam, chisels and peaks for the hammer drill, files for a jigsaw.
How to embed a lock into an interior door yourself, watch the video.
Homemade and insertion templates for inserting loops
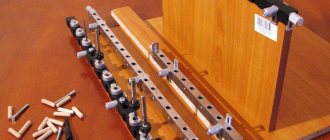
You can make a template for inserting loops yourself. You will need a lot of them, for all the variety of existing models of fittings. Therefore, there is a risk to seriously and for a long time engage only in manufacturing. And then get disappointed and start looking for where to buy. For this reason, it is better to look at the options for templates with inserts.
But you will have to face the fact that this will take much more money than you originally expected. You need to buy a lot of insert strips for inserting fittings, which will be installed in a special template holder.
A pair, a three, or even more sets - it definitely won’t fit all doors. And more and more varieties of accessories appear. Accordingly, the number of inserts is growing. And now the accumulated pile is difficult to lift, and Finding something in it is even more difficult.
The price of each insert is 270-290 rubles, the price of the template where the inserts will be inserted is 6000 rubles. With a minimum set of 5 models of fittings (lock, hinge, hidden hinge, strike plate, latch), the price is RUB 13,250. An average set will cost you about 60,000 rubles.
In addition, all flaws appear in the work. Any fittings are not ideal in size and are produced with a length and width tolerance of 0.5-1.5 mm. Even half a millimeter of discrepancy with the insert template - it will either install with gaps, which is very visible, or you will have to expand the recess manually using a jewelry chisel.
Disadvantages that you definitely need to know about when working with insert templates for a router:
- There is an error when inserting fittings, provided that if the fittings are expensive and made in Italy, the error may be minimal.
- Simultaneous insertion of hinges into the frame and door leaf is not provided
- It is not possible to install locks on an installed door
- The template is fixed with clamps, this is not reliable and safe
- There is no mount for the router; there is a risk of injury if a paper clip or knot gets caught in the door leaf.
Installing hinges
Installation of hinges begins with installing the template, but first prepare the tool. You will need a hand router, chisel, and screwdrivers. The sidebar consists of the following steps:
The sash is securely fixed to the floor, with its side facing up. Markings are applied in places where fittings are inserted. It is enough to simply outline the mounting plate of the canopy with a pencil.
- The conductor is clamped to the end of the door with screws. Overlay plates adjust the size of the window in accordance with the applied markings.
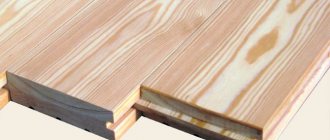
- Adhering to the boundaries of the matrix, chamfer is removed with a milling cutter or chisel. The recess must correspond to the thickness of the fittings mounting plate. If more wood is accidentally removed during insertion, the fittings will not work correctly. The door will warp. You can reduce the recess by placing a lining of hard cardboard under the hinge mounting plate.
- When all the grooves have been cut, begin installing the fittings. The hinges are screwed on with self-tapping screws.
How to install a lock using a template?
Installing a lock using a template follows a similar pattern, only the recess at the end of the door is made larger. The process consists of the following steps:
- The sash is securely fixed to the floor with its side facing up. Use a pencil to mark the future insert. The lock body is applied to the end of the door and outlined.
- A template is set according to the markings. Adjust the coincidence of the matrix boundaries with the drawn lines.
- The wood is sampled using a milling cutter. If there is no tool, holes are drilled with a drill, and the remaining jumpers are cut out with a chisel. The depth of the opening must correspond to the length of the lock body.
- The template is removed from the door. The lock is applied to the front part of the sash, the holes for the handle and the keyhole are marked. Holes are made with feather drills. The lock is inserted into the cut-out recess and secured with self-tapping screws.
- The sash is hung with hinges on the frame. When closed, mark the location of the strike plate. A template is fixed to the bowl, the window is adjusted according to the markings, and a recess is selected using a router or chisel.
- The insertion is completed by fastening the strike plate with self-tapping screws and checking the functionality of the lock.
A homemade device for inserting fittings can be assembled according to individual sizes, come up with your own convenient design, and improve the clamps.
Installation with a router
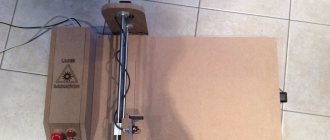
A set of tools for inserting locks into interior doors consists of a hand router, an electric drill and two chisels (one narrow, the other wider). The canvas is fixed in a stationary state so that during the installation of the lock you are not distracted by aligning it in the desired position.
At a height of 0.7-1 m, a line is drawn for the location of the future constipation. A lock is placed sideways on this line so that it runs exactly in the middle of the tongue. Next, lines are drawn along the top and bottom of the mechanism. To prevent the cutter from catching too much, stick masking tape as a limiter. The size of the cutter must match the size of the lock. While working, adjust the depth of insertion of the cutter, equal to the thickness of the plank, as well as the speed of its rotation. You should not make sharp, hasty actions, so as not to violate the integrity of the canvas and not to cut off unnecessary things.
A router is an excellent device for cutting locks into interior doors yourself, which allows you to get results with perfectly even, smooth edges. A machine with the immersion principle, the so-called vertical router, is suitable for inserting locks and awnings.
If desired, the edges can be polished with an edge cutter. But since two such tools are quite expensive, it is recommended to purchase a combined router that has all these capabilities.
The process can be simplified by using templates for cutting out recesses for fittings. In addition, it is recommended to work with a router on a horizontally laid door.