Quite often, inexperienced owners do not even consider installing the faucet themselves. It seems to them that this is a very long, complicated matter, subject only to professionals, and the risk of flooding their neighbors scares them no less. Therefore, they simply call the master and give him a considerable amount of money. However, this procedure is completely optional, since in fact the entire installation process takes very little time, even for beginners. You just need to understand the device a little, prepare all the necessary tools and get to work.
Materials and tools
By preparing all the tools and materials in advance, you can save a huge amount of time, since during the installation of the mixer you will not need to be distracted by searching for this or that item. So, all you need in the process is:
- a new mixer with all its components;
- adjustable wrench;
- pliers;
- open-end wrenches;
- tow with flax.
In addition, other tools may be needed. This depends on the installation method and other features of your bathtub. Therefore, it is worth thinking about this in advance so that nothing distracts you while working.
Mixer installation options
The type of installation of the mixer directly determines the procedure during operation, the amount of time and materials required. Among the methods for installing mixers, there are three main ones:
- wall installation;
- construction of a special rack for further installation;
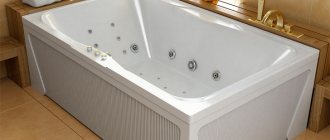
- installation directly into the bath body.
Installing a faucet on a wall is the most common method, since you can hide all unsightly connections and place the faucet in any convenient place. The construction of an additional rack also allows you to hide all the pipes, but it requires much more time and materials, and is not suitable for all baths. But if the size of the room allows, then in this way you can create a very interesting interior. But installing a faucet into the side of a bathtub is only possible in cases where the bathtub itself has a special hole for installing a faucet. A faucet cannot be installed in a regular bathtub that is not intended for installation of faucets.
In addition to the listed options, there are many more additions and features that depend only on the desires and fantasies of the person himself. You can also install the faucet between the sink and the bathtub if they are located close to each other.
Technological nuances of installation
When solving the problem of how to connect a sink faucet, some difficulties may arise that have a significant impact on the quality of the work performed. For example, the joints of flexible hoses can become very sticky, and the use of special tools does not give the desired result. In addition, sometimes the diameter of the cut-in hole may need to be adjusted or the faucet may need to be mounted on a countertop.
In this case, you can use a jigsaw and cut a new hole. In addition, it is necessary to check the condition and functionality of the water pipes and all wiring. If necessary, these elements need to be modified or completely replaced.
To independently install and connect a kitchen faucet, it is enough to study materials on the relevant topic, and professional craftsmen will help solve complex problems.
Preparatory stage
Before you begin the actual installation of a new faucet, you need to get rid of the old one, if any. In fact, this is the simplest stage of all, since it very rarely causes any difficulties. The first step during dismantling is to turn off the hot and cold water supply. After this you need to open the tap. This way you can simultaneously drain the remaining water and check whether its supply is completely shut off. Next, use a wrench to unscrew all the connections.
Usually, if difficulties arise, it is at this moment, since often a large amount of salts are deposited at the joints, which prevent the connecting nuts from being unscrewed. In this case, there is a high probability of damage to the pipes, because they cannot withstand the force that needs to be applied in the process. However, there is a fairly simple way out in this situation. You just need to drop a few drops of kerosene or a special liquid onto the places where salts are deposited and wait about fifteen minutes. After this procedure, all connecting elements can be easily unscrewed, and you can complete the process of dismantling the old faucet.
Types of cranes
Cranes are distinguished by the type of body, valve and control mechanism, as well as the presence of additional elements in the device.
Type of shell
By type of case there are:
- direct - installed at key components of the pipeline and used to adjust the pressure or turn off the water supply in the area, for example, during repairs;
- corner – installed in corner nodes, perform the same tasks as straight ones;
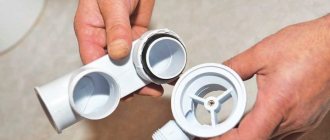
- distribution - the body has the shape of a tee with one inlet and two outlets, such taps are needed to cut one flow into several or redirect the flow from one water circuit to another;
- water-folding - have a spout and are used to receive water from a water supply system, while the body can be solid with a fixed spout or assembled - with a movable spout that rotates in a horizontal plane;
- mixers - water taps, shaped like a tee, with two inlets and one outlet, used to mix flows from two water circuits in the required proportion.
We recommend that you familiarize yourself with: Types and rules for installing valves of shut-off flange connections
Locking mechanism type
Depending on the type of valve, ball valves and valves with a cone mechanism are distinguished.
- In a ball mechanism, the locking element has a spherical shape; the water flow is adjusted when the shutter is turned. If the valve hole is installed parallel to the water flow, the tap is open; if it is perpendicular, it is closed.
- In a faucet with a cone mechanism, the through hole has a curved shape. An O-ring is located horizontally at the bend. When the valve or lever moves, the cone-shaped valve moves vertically down or up through this ring. In the extreme upper position of the valve, the valve is open; in the extreme lower position, the ring and valve are hermetically connected and the valve is closed.
Control mechanism type
According to the type of mechanism, the crane can be:
- single valve,
- two-valve,
- single lever.
Each device differs in the way the locking mechanism is activated.
Single valve taps
Single-valve taps in a water supply system are used to regulate the flow in pipeline nodes or to obtain water from one water circuit, for example, drinking water or water for irrigation.
The control mechanism consists of the following parts:
- head - a thumb or handle, this is the external part of the mechanism, the impact of which sets the internal parts in motion;
- axlebox – a housing inside which the working parts of the control mechanism are located;
- a locking washer that secures the valve to the tap;
- a plug on the head that covers the washer;
- rod - a part that transmits force from a rotating thumb or handle to the bolt;
- oil seal - seal between the rod and axle box;
- coupling with guides;
- gasket between the valve and the valve body.
When the valve head is turned, the stem moves the valve. In this case, the cone valve moves progressively up or down, and the ball valve rotates around its axis. The valve control mechanism is simple and reliable, and since it is not part of the tap, in case of breakdown it can be repaired or can be completely replaced.
Double-valve taps
Two-valve taps are mixers that are used in houses with centralized hot water supply or in the presence of a water heating device.
The control mechanism has the same device as a single-valve faucet. One valve regulates the flow of cold water, the other – hot.
Single lever devices
Single-lever faucets, an alternative to single- or double-handle faucets, have become popular as faucets due to their ease of operation. To obtain the required pressure, simply lower or raise the lever, moving the lever left or right to adjust the temperature.
Design of single lever taps:
- lever arm;
- ball valve with three holes;
- control rod;
- pin or screw securing the lever;
- stub;
- valve body;
- cover in the form of a truncated hemisphere;
- seal between parts.
We recommend that you familiarize yourself with: Functions of a three-way valve for a pressure measuring device (pressure gauge)
When the lever is applied appropriately, the ball valve is raised and lowered or rotated. In this case, the holes in the ball change their position relative to the outlet holes of the water supply pipes and the faucet spout, adjusting the water pressure from each pipe.
Cranes equipped with additional elements
Faucet manufacturers complement the device with a variety of elements:
- thermostats,
- touch panels,
- photocells,
- water opening sensors.
The faucet with thermostat has a screen that displays the temperature and water pressure, and two regulators. The first regulator is connected directly to the ball mechanism and changes the water pressure, the second, which serves to regulate the temperature, is connected through a thermocouple.
The touch panel built into the faucet allows you to regulate the water flow with a simple touch; there is no need to rotate the valve or turn the lever - the electronic system will automatically adjust the pressure and temperature.
The contactless faucet is equipped with a photocell that reacts to the appearance of any object under the spout. The photocell sends a signal to the regulating mechanism, which turns on the water. As soon as the reason for turning on disappears from the sensor’s field of view, the water turns off.
This control of the water supply allows for more economical use of resources and minimizes direct human contact with the tap, which makes such taps more hygienic compared to conventional valve and lever taps.
Mixer installation
The crane installation process occurs in several stages. The first step is to install the eccentrics, while screwing the tow onto the threads. Its final position should be such that the bend faces upward. Next, you need to assemble the faucet, since most often it is sold disassembled.
This is not difficult to do, especially if you follow the instructions, you can do it within 5-10 minutes. However, this must be done carefully, trying not to damage the parts with an adjustable wrench. The next step is to attach the crane to the eccentrics. This stage requires special control over the horizontal position of the crane. Also, do not forget about the rubber seals that prevent further water leakage. They usually come with a faucet, but they are not always the right thickness. Therefore, it is advisable to play it safe by purchasing spare ones.
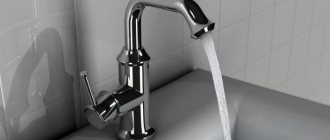
After you have installed the faucet, you should test it by turning on hot and cold water alternately. If leaks are detected, you need to slightly tighten the nuts. However, this must be done carefully, because it is very easy to twist them, damaging part of the structure.