The operation of pipelines for various purposes requires that the liquid and gaseous media transported through them must move in a certain direction. By making a check valve yourself or purchasing a serial model, you can meet this requirement for the operation of the pipeline and its equipment, which will allow you to maintain them in working condition for a long time.
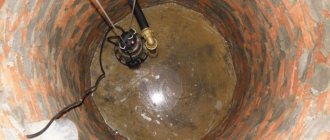
Submersible pump check valve
Application of check valve
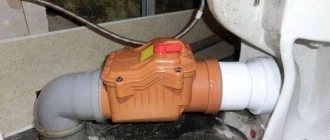
The mechanism itself is a cylinder with a small spring inside and a round overlapping plate. The valve is initially closed using a spring. The spring becomes weaker with water pressure, and the valve opens, allowing water to pass through. If a leak occurs, the pump or something else stops, and the power of the water flow decreases, the shut-off plate closes. A check valve prevents unpressurized water from flowing back.
THE NOTE. Thanks to the non-return valve, the emergency section is automatically disconnected from the reverse flow.
It is advisable to install a check valve in a house equipped with a water intake system using a pump, so that when its operation stops, water does not flow into the well or borehole. Thanks to the presence of the valve, there will always be water in the pipeline, so there will be no need to wait for the water to reach the tap after turning it on. If there is a power failure or the pump is turned off, you will not have to refill the system with water.
Possibility of making it yourself
There is no deep financial sense in making valves yourself; purchasing components will cost almost more than a ready-made industrial valve. Or the home workshop should have high-precision drilling, turning and milling machines for self-manufacturing of device parts.
Most often, home craftsmen make valves with their own hands to test their strength in design and assembly. They also make custom valves for home process units for making beverages or aquarium filtration and aeration systems. Next, the design and manufacturing technology of the valves will be considered:
- Ball for water.
- Gravity ball for water.
- Disc-shaped.
- Petal for ventilation.
Figure 3. Design of a petal air valve
The designs chosen are simple, the technology does not require the use of expensive equipment. Making a simple check valve in a home workshop is quite possible. It is enough to have intermediate level locksmith skills.
Is a valve needed in an apartment?
Desirable if a boiler is installed. The return valve will prevent the leakage of hot water to the neighbors. Also if there is a water meter. Often, a valve is already built into the water measuring device itself to prevent the device from “twisting” in the opposite direction. But since these built-in valves are of very low quality, it is better to separately install a good one immediately after installing the water meter. In apartments, the pressure in the pipes with hot and cold water is often different. The valve will help here too. Due to errors during sewer installation, there is always the possibility of flooding of housing with waste from the sewer. Residents of the first floors are especially at risk.
If the room is heated using a boiler, there is a possibility that the pressure in the system will change, air will enter the circuit, or other malfunctions will occur in which the flow of hot water will change direction. If the check valve is not installed, the situation will certainly lead to a serious accident.
IMPORTANT Valves increase hydraulic resistance. We are talking mainly about spring structures. Another serious “minus” of check valves concerns membrane mechanisms without springs: when they close abruptly, they provoke the risk of hydraulic shock and quickly wear out the system. But inclined gates and shock absorbers will solve this problem.
Purpose of the device
The water back pressure valve is designed to prevent water flow from being directed in the other direction. It has small dimensions and provides the necessary pressure in the pipeline.
Used for the following purposes:
In the water supply system. Installed on cold and hot water pipes in apartment buildings and private buildings. Normalizes the pressure in the system, providing the possibility of comfortable mixing of water and adjusting its temperature with a mixer.
In water heating systems. Boiler-type water heaters are filled with water under pressure. As the water heats up and increases, the flow tends back into the cold pipe. The check valve prevents water from being pushed back into the pipe.
In heating systems. Installed if the system consists of several circuits (water heater, heated floor, radiators), in which the flow parameters differ, to normalize the pressure.
In front of the counter. To protect the meter from failure due to pressure surges.
In water well systems powered by submersible pumps. Eliminates the possibility of water backflow after turning off the pump.
Classification of check valves for water
Depending on their design, check valves are divided into:
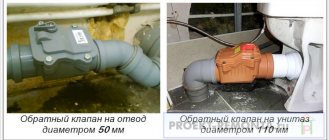
Disc spring valves. The most compact. In such valves, the shutter mechanism is a plate (disk) with a rod on a spring. At normal pressure, the disc is pressed out and water flows freely. When the pressure decreases and the flow tends in the opposite direction, the spring presses the disk against the seat and closes the hole. There are 15 mm – 200 mm.
Bicuspid valves. They are installed in complex hydraulic systems, where water hammer may occur due to the fact that the pump has stopped working. Under normal pressure, it folds in half, allowing water to pass through. If the water tends to change direction to the opposite, the disc is pressed against the saddle. Suitable for large diameter pipes (50 mm - 700 mm).
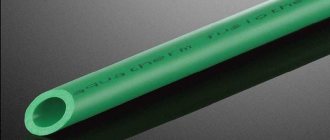
Wafer valves. Small in size and lightweight. If repairs to such a valve are necessary, it will have to be completely dismantled, since the mechanism does not have flanges. The wafer valve can be installed in any position (horizontally, vertically or at an angle). Mounted strictly in the direction of fluid flow. They are often installed with polypropylene pipes.
Ball valves. The spring presses the ball against the seat during normal water flow. If the pressure drops, the ball will block the walls of the hole, pressing against its walls. They are most often used in plumbing. The ball valve is also used in plumbing systems because the water flows there is clean and the pipes are of small diameter.
Check valves. The locking element is a “slam.” With normal water flow, it is in the open position, but if the pressure begins to drop, the lid slams shut and blocks the flow of water. They are divided into simple (up to 400 mm) and unstressed. Stressless check valves are installed in large diameter pipes where the cap, blocking the flow, can cause water hammer. Rotary valves are practically insensitive to environmental contamination. For this reason, they are used for installation in heating systems, since the constant circulation of water there heavily pollutes it. When installing a large diameter valve, a damper must be used.
Polypropylene. Spring check valves with polypropylene body. In water supply systems made from propylene pipes, check valves with a propylene body are usually installed. Externally, the fitting looks like an oblique bend. Propylene fittings are attached to the pipeline using polyfusion welding.
Lift spool valves. The shutter mechanism is a lifting spool. With normal fluid flow, the spool is raised.
IMPORTANT! The axis of the lift-spool valve must be located vertically, so they can only be installed on sections of pipelines that are in a horizontal position.
If there is a need to repair such a valve, it is not necessary to completely dismantle it. Its disadvantage: it is too sensitive to environmental pollution.
Reed valves. They are also called gravitational. The main characteristic is that they have a low-elastic spring in their design, which has low resistance. And sometimes it’s not there at all.
Correctly selecting a check valve and installing it correctly will ensure accurate operation of the entire pipeline system.
Anticipated difficulties
In the process of self-production, home craftsmen encounter a number of difficulties:
- Incorrect calculation of downforce. The spring has to be shortened or, what is more unpleasant, wound in a new way. This problem is solved in most cases by choice.
- Insufficient quality of surface treatment of the seat. The valve does not press against it completely and allows water to pass through. Solved by grinding the surface.
- Excessively high resistance to flow under particular system conditions. I’m not at all sure whether I’ll have to choose a different type of valve or purchase a factory one.
Making a check valve on your own will serve as a good test of your own engineering and plumbing abilities.
Application of check valves for water. How to install a water valve with your own hands
It is quite easy to install a check valve on water yourself: minimal plumbing skills will be sufficient. Also have all the required tools available.
It is necessary to install check valves on water depending on their mounting method:
- Wafer valves are the fastest to install. The largest number of check valves are mounted in this way. The valve is mounted between two flanges in the system and fixed using sealing gaskets. The wafer check valve must be installed strictly in the direction of water flow.
- Check valves, which are used in pumping stations, are connected to flanges in the pipeline using sealing gaskets. These are mainly valves mounted on large diameter pipelines and made of cast iron.
- In residential buildings, the most optimal method of fastening is a coupling fastening, in which the valve is screwed onto the couplings.
- The spool axis in the check lift valve must be located vertically.
- When installing a rotary valve, it is necessary to ensure that the axis of rotation of the “flap” is higher than the axis of the flow.
- When welding, the check valve is welded to the pipeline.
- When performing a coupling fastening, the valve is connected using a threaded coupling.
When installing check valves, be sure to carefully monitor the direction of flow in the system. The direction of water through the valve will be marked with an arrow on the device body.
IMPORTANT! Regular maintenance of the valve is necessary. Installed in a place accessible for inspection, cleaning, replacement or repair.
How to install check valves for pumping stations?
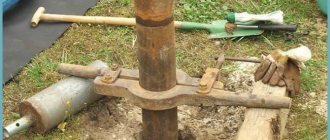
Valves for pumping stations are installed either directly in front of the station or immediately after the ratchet on the suction pipe.
Installation after the ratchet is preferable, provided there is a choice of location. If you install a valve in front of the station, the amount of water captured by the pump the next time it is turned on may drop.
If the valve is installed in front of the pumping station, a drainage system must be provided, because after some period of time repairs may be necessary. If the second installation option is selected, there is no need for driving. If you have a working piping system, it is necessary to excavate the pipeline in the place where the valve will be installed, connect it to a part of the pipe and, using a squeegee, connect it to another part.
Clue! If you use the water supply system only in the summer, make sure there is a faucet that will allow you to drain the water before the onset of winter frosts, and place it at the very bottom of the system.
DIY spring check valve assembly
Assembling a check valve yourself is problematic, since you need to decide on the choice of mechanism and search for parts. Even if you have the skills to perform plumbing work, which will make it possible to make tight connections, no one knows whether the parts are of high quality.
When making springs for a check valve at the factory, special steel is used. The guide rod follows the movement of the spring-loaded locking discs. The materials intended for the manufacture of the valve are compatible in the operation of the mechanism. Technical characteristics meet the requirements of regulatory documents. Guarantee provided.
IMPORTANT! There is no guarantee that a home-assembled check valve is safe to use or that its design is reliable.
Tools
To produce devices, you will need the following tools and equipment, which are probably available in every self-respecting workshop at home:
- Work table or workbench.
- Vise or massive clamp.
- Hacksaw for metal.
- Drill or benchtop drill press.
- Pliers.
- Knife for installation work.
- Set of files and needle files.
- Sanding paper of various grits.
- Jigsaw (electric).
Different materials and components are needed for different designs and will be listed in the appropriate section.