When should you change?
Common reasons, other than major repairs, are:
- water leaks through fistulas as a result of severe corrosion of the pipe;
- the welding seam of the pipe has broken;
- there is no pressure, the pipes are clogged with deposits and rust;
- The apartment is being renovated and the pipes are being changed at the same time, so as not to return to this issue later.
Who should pay?
Who should maintain and repair the common property and networks of an apartment building depends on the chosen method of managing the building.
In case of direct management, which is allowed for houses with up to 30 apartments, repairs are carried out at the expense of the owner or an organization hired under a contract, within the framework of the terms of the contract.
Such an organization can be a management company (MC) or a network company that provides a utility service, in our case Vodokanal. A simple contract for house maintenance (not to be confused with a management contract), or only water supply networks, is concluded with them.
When managing the house of a management company or a homeowners association (hereinafter referred to as the management company), the responsibility to maintain and repair the water supply networks lies with them .
If the riser can be restored, for example, by welding the fistulas and seams, or cleaning the pipes with a cable, then the management company will do exactly that, and it will be right.
But in the case when the riser requires replacement and does not meet the requirements for safe operation, and the water pressure, even after cleaning the pipes, does not meet the requirements of the Rules for the provision of public utilities (Appendix 1, clause 3 of the RF Government Regulation No. 354 of 05/06/2011 .), the management company is obliged to carry out and pay for the work to replace the riser.
It is the owner's responsibility to provide access to the riser. Therefore, when repairing walls in bathrooms, it is worth thinking in advance about how to get to them.
If the required water supply parameters are provided, and the apartment owner still wants to change the riser, then in this case he will have to carry out the replacement himself, at his own expense.
Payment for replacement of risers
Issues related to payment for this type of repair are specified in the provisions of Government Decree No. 491 of 2006.
Due to the fact that the property is common, the responsibility for paying for repairs falls on all owners . Funds are deposited every month according to a receipt sent by the management company. It is envisaged that the costs of replacement will be borne by the management company at the expense of money transferred to it by the owners of the premises.
Thus, the replacement of risers in an apartment building is carried out at the expense of payment made by the owners of residential premises. If the management company refuses to carry out repairs, this decision can be appealed to the State Housing Property Inspectorate.
Who can carry out the work?
With the direct management method, the owners themselves determine who can be allowed to carry out work.
Most often, this decision is made by the apartment owner alone. In the future, all responsibility for the defect and damage caused will lie with him or with the organization that performed the work under the contract.
In a house with a management company, work to replace risers is carried out with the consent of the management company, since it is responsible for their safe operation.
Depending on the position of the head of the management company, the following may be allowed to work:
- qualified employees of the management company itself;
- specialized organizations or individual entrepreneurs;
- a private person with the appropriate qualifications.
The responsibility to check the specialization of the organization and the qualifications of its employees lies with the management company.
But the apartment owner should not neglect this either. Especially in terms of control during the execution of work.
The following documents or their copies certified by the head of the organization can serve as confirmation of specialization:
- extended extract from the Unified State Register of Legal Entities indicating the types of activities;
- documents on certification of responsible persons issued by Gostekhnadzor, the qualification commission of the organization itself;
- information on the official website of the organization;
- order for the enterprise on assigning qualifications to an employee.
Attention! Often, owners themselves carry out work to replace the riser, and even without the consent of the management company.
In this case, in addition to compensation for damage, there may be administrative liability for damage to water supply networks, and in case of significant damage, even criminal liability.
Materials
- What materials can be used to replace a section of the water supply system (riser or liner)?
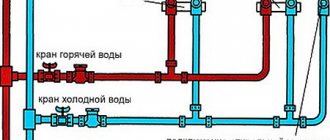
For domestic hot water, the answer depends on the heating system in your home.
If it is open (that is, hot water flows to your faucet directly from the heating main), we strongly recommend choosing metal pipes:
| Image | Description |
| According to GOST 3262-75, water and gas pipes (including those with zinc coating) undergo hydraulic tests with a pressure of 25 (for reinforced pipes - 32) kgf/cm2. Mounted on threaded or (less commonly) compression connections. In practice, they last at least 30-50 years. |
| With a wall thickness of 0.8-1 mm, they have a tensile strength of up to 240 kgf/cm2. They are connected by socket soldering, as well as deformable crimp fittings and compression fittings. They have limited flexibility and unlimited service life. |
| A corrugated stainless steel pipe has a wall thickness of only 0.3 mm, but its tensile strength (up to 210 kgf/cm2) is not much inferior to copper. The bending radius of the pipe is equal to its diameter, which greatly simplifies installation and allows you to get by with a minimum number of fittings. Connections are compression, with silicone seal. The service life of the pipes themselves is not limited by the manufacturer, but after thirty years the owner will have to replace the silicone rings in all fittings. |
In cold water and hot water supply systems with water supplied from boilers, geysers, heat exchangers of a heating point, etc. You can use lightweight, durable and inexpensive polymer and metal-polymer pipes (PPR, PERT, PEX, PERT/AL/PERT, PEX/AL/PEX).
Preparation of hot water in a house with a closed heating system
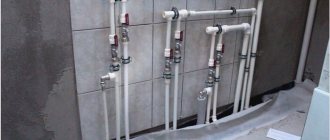
Connections and risers made of PPR pipes
Why shouldn’t they be installed in a centralized hot water supply system with water supplied from the elevator unit?
There are actually only two reasons:
- The possibility of water hammer occurring in such a system;
- Non-zero probability of a significant (up to the maximum possible 150°C) excess of the standard water temperature.
In cold weather, the supply temperature of the heating main reaches +150 degrees
If metal pipes tolerate overheating and pressure surges well (of course, within reasonable limits), then for polymer pipes deviations from the operating conditions recommended by the manufacturer mean a significant reduction in service life or even instantaneous destruction.
The influence of operating conditions on the durability of polypropylene
approximate price
The average cost of replacing 1 riser in central Russia ranges from 2,500 rubles for plastic pipes without passing through the ceiling , to 5,000 rubles with passing through the ceiling.
Replacing with any metal ones will cost 2,000 - 3,000 rubles more. In Moscow the price is 1.5 - 2 times higher. The approximate cost of work in a simplified form is shown in the table:
| Name of works | Cost, rub. |
| Dismantling the riser | 500 — 1000 |
| Riser installation | 1000 — 2500 |
| Passage of 1st floor | 500 — 800 |
| Passage of the 2nd floor | 500 — 800 |
| Cost of materials | 1000 — 1500 |
| Total: | 3500 — 6600 |
| Additional costs are possible for disconnecting, connecting, crimping the riser, sealing the water meter | At UK prices |
When discussing the final price, you should focus on market prices in the region, and not on the estimate provided by the contractor. The estimate can easily justify a cost that is many times higher than current prices.
A little about technology
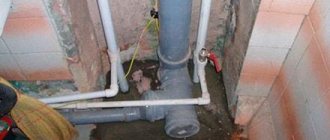
Let's consider the technical aspects of replacing a riser using the example of a sewer pipe, as the most complex. Others are changed according to the same principle: dismantling the old one from top to bottom, from the top floor to the basement, and installing the new one in the reverse order. Completely, i.e. including plumbing fixtures, the cast iron sewer riser is dismantled. in this way (starting from the top floor!):
- They turn off the water in the apartment.
- Remove the toilet with the flush tank. If there are other plumbing fixtures in the toilet, they are also removed.
- Remove the cover from the plumbing fixture (the groove in the wall through which the risers pass).
- The cast iron pipe is cut with a grinder as deep as possible, below 20-30 cm from the entrance to the ceiling. There is no need to touch its pipe leading into the ventilation pipe on the roof: it is too complicated, requires a separate permit, and the lumen of the pipe above the drainage path is free.
- The pipe below the cut is tightly tied with a rope, the other end of which is securely fastened above the cut. If this is not done, then during further work the entire riser may instantly fold like an accordion and fall down, throwing heavy sections of pipes to the sides.
- Release (possibly cut off) the old fastening clamps; there are 1-2 of them in one section.
- Steel wedges (wide chisels, chisels) are inserted into the cut and, one by one, carefully knock them down with a sledgehammer until the pipe breaks.
- The broken section is carefully rocked until it comes out of the fan tee flange and removed.
- Remove the floor covering around the fan tee and the ceiling covering around it on the floor below. If it is not possible to remove it from behind (the fan is close to the wall), remove it as much as possible.
- Remove the seal of the fan tee in the interfloor ceiling.
- They secure the fan tee as before, and carefully, using wedges, separate it from the wall.
- They cut the pipe on the floor below, break it, and remove the fan.
- In this way, the entire riser is dismantled down to the basement. The last section of the pipe is rocked very carefully so as not to break the basement deck.
- They rake out the outlet for the basement deck and prepare it for installation of a plastic riser.
Installation of a riser made of plastic pipes is much simpler: a modern sewer riser is assembled on sockets with standard seals without caulking. Here, firstly, the correct choice of pipes is of greater importance, see below. Secondly, the last (topmost) pipe is cut to size in such a way that it can be slightly tilted, put with a socket on the pipe protruding from the ceiling, pushed up, forward, and inserted with the narrow end into the outlet of the fan tee.
Pipe selection
Generally speaking, if the cast-iron riser is not in emergency condition, its joints are not leaking and it is possible to clean the gap (how is a separate topic), it is better to leave it. Cast iron perfectly absorbs sound. If you still need to change to plastic, then in order to get a quiet sewage system, you need to use noise-absorbing (anti-acoustic) pipes, white with red and green stripes, pos. 1 in Fig. The declared sound absorption coefficient is achieved only if the pipes are secured to the wall with anti-noise clamps, pos. 2. How a plastic anti-noise sewer riser with outlets to devices is constructed is shown in pos. 4; sealing pipes in walls - polyurethane; Ordinary polyurethane foam does not have anti-acoustic properties!
Pipes for internal sewerage and diagram of an anti-noise riser
The best material for internal sewer pipes is PVC. Due to their smoothness, PVC pipes are least susceptible to clogging with solid waste. However, PVC in natural light under the influence of ultraviolet radiation and in soil becomes brittle over time and leaks. Therefore, for local external sewerage (for example, in a country house or in a private house), you need to use red pipes made of stabilized PVC or polypropylene, pos. 3. Gray PVC sewer pipes (item 5) are a budget option: they do not absorb sounds and do not last long in the ground.
The best material for water pipes is soldered (more precisely, welded) polypropylene, it is resistant to light and chemicals, and pressure losses in propylene pipes are less than in steel ones. Modern metal-plastic pipes and fittings for them (item 6) are more reliable than the previous ones, but still, this is an option for the fastest and least costly delivery of the facility. No one has yet come up with fittings that never leak, but soldered propylene, based on foreign chemistry, microbiology and epidemiology, is much more reliable than steel. In these indicators, food-grade stainless steel is slightly superior to propylene, but pipes made from it and working with it are many times more expensive.
Repair of pipes throughout the entire entrance
The most correct and least expensive way is to replace the riser in all apartments connected to it.
This will provide the following benefits:
avoid repeated work in the apartment, with damage to the finishing, when replacing risers from neighbors;- achieve a larger discount, since the contractor will be more interested in receiving a large volume of work;
- obtain a higher-quality pipe connection, without additional elements of transition from plastic pipes to steel ones;
- it is easier to resolve all organizational issues regarding disconnecting the riser;
- involve the management company as an organizer and supervisor of the work if the work will be carried out by a third-party organization;
- responsibility, in case of damage, will no longer lie with one owner, it can be assigned to the management company;
- you will not have to pay for disconnecting and connecting the riser.
Replacing the water supply riser in an apartment: with your own hands or with the help of a team
Hiring professionals to replace the water supply riser in an apartment means:
- saving effort, nerves and time;
- almost always a guarantee of excellent results;
- a considerable price for this type of service.
Attempting to replace the water supply riser yourself:
- significantly cheaper than contractor work;
- will require more time and labor;
- there is no guarantee of quality results.
In other words, when replacing the water supply risers in an apartment, the price can play a significant role in the choice of repair method.
To carry out such a replacement, you will need to take into account the cost of not only materials, but also tools. For example, cutting polypropylene pipes will require the use of a special device. But even if we take into account such expenses, replacing the riser yourself can be more profitable than involving a team of workers; the savings will be especially great if there is a significant amount of work to be done.
Repair through the management company
The most correct option in any case is to contact the Criminal Code in writing, which must conduct an examination and issue a verdict. If she agrees to a replacement, preferably in writing, all that remains is to wait for the actual completion of the work.
Reference! In case of refusal, it can be appealed to the State Housing Inspectorate.
To replace the riser through the management company, but at the expense of the owner, you also need to write to the management company and indicate in the application that you are ready to pay for this work.
In this case, the management company cannot refuse to perform the work, since it is obliged to provide paid services to the owners related to its type of activity. Replacing a riser is just such a service.
Application to the Criminal Code
To replace the riser, you must write an application. The application is written to the manager in free form.
It states:
- Last name, first name, patronymic of the applicant.
- Apartment address and phone number.
- The request itself to replace the riser.
- If it is assumed that the replacement should be made by the management company itself, then it is necessary to indicate the reasons for the malfunction of the water supply riser and the dangerous consequences that may occur due to the malfunction of the riser.
- If the replacement is planned on your own, then the date and time of replacement is indicated to turn off the riser, as well as the possible dismantling of the water meter, and therefore the seals.
Reasons for replacement
Of course, the pipes in the apartment last a long time. Decades pass, and they still seem durable and reliable. In fact, ordinary tap water gradually has a destructive effect on them from the inside.
One type of damage is the formation of rust. It accumulates gradually over many years and destroys the pipes from the inside. Of course, if the operating conditions of water pipes are not met, then rust can also be found on their outside.
Nothing may happen for decades, but at one point rust can completely destroy the strength of the pipe walls.
Another danger is lime deposits inside the riser. Accumulating over many years, sediment on the walls can significantly reduce the internal cross-section of the pipe. In this case, not only its current deteriorates, but also its quality decreases.
In many houses, risers are made of cast iron, which is highly vulnerable to the destructive effects of water. Pipes made from polyvinyl chloride (PVC) are much more reliable in this regard.
Although replacing risers is a relatively expensive operation, it will cost more to pay if a pipe rupture occurs.
Through a third party or individual
You can easily find dozens of offers for riser replacement services on the Internet.
It’s better to choose an organization; it will be easier to ask for quality.
To do this, it is worth concluding an agreement, otherwise you will have to prove the fact that the work was performed by this organization.
But a private owner can do it no less efficiently and cheaper. Here the choice depends on the caution of the owner and the amount of savings.
The management company also needs to write a statement about disconnecting the riser and agree on a replacement. Often the contractor himself does this for the owner. Payment for work should be made after the water supply has been restored and the tightness of the entire riser has been checked.
How does it change on its own?
This is the least desirable option. All responsibility in case of flooding of neighbors will be borne by the owner of the apartment. And perhaps the person who performed the work, if the owner proves that he did not know about the work, or was misled about the qualifications of the contractor.
Attention! If you do not agree on the replacement of the riser, much less notify the management company about this, then administrative liability for interfering with the operation of utility networks is possible.
But there is no direct legislative ban on carrying out work . You have to start the same way, with an application to the Criminal Code. In which it is requested to turn off the riser and it is mandatory, for safety reasons, to carry out pressure testing of the riser by the employees of the management company upon completion of the work.
In this case, there is a chance to share responsibility with the management company. In addition, it is worth pointing out the need to remove the seal from the meter and reseal it. It may be possible without unsealing, but it’s better to warn the Criminal Code.
If you can come to an agreement with the neighbors below and above, then it is better to connect to the old pipe from them.
How and when to change the riser and pipes in an apartment: regulations, at whose expense, features of repair
Reading time: 7 minutes(s) Sewage drains in old multi-story buildings were installed from cast iron pipes. Such a pipeline periodically requires urgent repairs, since with active use it becomes unusable. In addition, replacement of the sewer riser in an apartment is also carried out during major renovations.
Today, there are many sewage systems on the market made from modern materials that have a number of advantages over cast iron. It is for this reason that homeowners prefer to replace cast iron pipes with plastic ones.
When is it necessary to replace the sewer riser in an apartment?
Replacing the sewer riser in a separate apartment is required when:
- The sewer riser is being replaced as planned.
- The sewer pipe leaked and became unusable.
- The tenant or homeowner decided not to wait for leaks and began a major overhaul, including replacing pipes.
Where to go?
Rules for maintaining property in apartment buildings are regulated by the state. The list of state property includes a sewer riser, since the pipe and the outlet from it are the common property of the house.
These rules are specified in the following regulatory documents:
- Government Decree on the maintenance of common property dated August 8, 2006 No. 491.
- Resolution of the State Construction Committee on technical standards. exploitation of housing stock dated September 27 for No. 170.
- Manual on maintenance and repair of common property dated April 2, 2004.
All maintenance, replacement and repair work is carried out by the management company. The owner (tenant) of the apartment just needs to write a statement indicating the reason for the need to repair (replace) the sewer riser.
If the answer is positive, the time for the work will be agreed upon. The owner of the apartment, in turn, must provide access at the agreed time.
Important! Asking to pay for materials or labor when repairing or replacing a sewer riser on the basis that it is located inside the apartment is illegal.
At whose expense is the riser changed?
Since the sewer riser is the property of the management company, its partial replacement or repair is carried out at the expense of the apartment owners.
If the tenants are not such and live in the apartment under a social tenancy agreement, then the owner is the state. In this case, all expenses are covered by the municipal budget.
In addition, the planned replacement of the sewer riser can be financed from the funds that residents pay monthly for major repairs of the house.
If the apartment owner or tenant decides to replace serviceable communications with more modern ones at their own request, then all materials and work are paid for independently.
Such a replacement can be made, for example, during redevelopment or major renovation of an apartment.
Division of areas of responsibility between neighbors
First, it’s worth figuring out who should replace the riser in an apartment in a multi-story building when it wears out.
In Decree of the Government of the Russian Federation No. 354, clause 5 contains a list of elements of the sewer system, which relates to the common property of owner-occupiers.
It includes:
- Risers and branches up to the first butt connection.
- Sewer outlets.
- Cleanings (audits).
- Exhaust (exhaust) pipes.
Important! The riser (i.e. pipes, crosses and tees mounted on a vertical drainage channel) belongs to the area of responsibility of the service company or housing organization, regardless of the type of housing (municipal, state or privatized).
However, there are several nuances here. Housing and communal services have the right to refuse repairs if the tenant does not pay the rent.
The exception is when the situation is emergency and can lead to flooding. But even in this case, the management company can replace the section of the riser with a cross or tee with a smooth pipe, thereby plugging the outlet to the apartment.
If the act states that the defect in the riser is a consequence of its natural wear and tear, all repair costs are borne by the housing and communal services.
If the riser was repaired independently and the management company states in the report that the leak is a consequence of the resident’s intervention in the operation of the building’s utility networks, then all the consequences of the accident and compensation for the flooded neighbors will have to be paid by the owner of the apartment.
If the pipes are replaced independently, all problems associated with their repair are also eliminated by the owner of the apartment.
As for blockages, this is a problem for the management company, since the sewer riser belongs to common property, therefore it is impossible to determine the tenant through whose fault the blockage occurred.
Why can they refuse to replace the riser and pipes?
There are several situations when the management company has the right to refuse to replace the riser in an apartment:
- When the homeowner decides to replace the riser on his own, outside the management company’s work schedule.
- If the applicant has significant debts on utility bills (with the exception of liquidation of an emergency situation). Work can only be completed after full payment of the debt.
- If previously the owner of the apartment changed his part of the riser himself.
Important! Pipe replacement work carried out without the approval and control of the housing and communal services relieves it of responsibility for maintaining this area.
How to make a replacement yourself: sequence of actions
To carry out work on replacing a sewer riser, it is not necessary to involve specialists.
If you have the necessary tools at hand and know the procedure, you can do all the work yourself.
Planning and material selection
In order to replace the riser yourself, you need to acquire:
- Plastic pipes with a diameter of 110 mm.
- Appropriate fastenings (as a rule, simple clamps are used).
- Tees with bends.
- Vertical level.
- Rubber parts (to ensure fastening between the new and old pipe).
- Liquid soap (for smooth insertion of the pipe into the connecting parts).
Important! For installation of a sewer riser, it is better to choose pipes made of polypropylene.
What tools are needed?
You should purchase the necessary tools in advance. To work you will need:
- Hammer. It is used to open interfloor connections.
- Grinder for cutting pipes.
- A section of pipe with fittings.
- Clamps for fastening pipes.
- Hammer, hacksaw, chisel, sharp knife.
- Crowbar, nail puller.
- Sealant and mortar.
Rules for dismantling an old pipe
Before starting work, you need to determine the specific installation location of the riser in the apartment; it may require replacement:
- Pipe sections located between floors.
- Pipes located between the floor and ceiling.
In the first case, coordination with the neighbors is necessary, since some manipulations will have to be carried out in their apartment. However, most often they use the second replacement option; such actions are performed much faster and easier.
When repairing a sewer riser yourself, you need to take into account some organizational points:
- The management company must be notified of the work being carried out, even if the work is carried out at its own expense and independently.
- Neighbors must be notified about the time of work.
- During the manipulations, you will need to turn off the water and ask your neighbors not to use the drain.
To dismantle the old pipe you need to:
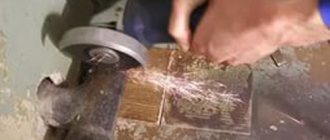
- Measure a distance of 10 cm from the ceiling and 80 cm from the tee. Using a grinder, make several horizontal cuts approximately half the diameter of the pipe.
- Using a chisel and hammer, first hit the upper bridge, and then the lower one. When performing such actions, the cast iron pipe splits and its middle part can be easily dismantled.
- The pipe under the ceiling should be covered with plastic film, after which you can begin to disassemble the lower part of the pipe, where the tees can be placed.
- Using a crowbar and a nail puller, you can loosen the tee fastening. The places where the connection was made with cement are cleared with a hammer drill.
- The remaining pipe cuttings must be prepared for the installation of new pipe elements. To do this, you need to thoroughly clean the ends of the old pipes from any contaminants and treat them with a grinding machine.
If the dismantling work was carried out correctly, then reliable operation of the new riser will be ensured.
Assembly and installation of a new riser
All work on installing a new riser must be performed in a certain sequence:
- You need to put a rubber cuff over the cast-iron piece of pipe, treating the joint with sealant.
- An additional adapter must be installed in the tee located below.
- To accurately measure the riser with the compensator inserted into the tee, you should place it in the position in which it will be located. When cutting a section, you need to retreat no more than five centimeters above the bell and only after accurate measurements can you connect the individual parts into a structure.
- The final stage of installation includes attaching it to the wall using clamps. If this is not done, there will be a risk of it moving downwards, which may cause the entire structure to rupture.
- If it is planned to replace the tee during the pipe replacement process, then the compensator must be installed directly on the tee. If two pipes are used to install a pipe, then the compensator should be installed in the place where they are fixed.
- Regardless of the connection location, sealant treatment is necessary.
In fact, replacing a sewer riser is not that difficult. In this case, attention, accuracy and adherence to the sequence of actions are important.
Difficulties in replacing pipes between floors
When a sewer coupling is destroyed, the repair consists of replacing the section of pipe between the ceilings. For this you will need:
- Compensating pipe.
- A straight pipe (or several pipes) with a total length slightly less than or equal to the length of the section to be replaced.
Important! Plastic pipes can be installed in a gap in a cast iron riser. To properly combine them, you need to clean the rough surface of the cast-iron pipe from rust and paint layers using a wire brush or a sharp knife. Replacing a section of a riser made of plastic with cast iron pipes is impossible.
Action plan:
- Cut the sewer riser in two places and remove the cut section.
- Disassemble the socket connections.
- Place the compensator onto the top tube.
- Insert a straight pipe into the lower socket.
- Place the compensator into the pipe socket.
- Securely secure the necks with clamps.
When the lower bell is located in the ceiling, you don’t have to open it. It is enough to add a sewer coupling to the list of necessary materials.
After dismantling the defective area, it is put on the lower part of the pipe with a previously chamfered. Further manipulations are identical to those described above.
Review of emerging problems and solutions
There are reasons that contribute to repair work on a sewer riser.
Bell leak
A typical problem that arises when a cast iron riser is installed is the destruction of the socket by the mass of the pipe resting on it.
This problem can be solved in two ways:
- Installation of a rubber band. The bandage can be a rubber bandage purchased at a pharmacy or a cut bicycle inner tube. The bandage is installed as follows: the rubber is wound around the defective area, extending 10-15 cm onto the pipe. The bandage itself is tied with a knitting wire.
- Replacing a section of pipe with a socket. The procedure is the same as for replacing the riser between the floors.
Leak in the ceiling
Often the cause of a leak in the ceiling is the subsidence of the lower cast iron pipe under the influence of its own weight.
During the process of subsidence, the upper pipe partially or completely leaves the socket of the lower one, and when the riser is filled with drains coming from the ceiling, it begins to flow.
A sign of such a problem is an unpainted strip of cast iron on the riser near the ceiling.
The reason for the subsidence is due to poor-quality sealing of the technological hole in the ceiling.
The problem is solved like this:
- A clamp made of thick wire or rope is placed on the riser.
- A support made of timber, boards or other material is constructed on the floor of the bathroom.
- Next, the lever principle is used: the pipe or crowbar rests on a support made of timber and is placed under the clamp.
- The pipe is then secured to the wall with clamps. For temporary fixation, you can use wooden wedges driven into the lower socket.
- Next, the socket is re-embossed with an oil seal or cap and sealed with cement mortar.
Blockage
If the water level in the toilet rises when the taps are closed, this is a sign of a clogged sewer riser.
To clean the riser, use:
- For a larger distance, use a special sewer wire.
- At a small (2-3 meters) distance from the inspection to the blockage, use a cable.
The task is to gain access to the nearest tee or revision located above the blockage.
Important! It is not recommended to clean the riser from the bottom up, since when cleaning the sewage will cover everything around with a layer of substance.
It is better to clean the sewer riser together. While one person pulls the wire or cable and rotates the handle, the second person delivers the necessary tool to the blockage. When the water goes away, it is necessary to continue to rotate the cable on the way back.
Replacing a sewer riser is done quite rarely and does not pose a problem. However, if you lack experience, it is better to use the services of professionals, then the quality of work will be guaranteed to be high.
Did this article help you? We would be grateful for your rating:
2 0
Materials and tools
The easiest way is to replace any pipes with polypropylene ones, especially since you can even purchase pipes with a pressure of 25 bar for high-rise buildings. Most often this is what they do.
Tools for dismantling will be needed:
- angle grinder (grinder) with a cutting wheel for metal;
- small sledgehammer 3-5 kg;
- locksmith's key number 2-3;
- hammer drill or electric hammer.
For installation you need to prepare the following tools and materials:
- soldering kit for plastic pipes with scissors;
- tee for connecting an apartment;
- faucet for soldering to plastic, with the transition to residential wiring, taking into account the material of the internal water supply pipes;
- 2 transition elements for connecting a plastic pipe to a steel pipe (more about them below);
- 4 meters of pipe (2x2), taking into account the thickness of the ceiling and the approach to neighbors of 20 cm;
- wall mounting clamps;
- die for cutting threads on an old steel pipe
- 2 bends complete with couplings and locknuts if the threaded option is selected.
We recommend an article on the topic
Details about cold water pipes - what material to choose, how to determine the diameter and when is replacement needed?
Before purchasing materials, you need to think about how plastic pipes will be connected to steel ones, as well as how to connect the apartment. These are the most crucial and difficult moments in replacing the riser.
If the metal of the pipe is in good condition, then the best way is to cut a thread, then install the pipe on a coupling with a lock nut and connect it to the pipe with an adapter plastic coupling with an internal thread.
Such a connection can be serviced, and in the event of a leak, disassembled and repacked. Some contractors immediately screw the coupling onto the threads, guaranteeing that there will be no leaks. As a result, you still have to redo it, and relations with neighbors will be ruined.
Advice! You can cut threads on a pipe using grapple. You can do without a special key by turning it with a plumbing (gas) wrench. The Krupp has a guide skirt, so a reliable thread is obtained.
If the metal is severely corroded and there is doubt about the quality of the thread, then GEBO fittings are installed, specially designed for such a connection.
The pipes should be approximately equal in diameter . It is possible to use crimp clamps consisting of two halves with 4 bolts.
In this case, it is also important that both pipes are approximately the same diameter, and a rubber band is applied at the crimping point, which should compress the clamp. This method is the least reliable of all three.
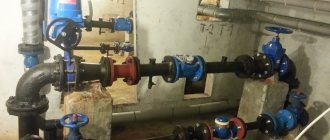
When choosing a tee and a tap, you should think carefully, or better yet, pre-assemble a sequential chain: tee, tap, suitable threaded connection to the outlet to the apartment.
Stages of self-replacement of a water supply riser in an apartment
1. Organizational preparation
If your apartment is located in a multi-storey building, then you:
- use the building's water supply system. She is responsible for providing water to all residents;
- must be aware that replacing the riser will certainly affect the residents closest to you;
- Without the participation of the housing office or management organization, you are not able to create the conditions required to replace the water supply riser.
Therefore, you need to fill out an application in advance with the HOA or Housing Office, where you need to ask to turn off the water at the entrance. This is possible, but this procedure is paid. Neighbors will be notified that the water supply system will be turned off.
In addition, when replacing you must:
- coordinate your actions with the owners of apartments on the floors below and above, since when dismantling old water supply structures you will definitely break the ceilings;
- try to identify the problem of collective change of all entrance risers, which will require the participation of all residents in the entrance.
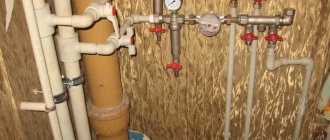
2. Materials and equipment used to replace the water supply riser in the bathroom
After all issues with the housing office, management company and neighboring apartments have been resolved, it is necessary to begin creating a scheme for replacing water supply elements. This will help plan the pipe layout in the room and calculate the exact costs of materials.
To perform the operation you need to stock up on the following:
- pipes with a diameter of 32 mm (polypropylene);
- similar size fittings;
- sealing material (silicone is better);
- metal clamps.
Water supply pipes for vertical installation are selected to the width that corresponds to the diameter of the structures being dismantled.
To connect the riser segments, couplings with a diameter of 25 or 32 mm are used (depending on the selected pipe size), as well as compensators of the same width. Polymer pipes are connected to the steel part of the vertical water supply using cuffs.
At the same time, you will need to determine how the final finishing of the water supply riser will be carried out, consider issues of heat and sound insulation, options for the structural part of the duct and its appearance.
Required tools:
- Bulgarian;
- cutting discs with a diameter of 125 mm (from 3 to 4 pcs.);
- thread cutting equipment;
- keys (adjustable and gas);
- level;
- crowbar (used as a lever);
- pencil;
- chisel;
- roulette;
- different screwdrivers;
- hammer.
You also need to take care of protective equipment in advance - a respirator; special glasses that do not allow dust to enter the eyes; gloves that protect against exposure to different temperatures; cap - from dust.
3. Dismantling old water supply structures
The work carried out to dismantle the old steel vertical pipe that served for water supply is a plumbing project of a high level of complexity. To do this, you need to have the necessary qualifications and be able to handle power tools, as well as strictly adhere to safety standards.
The first thing that is necessary is to shut off the entire water supply system and drain the remaining water from it. This operation is performed by a responsible person from the Housing Office. Otherwise, there is a chance of running into an administrative fine.
Using a grinder or a special device (pipe cutter), old rusty pipes are cut. To do this, you need to make 2 cuts horizontally (the gap between them should be 10 to 15 cm). The cuts should meet at the edge of the pipe (the one closest to the wall). To prevent subsidence of the top of the pipe, such cuts are not initially made completely.
The upper pipe segment is cut in accordance with the design height, which should be the same as the length of the part to be pressed. The purpose of this operation is to ensure that the immediate axis of the pipe is perpendicular to the plane of the cut.
The manipulation can be simplified if you use masking tape as a guide. Its strip is glued around the circumference - the end of the tape must exactly match the beginning.
To get rid of the lower segment of the water supply riser, the pipe is carefully shaken - it is important not to deform the socket itself. The joint mortar is hammered around the perimeter, and the pipe cuttings are removed with a crowbar or wedge.
Previously, cast iron pipes were connected using 2 methods:
- suture embossing using a solution of sand and cement;
- sulfur filling of joints.
Hardened cement is removed with a screwdriver. The simplest way to burn off sulfur is to heat the communications with a blowtorch.
The cut pieces are hooked with a screwdriver and carefully removed from the ceilings. Stuck elements will need to be knocked out with a hammer. Then the required area is cleaned, points are marked on it for fixing the clips - they are the ones that fasten the pipes in the walls at the distribution points.
4. Connecting a new water supply
Using a hacksaw, the pipes are cut into segments of the required length. The connected areas are marked with marks that will tell you where the limiting connection point is located.
If there are old metal water supply risers in nearby apartments, you will need to assess their condition. Thanks to this, you can find out whether it is necessary to cut a thread on the end of a metal structure. To make this easier, machine oil is applied to the end of such a pipe.
If the metal structure is very dilapidated and there is a danger that it may not withstand the threading process, it is better to simply weld a pre-supplied thread to it (from 5 to 7 turns). Alternatively, the connection can be made using a collet coupling.
Next, an adapter coupling with a ready-made thread for installing a plastic pipeline is attached to it.
The connection between metal and plastic is also carried out through a thread using a coupling, and the screwing should not be excessively strong. For this purpose, the pipe connection points are filled with tow and a special paste is applied. Before attaching the connecting adapter to the cast iron pipe, you will need to treat this area with sealant.
Plastic parts are much easier to fit together. The joints are cleaned and then wiped with alcohol. Next, both the end of the pipe and the fitting element are put on the preheated apparatus at once, then both of them are screwed to the full depth of the nozzles. The fitting and the end of the pipe must warm up well, then the workpieces are removed and interlocked.
5. Nuances of connecting to the wiring
At the point of attachment of the apartment wiring and the vertical pipeline, a tee is installed, the dimensions of which should be 32 * 20 * 32 mm. To facilitate its installation, liquid soap is applied to the end of the tee. All elements are sealed.
Attention: it is advisable to install tees not using couplings, but by soldering.
After installing the shut-off valve, you will need to find out if there are any leaks. If it is missing, the structure is attached to the wall; a level is used to position it correctly. Before fastening, mark the locations for the holes into which the clips will then be inserted. The distance between fasteners should be from 100 to 150 cm.
After all fastening work is completed, water supply can be carried out after approximately 60 minutes. To ensure a sufficient degree of waterproofness and sound insulation where pipes pass through the ceilings, these places are covered with concrete to the full thickness. Finishing and other work is carried out only when the entire structure has been thoroughly tested.
Step-by-step instructions for changing
Replacement of the riser is carried out in the following order:
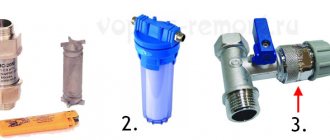
Open and do not close any water tap to drain. Make sure the riser is turned off and there is no water in it.- Disassemble the cold water supply unit into the apartment from the tap to the coarse filter following it, if possible without removing the meter. Secure the disconnected water supply so as not to damage its elements.
- Cut out the old riser inside your apartment, leaving 15-20 cm of pipe at the top and bottom to knock the pipe out of the ceiling.
- Cut out 15 cm of old pipe from the neighbors below near the ceiling, and from the neighbors above near the floor, so that you can remove the rest of the pipe from the ceiling.
- In your apartment, use a sledgehammer to knock out an old pipe from the ceiling. If it is not possible to knock it out, then use a hammer drill to hollow out the concrete around the pipe until it becomes mobile, and then knock it out again. There should be a second partner below who controls the exit of the pipe so that if it falls, it does not cause damage to the property of neighbors.
- Install fasteners for new plastic pipes in increments of no more than 40-50 cm, otherwise the pipes may bend and a leak will appear at the soldering site. This is typical for hot water, but it is also possible with cold water.
- Solder a tap into the tee to connect the apartment. You will need a piece of pipe for the transition of a smaller diameter. A tap with a tee is connected to the apartment water supply. This will allow you to accurately determine the location of the tee.
- Cut threads on the remaining old steel pipes using grapple. If this is not possible, move on to the second option, with GEBO fittings.
- Assemble the unit : screw the drive with a steel coupling and lock nut into a plastic coupling with an internal metal thread. Attach the squeegee to the old riser with a cut thread and connect them with a coupling. This is necessary to accurately measure the length of the plastic pipe and determine where to cut it.
- Insert new pipes into the holes in the ceiling and solder them into the tee. Fasten to the wall with clamps.
- Cut plastic pipes at the top and bottom at the level of the edge of the plastic coupling, taking into account the length of the inserted end of the pipe into the coupling when soldering.
- Remove the squeegee and the plastic coupling from the squeegee and solder the coupling to the plastic pipe. Then screw the squeegee into the plastic coupling. Screw a locknut and a steel coupling onto the drive. All threaded connections are sealed using sealant or fum tape.
- Attach the squeegee to the old threaded riser and connect them with a steel coupling. Lock the coupling with a locknut or install GEBO fittings. These operations are performed for both connections.
- Connect the internal water supply to the tap soldered into the tee. To eliminate the gap, you can use steel inserts from a bend or double-sided thread.
- Invite management company employees to accept work and supply water to the riser.
- Turn on the riser to pressurize the mounted section of the riser with operating pressure. Why does one person open the tap at the bottom of the riser, and the second must monitor the presence of leaks. If a leak appears, give a signal to close the riser, then repack the current connections.
Attention! If there are no leaks, the work is considered completed.
Sewerage
The next most difficult task is replacing the sewer riser. Firstly, technically, because sewer risers do not have shut-off valves as such (see below); A water seal (siphon) is not a valve. Secondly, organizationally. To tear out a pipe or fan cross (tee) from the ceiling, you will have to seriously damage the floor and ceiling of yourself and your neighbors, which both legally and humanly requires compensation. As well as the inconvenience: if your neighbors, like you, suddenly get a stomach ache during work, they will have to urgently run somewhere. By the way, in such a case, the optimal solution is to rent a dry closet and place it in a common corridor or on the landing, depending on the layout of the building.
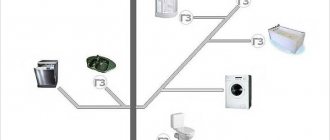
We’ll talk about the technical aspects of replacing the sewer riser later, but the following figure will help you understand what kind of organizational problems you can expect here:
Location of sewerage and water supply risers
The sewer riser itself is its pipes (1a) and drain tees 1b. The latter cannot be replaced without disturbing the finish of the floors/ceilings and without depriving neighbors of amenities. In general, cast iron for sewerage is good for everyone: it does not corrode, it only becomes covered with deposits from the inside from wastewater, and has excellent anti-acoustic properties. The fragility of cast iron is important for fairly long parts, but for a tee actually embedded in the ceiling and connected to light, elastic and elastic plastic pipes, it is insignificant.
Here the following option for organizing work is possible: after removing the top pipe (see below), an inspection of the tee is made. If the old cast iron fan tee is still intact, without cracks, and strong, its clearance is expanded by treating it with “Mole” or another sewer cleaner and only the pipes are replaced. This is how they go from top to basement: transitions from plastic to cast iron can be made quite reliable. In this case, if experienced, skillful and not lazy craftsmen work, each apartment is deprived of the opportunity to use the toilet for a maximum of an hour and a half, and the capacity of the riser will not decrease. True, the neighbor above may significantly disturb you or the workers if he decides to use plumbing fixtures during the replacement. It is legally impossible to hold him accountable for this - it is a vital necessity.
The outlet from the fan to the toilet 1c also refers to the sewer riser not only formally, but also technically: it is impossible to replace the riser pipes without removing the toilets with flush tanks. Here, in order to get rid of the emergence of sudden and very acute organizational issues during the work, you need to come to an agreement with your neighbors in advance, make an audit - whose toilet mounting is rusty, stuck, or generally unreliable, and prepare everything necessary to secure the toilets properly when replacing the riser . As for apartment sun loungers 1d with outlets for a bathtub, washbasin, sink, then technically this is definitely not a riser (although formally it is one), because You can work on sewer lines in an apartment without disturbing your neighbors at all.
Note: the most difficult and responsible work, if the installation of a sewer riser is carried out with transitions from cast iron to plastic, is the caulking of fan tees/crosses. How to do it, see video tutorial: