In small settlements there is no general sewerage system. At the same time, the need for safe collection of sewage in a suburban area plays an important role. Do you agree? A well-equipped drainage pit in a private house will perfectly cope with the duties of receiving and partially disposing of wastewater.
But is it capable of providing comfort and epidemiological safety to household members? How to make sure that the hole does not cause trouble? It is worthwhile to thoroughly understand these issues before deciding to install such a system.
We will also discuss solutions to the problem of wastewater in a suburban area and talk about how to build a cesspool yourself and what you will need for this. The article contains expert advice, photo and video materials that help to better understand the arrangement of a sewerage point on the site.
Sump volume
Homeowners need to decide in advance (before choosing the type of cesspool) how to make a drainage pit of sufficient volume. Its required capacity is calculated by the formula:
V=Nday•Hperson•Vday/person
Wherein:
- V – design volume of the cesspool, m3;
- Ndn – number of days of operation of the pit for accumulation (before pumping out);
- Khchel – number of permanent household members;
- Vday/person – daily water consumption for one household, l.
For example, for a private household with permanent residence of 5 people, cleaning the cesspool once a month and water consumption of 150 l/person, the volume of the cesspool will be: V=30•5•150=22.5 m3.
We increase the resulting volume by at least 10% (filling the pit to the top is prohibited by regulations) and obtain the cesspool volume: V=22.5+22.5•0.1=24.75 m3. Let’s round the value to 25 m3 – more is better than less.
The correct value of daily water consumption depends on the needs of household members for bathing and washing, i.e. from their daily habits. According to statistics, city dwellers use more water than villagers.
You can, of course, prepare a bulk septic tank, calculating its cleaning once every two months. But a sewage tank truck does not accept more than 11 cubic meters
It is not worth digging a cesspool deeper than 3 m. Its bottom should not be in direct contact with the groundwater horizon; according to standards, it must be at least 1 m above their level. Let’s assume that in the spring-autumn rainy season the perched water is at a depth of 3.5 m. This means that the depth of the drainage pit can be no more than 2.5 m.
Since laying the walls of a rectangular cube is easier than that of a round tank, a rectangular cesspool will be considered. But a round septic tank is more reliable in operation, since the soil pressure on its walls is significantly lower.
Volume is calculated by multiplying the sides of a cube. We determine the long side (width) according to the future location of the cesspool, taking into account the convenient access of a sewage disposal truck. Let the width be 5 m. Then the length will be 25:2:5=2.5 m.
There is no need to get too carried away with the capacity of the drain pit. The capacity of the sludge tank, as a rule, does not exceed 10 m3. This means that such special transport is not capable of emptying an overflowing sewer bunker of a larger volume (as in the example above) and removing waste in one go.
It is more rational to arrange a cesspool with a volume of up to 10 m3 and empty it every two weeks. After all, a large sewer bunker will take away useful space on a suburban area, which can be used for something no less important.
Image gallery
Photo from
Drainage pit made of concrete rings with waterproofing
Factory-produced concrete storage tank
Drain pit with brick walls
Plastic containers for constructing drainage pits
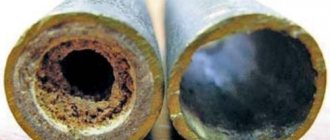
Features of operation
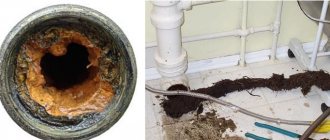
To use an autonomous sewer system calmly and without problems, it is not enough to know how to make a drainage hole in a private house. You need to use it correctly. Simply pumping it out as it fills is not enough, since over time the bottom and walls of the structure become silted and covered with fatty deposits. This is especially undesirable for filter-type storage tanks, since water from them stops seeping into the ground. And the likelihood of an unpleasant odor in this situation greatly increases.
This problem is solved with the help of special preparations with live bacteria that process sewage. These are powders or liquid compositions that are added to the pit according to the instructions. As a rule, they are poured through the toilet.
Note! Carefully study the instructions for compatibility of the drug with household chemicals. Some washing powders and other chemicals have a detrimental effect on bacteria.
Preparations with bacteria for cesspools and septic tanks Source i.ytimg.com
Old deposits in a pit can only be removed mechanically, scraping them from the bottom and walls or knocking them down with a powerful pressure of water.
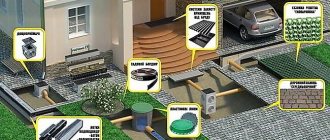
Local sewerage system with wastewater treatment
For a cottage equipped with modern plumbing equipment - a bathtub, toilet and bidet - a bunker-type sewer storage tank will not be enough.
A wastewater treatment complex will allow minimizing calls to specialists with treatment equipment, completely covering the need for sewerage, and avoiding local problems with soil contamination with sewage.
The principle of clarification (purification) of household wastewater through a system of drainage pipes is based on the natural order of filtration of fecal waste, which “works” in nature. Through the riser in the house, wastewater flows into a pipeline connecting the cottage and the septic tank. Sufficient volume of the sewer well is 2.5 m3.
When planning the landscape of a suburban area, we must not forget about the need to clean the septic tank. The car may not pass, and its hoses are not long enough
In such a storage tank, household wastewater is clarified with the precipitation of suspended matter. You will need to hire a sludge sucker with a team to clean the sludge deposited in the septic tank twice a year.
Self-cleaning with neutralization of sediments in a specially designed compost bin is also acceptable (see below). Clarified sewage water is sent to the drainage network, from where it goes into the ground.
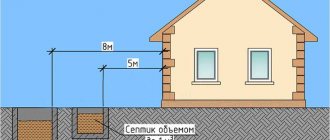
The drainage pit is located at a distance of 5-20 m from the house. The main requirement for the location and positioning of the drainage network is a sufficient distance from the building so that the wastewater entering the ground does not wash away the foundation or flood the cellar.
From the sewer settling tank, the clarified waste stream moves first into a distribution well, then from it into a system of perforated drainage pipes made of polymer or asbestos cement.
Drainage pipes are laid at a depth of at least half a meter, actually at the level of development of the soil-vegetative layer. If the soil developed on sandy soil, then the length of the drains is calculated taking into account 10 m per person.
In soil with a sandy loam base, the length of the perforated pipe should reach 14 - 17 m, with a loamy base about 20 m.
For filtration in natural conditions, in the ground, of sewage, a two-chamber or three-chamber bunker is not necessary. A single-chamber drive will do if it is built correctly (+)
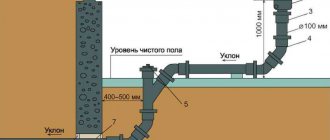
Sewage pipes from the well to the accumulation or discharge point should be placed with a slope of 0.02, i.e. There should be 2 cm of inclination per linear meter. It is desirable that the main part of the pipeline is laid below the frost depth noted in the region.
Areas located above the specified mark are thermally insulated with detachable cylindrical insulation made of polystyrene foam, polyurethane foam, polyethylene or slag backfill.
Laying a channel of 100-150 mm pipe that drains sewage water into a storage pit is carried out at least 50 mm above the distribution well with pipe routing through which clarified wastewater is directed to sealed drainage pipes.
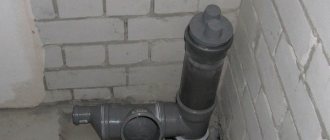
The pipeline enters and exits into the pit through tees of 100 mm diameter. Their upper ends must be left open, with cleaning pipes placed above them, having an equal cross-section with the trays supplying and discharging waste.
There is a gap of 50 mm between the open end of the tee and each cleaning pipe. Sewage pipes made of polyvinyl chloride or polyethylene are used, the diameter of which is 100-150 mm.
One distribution well in a ground wastewater treatment complex is not enough. You will need at least two of these
A pipe is attached to the lower end of each tee. It must be brought 400 mm below the calculated water level in the drain hopper.
All components of the drainage pit, together with the ground filtration system, require ventilation. This function is assigned to the sewer riser inside the house, the upper end of which is located above the roof level, the cesspool itself and each sewer pipe.
The pipeline from the distribution well to the drains laid in sandy soil is carried out with a slope of 3 mm, in sandy loam 2 mm, in loamy 1 mm
In trenches dug under the filter system, pipes are laid with the perforation down. The joints of drainage sewer pipes are insulated with roofing felt, tape, simply polyethylene or a similar material.
Drainage sewer complex
It is better to make the body of the wells, which contain the wiring elements of the drainage system intended for collecting and discharging groundwater, round. When making their walls from brick, a 400 mm internal diameter of the circle is convenient, from concrete – a 700 mm diameter.
The distribution well is not built higher than 400 mm, otherwise it will be inconvenient to work with the wiring inside it. Brick walls must be plastered and iron-clad from the inside. From the outside, it is permissible to waterproof them with clay or bitumen coating.
The necks of all distribution wells must be covered with covers made of reinforced concrete, plastic or tarred boards. A heat insulator is laid on top - slab polystyrene foam with a 200-400 mm layer of surface soil filling.
The channel cross-section for laying drains cannot be chosen arbitrarily. The operation of the filtration system depends on this
According to the direction of the drains, the wells are equipped with one-, two- and three-sided water intake outlets - open pipe outlets closed by vertical stroke gate valves. Wooden gates will be needed to regulate the water supply and when repairing the well.
At the bottom of water distribution wells, open concrete trays are formed, leading from the supply pipe to the receiving drainage pipes. The height of the trays should be equal to the diameter of the largest pipe entering the well. Their bottom is brought to the level of the lower wall of the pipes.
In polymer drainage pipes (their lower part), slots are cut 15 mm wide, with a height of approximately half the diameter of the pipe. Cuts with a pitch of 1000 mm will ensure uniform flow of clarified drain water into the ground.
The bottom of the drainage trenches is given a trapezoidal shape. They contain a 100-150 mm layer of gravel or crushed stone with a grain size of 15-25 mm. In principle, the thicker the underlying layer of crushed stone (gravel), the better the filtration of wastewater will be.
After giving the specified slope to the surface of the fill, drainage pipes are placed on it. Gravel or crushed stone is poured on top of them in a 50 mm layer, then the soil is level with the soil level.
The drains should not be connected to each other. The movement of waste water into them is carried out only through distribution wells
The distance between the septic tank and distribution wells depends on the type of soil on the site. The required number of wells from which parallel drains are drawn is two or more.
Characteristics of the wastewater filtration complex depending on the type of soil:
- Sand . Two drains, each 18 m long, with a 1.5 m intermediate distance between them. Filtration field area – 70 m2;
- Sandy loam . Five drains, each 19 m long, the step between them is 2.5 m. The area of the filtration field is 231 m2;
- Light loam . Seven drains are 18.5 m long, with a 3 m distance between them. The area of the filtration field is 495 m2.
To prevent the formation of air pockets in the drainage pipes and to remove the methane inherent in the wastewater treatment process, the drainage system will require an air flow. At the end of each drain, it is necessary to build a riser from a pipe of 100 mm diameter, raising it 400-500 mm above the ground.
Recommendations
How to choose a fecal pump with a grinder for cesspools: detailed description, properties Read about plastic entrance doors in this article
Let's learn about the advantages and disadvantages of commercial linoleum here
Neutralization of sediment from a septic tank
When you clean out the drainage pit yourself and try to place sewer sludge on top of the ground, the result is the same - an abundance of flies and infections among household members. Waste can and should be converted into compost, completely disinfecting it from microbes.
Having chosen a place - 15 m from the house, 25-30 m from the well - you need to dig a hole half a meter deep and of the required size. Its pit is waterproofed with crumpled clay in a 200-300 mm layer, concreted or lined with bricks with the sides raised above the ground surface.
Sides are required - the sewage collected in the compost pit should not penetrate into the soil and contaminate it. To completely eliminate moisture exchange, cement mortar is applied to the walls of the pit, followed by ironing. It is also useful to coat the surface with bitumen.
The bottom of the compost pit is sprinkled with a 150 mm layer of peat or dry soil, and waste is placed on top. Having increased the layer of sewer sludge to 250-300 mm, you need to cover it with a 100-150 mm layer of peat or dry soil.
Having raised the compost heap to a height of 1000 mm above the ground in a layer-by-layer manner, you need to fill it completely with earth or peat 150-200 mm thick and leave it for 8 months to mature.
If, during the process of filling a compost pit, you sprinkle the layers of waste with a small amount of ash and pour a little water on them, then the compost will ripen faster and of better quality.