Installing and connecting a sink in the kitchen seems like nothing could be easier. However, this impression is deceptive. You can feel this as soon as you start connecting the sink in the kitchen yourself. It is then that a lot of questions arise and various nuances emerge.
Scheme for installing a sink into a countertop.
Today, there are several types of kitchen sinks in use, which differ in installation method and have different uses. Connecting a sink is also individual, but there are still general rules.
Main types of sinks and installation methods
The modern market of plumbing fixtures offers a large selection of sinks for the kitchen. They have different installation options and are made from different materials:
- stainless steel;
- stone;
- ceramics.
According to the installation method, the following types are distinguished:
- overhead - mounted directly on top of the cabinet, instead of the countertop. This option is the easiest to install with a modular kitchen design. Overhead models are almost never used for solid countertops, so as not to create a gap between the cabinets;
- mortise - a common option for the kitchen, suitable for installation in countertops or cabinets. In the first case, you will need to cut a hole for the sink of the required size;
- integrated - the sink and the cabinet are a single whole, this method is used during the manufacture of the set;
- under-table - a modern installation option in which the sink will be slightly lower than the countertop. The ends of the working area are under constant exposure to water, so you need to choose moisture-resistant materials; MDF and chipboard are not suitable; glass or stone are preferable.
The kitchen must be ergonomic so that it can be used quickly and comfortably. When installing a sink, you need to take into account that the distance from it to the refrigerator and stove should be at least 40 cm; a similar rule applies to the hob and refrigerator.
For right-handers, it is better to place the sink on the right and the dryer on the left. The sink must be located in close proximity to the water supply and sewerage system.
When choosing a sink, you need to consider several important features:
- capacity, which determines the number and size of dishes in the house that will be used most often;
- functionality, which is characterized by the work carried out in the kitchen. For example, you can buy and install a sink with several bowls, with wings, drainage and other accessories. Such elements will simplify work if cooking, washing dishes and other activities are carried out very often;
- ease of use - this depends on individual characteristics; the owner should be comfortable using the product;
- wear resistance - determined by the materials of the sink;
- combination with the style of the kitchen.
To perform high-quality installation work with your own hands, you should understand the basic rules and errors of installation, the stages of work for different types of installation.
Installation process
If you do the work yourself, it is easier to break the whole process into two stages, since each of them is carried out separately. This makes it easier to understand the connection - the instructions on how to assemble a sink in the kitchen prescribe a certain sequence of actions.
Mixer connection
The work depends on the type of installation of the system - a wall-mounted kitchen sink can be equipped with a wall structure, and this requires preliminary connection of communications directly to the connection point.
For standard options, work is carried out as follows:
- First of all, the product is unpacked, most often the mixer is delivered assembled, but sometimes you may need to attach the valves using the screws supplied. It is also necessary to check the presence of all seals that should be included in the kit.
Modern products are delivered assembled, which greatly simplifies the work.
- Next, the system is attached to the sink, and there must be a sealing element both above and below that will prevent water from leaking during operation . Fastening can be implemented in several ways - either with a large nut, or using one or two threaded rods - the instructions included in the kit will help you understand the work - everything is very simple and clear.
Option using a special clamping nut
- The next stage is attaching the flexible line; its length should be sufficient so that it is not stretched, but with a small margin . There must be rubber washers under the union nuts, and the thread itself is additionally sealed with Unipak. If there is not enough space under the sink, then you should connect the hose to the faucet first.
Important! It is not recommended to use fum tape for sealing in these places, as it does not tolerate constant exposure to hot water.
- Lastly, the system is connected to the water supply, after which its tightness is checked.
After finishing work, carefully inspect all connections.
Drain system
There may also be different options - a wall-hung kitchen sink requires the installation of a hidden siphon, most often it is simply hidden in a niche in the wall.
Standard options are assembled as follows:
Built-in siphons are supplied as a pre-assembled unit
- First of all, the outlet for the kitchen sink is attached to the structure; it must be sealed on both sides with rubber rings for tightness.
It doesn’t matter what kind of kitchen sink you have - you can connect it with your own hands
- Next, the water seal is assembled and connected to the drain using a union nut, which must also be sealed with a ring.
- Lastly, the structure is connected to the sewer system and checked for leaks.
Grids and cutting boards – these kitchen sink accessories will enhance your ambience
Of course, when it comes to such a group of equipment as kitchen plumbing, the sink is the most important part of the system, which should be given very close attention.
Rules for installing kitchen sinks
When deciding on the method of installing a sink in the kitchen, you need to understand that you will be able to do the work yourself with an overhead or mortise option. Other models require not only specific knowledge and skills, but also additional tools. Before starting work, a siphon for water drainage, a mixer are installed, and all materials and tools are prepared.
During installation, it is important to consider additional rules:
- The sink divides the workspace into 2 zones. On one they carry out dirty work, on the second they carry out clean work;
- the sink should be placed close to the work area to simplify the process of cleaning, cutting and other actions;
- you need to use the “golden triangle” rule - place the sink at a standard distance from the refrigerator, stove and other appliances;
- the height of the sides of the bowl should be level with the cutting part, the standard size is 82–86 cm;
- be sure to use a level when placing the sink to prevent distortion and align it strictly horizontally;
- installation is possible only after installing water pipes and sewerage;
- the brackets must tightly fix the plumbing fixtures, eliminating any backlash;
- all water supply hoses must be placed freely, without fractures or bends;
- you can install the sink opposite the window;
- if the kit includes rubber seals, it is better to use sealant instead, this will increase the service life and tightness of the structure;
- Stone sinks are best installed by two people due to their heavy weight.
In fact, plumbing fixtures are placed next to water and sewer pipes. This is done in one of the corners of the kitchen or on a certain wall. Modern materials and installation methods make it possible to install the product anywhere in the room. The choice of installation type depends on the individual preferences of the owners and the style of the kitchen.
To install overhead models yourself, you do not need professional tools. If a mortise type is used, then you need to prepare in advance:
- drill and drill bits of different diameters;
- screwdrivers;
- tape measure, ruler and pencil;
- sealant, sealant;
- hacksaw or jigsaw.
Now you can begin the actual installation work.
Tools for installing a kitchen sink
Before you start, check that you have all the tools. To attach the overhead model, all you need is a screwdriver and fasteners, which are sold along with the bowl.
To install a built-in sink, the list of tools is larger. You will need:
- Drill.
- Electric jigsaw. For beginners, we recommend a sample with a laser sight. It will help you make the cut as clearly and evenly as possible.
- Screwdriver. Do not use a screwdriver to avoid over-tightening the fastener and damaging the materials.
- Sandpaper.
A self-adhesive rubber seal, a pencil, a ruler and silicone sealant are needed to work with both types of sinks. Many stainless steel models have sharp, raw edges. To avoid cutting yourself, wear construction gloves.
Assembling the sink, faucet and siphon
The easiest way to install is with the sink assembled with a faucet, hoses and siphon. The assembly of the structure is carried out according to the following scheme.
- Initially, a pin is placed on the faucet and secured with a nut; these elements are always included in the kit.
- Hoses are connected to the mixer. The short needle is connected first, then the long one. They are screwed in by hand and tightened with a wrench with medium force to prevent damage to the gasket.
- The hoses are passed into the hole on the sink, the mixer itself is inserted using a moon-shaped gasket, everything is secured with a nut clamp.
- Next, the siphon is assembled and connected. At this stage, it is enough to secure the drain and overflow parts.
Having assembled the main parts, you can begin installing the sink into a cabinet or countertop.
Fittings and mixer
Diagram of a kitchen faucet.
The best quality mixer is with a swing lever and a ball valve. When purchasing it, you should make sure that the faceted areas of the threaded fittings of the supply flexible tubes (chenok) are placed at different levels.
Henks are more durable (it is best to use metal-plastic options), however, installing a mixer with their help is only possible in a pre-hung sink, which is inconvenient. Henkey made of plastic with a woven fabric covering can be pulled out through the gap under the sink and connected to the light.
Installation of an overhead sink
Such models are most often made of stainless steel. On either side of the sink there are curved edges that match the thickness of the cabinet slide. To simplify fastening, a frame made of wooden blocks is often placed in the middle. If the cabinet is of standard sizes, then there are no difficulties with the entire procedure, but, depending on the type of sink, there are several installation options.
Glue mounting
The installation scheme is the simplest, even beginners can handle it. The sink is placed on a prepared cabinet, and the sanitary ware itself should be wider than the underframe, and the ribs will cover the slide of the cabinet. The ends of the furniture must first be coated with silicone-based sealant around the entire perimeter, the sink must be installed and pressed down.
After the adhesive mixture has completely dried, a tight fixation will be achieved. In addition, silicone will prevent water from getting under the cabinet.
Bracket mounting
In this option, the sink is fixed with fasteners, which are sold separately or included with the plumbing fixtures. First of all, screw the screws inside the cabinet, put the brackets on them, but do not clamp them. You should tighten the screws on the sink and place it, move the fixing corners along the screws so that the self-tapping screw fits into the recess and the sink fits tightly to the furniture. Finally, tighten the fasteners and, if desired, lubricate everything with sealant.
Mounting on a wooden frame
If standard fasteners are not suitable or are not available at all, then make a wooden frame with your own hands. The bars must be placed in the cabinet around the perimeter, and metal corners must be screwed in. The height of the slats can be adjusted so that the sink is level with the rest of the furniture. The kitchen element is placed on the finished frame and additionally coated with sealant.
Any fasteners should be tightened manually with wrenches, without using electric tools, to prevent damage to the plumbing. If you use a sink made of artificial stone or other heavy materials, then you need to prepare additional fasteners. For this purpose, a metal or wood strip is suitable, which is placed on the back wall along the length of the sink.
When a ceramic sink is used, it can be installed without a cabinet, directly against the wall. For this, special fasteners are used. The execution procedure is as follows.
- The height is marked on the wall, the standard size is 80 cm, but it is important to take into account the height of the owners and the location of the furniture.
- A second line is drawn a little lower, and the distance between them indicates the thickness of the back of the sink where the fasteners will be located.
- The distance between the holes in the plumbing for its fastening is measured and the data is transferred to the wall.
- The wall is drilled, a bracket is inserted, and the sink is fixed on it.
When using the described installation rules, overhead kitchen plumbing fixtures will be installed independently in a short time without any particular difficulties. A properly performed process will ensure a long service life.
Types of siphons
Modern devices in this category are made mainly of metal or plastic. Metal products are more expensive, require more careful maintenance, and are usually preferred in cases where communications are not hidden behind a cabinet or wall, but remain visible.
Metal siphon
Plastic analogues are more practical and therefore have become widespread. This option combines strength and light weight well. Such products are easy to install, and their replacement does not require significant costs. In addition, they are much less demanding to maintain and use than models made of metal.
Siphons made of plastic
Water seal options
The main options for water seals are represented by three main types:
- bottle
- corrugated
- pipe
Bottle type is traditionally in demand due to its simple and effective design. The bottle-shaped part provides a water seal, which reliably prevents the penetration of unpleasant odors from the sewer. Modern models allow you to connect not only a sink, but also a dishwasher and washing machine to the drain.
Bottle water seal
Corrugated - represented by a flexible corrugated tube connecting the drain hole to the entrance to the drain. When using this scheme, it is important to lay the tube in the correct double-bent position, due to which a hydraulic plug will form. The flexible hose takes up very little space and can be used in any limited space, such as a small bathroom. Such models are cheap and easy to install and use, but they cause criticism due to the accumulation of dirt in the folds of the corrugation. If a blockage occurs, this part will require replacement.
Corrugated siphon
Pipe - a current, higher quality, but also more expensive analogue of a corrugated hose - a pipe connection. Instead of corrugating the water seal, it is replaced here with a curved pipe, the material for which is metal or polypropylene. The cost of such models is higher. They are sometimes difficult to install due to the need to accurately align the rigid pipe with the drain socket, so before connecting the kitchen sink to the sewer system or providing drainage for the washbasin, the serious and responsible task of choosing and purchasing suitable equipment is solved. Careful measurements must be taken to ensure that all plumbing parameters match the piping system being purchased.
Pipe water seal
Installation of mortise sinks
Built-in sinks are equipped with fastening parts, as well as a cardboard template for marking the countertop, thereby simplifying the entire process. If there is no template, then the sink itself is used to correctly draw the contours. Similar to the instructions already described, it is necessary to assemble all the elements in advance. The scheme for doing the work is as follows.
- The template is placed on a tabletop or cabinet and secured with tape on different sides. When placing the cardboard, you need to make sure that the edges do not overlap the strength and side parts. The optimal distance from the walls is 5–10 cm.
- Next, you need to outline the contours with a pencil, carefully select the location so that it is convenient to operate the plumbing fixtures, furniture and equipment in the future. After transferring the outlines of the shell, it is necessary to retreat 1.5 cm and make a second marking along which the cutting is made.
- Using a drill, make holes around the perimeter of the lines, select a drill 10–12 mm in diameter. A jigsaw is inserted into the finished hole and the outline is cut out.
- Clean the surface from dust and other debris, use a sink to check the hole, then sand the edges and remove chips.
- The sink should fit tightly to the countertop. Sealant is applied to the edges of the cut hole, special tape from the plumbing kit is glued to the front side, or additional sealant is applied.
- The sink is inserted and pressed tightly at all edges - this is necessary to ensure that the voids are filled with silicone. From below you need to fix the part with brackets, starting from the corners diagonally, then on the middle part. Remove excess sealant or cut off the tape.
Leave the plumbing for 3-5 hours so that the silicone dries, then connect to the sewer. The corner sink is mounted in a similar way; there are no special features other than placement in the countertop.
Siphon design
The simplest description of the type of siphon is an S-shaped bend of the outlet corrugated hose, rotated 90 degrees in a vertical manner. This is generally sufficient for the sink as it prevents used toilet paper, dish scraps and sanitary pads from entering the sink.
However, there is a nuance here: in the process of cleaning the sewer with a plunger, the corrugation may be damaged. If you clean the sewer with a pneumatic blower (powered by a canister of compressed inert gas), it may rupture instantly. It is unacceptable to clean the corrugation using a cable. Accordingly, if the sewerage system is not a matter of primary importance in the apartment, but you have to “punch” it quite often, for these purposes you should use a rigid siphon with an inspection (removable lid for cleaning and inspection). You won't need this device in the kitchen.
Installation of a sink into a countertop.
Rigid type siphons can be classified as follows: bottle siphon and elbow with removable hatch (obsolete model). In the first case, the structure consists of two concentric pipes, of smaller and larger diameter. The smaller one is inserted into the larger one with a certain gap at the bottom. The lower pipe of the siphon-bottle, in turn, is inserted into a special hatch with a thread; the outlet is mounted on the side.
Related article: How to paint interior doors: work technology
Cleaning a bottle is a fairly simple process. At the same time, they put on gloves, place a bucket, unscrew the bottom hatch, and all the waste falls into the container at once. It is important to clearly ensure during the purchasing process that the outer pipe is equipped with a kind of narrowing upward. Otherwise, the contamination may become clogged and additional cleaning measures will have to be taken (the connection will be delayed).
The most modern siphon is a decorative chrome siphon with revision. In addition to the effective qualities of its construction, it is 100% hygienic and functional. However, its cost is much higher than the standard one. The sewerage installation in this case is built into the walls, which is also quite expensive.
Connection of the siphon with revision is carried out before hanging the sink, corrugated siphon - focusing on the installation location and user convenience. In both cases, you should use a transition collar with a 32 mm diameter sink outlet to the existing diameter of the sewer pipes, from 40 to 100 mm (you should look at the installation site).
Installation of other types of sinks and connection to sewerage
In addition to the overhead and mortise models of sinks, there are other types. Their installation is often carried out by specialists, due to the need for experience and special tools. For the under-counter option, you will need to make a neat and even cutout in the countertop according to the clear dimensions of the sink.
The sink is lowered into the cut hole, and its edges should fit tightly, this will prevent moisture from entering. A special fastener or frame is made under the countertop, on which the plumbing rests. All joints must be sealed with sealant. The main difficulty lies in cutting out even and clear dimensions, as well as in fastening. Any mistake will result in the need to replace the countertop.
For an integrated type, the rules are almost the same; it is very important to make an accurate hole and properly seal the parts. Installation begins in a similar way to the mortise type, since a cutout is created in the countertop, with the exception of the sides of the sink.
They go around the perimeter with a rebate cutter to make a recess for the side of the sink. The plumbing fixtures are placed on the sealant, and after it dries, they are fixed with brackets. This option is perfect if the sink and countertop are made of stone - in this case, the perfect combination is obtained.
After installation by any method, the plumbing must be connected to the water supply and sewerage system. First, you need to insert the corrugation from the siphon into the sewer pipe and seal it with a gasket or cuff. Then connect the flexible hoses to the cold and hot water pipes and tighten the nuts. Be sure to monitor the presence and position of gaskets.
Having connected all elements, open the water, check the quality of assembly, possible leaks. If everything is normal, then the work was done efficiently, does not require any modifications, and the kitchen sink is ready for use.
Sink installation
To carry out all the necessary work on installing a sink in the kitchen, you will need the following:
Scheme for installing a sink into a countertop.
- dowels;
- winding;
- screwdriver;
- new sink;
- silicone sealant;
- adjustable or wrench;
- screwdriver or drill.
Related article: 5 by 5 room design
The sink in the kitchen is connected using a special hanger to the wall using self-tapping screws, dowels and standard brackets. Do not forget that even a full pedestal from the bottom of the washbasin to the floor plane is not a load-bearing part.
The diameter of the screws should be the maximum possible and allowed by the brackets. Do not forget that the sink in any washbasin is suspended. If the diameter of the special holes for self-tapping screws is less than 6 mm, then they should be drilled out or this type of sink should not be taken at all. Moreover, these “alternative” types of products are silumin (rather fragile) or plastic (not durable).
Selecting a sealant
The sealant plays an important role in installation. The building materials market offers several options for this product:
- acrylic - does not contain harmful substances, is excellent for metal, chipboard and MDF, dries quickly. The main disadvantage is strong shrinkage and rigidity; joints can crack over the years and will allow water to pass through;
- polyurethane - suitable for places with high humidity and unstable temperatures, has excellent adhesion to almost all materials. The sealant is elastic and practically does not shrink, but it is better not to use it for MDF, chipboard, or plastic. The polyurethane composition is ideal for sinks made of stone, granite, and metal;
- silicone - elastic, does not shrink, has excellent adhesion.
Apply any sealant to clean materials to improve adhesion. Without preliminary preparation, cracks may appear and moisture may enter.
Choosing a kitchen sink and preparing for its installation
Before deciding how to install a sink into a countertop, you need to decide on the choice of product. The best option is to connect a deep sink and a faucet that is not too high - in this case there will be a minimum of splashes when washing dishes. The sink should be deep so that it is convenient to wash large pots or stack plates after a family dinner.
The material also matters - it is easiest to connect a traditional stainless steel sink yourself. Enameled steel would also be a good solution.
Installing a kitchen sink with your own hands requires the following tools and materials:
- Sealant;
- Self-tapping screws and screwdrivers;
- Jigsaw;
- Fasteners (as a rule, they are included with the product).
Advice! Before fixing the kitchen sink, you should carefully treat all seats with sealant. This will ensure high-quality waterproofing and protection of the chipboard from damage due to high humidity.
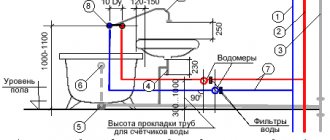
Pipe routing
The distribution of water and sewerage is done from the corresponding risers. Often apartments have common risers for the bathroom and kitchen, but in some series of houses there are separate risers for water supply to the kitchen. Wiring is carried out at the initial stage of repair during the plumbing work and immediately in all rooms where it is provided.
Scheme for connecting equipment to utility networks: 1 – cold or hot water supply riser, 2 – ball valve, 3 – coarse water filter, 4 – pressure reducer, 5 – water flow meter, 6 – collector, 7 – drain to the sewer
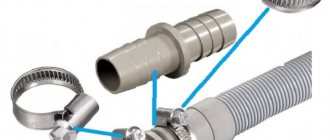
Making a QuickEasy connection (WIRSBO): a – cutting the pipe to size; b – putting on a self-clinching ring; c – expansion of the pipe with an expander; d – joining the pipe with the fitting
Installation of shut-off valves
First of all, it is necessary to install shut-off valves on the outlets from the hot and cold water supply risers. Ball valves are best suited for this purpose. High-quality shut-off valves are produced by BUGATTI, GIACOMINI, ITAP (Italy), NAVAL (Finland) and many other companies.
Filter installation
A coarse water filter must be installed behind the ball valve. Such filters are divided into mesh and cartridge filters. The degree of filtration of a cartridge filter may be higher than that of a mesh filter, but the cartridges require periodic replacement. It is recommended to purchase filters with a filter element mesh size of no more than 100 microns.
Mesh models are produced by companies such as RBM, BUGATTI, TIEMME (Italy), HONEYWELL BRAUKMANN (USA-Germany), SYR (Germany). Cartridge filters are manufactured by USFILTER (USA), ATLAS FILTER (Italy), etc.
Installation of pressure reducing valve
If the pressure in the water supply system exceeds 5 atm, it will be necessary to install a pressure reducing valve, or pressure reducer, which is located after the filter. The valve will prevent equipment failure due to excessively high pressure in the system; in addition, installing the devices on both risers will allow you to set the same pressure in the apartment lines. Different pressures cause inconvenience when using mixers (it is difficult to adjust the required temperature and water pressure), and can also cause noise and vibration in pipelines.
For the operation of plumbing fixtures and household appliances, a pressure of 3-4 atm is considered optimal. To save space in the plumbing cabinet, it is better to install combined filters with a built-in pressure reducer. Reducing valves are produced by RBM, HONEYWELL BRAUKMANN, TIEMME, etc.
Stage #3: attaching the washbasin to the wall ↑
When the mixer is already installed on the sink, you need to attach it to the wall and complete the connection to the water supply. To do this, put the device on the prepared mounting studs, install the plastic inserts that are supplied in the kit, and tighten the nuts. If there is a support under the sink, then place it on it.
There should be a rubber seal under the tap. It is placed above the nut. The seal will not prevent you from tightening the nut in the future, so do not tighten it too tightly. If the tap leaks when checking the connection, simply tighten the connection tighter.
Connecting water hoses