Plumbing pipes for hot water supply and heating systems
In the case of pipes through which hot liquid must pass, things are different. The most important factor is the ability of the material to withstand high temperatures over a long period of time. In addition, it is necessary to take into account the much lower degree of plaque on the inner surface of the wall, which is typical for hot water supply and heating.
A completely suitable material for such a system would be “black” steel, because the absence of condensate will prevent rust from appearing. True, in such a system the liquid must be constantly present, and the system itself must be sealed. Even a short drain of water will lead to the rapid appearance of rust.
Stainless or galvanized steel pipes will perform even better in such conditions. Copper pipes would also be an excellent option - however, you will have to come to terms with the very high cost of such material. In addition, in this case, thermal insulation will be required, which will increase the cost of pipeline construction by an order of magnitude.
Reinforced polypropylene demonstrates the best characteristics among polymer pipes. Due to the layer of aluminum foil and fiberglass, polypropylene retains its shape.
In principle, polymer pipes for plumbing water supply and sewerage are a good choice, but you just need to carefully study its characteristics before purchasing. You need to understand that the price of modified polymer pipes is quite high and quite comparable to their metal counterparts, so you will have to weigh all the pros and cons of different materials.
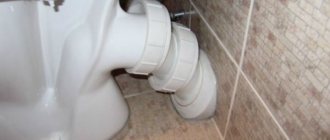
Possible problems when moving the toilet
Increasing the free space of the toilet room encourages thinking and reinstalling the bathroom. Is it possible to move the toilet to the side?
Yes, but in order for plumbing to function properly, you need to know some subtleties.
To ensure the required slope, sometimes it is necessary to install the toilet on a podium
The pump should be placed in the wall behind the toilet
Another situation is possible when it is necessary to move the pipes in the toilet to a distance of more than 1.5 m or compliance with SNiP is a difficult task. What to do?
There are two solutions, the first of which is the relocation of the sewer riser, and the second is the connection of specific equipment (forced sewerage). It would be preferable to install a sololift.
When is it necessary to relocate water supply risers?
Relocation of risers is usually necessary when remodeling a bathroom
Stand-up sections of pipes supplying water are most often installed in a bathroom or toilet at a distance of about 4 cm from the wall. One section of the main line must be mounted on a group of water distribution devices. Shut-off valves are installed at its lower base.
They decide to replace risers if they are leaky, severely clogged, or the pipes have expired. Also, replacement is usually carried out during large-scale repair work. At the same time, risers are changed minimally from the ceiling to the floor covering, and ideally in all apartments from the top floor to the basement. Inserting a small piece on such pipes is impractical.
If you want to increase the usable area of the bathroom or the design requires it, the riser pipes for cold and hot water supply can be moved.
Work is necessary in the following cases:
- the risers are located in the wrong place according to the layout;
- there is a desire to create a combined bathroom, but the pipes run right in its center;
- it is planned to swap the living room and sanitary premises;
- pipes interfere with the installation of modern plumbing - corner bathtub, jacuzzi, shower;
- the heated towel rail needs to be moved to another wall;
- It is impossible to properly install metering devices.
A successful location of risers will create the desired environment. When designing a renovation, you need to think through everything down to the smallest detail, because large-scale renovations are carried out once every decade.
Communications
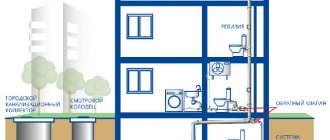
Moving the kitchen to a corridor or another room entails the need to provide a water supply to the sink and dishwasher, as well as drain household wastewater into the sewer system. For some reason, this is the last thing the owners think about, although it is this factor that very often becomes decisive when remodeling an apartment’s space.
There are practically no problems when installing water supply pipes. They can be placed either under the ceiling or in a screed under the floor covering, passed through small holes in the wall or walled up in grooves. Difficulties arise, as a rule, with the installation of sewerage, which must be laid at a certain slope, and the diameter of a typical pipe is larger than for a water supply, 50 mm, which often creates an obstacle when passing through load-bearing fences.
When carrying out communications in the “new” kitchen area, one should not forget about ventilation, which rids the room of fumes and odors floating in the air during cooking. A properly laid box with a hood installed above the stove will protect the room from smoke and excessive humidity. It will definitely need to be connected to the exhaust ventilation duct located on one of the walls of the former kitchen, but in no case to the ventilation grilles located in the bathrooms. Otherwise, unpleasant odors will appear in the kitchen from time to time, if not constantly. When connecting the ventilation pipe to the duct, it must not be blocked or narrowed.
Installation of the ventilation duct is accompanied by some inconveniences:
- to ensure good traction, on long horizontal sections it will be necessary to install an additional fan and, as a result, a sound muffler;
- to improve visual perception, the pipe is hidden behind the suspended ceiling structure, which is not feasible even with a standard room height;
- To make it possible to lay the box without kinks, holes of significant diameter are punched in the walls.
The relocation of the kitchen is also accompanied by the installation of electrical wiring. For the convenience of the housewife, it is necessary to provide lighting in the work area and the required number of sockets, as well as single lamps and lamps. Coziness and comfort will appear in the kitchen only if it has sufficient lighting, the brightness of which can be adjusted according to the situation and your mood.
There are many more nuances that owners encounter when moving a kitchen into a room than those previously listed. Before starting work, you should carefully consider all the difficulties that, with varying degrees of probability, may be encountered during the redevelopment process. With an irresponsible approach, the repair will stop somewhere in the middle stage, when it will not be possible to advance further due to various reasons, and it will be too late and pointless to go back.
Unfortunately, there are often situations in which the material resources spent on relocating a kitchen are not justified. Although there are also hopeless living conditions, when it is extremely difficult for a family to cope without remodeling the apartment.
Step-by-step instructions - how to move a hot water riser
After the project has been drawn up and the upcoming work has been approved by the management company, BTI and other responsible organizations, the time comes for the actual implementation of the work. Let's consider the procedure for moving the hot water riser.
Tools and materials
It is necessary to prepare the following tools and materials:
Grinder for cutting an old riser and cutting a new pipe.- Gas or adjustable wrench for installing shut-off valves on the outlet.
- Fittings (minimum set - 4 corners and 1 tee for outlet).
- Ball or valve valve.
- Plumbing flax, FUM tape or other sealing material.
In addition, you may need tools to make holes in the wall and recesses in the floor. Please note that making recesses in the ceiling slab is prohibited. Since this weakens its structural strength.
Preparation and coordination of work
These are the very first actions that are performed before all work begins. A project is drawn up with a diagram of the location of communications before and after the transfer . This is an important part of the work, which is recommended to be entrusted to knowledgeable and experienced specialists.
They will be able to immediately discard all obviously impossible or prohibited options and carry out the project according to all the rules.
With the finished project, you need to contact the management company. After receiving their visa, they go to the BTI, where they will need to make changes to the apartment plan. The last stage will be the architecture department, where the project is stamped “for execution.” After this, you can begin work.
Dismantling the old
Before starting work, you must contact the management company to turn off the water supply. This is a paid service.
In addition, it is necessary to indicate how long the work will take, so as not to create unnecessary inconvenience for the residents of the entrance.
After the water is turned off, you need to open all the hot water taps and drain the remaining water from the riser.
After this, the cutting locations are marked (usually under the ceiling and near the floor), and the riser is cut off along with the outlet. The old pipe is immediately removed so that it does not interfere with the room.
Preparation of carts
The next stage will be the preparation of the carts. This is cutting sections of a new pipe, 2 short horizontal sections (they determine the distance by which the riser will be displaced) and a vertical section, which is the riser.
In addition, the vertical section may have to be cut and a tee inserted into it to drain it to the apartment dead-end hot water supply line.
This step is not necessary, since sometimes the outlet is welded directly into the riser without the use of fittings (for example, when installing stainless steel pipes).
Fitting connections
Fittings are elements that allow pipes to be diverted, bent, or otherwise changed in direction.
They fully match the dimensions of the pipes, which allows you to create reliable and tight connections.
When moving the riser, corner bends and a tee are used. The corners are connected to the ceiling and floor sections of the pipe.
Then horizontal sections of pipes are welded, to which another pair of corner fittings is attached. After this, a vertical part with a branch (tee) is installed.
Installation of input fittings
The input fittings determine the boundary of responsibility - on the side of the riser, the common house equipment remains, and after the valve, the property of the home owner remains.
The installation of a shut-off valve is carried out only on the outlet from the riser (the horizontal section leading to the plumbing). Installation of valves on the riser itself is prohibited.
Valve or ball valves are used. The second option is preferable, since these devices are much more efficient and durable.
When you need to quickly turn off the water, they are much more convenient. In addition, ball valves are less likely to fail, which cannot be said about valve structures.
Wiring connection
The riser is connected to the wiring after completion of the installation of all elements, including the input shut-off valves.
Horizontal apartment wiring is connected to a ball valve (or to a DHW flow meter if it is installed immediately after the valve).
This stage is the final one, after which the work is considered completed.
After connecting the wiring, water is supplied (open the valve in the basement) and the riser is inspected.
The plumber from the management company who opened the water should not be released yet, as leaks may be detected, requiring repeated shutdown and elimination of deficiencies. If no problems arise, the riser is put into operation.
Bathroom remodeling
Separate toilet location
In the case of a separate bathroom, the layout is somewhat simpler.
Let's start with a simpler case, when the toilet is separated from the bathroom. It is simpler because in such a toilet, as a rule, there is one device. A bidet can be added to the maximum configuration if the size of the room allows.
We will immediately announce the standards for the distance from the wall to the toilet adopted in SNiP 2.08.01-89* “Residential buildings”:
- The minimum dimensions of the toilet room are 800 mm width and 1200 mm length. In this case, the average dimensions of the compact are taken to be 650 mm in length and 350 mm in width;
- According to the standard, the height of the toilet bowl should be 400 mm, the height of the tank should be 815 mm, the height of the drain pipe should be 185 mm;
- If a bidet is installed in the room, then the gap from the edge of the compact bowl to the middle axis of the bidet bowl should be at least 380 mm, and for maximum comfort - at least 450 mm. The same standards apply if there is a washbasin nearby;
- The minimum distance from the toilet to the wall located in the front (front) must be at least 530 mm, and for maximum comfort - at least 760 mm;
- The space from the middle axis of the bowl to the side wall is at least 400 mm, for optimal operation mode - at least 450 mm.
Minimum and optimal distances from the toilet to side and front obstacles.
Important! Official standards are mandatory for public and private construction of facilities. Apartment owners may not carry them out and place the devices at their own discretion, since their operation and maintenance are carried out by them
It should be said that these standards are relevant in the case when the toilet is quite spacious, and you do not know where it is better to place this or that device. However, in most post-Soviet apartments this problem does not arise, since the dimensions of the toilet are minimal, and the toilet is placed in the middle of the cubicle near the back wall.
The photo shows that the layout of the “Khrushchev” houses does not leave much room for maneuver.
Important! Most Soviet-era toilet stalls have dimensions such that installing the compact exactly in the middle of the room near the back wall gives the same minimum distances to the side walls and the front door
Combined bathroom
A wall-mounted toilet allows you to save space, which is especially important in combined bathrooms.
If the toilet and bathroom are located in the same room, the task is a little more complicated because you will have to rationally place several plumbing fixtures in a relatively small room.
Additional problems may be caused by the need to install household appliances - washing machine, boiler, etc. At the same time, the most acceptable layout option involves not only a rational and convenient, but also a harmonious arrangement of all objects from a design point of view.
This is another feature of modernity: people want to live comfortably and beautifully, and, as you know, this cannot be prohibited.
The price of comfort is high, the price of beauty and luxury has no limit.
If the bathroom is large enough, then it is advisable to divide its premises into zones: a shower or bath area, a washbasin area, a toilet area, etc. However, in most Soviet and many modern apartments there is no such space, and the task comes down to meeting the minimum requirements for the distance between adjacent devices, devices and walls and the presence of passages.
Often the compact and bidet, and sometimes the washbasin, are placed in a line against the wall. In this case, there should be a gap of at least 20 cm between adjacent devices, preferably 30 cm. This means the distance from edge to edge.
An example of rational planning.
If there is a sink next to the toilet, and it is approached from the side of the appliance, then you need to remember about the space for tilting: when washing, a person leans towards the sink and moves back a little. The minimum space for this should be at least 70 cm.
To avoid resting your forehead on the mirror, remember to have room to tilt your torso.
Important! The dimensions of the distances to the side walls are accepted without changes - 38 - 45 cm from the middle axis of the bowl to the wall. Similarly, the requirement for the distance in front of the toilet does not change - it is at least 53 cm, for comfortable use - 76 cm
Here you can make adjustments only in a larger direction.
In some situations, a toilet in the wall is the only salvation.
For combined bathrooms, the issue of saving space is more pressing than ever. One example of such savings is a toilet with a tank in the wall. Do-it-yourself installation of this model is somewhat complicated, but the use of modern installations and kits with frames simplifies this task.
Agreed upon options for remodeling the bathroom and toilet.
2.1. Remodeling the bathroom in the house p-44t.
dismantled-erected structures
apartment plan after redevelopment
Above is a typical redevelopment of a bathroom in p-44t with its combination and expansion through the corridor and the creation of a separate entrance to the kitchen through the room. In most homes, the bathroom and toilet are made using “glass” or “hood” type sanitary cabins. They are non-load-bearing and their dismantling is painless. The main thing, as mentioned above, is not to affect the ventilation shafts.
2.2. Remodeling a bathroom in Khrushchev.
The illustration shows a non-standard multi-room apartment for Khrushchev. A redevelopment of the Khrushchev building was carried out with a small bathroom and its expansion through the corridor.
2.3. Remodeling a bathroom in a panel house.
before redevelopment
after redevelopment
These illustrations show the redevelopment of a toilet with a bath in a panel house. In many ways, similar measures were taken here to the reconstruction already discussed, only this time an additional toilet was placed in the corridor area, while expanding the bathroom itself.
2.4. Remodeling a bathroom in Khrushchev.
But this option is already the most typical for Khrushchev and Stalinist buildings. The corridor leading to the gasified kitchen became part of a combined and expanded bathroom, and the kitchen itself was combined with the room through roller shutters.
Steel structures
Until relatively recently, almost all plumbing pipes were steel. This is a cheap type of material for which you can always easily select suitable fittings.
The main advantage of the material is strength. Thanks to which they can withstand pressure changes, they are not afraid of high temperatures.
At the same time, condensation forms on such pipes. In addition, installation will require the use of special equipment and the skills of a craftsman; welding and threaded connections are required.
If the installation is carried out at a high quality level, then steel plumbing pipes will have a long service life, up to 40-50 years.
Summarizing the shortcomings, we can note:
- complex and expensive installation;
- lime formation, which leads to “overgrowing” of pipes;
- corrosion formation;
- high electrical conductivity.
Experts recommend using plumbing and sewer steel pipes when replacing individual parts of an old water supply system in order to avoid mixing and matching different materials. In other cases, it is better to abandon steel structures. And if you need to connect different materials, the easiest way is to use special adapters.
Our gallery of works
Replacing water supply risers in an apartment
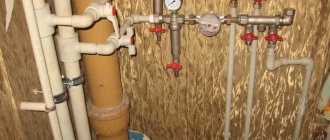
To install water supply systems in residential buildings and premises, steel and polymer pipes, in particular polypropylene, are used. Given this fact, replacing a water supply riser involves the use of a welding machine or a soldering process if we are talking about plastic. As in the previous case, for the proper implementation of measures during the work, the system is de-energized upon application to the management company. In addition, it is necessary to coordinate installation work with neighbors above and below.
The procedure for replacing a water supply riser in Moscow is divided into stages:
- Drawing up and approval of estimates;
- Selection of materials and preparation of equipment, consumables, tools;
- Dismantling old pipes using a grinder or other cutters;
- Installation of a new main using clamps, adapters, waterproofing;
- Insertion of shut-off valves;
- Checking operating pressure and connection areas for leaks.
The work is carried out in accordance with SNiP by experienced craftsmen with the appropriate level of qualifications and approvals.
Re-equipment of the sewer riser
Old sewerage systems installed in Soviet-built houses were made primarily of cast iron. Modern configurations involve the use of different materials, but the most common and in demand is a polymer analogue (PVC or polypropylene). Replacing a sewer riser with a new one involves various connection methods - clamps, soldering, fittings. However, the main problem is not the assembly of the main, but the dismantling of the old cast iron pipe. The metal is quite fragile and can crack if subjected to excessive physical force. It is necessary to carefully remove the upper section from the socket connecting your section with the neighbor’s, and then dismantle the elements from the lower inlet (compensation pipe, tee or cross).
The following procedure is standard:
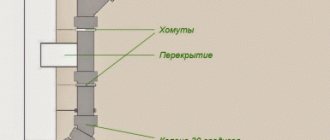
- A pre-prepared pipe is first installed in the upper socket and secured with a clamp at a distance of several centimeters from the ceiling;
- The lower bell, cleared of debris and foreign elements, is prepared for installation;
- A tee is installed;
- The pipe goes deep into it at least 15 centimeters;
- The joints are insulated and treated with silicone, and rubber rings are used for sealing.
Once the work has been completed correctly, the system is ready for use.
Cold water
Materials
Non-galvanized steel. Black steel plumbing pipes without anti-corrosion coating are the worst choice for cold water supply. Cold water is always condensation, that is, a combination of dampness and air. If so, the pipes will quickly rust. A coat of paint will only partially slow down this process. In addition, a steel pipe in cold water rapidly overgrows from the inside, reducing its throughput.
Steel pipes and cold water are a bad combination
- Cink Steel
. Here everything is much better: only areas where the zinc coating is damaged - threads and welds - can rust. No deposits are deposited in the pipe. The disadvantages include the laboriousness of assembly and the heavy weight of the pipe. - Copper
. Copper plumbing pipe is an almost eternal material, aesthetically pleasing in appearance and not afraid of dampness. But dear. In the case of cold water, its cost is simply unreasonably high.
- Stainless steel
. Cheaper than copper, but more expensive than galvanization. Added to the complexity of assembling the water supply system is extremely complex processing: it’s simply unrealistic, and the turner can damage the cutters on it. However, cold water plumbing made from stainless steel is also practically eternal and much stronger than copper. - Polyethylene and polypropylene
. When applied to cold water, their properties are the same: light, cheap materials, the life cycle of which in these conditions approaches the duration of human life. If you plan to replace cold water plumbing pipes, this is the ideal choice.
Dimensions
Plumbing pipes made of copper can have a minimum diameter: if there are filters, a pipe with a diameter of 12 millimeters will be enough for a standard apartment. It does not overgrow over time, and the thin walls provide sufficient clearance with a minimum external diameter.
Then, in ascending order, follow a steel pipe with a diameter of 15 millimeters. with a diameter of 16 millimeters is the most popular among this material. Those used for cold water pipes are polypropylene and start from 20 millimeters. The reason for the latter fact is the thick walls, which, with a constant outer diameter, provide less clearance compared to other materials.
Stages of work
To move a heated towel rail you need to:
- Carry out preparatory work. First, the water in the apartment is shut off. Then the hot water supply to the entrance is turned off. It is advisable that this work be performed by a plumber from the management company. Only he knows how to turn off one riser without disrupting the water supply to the house. The whole process takes about an hour and a half. In order to maintain good relations with your neighbors, you should warn in advance that you plan to install a heated towel rail.
- Prepare the equipment location. It is better to place it above the washing machine. The M-shaped cutout is installed at a height of 90 cm from the floor, and the U-shaped cutout is installed at a height of 110 cm.
- Dismantle unnecessary equipment. A grinder is used to cut off the heated towel rail above the toilet. Sections of sufficient length are left to connect to the new pipeline. If the device has threaded connections, they are simply unscrewed.
- Place connectors and tees of suitable diameter on the mounting holes.
- Install a jumper - a bypass, which facilitates the smooth operation of the system when shutting off the shut-off valves. For its manufacture, a pipe of smaller diameter than the main one is used. Shut-off valves are located on both sides. One of the ball valves from the equipment is mounted on the bypass. Now you can safely make repairs or replace gaskets.
- Increase the length of the pipes to the new location of the heater. Hydraulic calculations will be required for the location of pipes to warm the device to the required temperature. To install a heated towel rail, polypropylene reinforced pipes classified as “heating” are used. With a diameter no smaller than the original pipes. Since pipes with a longitudinal weld do not withstand long-term use, it is preferable to purchase heated towel rails made from seamless seamless pipe. Installation is carried out at the same level in order to avoid the formation of air plugs. Laying is carried out horizontally with a slight slope in front of the device. The pipeline is laid along the wall or the pipe is hidden with a decorative coating. The bathroom will only benefit from the second method.
- Carefully and evenly mark the mounting locations for the heater. Use a drill to drill holes, drive in dowels, secure the brackets, and hang the heater.
- Connect the heated towel rail above the bathtub to the pipeline by welding or using threads and taps. The second method is not recommended if decorative finishing is intended. Because this connection is leaky. The heated towel rail in the bathroom must contain a Mayevsky tap through which air is released.
- Check the operation of the device and carry out finishing work.
After completing the above steps, you need to open all water taps. Since there are water changes in the system and water hammer in apartments, experts recommend purchasing a seamless heated towel rail.
https://youtube.com/watch?v=LdKEyXZzVjA
WATCH THE VIDEO
Prohibited and allowed options
Cases when it cannot be transferred
- After the redevelopment, the kitchen space will be located directly under the bathroom of the neighbors above.
This option can work out if you increase the area of the new room due to the square meters of the bathroom by demolishing the partition.
There are exceptions here.
- This can be done if you have a two-story apartment.
- This can be done if you live on the top floor.
Kitchen moved to the living room along with communications
- After the redevelopment, under the new kitchen space there are living rooms for the neighbors.
There are exceptions here too.
- This can be done if you live on the first floor.
- This can be done if there is non-residential premises below you. As a rule, these are commercial premises on the first floors of apartment buildings. They can occupy one or two floors. With housing on the second or third floor, there is a chance to coordinate the project according to all the rules.
Kitchen in large living room. Water supply and sewerage are connected from the bathroom behind the adjacent wall
- The neighbors above the kitchen will have a toilet or bathroom.
It is good if the location of the new kitchen is close to the original location. Then it will be possible to avoid problems with the supply of sewerage, water supply and ventilation pipes.
- The kitchen is gasified.
It is impossible to remove the partition from the living room in a gasified room, because... According to the standards, it must be isolated. It is permissible to make sliding doors.
Exception: you can legally refuse gas in your apartment as a single person by submitting an application to the municipality. A special commission makes a decision on the reconstruction project and transition to a new tariff for electric stoves. After making changes to the technical plan, you can coordinate the time of work with gas services. The contract with old service providers is terminated and a new one is concluded with electricity suppliers.
- There will be access from the kitchen to the toilet or bathroom.
5 valid transfer options
Here are a few options when it’s realistic to get approval:
you live on the first floor and there is no neighbors’ bathroom above you; on the floor below there is a non-residential premises; you have a two-level apartment; the neighbors below also legalized the redevelopment (and already under them (the neighbors) there is probably non-residential premises). you live on the top floor and are expanding the kitchen, combining it with a bathroom
There is an important note here: the main kitchen equipment (stove, sink, etc.) can only be located above non-residential premises.. Another possible example of redevelopment
Ventilation runs along the ceiling (hidden by a suspended or suspended ceiling), sewerage runs along the floor, and water pipes run next to the new sink. Combining the bathroom and moving the kitchen into the living room. It is easy to transfer communications here, because the wall borders the bathroom. But it can be difficult to coordinate the redevelopment of corridor partitions
Another possible example of redevelopment. Ventilation runs along the ceiling (hidden by a suspended or suspended ceiling), sewerage runs along the floor, and water pipes run next to the new sink.
Combining the bathroom and moving the kitchen into the living room. It is easy to transfer communications here, because the wall borders the bathroom. But it can be difficult to coordinate the redevelopment of corridor partitions.
There is another option, although it can hardly be called a transfer - demolishing the partition between the kitchen and living room. In Khrushchev buildings, this idea receives the most approval from the housing inspectorate, because the wall between the kitchen and living room is not load-bearing.
Sewerage and water supply installation
When planning to move the kitchen to another room, you first need to re-route the sewer system. Since in any case the sink will change its location, additional pipes will need to be prepared.
To ensure that the work does not cause difficulties, it is important to first draw up a plan for the new pipeline. To implement the plan, in frequent cases it is necessary to block the doorway with pipes. A good option is to run the water supply under the screed or ceiling. The second option involves the use of suspended ceilings.
Installing a sewer system is considered a more serious task, since such pipes must be laid at a special angle, which can be within 2-3 cm per meter.
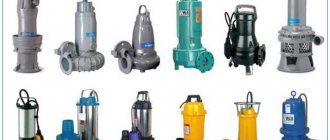
If there is a large distance to the riser, then due to the slope the pipes will not be able to be laid in the floor screed. In such situations, pipes are laid without a slope, and it is necessary to use a pump to pump water from the sink into the riser. As a rule, such devices are not expensive and can be installed under the sink.
The pump will be connected to the drain of the plumbing fixture, and all solid waste will be crushed. When the pump operates, water passes through the grinder, only then does it enter a special container with a pump, which pumps the water into the pipe. Since the operation of the device ensures high pressure in the pipe, wastewater can be transported to great heights and long distances through a winding pipeline without problems. As a result of such actions, a sewer system is obtained, the operation of which is ensured under the influence of excess pressure.
laying water and sewerage pipes
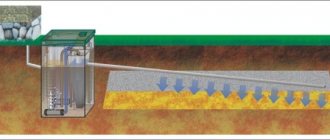
The best way to move sewer
If there is a need or desire to move the sewer system, then the best way to locate the sololift is to place it above suspended ceilings. For these purposes, a 30-40 mm reinforced polyethylene hose is used, which will pass under the ceiling. The pipeline is led upward from the pump, and a hose is pulled from it to a certain point at the junction with the main sewer system. Since a one-piece hose is used, the risk of leakage is reduced to zero. Experts believe that this design is not only convenient, but also reliable.
Despite all the advantages of pumps, experts recommend using them in rare cases. If the issue cannot be resolved in the usual way, then this option will be the most suitable.
Sololift is an electrical device and if the electricity is turned off, then it will not be possible to use the sewer system into which the pump is built. In addition, there is a risk that such equipment may fail, which is a serious problem.
Lighting organization
As stated in SNiPs, the kitchen must have a source of natural light. In addition, it is necessary to provide for the installation of lighting fixtures, for which electrical wiring is installed. If the kitchen is simply moved to another room, then just having a window is enough.
If you plan to use a non-residential premises where there is no source of natural light, then there will be a need to change the plan of partitions or door openings. In this situation, you can choose one of two options to solve the problem:
- natural light will come from the windows of another room;
- You can install partitions using glass blocks. Fiberglass doors are also an excellent option, allowing natural light to pass through well.
To determine the details of the redevelopment, you can look at some examples of ready-made redevelopments. In each individual case, obtaining permission to move sewerage to another premises is not so easy, even if the apartment meets all the requirements and all conditions are met. One way or another, obtaining the appropriate permit is a mandatory procedure, without which the redevelopment of the premises cannot be carried out. If you are not confident in your abilities, it is recommended to turn to professionals.
Furniture and decorative elements
Does the toilet interior require additional furniture? We have already decided that having a washbasin in the toilet will be a big plus for comfort. Some other furniture is also necessary, because the restroom is a convenient place to store many things, for example, cleaning products, washing powder and other things.
If you decide to make a toilet room with a sink, then you can give preference to the “moidodyr” type option. This is a washbasin built into a small cabinet in which you can store many useful things. In addition, you can place a tall shelving unit behind the toilet. Place it so that the toilet is built into the bottom of the rack. As for the materials for the “moydodyr” and shelving, wooden furniture is suitable for a classic restroom, while furniture made of plastic, glass or metal will complement a modern design.
The interior of any toilet involves the use of mandatory elements: a brush, a paper holder, a towel hook, a trash can, an air freshener. In addition to them, you can easily add details that will make your toilet stronger and more homely. You can hang a beautiful poster in a stylish frame on one of the walls. Not far from the toilet, try placing a small newspaper rack for newspapers, books and magazines, because many people don’t mind reading in the toilet. You can place flowers on the shelves. Choose artificial flowers or unpretentious live plants in pots. And, of course, scented candles placed around the entire perimeter will greatly decorate the design.
Plumbing pipes for cold water supply
The presence of cold water is required in any building, regardless of its functional purpose, be it an apartment building, a private house or a warehouse. Cold water supply is often carried out even in places where heating or sewerage is not required at all.
Materials for arranging the pipeline necessary for supplying cold water can be:
- Cink Steel;
- Stainless steel;
- Copper;
- Plastic.
Zinc coating provides complete protection of the pipe from corrosion. Unfortunately, not everything is so smooth - if the zinc layer is damaged in at least one place, then nothing will prevent the formation of rust. The problem is that when welding or threading, damage to the zinc layer inevitably occurs.
Naturally, using pipes made of “ferrous” (non-galvanized) metal for water supply is impossible: condensate always falls on the surface of the pipe, which is why it will be completely covered with rust. In turn, rust compromises the integrity of the pipeline and it can no longer perform its functions.
To protect steel plumbing pipes from corrosion, you have to use workarounds. The most common of them is to coat the pipeline with paint, but even this does not save the pipe from the effects of corrosion. In addition, the internal cavity of a non-galvanized pipe becomes overgrown over time, so its throughput significantly decreases.
You can avoid problems by using stainless steel pipes. Of course, this option has disadvantages - high cost compared to conventional steel, and difficult installation, especially in the absence of threads. If we talk about positive qualities, then stainless steel is characterized by maximum strength and long service life.
Moving a water heated towel rail, what difficulties arise
Firstly, legal problems may arise with permission to move, and secondly, when moving a water apparatus, problems may arise with the load of the new structure on the water supply system of the house.
All other difficulties are not serious compared to the first two.
Before starting the transfer, be sure to turn off the supply riser. It is not recommended to do this yourself; it is better to entrust it to a professional plumber.
Typically, water devices do not have a heat control system, but you can install a ball valve on it, which will allow you to regulate the heating of the installation.
If you transfer the installation and do not agree with the housing inspectorate, you will be held administratively liable. The case may go to court, and you will have to be punished or get off with a fine for a tidy sum.
Watch the video for an interesting and safe option for connecting a heated towel rail:
Popular plastic pipes
This type is, if not the most popular, then in demand among consumers. This material is used to install both internal and external water pipes.
Plastic pipes have high strength, low cost, have a decent appearance, do not corrode and have a long service life.
Even a beginner can install plastic structures using a soldering iron, special glue and fittings.
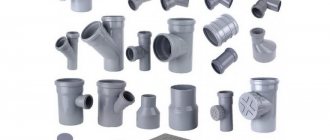
Plumbing plastic pipes include several types:
- PVC. They are inexpensive and practical. PVC plumbing pipe can be used for hot and cold water, as well as for installation of a heating system. The most rigid types of PVC are connected with fittings, adapters and special glue.
- The widest scope of use is for polypropylene pipes. It is easy to connect this material using coupling and butt soldering.
- Polyethylene structures are durable and elastic. If the water freezes, they will not burst, and soldering is used to connect them. Cross-linked polyethylene allows them to be used for hot and cold water.
Metal-plastic pipes
This type of material is lightweight and easy to install and replace. He occupies one of the leading positions. The material is a three-layer structure - the frame is made of metal, sealed on both sides in plastic.
Metal-plastic is able to withstand water temperatures up to +75 C, as well as pressure changes. The service life reaches 30-35 years. Fittings are used to connect pipes.
The disadvantages of metal-plastic products include:
- The material cannot withstand too high water temperatures;
- The need for regular tightening of joints;
- Low level of strength of connections.
Metal-plastic pipes are best used for installing plumbing structures in the country. An apartment or house requires other practical options.
Relocation of the kitchen to the living room, approval 2021.
Many people want to carry out just such a redevelopment. We are often asked the question “Is it possible to legalize the transfer of the kitchen to the living room?” Unfortunately, there is only one answer - it’s impossible. There is clause 24 of the Government of the Russian Federation of January 28, 2006 No. 47, which prohibits the placement of a kitchen above the living quarters of neighbors below. In this case, these premises must be declared unfit for habitation. The same can be said about simply enlarging the kitchen at the expense of the living room.
These redevelopments can be legalized only in one case - if there are non-residential premises located below you, that is, your apartment is on the first or second floor. Then the above paragraph of the Resolution is not violated and the kitchen can be moved to another room by obtaining official permission.
Before moving on to the rest of the nuances of remodeling a kitchen, we’ll make a short digression for those who are not going to go through all the steps on their own.
Is it possible to move the kitchen into the room?
First of all, it is necessary to understand all the legislative and everyday nuances. Relocating a kitchen in a new building is considered a remodel. And if you live in an apartment building, then your freedom to remodel and remodel is seriously limited. It is necessary to take into account the requirements of a number of legislative acts and not violate the rights of other residents. Therefore, the apartment owner is required to obtain permission for redevelopment from local authorities. For St. Petersburg, these are regional interdepartmental commissions created under the administrations of the city districts.
In case of ignoring the law, according to Art. 7.21 of the Code of Administrative Offenses of the Russian Federation, you face a fine of one thousand to two thousand five hundred rubles, and you will not be able to dispose of your apartment, for example, sell it. Moreover, you will be obliged to return the room to its original appearance, which will require a lot of expenses.
Theoretically, you can move the kitchen to another room, even to a hallway or utility room. In practice, you will not always be allowed to make a transfer.