The quality of the home sewer system should not be inferior in reliability to the water supply or electrical network. If the sewage system in an apartment is installed efficiently with your own hands, it will last for decades, provided that installation standards are followed and high-quality consumables are used.
Do you doubt your abilities and are afraid to make mistakes? We will help you competently design and install a sewer system. The main thing is to take into account all the basic requirements, choose the right pipes and adhere to the installation technology described in the article.
The first stage is planning
Apartment sewerage diagram
Before laying pipes and installing plumbing, it is necessary to plan the sewer system. The scheme includes the following elements:
- locations of plumbing fixtures: toilet, sink, shower, bathtub, dishwasher, bidet;
- length and diameter of pipes;
- distance from walls to plumbing and pipes;
- riser location;
- diameter of siphons for connecting sinks and bathtubs;
- number of connecting elements (fittings);
- system tilt angle;
- location of inspection points.
If there are no plans to connect new points, then you do not need to change the existing sewerage layout. This will make it easier to calculate the required material. The length of all pipes is measured on site; if they pass through a wall, then the size of each section will be required.
Sewer pipes
The diameter of sewer pipes is not chosen arbitrarily; there are recommendations for their size:
- for the riser section – 110 mm;
- for a toilet – 110 mm;
- for baths, sinks and other appliances – 50 mm.
To connect some devices, a 32 mm pipe is sometimes used.
You also don’t have to choose the slope yourself; pipes with a diameter of up to 50 mm are located at an angle of 3º, and 110 mm - 2º. This means that on an area of 1 meter the slope changes by 3 and 2 cm, respectively. The correct location of the line ensures the movement of water in a gravity system.
Our gallery of works
Our specialists carry out turnkey installation of sewerage according to the following algorithm:
- Analysis of project documentation and development of a work plan and scheme.
- Laying a horizontal riser in the house. Connection and assembly begins from the most distant and highest point and moves towards the central drain.
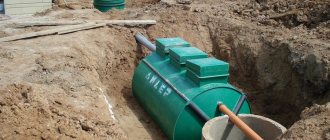
- Arrangement of a reservoir for storing or processing waste;
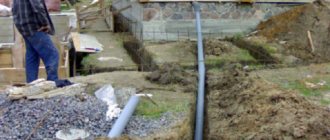
- Connection of drain and reservoir with a single pipe. To lay it, a trench is dug, 3 meters deep, where the structure is assembled and buried. All joints are reliably treated.
You can get acquainted with what specific projects you can order from our organization, and what the process of installing sewerage systems and repair work to replace it looks like, right on the website. Especially for this, we organized a gallery where we placed a selection of current high-quality photographs. Please note that not all types of projects we are implementing are published in this block - this is just a clear example of how work is carried out and in what form it is delivered.
Would you like to learn more about how the service works? We present to your attention video reviews from our clients, where they share their impressions of the work of plumbers and communication with managers.
Material selection
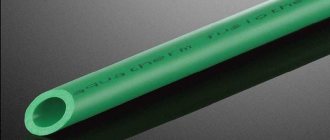
Plastic sewer pipes
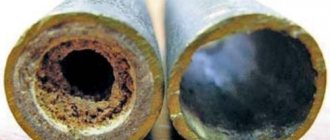
The sewage system in the apartment is installed from plastic; it is more difficult to work with cast iron pipes. Three types of polymer pipes are used: polyvinyl chloride, propylene and polyethylene. These products are similar in appearance and properties:
- smooth surface on which deposits do not accumulate;
- strength, corrosion resistance;
- a light weight;
- durability;
- installation does not require welding.
Adapters for sewer pipes
To connect pipes, special elements are required: bends, tees, metal transitions, cuffs. It is better to purchase all the necessary material from one manufacturer, this guarantees an accurate match of all diameters. Sealing the joints will require silicone grease, which is also purchased in advance. So, for work we will need:
- plastic pipes with a diameter of 50 and 110 mm;
- fitting;
- sealing cuffs;
- plastic clamps selected according to the cross-section of the pipes;
- inspection hatch, which is installed on a common riser;
- silicone sealant.
Tools:
- perforator;
- Bulgarian;
- hammer;
- hacksaw;
- chisel;
- adjustable wrenches of various sizes.
Do-it-yourself sewerage installation in an apartment
Currently, due to the presence of a large number of plumbing fixtures in apartments, the option of arranging a branched sewer system, in which each individual branch is laid with an optimal slope, is relevant.
In new buildings, the internal sewage system is connected to the riser using a crossbar insert that has three outlets. In this case, two branches have a diameter of 50 millimeters, and the third one has a diameter of 100 millimeters. The fact is that inserting additional crosses into the sewer is not possible. The reason is that the location of the entry points above the main cross presupposes the installation of plumbing fixtures too high, and below it the neighboring area will be affected (about
Dismantling the old system
Sewer replacement begins with the riser. This is the most difficult area; drains from neighboring apartments pass through it, so while the pipe is being replaced, neighbors should be asked not to use the sewer for a while. Dismantling proceeds as follows:
- Access is provided to the junction of the riser with the neighboring site. This may require breaking up part of the floor.
- Part of the cast iron pipe is cut out with a grinder. If it is not possible to cut through completely, then it can be broken with a hammer. The work must be carried out carefully, since a broken piece of pipe may remain inside and block the entire pipe.
- A tee is installed at the bottom of the riser near the floor. The straight plastic pipe chosen for the riser is connected at the top to the rest of the cast iron pipe using an adapter collar. Fastening with a tee is carried out with a socket. The tightness of the joint is ensured by a rubber ring and silicone sealant.
- The pipe is attached to the wall with clamps. In the area of the sockets the pipe is fixed rigidly, in other places the fixation is floating.
Having finished installing the riser, we begin wiring.
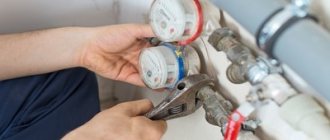
Protective Equipment and Precautions
When repairing a sewer system, the riser outlets, even if they are not changed, will have to be released for some time. Let’s say everything is settled with the neighbors and the water is turned off. But where is the guarantee that one of them will not be “grabbed” to the point that he forgets, does his job in the toilet and flushes out of the bucket? And all this will be yours. And on you. Therefore, before starting work:
Remove the toilet and clean the toilet completely. Cover the walls and floor of the toilet with plastic film and tape. Stock up on a plastic raincoat, rubber boots, gloves and a helmet with protective glass. A separate glass on the hoop will not work: you will have to work with heavy, brittle cast iron hanging above your head.
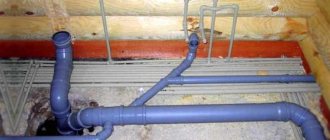
Installation of sewer system
Replaced-riser
All plumbing fixtures are disconnected from the pipes that need to be removed. After removing the old system, the location of the new highway is marked. When installing a pipeline, straight sections are preferable; there should be a minimum number of bends and turns that cause blockages. Correct installation of the sewer system with a small number of connections and a consistent angle of inclination ensures self-cleaning of the system. With each flush, the stream carries away the residue from the previous stream.
Sewer slope
You can mark the slope of the pipes using a line on the wall or a cord attached to the highest and lowest points of the sewer system. Using this marking, the installation locations of the fasteners are determined; for pipes Ø 50 mm, clamps are placed every 50 cm. To relieve stress in the pipes, it is necessary to combine two types of fastening:
- rigid - the pipe is fixed with a clamp with a rubber gasket;
- floating - the fastener allows the pipe to move; it is performed without a rubber insert.
Joining plastic sewer pipes
Before installing pipes, you need to chamfer them and clean the edges to avoid burrs. The inside surface of the pipe and fitting must be clean and dry. When making a connection, the end of the pipe is inserted into the socket until it fits tightly. To enhance the tightness, silicone grease is applied to the rubber ring. The bells must be positioned along the flow of water. During the operation of the sewer system, thermal deformation of the plastic occurs. To prevent the seam from losing its tightness when the material expands, leave a gap of 1 cm. This is done like this: the pipe is inserted into the socket until it stops, then a mark of 10 mm is made and the part is pulled back to this mark.
To avoid having to redo the finished system, it is worth carrying out a trial installation without sealed connections. Once you are satisfied that the installation is correct and all parts are present, you can perform final assembly.
Marking the pipe before cutting
Installation recommendations:
- Only straight plastic pipes can be cut. Most often, at home, the cut is made with a hacksaw, always at an angle of 90º.
- If necessary, make a turn, it is better to use two 45º bends. They do not break up moving drains so dramatically, so they become clogged less often.
- The toilet is connected to the system first, then the rest of the plumbing fixtures.
- In difficult areas, a segment called revision is installed. It has a hole covered with a rubber cover, through which you can inspect the inner surface of the pipe.
- Some plumbing is connected directly to the sewer, but there are devices that require the installation of a siphon. This is a device with a bend in the form of an elbow, inside of which there is always water for a water seal. The siphon prevents unpleasant odors from the sewer system from spreading indoors.
- Sewerage installation is carried out not only along the walls, but also in the groove. Before being placed into the wall, the pipes are wrapped in soft material to reduce noise. To prevent cement from getting into the joints, they are sealed with tape. In the grooves, the pipes are fixed in a floating manner.
- The ends of the horizontal bends are closed with plugs.
Leaking collected sewerage must be repaired
After installation, it is necessary to check the tightness of the assembled system at all sections of the wiring throughout the apartment and at the junction with the riser. The reliability of the connection of the new riser with the neighbor's pipe is checked after draining the water in the upper apartment. To check, water is drawn into the bathroom, and then the plug is removed, both taps in the kitchen are opened, and the water in the toilet is drained. The reliability of the joints is easy to assess - they all must be dry.
About neighbors
Replacing the sewer system yourself in an apartment building is impossible without good neighborly relations: after all, during your work, the neighbors “on the risers” (above and below) will have to sit without water and endure it or go to a bucket instead of a toilet. And any secret ill-wisher, by opening the taps of the cold and hot water risers in the basement, will give them a sign that the work is supposedly finished. They will start using it “from the heart”, and everything from above will come to you. Non-trivial options are possible here. The author of these lines knows of a case where an evil and irresponsible alcoholic was successfully neutralized during work by getting him drunk to death.