Connection to sewer networks, what documents are required
Complete house plan. It is mandatory that a sewer pipeline laying diagram be presented on paper. This process is carried out with the help of a company that conducts geodetic examination.
All technical conditions for sewerage connection. All these issues are considered by the organization.
The diagram on which the plan will be indicated is exactly according to which the sewerage connection must be made. This document must be provided by the specialist who designs and installs the technical functions. It relies on the basis of technical conditions, thus producing a new plan.
The project, which was prepared by the water utility, with their approval. This process is handled by architectural management.
It is also necessary to remember one main nuance. Before starting construction work, you must obtain permission from your neighboring residents. They are required to sign their consent. If additional questions arise about pipelines that will pass through places where other electrical or heating networks have already been installed, then in this case, it is necessary to take another permit. It is necessary to request a special document from the organization. If the owner does not pursue certain requirements, he will have to pay a huge fine.
To lay a pipeline to the central highway, you must obtain a permit. In the event that there is a well nearby. The pipe that will run through the area to the well will be directed at a certain inclination and angle. To accurately determine the laying depth, you must use the special values provided by the data in the SNiP.
There is also one main piece of advice to consider. This question concerns the presence of existing turns on the highway. As shown in practice, turns on the highway should not exist, but if such a problem suddenly arises, then it is necessary to turn the highway a few degrees, about 90. It is also recommended to install an inspection well. Since, in this case, the well performs the function of controlling this system.
The correct selection of the trench digging height plays a significant role. Certain elements need to be taken into account. The diameter of the pipe must be larger than the internal one. The usual size is up to 250 mm. Basically, pipes with a diameter of 150 to 250 mm are used. After the specialist determines the size of the pipes, it is necessary to dig the bottom of the trench. Once the process is completed, the cushion can be provided for laying the pipeline.
Where to go to get sewerage installed?
Vodokanal or gardening association
First you need to contact the local administration, from there you will have to go to the geodetic service (order a situational plan for the site), to the Vodokanal and SES. An application is submitted to the water utility to obtain technical conditions for connection. You need to have a copy of your passport and a document confirming ownership of the house and land with you. If the pipeline has to be installed under the roadway, permission from the road service will be required.
Once the technical specifications have been received, you can order a sewerage project. If it is created by third-party specialists, the finished document still needs to be approved by the water utility and the companies whose communications run near the house (gas service, distribution network, telephone service). Final approval takes place in the architecture department of the local municipality.
For installation, you can also hire a contractor who has the appropriate permits. But in any case, the connection to the general network is made by a specialist from the company servicing the municipal sewerage system.
install an autonomous sewer system.
Private sewer network project
Laying a sewer system in a private house begins with the development of a project and estimate documentation.
Domestic sewerage project
A domestic sewerage project is a diagram that details where and how the main parts of the sewer network should be installed.
Private sewer network project
When designing a domestic sewer system, it is necessary to take into account:
placement of plumbing products inside the house. It is desirable that all sewerage distribution in a private house be located as close as possible to the previously installed central riser. This will avoid the use of additional equipment, significantly reduce the cost of purchasing and laying pipelines, reduce the risk of blockages and unpleasant odors;
Typical diagram of an internal sewer network
- sewer slope in a private house. If it is possible to build a gravity sewer system, there is no need to resort to the pressure type. Installing a gravity-flow sewer system in a private house is much simpler and cheaper than a pressure-flow one;
- sewer depth in a private house. It is required that all pipelines and additional structures be reliably protected from freezing, which can lead to complete failure of the system.
Basic rules for laying a sewer pipeline
Storm drainage project
The design of a private storm sewer system, as well as a domestic one, includes the location of the main elements and recommendations for installing the system.
Typical design of a storm sewer system
For high-quality and uninterrupted operation of private sewerage, it is better to develop all necessary projects in collaboration with qualified specialists.
Placement of system elements
Sewerage is an interconnected system where each element influences the overall configuration. The layout of sewer pipes in a private house is carried out taking into account the specifics, location and technological needs of all plumbing fixtures, installations or departments. It is necessary to ensure that the following conditions are met:
- pipes must have a slope corresponding to the recommended values for a given diameter;
- the size of the pipes must provide sufficient throughput;
- the configuration of the sewer networks does not allow sharp turns, complex bends or changes in the direction of the slope;
- it is necessary to have inspection hatches, access to pipes must be provided for repair work;
- It is necessary to have a vent pipe to ensure ventilation of the system.
Compliance with these requirements is determined by SNiP and other regulatory documents. In addition, the owner, who will have to use it every day, is primarily interested in the proper installation of sewer pipes in a private house. All errors will affect the level of comfort and quality of living in the house, so it is important to treat the creation of the system with the utmost care.
Installation stages
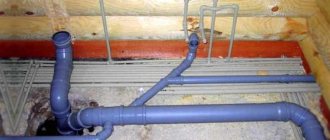
Gray pipes are used for internal sewerage.
You need to install the home sewerage system from the inside. In all rooms with plumbing equipment (kitchen, bathroom, swimming pool, sauna), pipes are installed towards the riser. The wiring is made from tubes with a diameter of 50 mm. A pipe with a cross-section of 110 mm is connected to the toilet.
All joints and connections must be treated with sealant. Plugs are installed at the outlets for household washing equipment.
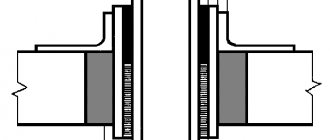
The riser is brought to the foundation, in which a hole with a diameter of 130-160 mm has been punched in advance. A metal sleeve must be inserted into it. The collector pipe is led out through it. The exit point of the outer pipe is insulated with high quality, the gaps between the sleeve and the foundation are concreted.
External sewerage
Orange pipes are for external sewerage
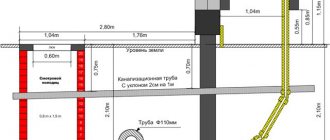
Initially, you will have to dig trenches for the collector. They are dug from the very exit of the pipe from the house all the way to the intended location of the septic tank. The digging depth depends on the level of soil freezing in the region, as a rule, it is at least 70-90 cm. The upper edge of the laid pipe should be at this mark from the soil surface.
When digging trenches, the slope specified by SNiP is observed. The final wastewater receiver should be located below the sewer pipe exiting the house. Then it works like this:
- A sand cushion is poured onto the bottom of the trenches and compacted well.
- Pipes are laid on the base, connecting them securely.
- The fully assembled system is checked for leaks. If there are no leaks and water leaves the house freely, the collector can be backfilled. The soil is not compacted much. He will sit down on his own over time. If necessary, then add more soil on top.
Septic tank installation
At the final stage of work when installing a private sewer system, you need to build a homemade septic tank.
The simplest option is to use a reservoir in the form of a plastic barrel. Some build a sewage receptacle from car tires or concrete rings. Plastic is easier to work with. The principle of installing a two-chamber septic tank looks like this: They dig holes under the tanks in accordance with the parameters of the barrels. At the same time, the depth and width of the pit is increased by 30-40 cm for the base and backfill. The bottom of the pit is carefully compacted. Pour a sand cushion of moistened sand. It is well compacted. Wooden formwork is placed on the sand under the first chamber and a concrete solution 20-30 cm thick is poured. The bottom of the second tank is made drainage. A layer of fine crushed stone is poured onto the sand bed, and broken brick or cobblestones are placed on top. After the solution has dried, install both tanks next to each other
It is important that there are no distortions. Both chambers are connected by an overflow pipe at a level of 40 cm from the bottom of the barrels. A drain/waste pipe is connected to the first receiver in its upper part. All joints are well sealed. The tanks are filled with water and only after that they are backfilled with careful compaction of the soil.
If the barrels are not filled with water, they may subsequently burst in the soil. The top of the septic tank chambers is covered with hatches.
Risers and bends
Installation of the internal sewerage units of a private house begins with the installation of the riser structure. They are installed in a vertical position and attached to the walls (distance from each other is 20 cm) or in special grooves. Deviation is checked using a plumb line or level. Then they are fixed with clamps. Risers are installed using both frame and hidden methods.
Sewage ventilation
- Absolutely all sewer flushing risers must have an exhaust hood. Its role is to ensure the connection of internal sewerage nodes with the outside atmosphere. The ventilation pipe helps to avoid drain leaks and pressure surges.
- Ventilation of aeration sewerage. The hood is made on the roof of a private house away from the windows. Sometimes the ventilation pipe is connected to the farthest riser, and air exchange valves are installed in the rest.
- The most important thing during installation is the correct installation of the sewer-flushing compartment. Its diameter varies from 15 to 90 cm. They are made with different diameters and exits (wrong, innocent, upper, return, paired).
- By adjusting the bends, the diameter of the pipeline or riser is changed. They are fastened using a socket with a rubber seal and a ring from the inside. This creates a reliable airtight connection.
- It is recommended to install the transition of the riser to the desired distributor with 2 outlets. A pipe with a length of more than 2 times the diameter of the riser is installed between them.
This installation method reduces the possibility of sewer clogging, and also reduces noise and pressure. In order to reduce the degree of transformation in the future, it is recommended to monolith it with concrete. The water inlet plumbing connections are connected to the riser in front of the pipeline.
Internal and external sewer units are connected in front of the well at an angle of 90 to 130 degrees. In the future, this arrangement will help extend the service life and eliminate the formation of blockages. The exposure pipe is placed in a metal case.
Connecting a house to a sewer system, where to start?
Sewage connections are divided into two types. They are separate and mixed. Separate is used in cases of stormwater and domestic connections. But mixed ones are used only for mixed-type pipelines.
It is worth noting that the developer himself finances the sewerage installation. This process involves large sums. But if the home owner does not have that kind of money, then there is an opportunity to save. In this case, it will be necessary to modernize the centralized branch. First of all, the owner is obliged to contact the water utility and offer his cooperation, that is, a certain payment for the work. If the institution confirms your application, then part of the amount of money will be paid by the organization itself. However, you can pay money in agreement with your neighbors. If they are satisfied with this method, then it will be much easier for you to complete the task.
Many people do not like to do troublesome things and prefer not to go to various institutions. There is an optimal solution. You can contact the company that handles these matters, provide all the documents and draw up an agreement. They will do everything for you. Just before you trust the company, you need to clarify whether they are ready to cope with the task. Do not forget that all services are quite expensive. Therefore, if you do not have sufficient funds, then you should not apply.
We connect the sewer system to a private house
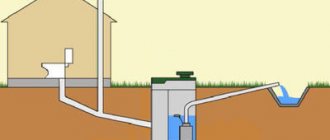
Before starting the construction of their own residential building, each owner is always faced with a number of different problems. First of all, it is necessary to create the correct design of the facility and subsequent installation work. If the residential plot is located in an area where centralized communication networks have not been built, then you will have to take measures and build an autonomous option. Connecting an autonomous sewer system will require money and time. If the owner builds his house near centralized networks, then there is an excellent opportunity to connect the system to the city sewerage system. This is the most advantageous option.
Design and carrying out the necessary calculations
Before starting construction of the system, you need to draw a preliminary sewerage installation diagram.
The drawing marks all the locations of plumbing in the house and the location of the septic tank on the site. In addition, the location of the pipeline exit through the foundation into the ground under the first floor is indicated on the diagram. All collector lines are drawn on the drawing from each plumbing point up to the entrance to the septic tank. The length of each section of the pipeline is measured. Thanks to the measurements, the total amount of required footage of external and internal pipes is obtained. It is extremely important to mark on the drawing all the bends, connections, branches and turns of the manifold. This way the master will be able to purchase the required number of adapters, fittings, etc.
Types of waste systems
Since the old grandfather's toilet has lost its relevance, especially in the cold season, three main types of waste systems are currently in use:
- A system connected to a collective or city sewer;
- Stationary waste collection point:
- Sealed tank;
An example of a sealed waste collection point
- Stationary sewer well without bottom;
Cesspool made in the form of concrete rings
- Biosewage installation diagram.
An example of the construction of a biosystem.
The principles of installing a pipe system in the house and up to the collector are almost the same for all types. It is convenient to make all the wiring around the house from PVC, and it is more rational to make the connection to the collection point with a HDPE pipe for technical purposes, since its length allows for a seamless method. The main branch connected to the toilet is laid with a pipe with a diameter of 110 mm, all other standard water points (sink, washing machine, shower) are connected to the general system with pipes of 50 mm diameter. The only requirement is an angle of 2-3° in horizontal sections to ensure optimal water flow.
PVC pipes
HDPE pipe completely black
PVC sewer pipes have their advantages and disadvantages when installing a waste system:
- An easy way to connect. The entire circuit is assembled like a construction kit, pipes and components are simply inserted into each other;
Typical connection example
- The materials are light in weight compared even to HDPE materials;
- A simple method of fastening, including on a vertical surface;
Steel bracket screws into the wall
- The only drawback is the maximum length in free access is 6 m.
Do-it-yourself sewerage diagram in a private house
Do-it-yourself installation of a sewerage system in a private house is possible for all types of sewerage, except biosewage. To implement this option, it is recommended to contact specialists. All others can be installed independently, but when connecting to a central system, a package of permitting documents will be required.
One of the waste system options
Where to start
The first point is to select the type of collection point. The most profitable is connecting to the general city branch. The user makes a one-time investment in installation and required materials and pays a symbolic amount monthly for services. This option is not always feasible for suburban construction, but there is an alternative.
Related article:
Sewerage for a private home: how to properly arrange it. How to properly design and implement systems for internal and external wastewater disposal, as well as their treatment - read in this material.
Stationary sewerage scheme for a private house: depth of laying the pipe to the tank
The reservoir can be made of different materials. It could be:
- Metal or plastic tank;
Container made of metal
Plastic container
- Concrete structure;
Concrete monolithic cesspool
- Concrete rings installed on a concrete base.
Installing the lower ring
This method is acceptable even if there is a water well on the site, since liquid waste with good waterproofing does not penetrate into the soil. The only drawback is the waste of money on the services of vacuum cleaners. A septic tank, as a rule, is installed at a depth of 1.5-2 m. It is strongly recommended that the pipeline be laid below the freezing level of the soil, which can be determined using a special map.
Map diagram for determining the level of soil freezing depending on climatic conditions in a certain area
Depending on the number of water collection points, the working volume of the container is selected, but it should be taken into account that the standard volume of a sewer truck is 3 m3, that is, the volume of your container must be a multiple of this figure. For example, if the volume of the tank is 5 m3, you will either overpay for the services of a second machine, or 2 m3 of working volume will be filled once and become useless.
In the case of a standard family of 4 people, with periodic washing, showering, and washing dishes, a container with a volume of 3 m3 is filled on average in two weeks.
Septic tank volume calculator
Related article:
How to choose septic tanks for a private home. Let's try to understand in this article the features of different types of septic tanks and what needs to be taken into account when choosing them.
Option with leaky waste collection point
When implementing this type of sewage system, the location of the waste collection point is very important. The minimum distance from the house and outbuildings to the cesspool is 6-10 m. Otherwise, liquid drains wash away the soil and sandy base of the foundation.
Execution options:
- Concrete rings installed on a drainage pad;
Waste collection point made of two rings
- Brick version of the cesspool;
Gaps between bricks allow liquid waste to seep through
- Metal or plastic barrels with holes connected into one system.
An example of two barrels, there may be more
Note! When using barrels, the base is laid out with gravel, since the weight of the poured soil will press the container into loose soil.
When laying a sewer system in a private house, it is recommended to make the ditch with a slope exceeding an angle of 2-3° for a more efficient process. The depth of the ditch for each case is different, depending on the size of the site and its location relative to the access roads.
Stages of sewerage installation in a private house
If you would like to independently install a sewer system in a private house by connecting to the central system, then you should take the following steps:
- it is necessary to use the services of a surveyor to draw up a situational plan of your site, including a plan of the house itself and marking the path along which the sewer line will be laid;
- submit an application to the relevant organization for the development of technical conditions for wastewater disposal on your site;
- These technical specifications must be transferred to design specialists who will develop a project for entry into the central sewerage system. The finished project must be submitted to the architect and the water utility service for approval;
- the architect must issue permission for the work to be carried out by a specific organization;
- it is also necessary to obtain the consent of your neighbors to carry out work near their homes to connect to the central sewerage system;
- if the work involves destruction of the road surface (if the highway passes through it), then it is necessary to obtain the appropriate permits from the traffic police, as well as from the road maintenance service;
- before putting the line into operation, it is necessary to notify the water utility service;
- upon completion of the sewerage installation work, the operating organization must accept the finished project and sign an agreement with you regulating the acceptance of wastewater from you.
When laying sewer pipes, it should be remembered that the pipe should lie at a depth of 1200 mm from the house, and the slope should be approximately 5 mm per linear meter.
Storm sewer - connection to the city storm network
Many owners of private cottages would like to drain rainwater from their plots together with domestic wastewater. Technically, this is not at all difficult, but directing rainwater into sewer wells is strictly prohibited.
This method can easily lead to the well overflowing, causing a large amount of sewage to come out. Therefore, to free the area from accumulated rainwater, it is necessary not only to install a sewer system in a private house, but also to connect it to a central or city storm sewer. Since storm sewerage has a much greater capacity, rainwater flows will not create excessive load on it. The rainwater pipe can lead directly to the collector.
Keep in mind that during heavy rainfall, water can flow back through the drain pipe, so when connecting to the central storm sewer system, it is necessary to install a return valve.
Installation of an autonomous storm sewer in a private house
The most practical way is to install a special pit on the site with a reservoir for draining rainwater. A similar system can also be used as a local sewage system for a summer residence. The reservoir is located in the soil, and therefore natural cooling occurs, preventing the growth of bacteria. Then a drain is laid through which rainwater from the roof of the house will flow into the reservoir. It is also advisable to install a special grill that will act as a filter and keep leaves, branches and other debris out of the tank.
The water accumulated in the tank can then be used, for example, for irrigation.
Subtleties of assembling internal sewerage
Fan pipe
If the system has curved sections of pipes, then conventional threadless fittings can be used.
When installing pipes in the kitchen, the slope is made a little more than usual. This is necessary to prevent blockages in this area, since water with impurities of soap and fat passes through it.
A drain pipe needs to be installed in the bathroom. It performs the function of a ventilation system. If it is impossible to mount it, install an air valve.
Types of sewer systems for a private home
The easiest way is to install a plastic pipeline.
Taking into account the fact that the pipeline will not be connected to the city central highway, the owners of private plots are constructing one of the types of sewerage systems near the house:
- A single-chamber septic tank is a cesspool with a sealed bottom and walls. If the tank is completely filled, it is necessary to pump out sewage using sewage equipment. You can make a drainage/filter bottom for a single-chamber septic tank. This way the water will go into the ground. But you should be careful here: if the groundwater level is high in the area, there is a risk of contaminating nearby drinking wells. By law, such actions are punishable.
- Two-chamber septic tank. It consists of two adjacent reservoirs. The first one has a larger volume than the second one. Sewage flows through the collector into the main receiver, where it settles. Large particles of debris (feces, paper) settle at the bottom. The clarified water is poured into a second tank and drains into the ground there. The bottom of the second storage tank is made of sand and crushed stone for filtering. To avoid silting, it is better to change the fill every 4-5 years. The first tank is cleaned every 1-2 years.
- Biological treatment septic tank. Here, bacterial preparations are used to process sewage into organic matter - sludge and water. Such a tank must be connected to electricity, since bacteria only work in positive temperatures.
Independent sewerage device
For the internal system you need:
- pipeline
- riser and drain pipe
- audits
- locking elements
- outlet (connection to external system).
the optimal location for the riser
The first step is to route the pipes from each device to the riser. The diameter of the pipe at the bathtub, shower, sinks and sinks is 50 mm, at the toilet - 100 mm. All plumbing fixtures have elbows installed to prevent unpleasant “odors” from the sewer from entering the premises. When installing and fastening the pipeline, it is necessary to take into account the slope (approximately 3 mm per meter). The riser is installed above the ridge and covered with a grill. The opening for the outlet to the external pipeline should not be smaller than 30x30 cm.
The external part of the sewer consists of:
- pipeline
- wells
- storage tank or septic tank.
It is best to install a pipeline located above the freezing level from cast iron. The use of plastic materials is allowed when buried below the freezing level. In a system without a pump, the pipeline is laid with a slope
It is important that the septic tank or septic tank is located no closer than 5 m from a residential building and 20 m (at least) from a well with drinking water. In addition, it is necessary to ensure free access for vacuum trucks.
The pipeline is installed and laid.
The size of the septic tank pit should be larger than the container (so that a concrete pad can be created at the bottom). In this case, the neck of the container at the end of the work should be located slightly above the ground level. The spaces between the septic tank and the walls of the pit are filled with a cement-sand mixture and compacted. After connecting the pipes to the septic tank and checking for tightness and functionality, all trenches are backfilled.
It is more convenient to install a system for collecting melt and storm water separately. This will avoid increasing the volume of the septic tank. In addition, melt and rain water is much cleaner than domestic wastewater, so it can be used for technical needs (for example, irrigation).
First you need to mark the surface and dig trenches for outlets and pipes (taking into account the slope), as well as holes for storm water inlets. The trenches for the outlets are concreted, and a 10 cm thick sand cushion is placed at the bottom of the trenches for the pipes. Catchment basins must be equipped with funnels that are covered with nets. All elements of the stormwater system are connected.
The cost of connecting the sewerage system of a private house to the general network depends on the cost of completing all the necessary documents, the volume of materials and their type, and the cost of the installation contractor. Depending on the region, the total amount varies between 50-150 thousand rubles. The cost of an autonomous system can range from 500 thousand to 1.5 million rubles. To save money, you can build one system for several houses.
https://youtube.com/watch?v=4IbYUyWsWV8
Correct location of main sewerage units
The overall sewage system of a house depends on the arrangement of each element of the system. To choose a storage tank for wastewater, you need to take into account the number of family members and plumbing fixtures from which used water is drained in a house, bathhouse or garage, etc.
Types of sewerage systems are determined depending on their location and the functions they perform:
- The internal sewerage system consists of pipes running from plumbing fixtures to the street.
- The external sewerage system is a network of pipes running from residential and utility rooms to treatment facilities.
- Treatment facilities , storage wells, filtration field.
At the design stage of the internal sewerage plan, it is necessary to consider the design features of external networks and the type of treatment facility. The sewer system of a private house also includes storm drains, which drain runoff from rain and melting snow from buildings and roads through gutters.
Attention! If possible, it is better to connect to a centralized sewerage network.
Types of sewerage for a private home
Any drainage system consists of two parts: internal and external. The first is designed to collect water from various plumbing fixtures. The second most often also consists of two parts: domestic and storm sewer. The first removes excess water from the roofs of residential buildings and other buildings, platforms and paths. The second collects wastewater from a residential building. It consists of:
- pipeline;
- pumps;
- filters;
- wells and drainage pit;
- filter wells or septic tank.
gravity or forced circulation.
depends on the supply of electricity, Stormwater and sanitary systems are sometimes combined into one and are called a common sewer system. But most often, storm and melt water is discharged separately from household wastewater. Such external sewerage is called separate.
Details
Principles of sewerage installation
Regardless of the number of floors of a country house, the layout of pipes for the sewerage system in it is built around the main, that is, vertical riser. Horizontal drains are already connected to it, that is, outlets from plumbing fixtures. From below, such a central pipe needs to be connected to an outlet to the street, from a septic tank or the village network for water drainage. And on top it is important to equip a ventilation outlet for the roof. If we are talking about a one-story house, and the only plumbing it has is a sink, a bathtub and a toilet, then you can completely abandon the riser. But keep in mind that you will still need to make a vertical pipe for ventilation, since otherwise all the unpleasant odors from the sewer will somehow end up in the cottage, and even siphons will not save you here. Sudden changes in pressure when draining water can cause the water seal to fail, causing sewer amber to begin to leak out of the pipes into the sanitary unit and kitchen area.
To install a sewer system in your home yourself, you need:
Fastening elements (clamps).- Siphons for bathtubs, sinks and shower stalls.
- Inspection hatches.
- Plugs.
- Elbows and tees.
- Pipe diameters are 5 cm (for bends) and 11 cm for the riser.
It is recommended to choose pipes for the sewerage system in a private house from polypropylene or plastic, that is, PVC. The latter are cheaper, but polypropylene is more resistant to household chemicals and high temperatures. In addition, for the country house you can purchase cast iron analogues.
They are durable, however, and much more difficult to work with. If you cut plastic with a simple hacksaw, then for cast iron you need to use a gas autogen or an angle grinder. In addition, the pressure system requires a sewage pump (installation with a small storage tank in the basement).
Schemes (real examples)
So, let's look at the layout of sewer pipes in a private house. Pipe distribution in a country house is carried out according to one of two schemes:
- Natural (that is, by gravity).
- Pressure, that is, forced (with a pump).
It would be better and even more correct to give preference to the first, that is, with gravity flow. The forced installation option should only be resorted to as a last resort, when it is not possible to ensure natural drainage of runoff water from the building. Such a system is energy-dependent; if the electrical power is turned off, the sewerage system will simply stop working. An internal storage tank of a pumping unit can accommodate a certain volume of waste water, but it is limited.
Installation procedure
The sewer system in the house must be assembled from bottom to top. To begin with, you need to make an outlet in the basement (output through the cottage foundation) in order to connect the street and indoor parts of the water drainage. After this, it is important to raise the riser with installation on each floor above the floor surface of the tee or cross in order to connect horizontal bends. It is recommended to make a riser turn into the outlet into the street with one bend with a knee at an angle of 90 degrees, and two at 45 degrees, or even three at 30 degrees. Such a bend will be smooth, which will reduce the risk of a blockage forming in such a place. The photo shows the features of installing pipe connections in the sewerage system of a country house.
The opening with the base is made with a size of 0.4 * 0.4 meters or more. There should be a free space of about 15 cm from the pipe to the very edge of such a hole. This is required so that in the event of subsidence of the cottage and soil heaving in winter, the outlet will not be destroyed or deformed. The remaining gap will be sealed with clay and tow.
Installation work on risers
Installation work consists of sequentially mounting individual elements away from each other. Connections and their fastening to each other are carried out thanks to the presence of socket elements at the ends. From the floor on the first floor, you first need to install a tee on the branches. After this, the pipe will be about 1 meter high. Afterwards, the revision is installed, and then another work is installed to pass the ceiling to the new floor. There will be a tee again and everything will repeat itself. There should be a distance of 1 to 1.5 meters from the floor level to the inspection hatch. If the pipeline is made of plastic products, then the riser must be attached to the wall using clamps on dowels. In this case, there should be a gap of 0.2 meters from the wall surface to the pipe. It is important to place the clamps under the sockets and with a distance of 4-5 meters from each other in terms of height.
The passage through the ceiling and the space above it after installing the pipes must be filled with cement mortar with a thickness of 3 cm from the pipe and a height above the floor surface of 10 cm. This concrete edging is made to protect the riser, as well as provide noise insulation and prevent the spread of fire during fire time.
Installation of bends
Installation of elements such as bends is required at a slope from plumbing fixtures of 2.5-3.5 cm per linear meter. If the slope is much less, then waste water will begin to stagnate in the sewer pipeline. And with a lower slope, the drains will begin to flow very quickly, which is why heavy particles and fat will settle inside, gradually creating a blockage. The length of the horizon line should not be more than 10 meters. If it is laid using the open method, the pipeline can still be made 2-3 meters larger. But for sewer pipes that are closed with a screed, this is unacceptable. And in any case, an inspection must be provided for the entire 8 meters of the site horizontally in order to carry out cleaning. The sloped outlet is fixed with clamps on the wall surface in increments of 1 to 1.5 meters. If you make this distance larger, the plastic line will begin to sag.
Features of the arrangement process
In a one-story cottage, sewer pipes in a private house are usually made with one riser in the sanitary unit and two horizontal outlets in the kitchen and bathroom. But if the house is huge and has 2-3 floors, then the sewerage system layout will be much more complicated. Here it is often necessary to install a couple of separate risers. But in general, the principles for arranging the collection of household wastewater with plumbing devices are the same - pipe slope and supply of wastewater to one point for discharge from the building.
In order for the sewer system to work as well as possible for many years, when designing and installing it, it is important:
- Leads with a riser must be connected not with straight crosses, but with elements with branch pipes at an angle of 35 degrees.
- To fix individual lines at a slope, clamps are used with a pitch of no more than 1.5 meters.
- It is important to seal the places where vertical risers pass through the ceilings with cement mortar.
- Remove any burrs from the ends of the plastic pipes after they have been cut to the required length with a hacksaw.
- To form hydraulic valves, use siphons.
- Place the fan outlet as far as possible from balconies and windows.
According to SNiP, in a private country house, the installation of sewerage pipes can be carried out using hidden and open methods (in boxes made of non-combustible materials or shafts). The first option makes it possible to constantly monitor the condition of the pipeline and, if necessary, will simplify their repair work, while the second is more aesthetically pleasing. Another important and popular mistake is to use a simple ventilation shaft to save money on a fan pipe. Sewer-type air exhaust and house ventilation cannot be combined, since otherwise the unpleasant odor from the sewerage system will end up not on the street, but in the building itself.
Materials for sewerage installation
Internal sewerage consists of plumbing fixtures and pipelines, which are most often installed from plastic materials. Not only pipes are required, but also various fittings:
- bends;
- knee;
- tees;
- crosses.
All plumbing fixtures must be equipped with devices that prevent solid particles from entering the system. The pipeline is installed with a slope, that is, the entry into the riser must be located below the sections connected to the plumbing fixtures.
collection and cleaning system. drain hole in a special sealed container
On sandy soils, you can build filter wells from concrete rings by filling the bottom of the holes with a layer of crushed stone. Such structures do not fill very quickly, but they purify wastewater by only 60-70%. Much more effective are septic tanks, in which wastewater is purified using aerobic and anaerobic bacteria and enters a filtration well with a layer of gravel (crushed stone) at the bottom. When using a septic tank, household wastewater is treated almost completely and does not harm the environment.
The pipeline for the outer part can be mounted from cast iron or plastic (PVC, polypropylene, corrugated polyethylene). Cast iron is too expensive, heavy and requires the use of heavy equipment. Plastic materials are lightweight, very smooth on the inside, and resistant to rust. For household pipelines, the best option is PVC pipes or corrugated polyethylene. But the choice is made based on soil analysis, the level of soil freezing in winter, the area of the site and the type of treatment system.
Sewer system design
Unlike electricity, gas, and water supply systems, which are installed in accordance with documentation certified by certain authorities, sewerage systems on your own land plot and in your house are allowed to be installed without permits.
However, one cannot do without a project, as it will protect against errors associated with violation of generally accepted requirements.
For example, one of the common violations is failure to respect the boundaries of the sanitary zone when installing a drainage pit. The supply and drain systems must not come into contact with each other.
Option for arranging communications in a private one-story house - external water supply and sewerage systems are located on opposite sides of the building
The installation of internal wiring is often associated with errors in the organization of ventilation, incorrect choice of pipe diameter or angle of inclination.
The construction of an axonometric diagram is usually carried out by specialists. They also carry out hydraulic calculations of the internal network and the highway located on the outside of the building. Now there is a more interesting option - creating a sewer model in 3D format.
3D modeling programs allow you to create an accurate and complete project that simplifies the selection of pipes, fittings, fasteners, and installation methods as much as possible.
They turn to specialists for a project when they want to reduce risks. But there is another option - study sanitary and technical standards, familiarize yourself with internal wiring diagrams, learn to understand the quality of plumbing equipment and draw up a project yourself.
Placement of important system components
The peculiarity of an autonomous sewerage system is that the principles of its arrangement depend on each component in the overall system.
For example, the criterion for choosing a wastewater storage tank is not only the number of people living in the cottage, but also the number of connected sources for draining technical and household water - from the house, garage, bathhouse, summer kitchen.
An approximate diagram of the interaction of internal and external sewerage systems with the mandatory installation of a drain riser. The cleaning function is performed by a factory-made septic tank
Based on location and main functions, sewerage is divided into 3 categories:
- internal - a network of pipelines from plumbing equipment to the exit outside, behind the walls of the house;
- external – highway from buildings (houses, bathhouses) to treatment equipment;
- cleaning systems - septic tanks, storage tanks, filtration fields, wells, settling tanks, biological treatment stations.
When considering the layout of the internal sewerage wiring in the house, you need to take into account the location of the external main and cleaning (storage) equipment.
If you have a centralized water collection and purification system, it is more rational to connect to a common pipe or treatment plant, if this option is cheaper than buying a septic tank
A full-fledged system includes not only drainage of household wastewater, but also a storm drain - a complex of stormwater inlets, gutters, pipes and connecting elements responsible for the collection and accumulation of rainwater.
Domestic sewerage on diagrams is usually designated K1, storm sewerage - K2. There is a third type - K3, but this is industrial equipment that has nothing to do with private farming.
Source data analysis
Everyone's sewerage conditions are different. Small country houses are characterized by the simplest system: a riser with a pipe outlet to the bathroom, where a toilet and shower are installed.
Multi-room or two-story cottages are equipped with a network of pipelines, which also converge to one riser, less often to two.
Accordingly, projects for different houses will differ. To take into account all the nuances, it is necessary to answer a number of questions before choosing a scheme:
- What method of wastewater treatment is appropriate?
- Is it possible to connect to a centralized sewer?
- How much wastewater should a treatment plant accept per day?
- How often will the drainage system be used? (Year-round, seasonal, weekends).
- Is additional insulation required for pipes?
- What pipe material is optimal for creating a network?
- Will the waste drain by gravity or will a pump be required?
Most of the questions will arise during the design process, when you will need to select a wiring diagram and materials for its assembly.
To allow wastewater to flow by gravity, all pipes are placed not parallel to the floor, but at a slight angle. The slope is always directed from the plumbing fixtures towards the riser
The external pipeline is laid in the same way - with an inclination from the building to the pit or treatment plant.
Important rules for setting up an internal network:
- the cross-section of the pipes is selected taking into account the volume of waste;
- During the installation process, the principle of serial connection is used;
- the number of turns and sudden changes in elevation are kept to a minimum;
- ventilation equipment must be installed;
- think over installation locations for inspection hatches;
- choose thermal insulation for areas located in unheated areas.
If the pipeline is long, it is difficult to maintain the slope along the entire line, so additional equipment is installed - a circulation pump.
Work planning and scheme selection
The installation of sewer pipes is usually carried out together with the installation of a water supply system; accordingly, it is better to design these two systems together.
If we summarize all the documents that make up the project and try to act according to the rules, we will get the following list:
- General data - description and conditions for installation of water supply and sanitation systems based on regulatory documents.
- Explication of the premises (explanation of the diagram) indicating wet areas and the method of waterproofing them.
- Calculation of water consumption and wastewater disposal volumes taking into account standards.
- Floor plan for the location of the water supply system and axonometric diagram.
- Floor plan for sewerage location.
- Specification - a listing of all components with an indication of quantity or footage.
The last point is difficult to calculate unless there is an exact diagram (model) of pipelines indicating all turns and connections.
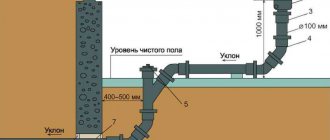
The diagram shows the diameters of the pipes, the height marks of the location of the main line relative to the UP (finished floor level), the location of the collectors and plumbing fixtures
Having diagrams developed for a specific building, wiring becomes much easier, and with the availability of modern materials, almost anyone can do it.
Therefore, owners of new private houses act as follows: they order documentation from designers, and do the installation themselves.