Faucets - devices that allow you to regulate the flow and temperature of water, consist of a large number of parts, each of which performs a specific function. In such a system there cannot be any unnecessary or insufficiently important elements, and a part such as a nut ensures the functionality of the entire valve as a whole.
Tips for selecting nuts
If you need to find a nut separately due to loss or damage to the complete one, then you should not forget a couple of simple rules:
| The best selection option is by example | It goes without saying that if you have an old element, then buying a new one instead is much easier. It is enough to compare two products and make sure that they have similar parameters and are interchangeable. But not always an example is at hand, so it is possible to take with you a faucet part that requires a fastening element |
| Study the quality level | If there is no example, then you need to take measurements very carefully and meticulously, and when choosing, select the option that is made better: there are no burrs on the thread, it is rolled evenly and carefully, there are no stains or cavities on the surface. Every little thing matters, because it is possible to draw conclusions from it about how well the element is made |
| Consider the type of tap cover | Putting a copper nut on a chrome-plated structure, as well as the opposite, is not the best solution, since it does not look very attractive. It goes without saying, this point does not apply to cases where the fastening is hidden and simply will not be visible; in such a situation, any color will do |
Advice! Another reason that speaks about the quality of the product is its mass. High-quality options weigh much more than fragile elements made of powder alloys, so it is better to choose those that are heavier.
Types of products and basic installation tips
As noted above, the design may contain different nuts; we will consider the most popular of them, since the number of models is huge and the design may contain atypical elements.
Types of nuts
Much more often during installation and repair work you have to deal with the following components:
- Elements for fastening to the water supply, they are located on the inlet lines and in most cases are visible . Much more often they are rigidly fixed to the structure and replacing them is unrealistic; you need to buy a new mixer. Based on this, when working, be careful and do not apply too much force, so as not to break the element; in addition, watch the position of the rubber gasket, it must be level.
- The nut to the faucet body under the spout helps to fix the faucet gooseneck . Its main highlight is that the spout must not only be well fixed, but also move left and right; for this, there must be a plastic expansion washer under the nut. Tips for securing such units are simple: you do not need to apply too much force, but you need to tighten the system carefully so as not to scratch the outer decorative coating.
- A clamping nut is also needed for systems installed on a sink or sink; it is located at the bottom and is not visible from the outside . The price of these elements is low, but it is better to buy a version made of brass or brass, so as not to worry about the unit being damaged by corrosion. It is possible to tighten the system with your own hands, without using a key, since too much force is not needed.
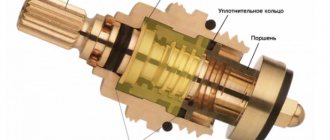
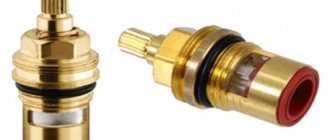
- Another type is nuts that secure the cartridge in lever valves . They are hidden under a decorative ring and can only be reached by removing the handle. The design is enormous in size; in the upper part there are turnkey edges, and in the lower part there are threads of a certain size.
Features of the work
The installation instructions tell you the assembly procedure, but you will need to learn how to disassemble the system yourself.
Let's look at how to change the nut on a faucet if it cannot be unscrewed:
- The first thing to do is to carefully tap the joint with a hammer on all sides; you do not need to apply too much force so as not to damage the edges and the threaded connection.
- Another option is to treat the structure with liquid key; this composition dissolves plaque and makes unscrewing much easier. In very difficult cases, this operation can be repeated 2-3 times.
- How to unscrew a stuck nut on a faucet if the above methods did not have the desired result? You can use a hairdryer and heat the connection; this method also allows you to cope with difficult problems.
Advice! You should unscrew the fasteners carefully, since if the edges are torn off, it will be much more difficult to carry out the work and you will need to make cuts on the structure.
Replacing the mixer cartridge.
The procedure for replacing the cartridge itself is very simple and does not require a super duper tool. As a rule, the most common tool is used, which any owner always has in the house. The only exception may be a hexagon, which, due to its rare use in everyday life, cannot always be found at home.
But the hexagon can also be replaced with a flat or Phillips screwdriver. Everything will depend on the type of screw head that secures the handle to the cartridge lever.
So. 1
.
We shut off the cold and hot water with the inlet valves. 2
. Remove the plastic plug that covers the hole for the screw in the handle. As a rule, red and blue colors are applied to it, symbolically indicating cold and hot water. You can remove it with the tip of a knife or a flat-head screwdriver.
There are also plugs of other designs. In the photo below, the plug is made in the form of a semicircular strip.
3
. Using a screwdriver or hexagon, unscrew the locking screw and remove the mixer handle by pulling it up. The handle will move with some effort, so you don’t need to be scared, but you shouldn’t pull too hard either, so as not to break the seat on the handle.
4
. We unscrew the decorative cover, which is located under the mixer lever, and then use a wrench to unscrew the clamping nut.
5
. We take out the cartridge and inspect the place where it was installed. If grains of sand or dirt are visible, be sure to wash it all off.
Then we take the old cartridge as a sample and go to the store with it to buy a new one. Install the cartridge in reverse order.
Types of faucets
Based on functionality, they can all be divided into two types: valve and ball. The first ones are well known to customers, since they are most often used to work with hard chlorinated water, which is supplied to apartments. Repair of this option usually consists of one replacement of the seal.
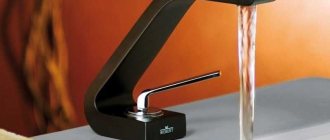
Ball ones are more common than single lever ones. They appeared on the domestic market recently and are distinguished by their ease of use and elegance. To adjust the temperature and pressure of the water supply, the lever is simply raised or lowered and then turned in the desired direction. A significant disadvantage of this model is the low tolerance of salt deposits in the water. Over time, they clog the mixer module, which negatively affects its further operation. Its repair consists of completely replacing the ball module. The cost of work is much more expensive than that of valve devices.
To reduce the risk of plaque on the ball system, special filters are installed. As a result, already purified water is supplied to the tap. Thanks to this mechanism, the mixer works much longer.
- Single lever mixer.
A device that has a lever that allows you to control the pressure and temperature of the water. It's easy to use. Its cartridge is usually ceramic or metal and serves as a seal and also distributes the water stream.
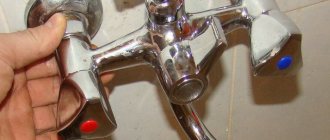
- Two-valve mixer.
In this case, the water supply is adjusted using two handles, which are placed on the sides of the tap with a bend. Each of them contains faucet axle boxes, where there are also rubber gaskets or special ceramic rings that act as seals. In case of a sharp drop in water pressure, this model is more stable and convenient.
- Thermostats.
This is a panel with handles that help you quickly adjust the temperature and pressure. This model is more modern and convenient. In addition, it combines all the advantages of previous types of mixers.
After studying all the offers on the market, you should pay attention to installation options.
Installing faucet cups close to the wall
In the sanitary area (in the bathroom or shower), everything must be brought to perfection - the absence of seams and significant gaps here plays not so much an aesthetic, but a protective function. The less significant the seams and gaps are, the less moisture can be retained in them and the less likely it is that black fungus, familiar to many, will appear in these areas, which is almost impossible to remove.
In order to prevent water from entering the areas connecting faucets, heated towel rails and other plumbing fixtures to the water supply system, special decorative cups (reflectors) are used - round metal plates that are screwed onto the eccentric fitting until it touches the surface of the tiled cladding.
The reason for the seam
When performing the correct installation of communications and high-quality installation of tiled cladding, the reflectors come into close contact with the surface, without leaving a seam. However, such installation can only be carried out if the correct calculation is made at the stage of installing the pipes and is consistent with the thickness of the future tile cladding. If you were finishing the bathroom by third-party hired forces and, at the same time, the plumbers were unable to come to an agreement with the tilers, most likely the reflectors will be located at a considerable distance from the wall - without knowing the thickness of the cladding, the plumbers, for insurance purposes, simply push the fittings further away, and, subsequently, they cannot be covered correctly by cladding.
incorrect installation correct installation
Defect elimination methods
Is it possible to solve this problem and correct the position of the cups? In certain cases, it is possible. There are two methods to solve this problem:
- Using taller cups
This method allows you to easily eliminate the gap by removing the faucet and replacing the original cup with a higher reflector. The most common cups are 20, 25, 35 mm high. Thus, if your cup has a height of 20 mm, purchasing a reflector with a height of 25 or 35 mm will not be difficult.
Be careful - reflectors also have several diameters (1/2, 3/4, 1 inch). Select the diameter in accordance with the standard size of the eccentrics.
The most commonly used cups with hole diameters are 1/2 inch. It’s not scary if the height of the cup turns out to be slightly larger than what is necessary to secure the thread section (by 1-2 mm) - it will be pressed by the mixer’s fastening nut. However, significant deviations cannot be compensated.
2. Trimming eccentrics
Very often, it is not possible to use the first method, as, for example, in the case of a small gap between the cup and the wall. Your faucet may also already be equipped with decorative cups (this is very common when purchasing high-quality imported faucets), in which case it will be almost impossible to choose a higher reflector of appropriate quality and design.
The problem in such a situation can be solved by using a more labor-intensive, but at the same time, the most effective method - direct correction of the length of the eccentrics. Using an angle grinder and a metal cutting disc, the eccentric thread is cut to the required size on the side where the mixer is mounted. At the same time, the eccentrics themselves do not need to be unscrewed. If necessary, trimming can be done on both sides of the eccentric. To fix and ensure tightness, 5-7 mm of thread on both sides is enough - the rest can theoretically be trimmed.
Types of faucet mounting
It is according to this characteristic that all models can be divided into four groups: for a bath, for a sink, for a bidet, for a shower.
- For Bath.
In this situation, there may also be two separate mounting options - on the bathtub or on the wall. In the first option, there will be only adjustment knobs and a spout on the surface. Most often used for acrylic bathtubs.
But still, most owners prefer the second mounting option. This is true in small bathrooms, where the bathtub is very close to the sink, so you can save on buying two taps and limit yourself to one with an extended spout and a swivel mechanism. But their significant disadvantage is unreliability. They often leak at the mounting points because the mechanism wears out quickly.
- For the sink.
The mixer can also be mounted either on the wall or on the surface of the washbasin itself. But still, most buyers give their preference to the second option.
- For shower.
These are models that do not have a spout. Instead, they are equipped with a hose for a watering can, as well as knobs for adjustment. They are mounted exclusively on the wall. The attachment points are masked with special reflectors for greater aesthetics.
- For bidet.
These faucets are similar to sink models. Most are installed directly on the side thanks to special mounting holes. Additionally, it is equipped with an aerator. This design is equipped with a ball joint that allows you to adjust the direction of the water.
Faucet installation methods
- Flexible connection.
The first thing you need to take care of is turning off the cold and hot water.
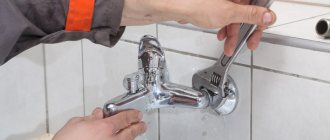
Next, you need to unscrew the clamping nut using a wrench and remove the fastening screw with a screwdriver. The mixer is removed and the installation site is cleaned. If installation is taking place for the first time, then it is necessary to consider the location and make marks if necessary.
The installed equipment must first be assembled and the reliability of the connections checked. A seal is pre-installed on the faucet.
Connection to the pipeline is made using adapters and union nuts. Flexible hoses are inserted into the holes in the sink. Then the mixer is fixed in place.
Additional fixation is provided by a gasket and a pressure washer underneath the sink. The faucet is then reliably “tightened” without any effort. As a result, its stability is ensured. In the event that the input axes of the coupling and the device do not fit together, eccentric adapters are used for connection, which have different threaded diameters at the ends.
Flexible hoses are used to supply hot and cold water. The nuts are first tightened by hand, and then using an adjustable wrench. When choosing a size, it is important to remember that you cannot twist, bend or stretch them. The strength of the thread connection is achieved using FUM tape or linen sealant.
The check is carried out with the mixer turned off, but with water supplied. First cold and then hot. This way, it will be possible to notice a leak if it occurs. If drops of water appear on the threads, then you just need to tighten the nuts a little with a wrench.
- Rigid connection.
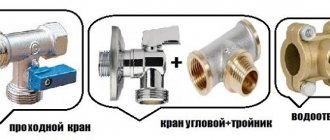
It often happens that flexible hoses do not “reach” the entrance. In such situations, a fitting nut acts as an alternative for connection.
A rigid installation is more durable, but if it breaks, it will be more difficult to repair than a flexible connection.
The preparatory period during installation is not fundamentally different from the previous version.
To access the collet, an angled needle is screwed into one of the entrances to the mixer in such a way that its direction is oriented towards the free area. This will make further work easier.
Next, a hydraulic seal is made between the sink and the mixer using a gasket. Installation is carried out through the mounting hole.
Having determined the length of the pipe, the remainder is removed with a pipe cutter. The pipes are secured using keys and clamping couplings.
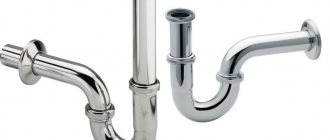
Types of pipes used for flexible and rigid connection
Depending on the financial capabilities of buyers, the quality of the required connection, pressure power, and size of the sink, connecting pipes are divided into three types:
- Chrome plated copper tube.
Used for rigid and high quality connection. During installation, high-precision and careful bending is required, which takes a lot of effort and time. But this connection is the most stable. It is also possible to place pipes in a wall cavity or in concrete.
- Flexible bellows hose.
The cheapest option, the most accessible type. It is a metal hose without rubber internal inserts made of stainless steel, completely flexible. A tube shaped like an accordion. Used for flexible connection of water pressure fittings with a mixer.
- Heat-resistant metal-plastic pipe.
Mount connections of medium rigidity. Provides for the mandatory use of additional needles for transitions to metal-plastic pipes, as well as end caps with internal threads. This type of connection is used less frequently, only when it is impossible to use any other fastening option.
Installation of eccentrics
The best option is if the water sockets are installed at a distance equal to the center distance on the mixer. Experienced plumbers recommend thinking about this at the stage of installing water pipes and using ready-made water sockets; all that remains is to secure them level.
A ready-made water socket will help you install the mixer evenly.
If the distance between the pipes is less or more than required, you can center the eccentrics. It is better to do this before winding. At the same time, remember the number of turns and orientation in space; it is better to mark it with a marker. This operation can cause you to lose a level. If the mixer deviates slightly from level, it will not be very noticeable. But moderation is important here. The device must not be installed too crookedly.
Next, the eccentrics need to be wrapped with FUM tape, flax or thread and screwed in. The part should fit tightly with force. First, screw in the eccentric by hand, then with an adjustable wrench.
It is better to check the tightness of the connection immediately rather than after installing the mixer. To do this, you will need plugs with rubber gaskets. You need to screw them onto the eccentrics and open the tap; if water does not drip, then the connection is reliable and you can continue working.
Plugs for checking thread tightness.
Before installing the mixer itself, it is necessary to seal the gap between the tiles and the water sockets with silicone sealant. This is important so that water flowing down the wall does not get behind the tiles.
Areas that need to be sealed.
Eccentrics can have different lengths; it is best to choose them so that after installing the mixer, the eccentric thread is completely hidden under the body of the device. If necessary, the eccentric can be shortened with a grinder, but only on the side that is screwed into the pipeline.
For some types of eccentrics, a hex wrench may be useful; instead, you can use a bolt with a suitable head and a gas wrench.
Types of eccentrics.
Installation of the mixer on the nut
Installing faucets on a nut is not so difficult if you know in advance the algorithm of actions and some nuances that should be taken into account. If all rules are followed, the installation process takes no more than 15 minutes.
- Preparatory work. Take the hose and mounting pins that come with the standard kit and install them on the faucet. Tighten the studs carefully, since they are the main fasteners. The hose, on the contrary, should not be tightened too much, since too much twisting can break the tightness of the hose.
- Installation. Place the faucet on the sink and lightly tighten the fastening nuts. Now you can install the second hose. Make sure that the faucet completely covers the hole in the sink, and also check the position of the taps when turning on the hot and cold water.
- Main fastener. Carefully secure the faucet, controlling its position relative to the sink, and secure the other end of the hoses at the junction with the water pipe.
It is possible to install faucets where nut mounting is the main type of fastening without involving professionals.
Advantages and disadvantages of installing a mixer on a nut
Nut-mounted faucets, which are offered by any online plumbing store, are extremely easy to install. Therefore, the owner of the premises can perform all the work himself, saving on the services of a plumber.
The disadvantages of such a device include frequent damage to components during the installation process due to carelessness. Therefore, if you decide to buy a nut-mounted mixer and intend to carry out the installation work yourself, be sure to control the tightness of the nuts. After all, tightly tightened fasteners can break the tightness of the system, and loosely fastened ones can lead to leakage.
Soldered spouts
Soldered spouts are usually more expensive, but more interesting in appearance.
Rubber and plastic rings in them are put on a separately machined nipple.
The nipple is screwed into the body, the spout is inserted into it and secured with a nut, usually larger in size.
In soldered Varion spouts, the plastic split ring has a special shape and its protrusion fits into the hole of the nut.
Sometimes, instead of a nut, a screw is used, screwed into the body perpendicular to the axis of rotation of the spout.
This design prevents the nut from unscrewing during operation.
Varion soldered spouts use a profile of an interesting shape (not just round).
On the left is a D-shaped Varion spout. On the right is a spout from another company.
Nuts for the aerator and nipple are soldered into the ends of the spout, all this is polished and assembled.
There are more parts, operations, and the tube thickness required with this manufacturing method is greater.
To obtain a shape with a diameter that varies from the base, the workpiece can not only be bent, but also “inflated” (sometimes this allows you to save on material).
The wall thickness decreases, but, as a rule, this does not impair the quality of the spout.
When is replacement required?
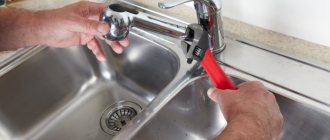
The obvious reasons for replacing the faucet are physical damage: the body has cracks, chips, replacing gaskets does not eliminate the leak. Restoring the tightness and integrity of the case while maintaining aesthetic qualities and reliability is unrealistic. The faucet seat or axlebox of hot or cold water often wears out. Damage can be repaired by grinding with a roller cutter. However, the process is lengthy and the result is not guaranteed. Some defects are accurately determined only after dismantling. The replacement also occurs after renovating the kitchen and changing the interior.
If necessary, you can call a specialist or work with the tools yourself. The process is not difficult if you take your time and do everything carefully.
Faucet selection
Choosing the right mixer is not as easy as many people think. The market offers products from several dozen manufacturers and more than a hundred models. Don't be overwhelmed by such a wide variety of choices. The main thing is to understand the differences between them.
Internal organization
Mixers are divided into several types depending on the internal structure:
- With two-valve system. The classic scheme, familiar to many from childhood: a spout between two axle boxes. The water flow is regulated by valves. Although models of this type do not cost much, their popularity is falling. Internal components, especially gaskets, wear out quickly.
- With single lever system. Many buyers prefer this type of faucets. It allows you to adjust the intensity and temperature of the water with one movement.
- With contactless system. Modern design and comfortable construction. When you bring your hand to the sensor, water begins to flow. The device significantly increases the cost of the mixer.
Spout
The height of the spout determines the comfort of using the mixer. With a high spout, splashes can scatter to the sides, and with a low spout, it is inconvenient to wash dishes. Preference should be given to the average value.
The spout must match the sink. It is better to choose a ready-made set of faucet and sink from one manufacturer. It will be equipped with additional accessories to solve possible problems.
Modern models may have a pull-out spout. It extends 0.6-1.2 m from the nest. High quality materials will ensure durability and hygiene.
Nozzle design
There are two types of nozzle:
- aerator;
- shower head
The “shower” mode is convenient for washing greens and berries without damaging their integrity. Caring for the sink is much easier.
Material
The material will determine the duration of the work. Today there are faucets made of metal, plastic and ceramics. Let's take a closer look:
- Metal.
The most common is silumin - an alloy of silicon and aluminum. Mixers belong to the budget price category; there is no high aesthetics and durability.
Another material would be bronze and brass. Their reputation is much better: they do not interact with water, are strong, durable. This is the best category of kitchen faucets.
- Plastic.
Modern plastic is chemically resistant, durable and lightweight. The cost of a product made from it is low. A significant drawback is low thermal conductivity, which causes strong heating of the parts. Longer service life than metal. - Fake diamond.
The production technology is based on low tide. It has high decorative characteristics.
Necessary equipment and materials
Before replacing the mixer, make sure that all components and tools are available. It will be sad if you have to run around and buy the missing materials, and the household will languish while waiting for the water supply to be restored.
- Mixer.
Before installation, check the flexibility of the hoses and their length. As a rule, the product is equipped with 30 cm hoses, which are not always enough. In “market” faucets, the quality of the hoses is very low. It is recommended to replace them immediately.
When purchasing hoses, you should pay attention to the length of the fittings. It is better when it is different, as this will make assembly easier - the hexagons for clamping will not interfere with each other.
Before going to the store to buy a mixer, you need to look at the threaded connection in the water pipe (diameter, male/female). The most common female hoses are ½ inch. However, other options are also possible when there is a “female” ball valve or a manifold comb is present.
The length of the hoses should not be minimal. During switching on/off, a pressure drop occurs, the hoses jerk, and the rubber tube inside quickly wears out.
Corrugated stainless steel hoses have the highest reliability. Their cost is higher, and installation is more difficult, but high rigidity ensures the preservation of the original shape.
Sometimes plumbers use metal-plastic pipes, excluding the use of flexible hoses. Then you will additionally need to buy special fittings. Their installation is the most difficult, but in the future there will be no questions regarding the installation of pipes.
- To work you will need tools:
- Wrench 10, 22x24. If it is attached to the sink using a large nut, then an adjustable wrench is required. Often studs require an 11mm wrench.
- Pliers.
- Screwdriver with different tips.
- Gas key.
- An electric drill and a 35 mm hole saw if the installation is on a new sink or countertop.
- A flashlight for illumination, since under the sink it is quite dark and the joints are difficult to see.
- Materials:
- Seals for threads. Often it is necessary to install a coupling or adapter on a water pipe.
- If you intend to dismantle the sink, you will need silicone sealant and a syringe for extrusion.
- Universal lubricant WD-40 in a spray bottle is used to disassemble “stuck” threaded connections.
You should not choose fum tape, as there is a low guarantee against leakage. It is better to give preference to a proven sealant - sealing paste and flax tow.
After preparing all the materials, you can begin work on dismantling the old mixer.
Tubular spouts
Let's look at the most common and inexpensive type of spout, tubular. It consists of a curved tube, usually circular in cross-section.
To make such a spout, no expensive, complex equipment is required, since there is no soldering and few parts. In fact, it differs from more expensive spouts only in appearance, but otherwise it performs its function in the same way and lasts quite a long time.
Let's see how a tubular spout works.
At the end that fits into the body there are grooves into which two rubber bands and a plastic split ring (white here) are inserted.
The plastic ring serves as a stop for the union nut and thus secures the spout.
Ring rubber bands help to secure the spout tightly and also block the flow of water past the hole.
A low-quality spout can be easily identified by one rubber ring instead of two: it not only wears out faster, but also does not secure the spout well, which is why it begins to dangle and leak.
Sometimes, to facilitate sliding, a thin and flexible plastic ring is added between the nut and the spout tube. With our water quality, such a gasket “hardens” over time; the small gap between it and the spout becomes overgrown with dirt, which ultimately prevents rotation. Therefore, taking into account the two rubber rings, there is no point in such a ring.
The diameter of the tube and the hole in the body where the spout is attached is usually about 18 or 19 mm (two main standards). When purchasing a spout, keep in mind that these two types are not interchangeable. Varion uses the 18 mm standard. When purchasing a Varion spout, you can be sure that it will fit the Varion body.
At the other end of the spout there is a thread for the aerator:
How to replace a faucet with a nut yourself
Before installing a faucet with a nut in the kitchen, you first need to remove the old one. Then they install a new one and connect it. It is also necessary to have keys of a suitable size on hand (usually 10, 11, 22 and 24) and some auxiliary materials. To dismantle the union nuts of the mixer, you will need two adjustable wrenches.
There is a good chance that new hoses will be required. As a rule, kitchen faucets with a nut come with hoses, but they are only 30 cm long. Therefore, before starting work, make sure that this length will be enough for you.
It is important to consider the distance from the mixer with a nut to the cold and hot water pipes. The hoses should sag a little, since when the tap is turned on/off, the pressure changes sharply, causing the hoses to twitch. If the tension is too high, the connection will soon leak. Thus, if the distance from the pipes to the mixer inlet is no more than 25 cm, then the existing hose is enough; if the distance is longer, buy a new one.
It is necessary to choose only high-quality flexible hoses made of stainless braided or corrugated stainless pipe, as they will last a long time.
Before you go for a hose, you need to determine the size of the “needle” (the tip that is screwed into the mixer with a nut), the diameter of the pipe and the type of its end (male-female) - in order to choose the right fittings.
When connecting hoses or supply pipes, you should adhere to the following diagram: on the left is hot water, on the right is cold.
There are times when difficulties arise when dismantling an old mixer: the nut may become stuck. If you encounter such a problem, then use universal lubricant in WD-40 cans. This liquid seeps well even into the most microscopic cracks. Apply the lubricant to the stuck joint and wait 10–15 minutes.
If no methods help to unscrew the nut, then use a grinder to cut the body along with it. However, this can only be done if the mixer is to be disposed of.
If the faucet is fixed on the countertop, then you need to act “from the inside” - unscrew the nut while in the closet and illuminate it with a flashlight.
Installation begins with attaching the mixer to the sink with nuts. The mixer always comes with a rubber sealing ring, which must be placed in the groove located at the end of the body.
The cylindrical part with thread is inserted into the hole in the sink. The rubber ring should not move.
The kit should include a wide rubber gasket, which also needs to be installed at the bottom.
Now screw on the brass fixing nut with a “skirt”. The “skirt” is an extension in the form of a washer, thanks to it the tightest clamping of the installed rubber gasket is created.
The nut is tightened with an adjustable wrench so as to ensure that the mixer does not move on the sink. It is important that the spout is positioned so that the sectors of rotation to the left and right from the central position are equal, and the switch lever or valves are level with respect to the sink. If the mixer is installed at an angle, then the spout position is selected diagonally.
In order to level the mixer, loosen the nut, perform the necessary manipulations and fix it again. Now install the hoses, first the one with the short fitting, and tighten them with a 10mm wrench.
If the sink has been removed, it must be reconnected to the sewer by replacing the siphon and inserting a corrugated hose with a sealing collar into the outlet of the sewer pipe. Now you can turn on the water supply and check the operation of the mixer with the nut.
Please note that you first need to spill water without the aerator tip in order to avoid clogging it with small particles accumulated in the pipes, faucet, and hoses. It is enough to drain a few liters of water, and then you can put the aerator in place.
It is also important to check the tightness of all connections during the first descent. If leaks are suspected, the connections must be tightened immediately.
There is no need to wrap the threaded part of the fitting with FUM tape or solder it, since it has one or two O-rings that ensure the required tightness of the connection. The fitting is screwed in until it stops, but you should not overtighten it, as you can damage the rubber ring. All you need is hand effort and one turn of the key.
Now you can install the hose with an extended fitting. If water will be supplied through a metal-plastic pipe, then the fittings with fittings are screwed in in a certain sequence: first the one that has a bend, and then the straight one. When the hoses (fittings) are screwed in, the sink must be secured in place.
The faucet is one of the important attributes of the kitchen and bathroom. It creates comfort for the owners and guests of the house and performs an aesthetic function. Modern sets are created from various materials that fit harmoniously into any interior.
The plumbing market today is quite extensive, so an inexperienced person will most likely get confused. In addition to choosing the right option, you should pay attention to installation. If you have never done this yourself, then it is better to call a plumber, and for a small fee he will do everything carefully and quickly. After all, in this matter everything depends not only on the availability of tools, but also on the type of fastening of the mixer. Skills, knowledge and availability of required components are required.
Various models and design options, a wide range of product prices give the potential buyer the opportunity to choose the right item.
First you need to understand the types of mixers and find out how they differ.
The initial parameter during selection is the length of the spout. Most often, shorter options (20-25 cm) are chosen for bathrooms, but elongated ones (30 cm or more) are well suited for the kitchen. There are also shortened versions that are compact and neat. You should also immediately decide what will be more functionally convenient: if the tap is rotary or fixed.
According to the form, there are two main options: cascade and traditional. They differ only in the size of the liner section. The most common pipe shapes are oval, triangular and round.
It is important to pay attention to the placement of the faucet in the bathroom. For example, if the sink and bathtub are adjacent, then the best option may be one elongated swivel faucet, which will be located right in the middle. In general, the choice is individual, and everyone decides for themselves.
Replacing the crane axle box step by step
When all the necessary tools are at hand, you can begin replacing the crane axle box.
- 1.) First of all, you need to find out which of the crane axle boxes has failed. The one that shuts off the hot water, or the one that shuts off the cold. To do this, you need to see what temperature the water is leaking from the mixer spout. If it’s cold or hot, then everything is clear. What if it’s warm? It is quite possible that both axle boxes have failed. But maybe only on the hot side. The water just has time to cool down. To be more confident, you can alternately turn off cold and hot water using common taps at the water supply inlet. And see in what version the mixer spout stops leaking.
- 2.) If you couldn’t decide which of the crane axleboxes failed, it’s worth purchasing two of them. In most cases, the hot water faucet is the first to fail. Since it has a more destructive effect on plumbing than cold water.
- 3.) We decide which crane axle box we will replace. We remove the plastic plug from it, which marks hot and cold water with its color. On some faucets, the plug can be removed by simply prying it off with a screwdriver. On others it is unscrewed using a thread. This point is not always clear. Here you should first try to carefully remove it by prying it with a screwdriver. If that doesn’t work, unscrew it with pliers, placing a piece of fabric under the jaws.
Valve handwheel plug without thread
Valve handwheel plug with thread
Lubricating soured parts of the valve axle box
- 4.) Surely over a long time everything inside has become sour and boiled over. Therefore, we spray WD-40 from a can onto the bolt securing the lamb. And also on the top of the stem. So that the place where the lamb fits on the rod is saturated with lubricant. As a result, the lamb can be easily removed. Then we pour WD-40 onto the protective and decorative cap along the connection line. You should also spray the place where the faucet axle is attached to the mixer body and the lock nut. If it is available.
- 5.) While the parts are soaked with lubricant, it is important to find out how the water is shut off in your house or apartment. The best option is to turn off the water to the plumbing fixture where the faucet box is being replaced. In this case, your household will be able to use water from all other plumbing fixtures. Of course, except for the faulty one. While you are shopping in search of a similar crane axle box.
Often the water is shut off only at the inlet, near the water meter. This means you will have to stock up on water for future use. And also go to your neighbors to visit the bathroom. And in the meantime, think about the benefits and convenience of installing shut-off valves. And for each individual plumbing fixture.
- 6.) When the WD-40 lubricant is sufficiently absorbed into the pores of the valve axle parts, you can turn off the water. Only then proceed to the actual replacement of the axle box.
Important detail! It is necessary to turn off both cold and hot water
Because by changing the faucet with cold water and opening the valve with hot water, we get a pressure of boiling water. But not from the faucet spout. Namely from the hole where we just unscrewed the valve axle.
Replacing a faucet box when closing only one tap
On the other hand, the rule of closing both taps at the input can be circumvented. To do this, you need to temporarily screw in a plug with an external thread in place of the unscrewed valve axle box. Of course, wrapping it with fum tape. In most cases, a 15 mm (1/2 inch) plug will do. In this case, replacing the faucet with hot water, you can use cold water. While we are picking up a new axle box in the store. However, the thread of the plug does not always match the thread of the mixer.
But you should not open the hot water inlet tap. Despite the fact that the hole in the mixer is closed with a plug. Otherwise, a constant flow of water will flow from the spout of a faulty faucet. You can open it temporarily to use hot water. That is, the inlet tap will serve as a temporary hot water valve on a faulty appliance. Undoubtedly, if there are separate shut-off valves on the mixer, then there will be no such hassle and red tape.
- 7.) Having turned off the water, you can finally begin replacing the faucet axle box. Open the plastic plug, unscrew the screw securing the thumbwheel and remove the flywheel from the spindle.
- 8.) It is necessary to remove the decorative and protective cap of the valve axle box. On the one hand, for this you can use a socket wrench of an appropriately selected size. It can be a 19 or 22 head. That is, depending on the size of the cap.
Place a piece of thick fabric on the protective cap, firmly press the head to it and unscrew it. The fabric is used so as not to damage the decorative coating of the cap.
On the other hand, you can use an adjustable pliers key to unscrew it. Provided that a cloth is placed under the jaws of the key. But in this case there is a possibility of bending the cap. The metal from which it is made is often very thin. In some cases, it is even made of plastic.
- 9.) By unscrewing the protective cap, we gain access to the crane axle itself. We clean the connection points from dirt and scale.
- 10.) Unscrew the locknut, if there is one.
- 11.) Then unscrew the valve axle itself. To do this, it is convenient to use the same socket wrench. Or use an adjustable wrench or open-end wrench of the appropriate size.
Fighting rust and stuck threads
When unscrewing, you may have to apply significant force. If the thread of the faucet axlebox is strongly stuck to the mixer body. Therefore, while carefully unscrewing with one hand, you need to hold the mixer itself with the other. So as not to tear it out of the mount.
Often the carvings become heavily encrusted with scale. Of course, this makes it difficult to unwind. Therefore, you should treat it with a weak solution of acetic or citric acid. Then spray with WD-40. As a result, it will be much easier to unscrew the valve axle.
- 12.) Having removed the valve axle box, we clean the seat - the threads and the valve seat. You can, taking precautions, open the water a little and wash out the dirt from the faucet housing. You must act carefully so that water does not spill on the floor or seep into your neighbors. Therefore, it is advisable to place some container under the sink or sink.
- 13.) Inspect the valve seat in the recess of the seat of the faucet axle box. Because chips or fistulas from corrosion may form here. In those places where the axle box gasket blocks the flow of water into the spout. This means that water can enter the faucet spout, bypassing the faucet. Of course, this is facilitated by the resulting chips and cracks.
In this case, it is worth replacing the entire mixer. You can, of course, seal the chips with resin or similar glue. Then level and clean the contact surface with the gasket. But this is a tedious matter and in most cases temporary.
- 14.) Let's assume that everything is in order with the mixer. That's why we continue to act. First, we make sure that the water is securely shut off. Secondly, we are going to purchase a new crane axle box. When searching for a similar part, it is worth considering one point. It is possible to replace the semi-rotary crane axlebox with ceramic inserts with a worm-type axlebox with a rubber gasket. And also vice versa. Provided that in other respects the crane axle boxes are identical.
- 15.) Having purchased a new crane axle box, we begin assembly.
Important detail! During assembly, it is advisable to lubricate all threads with some kind of lubricant. Lithol or solid oil will do. Castor oil also serves well as a protection against sticking.
Replacing the crane axle box - the final part
By lubricating, you will ensure quick and convenient disassembly of the mixer in a few years. If the crane axlebox fails again.
- 16.) Tighten the valve axle. We twist tightly, but without excessive fanaticism. On the one hand, so that there are no leaks later. On the other hand, so that the brass part does not burst from strong pressure with a key. There is no need to use any sealants. For example, fum tape or flax. A rubber gasket on the faucet axle protects against water leakage.
If there is a lock nut, do not forget to tighten it too.
- 17.) Screw on the protective and decorative cap. It can be tightened by hand. But it won't hurt to lubricate its threads.
- 18.) Place the thumb on the spindle tightly. Apply lubricant to the seat of the lamb.
- 19.) Tighten the thumbscrew. The screw threads also need to be lubricated.
- 20.) We put on or tighten the plastic plug, having previously lubricated the thread, if any.
Replacing the faucet box on the two-valve mixer is complete. You can open the water. It is necessary to check the operation of the mixer with different positions of the knob - open, closed, half-open. Now you can use the repaired plumbing fixture. And in order for the new faucet to last longer, it is advisable to install a fine filter at the water supply inlet.