Connection diagram
After purchasing a kitchen, there is a need to connect the equipment to utility networks. Typically, kitchen furniture supply companies connect appliances to pre-arranged water and sewerage points, but the problem of laying pipes to these points falls entirely on the shoulders of the customer.
Serious suppliers provide each client with technical documentation for the kitchen, which indicates the coordinates of the connection points for equipment and plumbing fixtures. According to this project, pipe routing is carried out. It must be remembered that all dimensions given in the document are given from the finishing marks of the floor and walls. If you ignore these parameters, problems will arise when installing the kitchen.
Installation process
If you do the work yourself, it is easier to break the whole process into two stages, since each of them is carried out separately. This makes it easier to understand the connection - the instructions on how to assemble a sink in the kitchen prescribe a certain sequence of actions.
Mixer connection
The work depends on the type of installation of the system - a wall-mounted kitchen sink can be equipped with a wall structure, and this requires preliminary connection of communications directly to the connection point.
For standard options, work is carried out as follows:
- First of all, the product is unpacked, most often the mixer is delivered assembled, but sometimes you may need to attach the valves using the screws supplied. It is also necessary to check the presence of all seals that should be included in the kit.
Modern products are delivered assembled, which greatly simplifies the work.
- Next, the system is attached to the sink, and there must be a sealing element both above and below that will prevent water from leaking during operation . Fastening can be implemented in several ways - either with a large nut, or using one or two threaded rods - the instructions included in the kit will help you understand the work - everything is very simple and clear.
Option using a special clamping nut
- The next stage is attaching the flexible line; its length should be sufficient so that it is not stretched, but with a small margin . There must be rubber washers under the union nuts, and the thread itself is additionally sealed with Unipak. If there is not enough space under the sink, then you should connect the hose to the faucet first.
Important! It is not recommended to use fum tape for sealing in these places, as it does not tolerate constant exposure to hot water.
- Lastly, the system is connected to the water supply, after which its tightness is checked.
After finishing work, carefully inspect all connections.
Drain system
There may also be different options - a wall-hung kitchen sink requires the installation of a hidden siphon, most often it is simply hidden in a niche in the wall.
Standard options are assembled as follows:
Built-in siphons are supplied as a pre-assembled unit
- First of all, the outlet for the kitchen sink is attached to the structure; it must be sealed on both sides with rubber rings for tightness.
It doesn’t matter what kind of kitchen sink you have - you can connect it with your own hands
- Next, the water seal is assembled and connected to the drain using a union nut, which must also be sealed with a ring.
- Lastly, the structure is connected to the sewer system and checked for leaks.
Grates and cutting boards made of wood - these accessories for the kitchen sink will make the environment even more convenient.
Of course, when it comes to such a group of equipment as kitchen plumbing, the sink is the most important part of the system, which should be given very close attention.
Advantages and disadvantages of hiding pipes
Advantages of hiding pipes:
- Aesthetics – by covering the pipelines with a box or disguising them with paint or decor, you can decorate the kitchen design or make the pipelines invisible.
- Hidden pipes make cleaning easier - it is easier to wash the flat surface of the box than structures with couplings and fittings.
- Small financial costs.
Flaws:
- In case of repair, you will have to open the wall, plasterboard structures or decorative screens and boxes; When water leaks, walls, floors, furniture and neighbors can become wet.
- The same goes for sewer pipes.
- The construction of boxes is quite labor-intensive and requires certain material costs.
- When plastic pipelines for hot water and heating are laid shallowly in the walls, the plastic will “lead” and the top plaster in this place will crumble. Therefore, plastic should be laid in a layer of plaster in a metal case and with insulation. The design turns out to be bulky - it is easier to cover the communications with plasterboard.
Pipe routing
The distribution of water and sewerage is done from the corresponding risers. Often apartments have common risers for the bathroom and kitchen, but in some series of houses there are separate risers for water supply to the kitchen. Wiring is carried out at the initial stage of repair during the plumbing work and immediately in all rooms where it is provided.
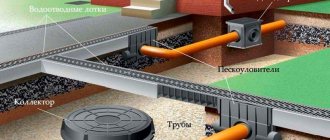
Scheme for connecting equipment to utility networks: 1 – cold or hot water supply riser, 2 – ball valve, 3 – coarse water filter, 4 – pressure reducer, 5 – water flow meter, 6 – collector, 7 – drain to the sewer
Making a QuickEasy connection (WIRSBO): a – cutting the pipe to size; b – putting on a self-clinching ring; c – expansion of the pipe with an expander; d – joining a pipe with a fitting Read on the topic: How to lay a tile apron in the kitchen with your own hands: design, materials, installation
Creating a water pipe layout
In most cases, the apartment already has a point from which water will flow. Before starting work, it is necessary to draw up a project. It should reflect all the necessary aspects of the future kitchen plumbing.
If you have planned everything on paper and the smallest errors have been eliminated, you can proceed to the actual installation. However, at the very beginning, do not forget to completely shut off the water supply to the apartment.
Below is a list of tools that will be required for the job:
- construction hair dryer;
- gas or adjustable wrench;
- soldering iron for PVC pipes;
- roulette;
- building level.
We must not forget that water supply is not sewerage. All pipes must be located either vertically or horizontally. These are the rules that have been developed over years of experience by professionals.
Today, plumbing fixtures for the kitchen, as well as any components for it, can be purchased online without any problems.
Installation of new plumbing in the kitchen
The plumbing system must be updated in several cases. Firstly, when it wears out and its service life expires, secondly, if the quality of the water entering the house deteriorates, thirdly, if your house is located in a climate zone with extreme natural conditions and temperature changes, fourthly, the initial the circuit could have been assembled from low-quality cheap materials.
First, let's look at the proposed wiring diagram. For cold and hot water supply, it is planned as:
- Horizontal
- Apartment by apartment
- Tee
- Collector (radial)
- Ring
- Mixed
When you choose the pipe layout for your own kitchen, proceed to drilling the channels and installing fasteners. Then replace the ball valve, dirt filter, meter, check valve. Next, the fine filter and pressure reducer are installed.
Finally, the installation of the collector and the laying of heat-insulating pipes take place. These pipes must first be fixed, and then caulking must be done - that is, the adapter cuffs must be fixed between the wiring elements made of plastic and cast iron, and after this stage the pipes are laid and the drain siphons are connected. When the main plumbing and heating equipment has been installed, the finished system must be checked.
Despite the fact that installing new plumbing in the kitchen is a rather complex process and consists of several extremely important steps, it is completed in just a couple of days. Let's look at each stage of this process in more detail.
What pipes and risers to install
Nowadays, water supply pipes are most often replaced in those kitchens that are already 40-50 years old, where they are noticeably outdated.
The best pipes today are made of polypropylene, they are connected by heat welding into a strong continuous connection that is stronger than the pipe itself. Such an effective system is lightweight, flexible, safe, resistant to rust and rot, and is not affected by temperature fluctuations. In addition, polypropylene channels are easy and reliable to install at joints, they will last more than 50 years and are now very inexpensive.
Copper is also a reliable plumbing material, as it has increased antibacterial properties. However, high-quality wiring of copper pipes can only be done by professional craftsmen, since copper should be welded under sterile conditions, at a fixed temperature with a special torch with an oxygen-propane mixture. The connections are fixed with brass fittings.
Ball valve advantages
Valves and gate valves are increasingly being replaced by ball valves, with the help of which you can easily turn off the water in the entire house or in individual rooms.
Ball valves in the kitchen provide reliable and durable operation. Therefore, if you shut off the water supply for any period of time, you simply turn the handle on the ball valve.
What are water meters for?
The most important thing is that installing a water meter significantly reduces utility bills and savings reach 80%.
To install a hot and cold water meter, you should turn it off, cut the pipe, install a water meter, secure the ball valve, connect the coarse filter and check the resulting structure for leaks. It is also important to coordinate the installation of the meter with your management organization.
Fastening the sink-sink
You can choose a wall-mounted or table-mounted sink in the store, made of earthenware, glass, or porcelain stoneware. To install it, first mark the mounting holes, install the brackets, cut the sink into the countertop and hang the sink on the fixed brackets. Next, install primary filters and connect the sink to the sewer with a corrugated or sewer pipe. All seams are treated with sealant.
Read on topic: White apron for the kitchen: +50 design photos, tips
Fixing the mixer
Nowadays, they mostly use only single-lever mixers for ease of water adjustment. They can be very different in design and you can choose an option for any interior.
Siphons
Siphons do not allow odors and gases from the sewer into the room thanks to a water seal. You need to choose models with pipes adjustable in length; they must be compatible with any drain hole. Most often, bottle (flask) siphons made of plastic are installed. Branched models are also used - for connecting a dishwasher and washing machine.
After installing the main plumbing, at your request you can additionally supply:
Water heater
Cleaning filters
Disposer
General rules
Any change in the position of utility networks in the apartment is a redevelopment. If a sewerage system is being transferred, all actions must be roughly divided into 2 stages:
- approval of redevelopment, obtaining permission to carry out work;
- execution of the technical part.
The relocation of sewerage in the apartment must be approved by the BTI and other authorities. Without going into details, we note the complexity of this procedure. First, you need to do a survey of the premises and consult with specialists. It is necessary to find out to what extent the proposed changes are possible and acceptable.
Secondly, you will need a detailed plan for the upcoming changes. It needs to be approved, then the work will have to be coordinated with the architecture department, etc. Officials or responsible persons are reluctant to accommodate apartment owners who want to make drastic changes. There are clearly defined rules:
- moving the sewer riser in the apartment is prohibited. Several restrictions apply simultaneously here regarding property rights (the riser belongs to common property of the house) and technical ones (changing the configuration of utility networks is prohibited). In addition, the placement of wet rooms above the living rooms of neighbors below is prohibited by housing legislation;
- It is prohibited to destroy or reduce the size of load-bearing walls. Similar actions are often carried out when combining two apartments or joining a kitchen to a room;
- if the kitchen is moved into the living room, the sewer may leak and flood the neighbors below. Regardless of whether the flood occurred in a residential or auxiliary premises, claims will arise against the culprit.
Given these difficulties, officials try not to take risks and do not give permission to carry out the work. The consequences of improperly performed sewerage relocation may affect the person who gave permission for this step. Moreover, the rules talk about changes in the general sewerage system of the house, and these include any work.
Therefore, before installing a sewer system in an apartment to another room, you should critically consider your plan and weigh its weaknesses. If there are too many of them, it is better to look for other, less problematic options. This will help save time, money, and eliminate unpleasant conversations with neighbors.
Also read: Shambo sewerage: what it is, how to do it, features
10 tips for plumbing work in the kitchen
1. Organize a separate water supply for the kitchen from the entire apartment. To do this, in the plumbing cabinet, which contains the “risers” of the water supply and sewerage systems, install a common manifold with separate shut-off taps for the kitchen. If it is not possible to install a manifold, simply install separate valves (shut-off taps) on the water pipes for the kitchen.
2. Install separate shut-off valves for each kitchen appliance that uses water.
3. Use only ball valves. Ball valves do not have internal rubber gaskets, and therefore their service life is practically unlimited.
4. For threaded water pipe connections, use plumbing flax with plumbing paste, such as UNIPACK. This is guaranteed to protect you from leaks for the entire service life of the water supply system.
5. When connecting the drain of a washing machine and dishwasher to the sink siphon (read detailed articles on connecting a washing machine and dishwasher), use special metal clamps for better sealing against leaks. (Look at the photo)
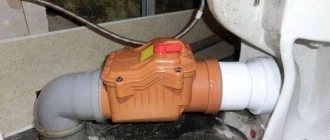
6. When connecting the drains of a washing machine and dishwasher directly to the sewer outlet, install a check valve on the outlet, which will not allow the machines to “suck” dirty water from the sewer.
7. If it is not possible to install check valves on machine drains, make an S-shaped bend at the drain connection. (Look at the photo). This will also protect cars from dirty sewer water. As an alternative to the S-bend, connect the dishwasher drain at a height of 40 cm, for a washing machine at a height of 60 cm from the floor level. Related article: 4 types of water faucets for the kitchen
8. When connecting the washing machine and dishwasher, use only new hoses. Replace the kitchen sink siphon with a new one. Disconnect the common sewer outlet from the sewer riser and rinse it with hot running water. 9. When connecting a drain, kitchen sink, washing machine, dishwasher, or sewer, use sealing gaskets that will ensure a tight connection of the drain hoses (20 mm in diameter) with the sewer pipe (40-50 mm in diameter).
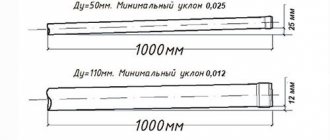
10. When laying a sewer drain in the kitchen, maintain a 2% slope of sewer pipes. 2% slope is calculated from the length of the sewer outlet.
Cost of work
| Name of works. | Unit change | Cost, rub. | |
| Installation of PVC sewer pipes (without gating) (one point) (material included in the price) | pcs. from | 3500 rub. | |
| Replacing a cast iron sewer riser with PVC (material included in the price) with caulking of the socket | pcs. from | 10500 rub. | |
| Replacing the sewer riser from PVC to PVC (material included in the price) | pcs. from | 9500 rub. | |
| Passage through the ceiling when installing a sewer riser | pcs. from | 500 rub. | |
| Sealing holes with polyurethane foam | pcs. from | 250 rub. | |
| Laying internal sewerage | dot | 1000 rub. | |
| Installation of plumbing fixtures | PC. from | 1700 rub. | |
| Puncture in the wooden floor for pipe 110 | dot | 1100 rub. | |
| Puncture in reinforced concrete ceiling under pipe 110 | dot | 3000 rub. | |
| Installation of fines (for pipes up to 50 mm. p/m.) in brick | p/m. | 600 rub. | |
| Installation of fines (for pipes up to 50 mm) in concrete | p/m. | 900 rub. | |
| Delivery and lifting of materials | FOR FREE | Dismantling of sewer pipes (cast iron, metal, plastic) | FOR FREE |
| Surveyor's visit, consultations, estimate preparation - free of charge | |||
Basic recommendations for purchasing the necessary items
Even if you strictly follow the technology, this does not guarantee a good result; the fact is that the fittings for the kitchen sink must meet a number of requirements, which we will consider:
| Suitable design | All components must correspond to the design of the sink; be sure to make sure that both the type of connection and the size of the fasteners are suitable for your sink. It is best to purchase everything comprehensively, then sellers will independently select the necessary design options in accordance with the characteristics of the sink |
| High quality products | As for the mixer, it is better to choose options made of brass - they are heavier in weight and much more reliable than structures made of powder alloys; there should be no flaws on the surface. As for the selection of a siphon, it is better to choose either an option made of polypropylene (its price is low) or brass - this type of structure is more expensive, but can withstand hot water |
| Availability of sealing materials | To ensure system reliability and functionality, all connections must be secure. To seal threaded connections in flexible hoses, a special Unipak compound is used, and to seal sewer units, silicone sealant with antifungal additives is used. |
| Set of necessary tools | In fact, you only need a few simple tools to carry out all the work at the proper level: a plumber's wrench for clamping connections and two screwdrivers - flat and Phillips |
A special wrench fits any size of plumbing fastener and replaces a whole set of tools
Advice! It is not worth saving on quality, since not only the comfort of use, but also the durability of the assembled system depends on the reliability of the fittings - any malfunctions can lead to leaks and flooding.
Requirements for components for sewer installation
When replacing a sewer riser in an apartment, communications are most often hidden inside building structures or disguised with decorative coatings. They are not subject to mechanical damage and other external influences, so the requirements for their strength are not the highest. Nevertheless, pipes laid indoors must have certain properties:
- chemical inertness towards aggressive waste components;
- resistance to pressure drops in the system;
- corrosion resistance;
- optimal throughput and resistance to blockage;
- suitability for use over a wide temperature range.
It is also important that any part of the pipeline can be isolated and quickly replaced if damaged.
How to properly install a sink and sink with your own hands
The easiest way to install a sink is on brackets. The main thing when installing brackets is to pay attention to the reliability of the wall to which they are attached.
Read on topic: Acrylic facade for the kitchen (+55 photos)
The sink should be installed after all finishing work has been completed. Before installing the sink with your own hands, you need to make markings. First of all, a horizontal line is measured, which, according to the standards for installing a sink in a bathroom, should be at a height of 80-85 cm from the floor. Having attached the brackets to the sink, you should measure the distance between them, and then attach them to the wall and mark the locations of future holes on it.
At the marked points you need to drill holes, and then hammer dowels into them and screw the brackets. After this, you can install the sink on the brackets and secure it in accordance with the design features. After installation, you need to check the reliability.
Having installed the sink, you can begin installing the siphon. After inserting the drain into the sink, it should be sealed with a rubber gasket and then tightened with a nut from below.
After this, a locking nut with a wedge-shaped locking ring is installed. The outlet pipe must be disconnected from the siphon. The exception is when the pipe is flexible and can be left in place. Then sealant should be applied to a rubber ring with an outer diameter of 70 mm and an inner diameter of 35 mm (according to the size of the siphon pipe) and insert it into the sewer socket until it stops.
After the pedestal is installed, a siphon is attached to the washbasin. To connect the sink to the sewer, the siphon outlet pipe, equipped with an O-ring, must be inserted into the sewer socket.
Installing plumbing fixtures in a private home such as a kitchen sink, although not fundamentally different from installing a sink in a bathroom, still has some peculiarities.
Before installing a sink with your own hands, first of all, install the water fittings - mixer and other additional accessories. Then a combined sink drain system or a simple drain assembly is installed and a compression connection is made to the sink siphon.
Cold and hot water are shut off. The new sink is mounted into the countertop of the kitchen unit. Typically, the sink base does not have a back wall, which facilitates the free connection of water communications to the pipeline. Then new water pipes are installed.
Now you know how to properly install a sink in the bathroom and a sink in the kitchen, which means it’s time to learn about connecting the toilet to the sewer.
Installation of an overhead sink
Standard cabinets with a width of 56, 60 and 80 cm, which are used in kitchen units, are equipped with overhead sinks. Main stages of work:
- a space in the kitchen is being prepared for the installation of sanitary ware;
- The kitchen cabinet is marked and the required number of fasteners is fixed to the upper end of the walls using screws;
- a sink made of stainless steel or other material is installed, and the screw heads must coincide with the holes;
- to lock the base screws, press the sink against the wall;
- check the correctness and reliability of installation of the sink on the bedside table;
- finally tighten the fasteners.
If the design of the sink includes a metal apron on the back, then specialists ensure tight fixation to the wall. In the kitchen, craftsmen also install and connect a mixer and a siphon to drain waste water.
Installation of a mortise sink
When installing kitchen furniture with a common worktop made of particle boards or natural wood, a qualified installation of a built-in sink is carried out. After marking, holes are made, and using a jigsaw, the required perimeter is cut out in the wooden countertop, corresponding to the installation dimensions of the sink. For stone and composite surfaces installed in the kitchen, specialists use special equipment that allows them to solve problems of any complexity. Installing a sink into a countertop is a multi-step process:
- marking the surface taking into account the dimensions of the product;
- hole preparation;
- gluing a special seal around the perimeter to prevent water from seeping under the countertop in the kitchen;
- installation of the sink and installation of fasteners;
- tightening the screws to tightly fit the product to the tabletop for complete tightness;
- installing the latches in the hole and screwing in the clamps.
The use of high-quality fasteners and modern tools by experienced specialists allows us to guarantee the reliability and durability of using a built-in sink in the kitchen.
Sources
- https://www.ivd.ru/stroitelstvo-i-remont/santehniceskoe-oborudovanie/vodosnabzenie-sovremennoj-kuhni-5533
- https://gidroguru.com/vnutrennyaya-kanal/santeh-pribory/mojki/2426-podklyuchenie-mojki-na-kuhne
- https://stroybud.com/montazh-santehniki-na-kuhne/
- https://RoomGood.ru/montazh-novoj-santexniki-i-elektroprovodki-na-kuxne/
- https://remont-kuxni.ru/2012/01/10-sovetov-santehnika-po-provedeniyu-santehnicheskih-rabot-na-kuhne.html
- https://www.stroy-dom.net/?p=11619
- https://vladimir.trade-services.ru/services/uslugi-santehnika/ustanovka-mojki-na-kuhne/
Which pipes to choose for drainage systems?
The choice of materials for sewer installation is very wide: you can purchase metal, asbestos, ceramic, cast iron and other products. But in terms of manufacturability, durability and practicality, none of these varieties can compare with products made from polymers - PVC or polypropylene. The advantages of these components include:
- high strength and resistance to deformation;
- chemical and biological inertness;
- light weight;
- simple, fast and reliable joining of individual system elements;
- smooth surface that prevents the formation of blockages;
- service life from 25 years.
HIGH LEVEL OF RELIABILITY
The state construction license SRO confirms the high level of reliability of the Vodokanalsbyt company
CHECK LICENSE
WITH US YOU ARE 100% INSURED
If during the work we cause damage to your property, we guarantee 100% compensation
CHECK INSURANCE