Tees for sewer pipes: types and installation instructions
Today it is impossible to imagine comfort and convenience in a private home without a sewer system.
Of course, in order to install a sewerage system in a private house, you will need many details, among which tees for sewer pipes occupy a special place. They are special devices used to create certain branches in the pipeline system in a private house, cottage, apartment or any administrative buildings.
These created branches facilitate the transportation of wastewater or fecal matter. The parts themselves have a bell-shaped design, which, in fact, ensures ease and simplicity of connections with plastic pipes, or with each other.
They can have a right angle, or they can have an angle of 45 degrees. As a rule, tees have a service life of 50 years and provide ultra-reliable installation.
The content of the article:
This is what a tee for sewer pipes looks like
What types of tees are there?
The sewer tee is a very important element that ensures the branching of the pipeline.
Today there are several types of connecting tees:
- PVC tees are straight, designed for sewer pipes at 90/87 degrees. This type of tee is used to connect vertical risers to the horizontal part of the sewer system;
PVC Straight Tee
45 degree tee
This is what an inspection tee with a coupling and cover looks like
The most modern and convenient are plastic devices for branching the pipeline system.
In addition, replacing a plastic tee is much easier, since it can be done without the use of improvised tools, and this greatly simplifies the repair process.
The main advantages of plastic tees include:
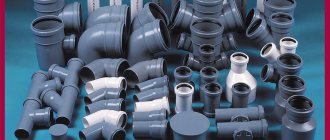
Tee for plastic pipes
- durability;
- ease of installation;
- affordable price;
- reliability of the design.
Thanks to this type of fitting, it is possible to connect pipes and make a branching of the pipeline, which will ensure the unhindered flow of wastewater into different parts of the sewer system.
Routing pipes using a plastic tee
How to install a tee on a PVC sewer pipe
PVC tees for sewer pipes can be used for both internal and external sewerage.
You can consider how to install a tee on a sewer pipe using the example of connecting a sink and toilet:
- first of all, you need to place the toilet in its designated place in the toilet and mark the place where you plan to install the tee;
- then the toilet needs to be removed from its future location or simply put aside;
- using sealant, the tee should be inserted into the socket of the riser;
An example of installing a tee for connecting to a toilet
This is how sealant is applied to connect a toilet
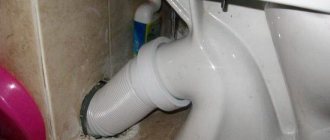
This is what a toilet connected to a corrugated tee looks like
For example, if you need to make only one branch from a water pipe, then using a regular tee will be the most optimal and convenient option.
If the plumbing system consists of metal pipes, then you will need to find their connections and unscrew them.
So, installing a tee on a water supply pipe is carried out as follows:
Using sewer pipe tees
- first you need to turn off the water along the riser and, of course, warn your neighbors that you will be carrying out repair work that requires turning off the water;
- then you need to find the pipe connection where you want to actually install the tee and make a branch;
- the connection point should be unscrewed, and this is where the tee should be inserted;
- to do this, you will need to move the pipes apart somewhat and, perhaps, even one pipe will have to be shortened and a thread cut into it;
- After this, you can safely install the tee and it is better to coat the joints with sealant in order to avoid water leakage. However, if you do everything correctly, select the appropriate type of tee to match the size of the water pipes, then the connections themselves should be sealed and should not leak.
This is what the installation of PVC tees looks like
As you can see, installing a tee is not an impossible task, and every owner can cope with it, even without any knowledge and skills.
In addition, installation of a tee does not require the use of any equipment, such as welding, and installation lasts a matter of minutes.
Connection methods
On sale you can find toilets with releases of three different shapes:
- Vertical exhaust was widely used in Stalin-era houses. The sewer drain from the outlet recessed into the floor was connected to a riser under the ceiling of the lower floor;
Sewer drain under the basement ceiling.
Vertical outlet is popular among owners of private houses. It allows you to completely hide sewer pipes if there is a basement in the house or a bathroom on the second or third floors.
- The oblique release experienced its peak of popularity in the 60-80s. Its great advantage is its ability to transport wastewater even when the connection is completely depressurized. A toilet with an oblique outlet can be used by simply moving it to the riser and inserting the outlet into the socket;
- Direct (horizontal) outlet allows you to install a plumbing fixture at a minimum distance from the wall, hiding all communications in it.
We have to figure out how to properly connect the toilet to the sewer in each specific case.
Connection diagram
The PMM can be connected to the drain in different ways. Sequencing:
- First, choose a connection diagram.
- They purchase materials and select the necessary tools.
- Connect according to the instructions.
Some users do not bother themselves with such work. They place the end of the drain hose directly into the sink. Dirty water will flow into the sink, and from there into the sewer.
A responsible owner will never allow such an “installation”. Firstly, this option is not very aesthetic and hygienic. And secondly, to maintain cleanliness and order, you will have to wash the sink every time after washing.
If you spend money on a dishwasher, you should take advantage of all its advantages, including automatic draining. By connecting the PMM to the drains, the user does not have to worry about dirty water.
There are several options for connecting a dishwasher to a drain; let’s look at each in detail:
- The easiest way . You can connect the PMM directly to the sewer pipe outlet. But this option is suitable only for those who have a free outlet in the kitchen.
- The most popular way . The drain hose is connected to the siphon fitting. Today they produce models that have several fittings at once. If the existing siphon has a free fitting, you can begin to implement the idea. If not, you need to buy a new siphon. The drain hose is connected to the fitting - the waste from the machine will be drained through a siphon.
- Good for a kitchen that, in addition to a dishwasher, also has a washing machine . The tee is placed between the sewer pipe and the siphon. The drain hoses of both machines - the dishwasher and the washing machine - are connected to the outlets.
The third method is especially convenient and effective - dirty water from three sources at once passes through the tee - the washing machine, dishwasher and from the sink.
Having chosen one of three connection options, do not rush to get to work. We need to think about where to put the device. It should not be placed too far from the connection point. If it is removed more than 3 m, the pump may break, since it will have to pump dirty water, experiencing maximum loads.
If the PMM is located too far from the connection with the drain, its pump will wear out twice as quickly as with a normal location.
Bath connection technology
The procedure for connecting the bathtub to the sewer system
The connection procedure is as follows:
Assemble the siphon in accordance with the instructions attached to it, paying special attention to all the necessary sealing gaskets. The plastic fasteners are tightened by hand, acting very carefully. Tools are not used, as using them can break the part. After the device has been installed, one end of the pipe is connected to it, and its other end is brought to the sewer drain hole and a connection is made. Connecting the bathtub drain must be accompanied by careful control over the density of the assembled joints to ensure a high degree of their tightness.
Pro tip:
Pro tip:
If the slightest malfunction is detected, it is necessary to eliminate them immediately, otherwise during operation it will be necessary to replace defective elements of the system.
- If the sides of the bathtub are tightly adjacent to the walls, the joints must be carefully sealed so that water does not have the opportunity to penetrate under the bathtub.
Connecting the bathtub to the water supply
Just like connecting a bathtub to the sewer with your own hands, it is also possible to connect to the water supply and install a mixer yourself. You don't have to call a plumber to do this.
Let's consider this technology:
- A shut-off valve is installed on the pipe in front of the fittings, the presence of which is necessary to shut off the water when replacing the mixer or in case of repair.
- Eccentrics are attached to the fittings located on the mixer (first by hand, and then tightened with a key). In this case, FUM tape or a specialized thread is used, intended for connecting elements of the plumbing system.
- Decorative attachments are put on the eccentrics.
- On the mixer, rubber or silicone gaskets are inserted inside the threads, and then the mixer is screwed to the eccentrics (in this case there is no need to use FUM tape or thread).
Pro tip:
The bathtub connection diagram must necessarily include a check of the quality of the work performed - if leaks are detected in the mixer, the gasket is replaced - it is possible that the leak occurred due to a defective gasket.
- The mixer is screwed on both sides at the same time. In this case, the gaskets are evenly sealed.
- If the bathtub comes with a mixer when purchasing:
- then the permissible level of pipe height is below the level of the bathroom, since in this case the connection is made using reinforced hoses;
- it is not necessary to align the ends of the pipes - such hoses are very flexible;
- The basic rule in such a situation is to ensure that the length of the reinforced hose is slightly longer than the distance from the bathroom to the end of the pipe.
After completing all operations to connect the bath to the water supply and sewerage, turn on the water and observe for leaks. If there are leaks, then you need to make sure how well the gaskets are secured, and also make sure the quality of the gaskets themselves (if they are of poor quality, you will have to replace them).
Following these simple rules will allow you to efficiently connect the bathroom to the sewer and correctly install the mixer. With this approach, the bathtub will last for many years!
What materials and tools are needed?
Tools required to complete the work:
- Adjustable wrench - install pipe fittings.
- Drill - drill holes to fix the pipe.
- Screwdriver - tighten the bolts securing the pipes.
- Level - check the slope of communications.
The set of materials depends on the selected connection method:
- When connecting a dishwasher directly, a 40/50 mm adapter . The diameter depends on the size of the pipe. You will also need clamps (2 pieces) and a check valve.
- For the second option - when connecting through a fitting, no components are needed. If, of course, there is already a siphon with a side fitting.
- For the third scheme you will need a tee (diameter 40/50 cm) , clamps (4 pcs.), adapters of the required diameter (4 pcs.), check valve .
If you decide to connect the dishwasher to the drain yourself, you may also need the following consumables (taking into account the method of connection to the drain):
- Siphon for drains. It is made of plastic. May have one or two three-quarter-inch diameter side fittings. The second fitting can be used to connect the SMA. While nothing is connected, you can put a plug on the second fitting.
- 3/4 inch metal-plastic tee . It is necessary for inserting into a sewer pipe.
- A check valve is not mandatory, but extremely useful. It is necessary to prevent the siphon from overflowing in the event of a clogged sewer system. If it is not there, then in case of a blockage, the drains will flow into the dishwasher.
- Sewage pipe. Its diameter should be similar to the diameter of the installed pipe or slightly smaller - but such as to provide the required performance for draining dirty wastewater.
- Clamps. Dowels or screws.
Connecting the bathtub to the sewer yourself
Many of us believe that the most difficult process is installing a purchased bathtub. But in fact, the main difficulties are caused by connecting the bathtub to the sewer, since the safety of the room from leaks depends on the quality of the work.
Indeed, a dripping faucet will not cause as much harm as a leaking siphon under the bathtub or a fistula on the sewer riser. And the situation that causes particular trouble for residents is when the bathroom smells like sewage. Let's deal with these and other problems together.
Step-by-step instructions for connecting a PMM via a tee
Let's consider the most interesting and promising option for connecting PMM with wastewater. Before starting work, it is necessary to ensure the stability of the device. This is achieved by adjusting the height of the legs.
Next, hoses are connected to the PMM and it is placed in a place where it will stand permanently. The built-in equipment is placed in a cabinet, pulling communications through the holes in the wall.
The procedure for connecting a dishwasher through a tee:
- Align the PMM body using a level.
- Check whether the hose reaches the desired point. It is necessary that it has a certain reserve of length left so that it can be bent.
- Install adapters onto the tee. Put on the clamps. Place a tee between the pipe and the siphon.
- Place the check valve on the outlet of the tee.
- Connect the hose to the outlet of the previously installed valve.
- Plug the remaining outlet if you are not going to connect the washing machine hose to it.
- Rewind all connections with fum tape. Tighten with clamps.
- Bend the hose so that unpleasant odors do not enter the dishwasher chamber - it should be located at a height of at least 40 cm from the floor.
Watch a useful video that shows one of the ways to lay dishwasher drains:
Preparing to connect
Before laying a sewer system in the bathroom, you need to prepare all the structural elements in advance, following the expert advice described below. The main element for ensuring drainage is a siphon, which makes it possible to clean the system if the drain in the bathroom is clogged. In order not to get confused in the terms when purchasing this product, you need to remember that this device has two more names, “piping” or “drain-overflow system” for the bathroom.
How to choose a siphon
The bathroom drain pipe can be made of materials such as:
- copper;
- brass;
- cast iron;
- plastic;
- textolite
When installing sewerage in the bathroom yourself, it is recommended to buy plastic products that do not have corrugated pipes and the structure is rigid. Plastic is chosen because this type of material is easy to work with and does not require special tools, while installing sewerage in a bathroom made of metal or copper requires certain work experience.
When buying a siphon model for your bathroom, you need to consider a number of features:
Installation of drain pipes in the bathroom can be carried out using siphons of two types. The universal type is suitable for all bathtubs where the distance between the drain and the overflow does not exceed 57 cm
In bathrooms with other designs, it is necessary to purchase special siphons or they can come complete with the bathtub itself from the manufacturer; Before making a sewer system in the bathroom and buying a siphon, pay attention to the thickness of the bathroom itself. There are products on sale that are designed for different bathroom wall thicknesses, but there are also universal models; installation of sewerage in a bathroom almost always involves the presence of additional consumers in the form of a washing machine
For these purposes, there are special siphons with several outlets for connecting drains of third-party household appliances.
It is worth remembering that a siphon of any model and design needs regular maintenance, so before hiding the sewer in the bathroom or when covering the bathroom with decorative panels, you need to provide an inspection hole of sufficient size so that the sewer line in the bathroom is provided with free access. Typically, in such cases, a removable panel or opening door is provided in the place where the bathtub is connected to the sewer.
When installing a new bathroom, the required height should be maintained to ensure free drainage. The sewerage system in the bathroom provides for a difference between the lowest point of the sewer pipe and the siphon connection point. This difference should be 10-20 cm for normal functioning of the system. In the absence of such a difference, the sewerage wiring in the bathroom will fill with water or the liquid will drain very slowly.
Connecting the bathroom to the sewer
Before assembling the sewer system in the bathroom yourself, for ease of understanding, we break down the entire process into main points in the form of step-by-step instructions. The installation procedure is as follows:
- laying sewer pipes in the bathroom begins with checking the configuration of all the elements involved;
- then all the elements of the siphon are assembled into one structure and a liquid sealant is used to ensure better sealing of the connections. Typically, a diagram for connecting the bathroom to the sewer and detailed assembly instructions are contained in the attached documents for the bathroom and siphon, so that you can carry out the installation yourself;
after the siphon is completely assembled, a sewer system is installed in the bathroom, where one end of the siphon pipe is connected to the drain hole of the bathroom, and the other to the inlet pipe of the waste system; at the last stage the overflow pipe is connected
In this case, it is important to monitor the tight fit of all rubber gaskets at the joints. The sewer pipe in the bathroom should not have stressed areas, this will lead to deformation and cracking of the plastic.
You can watch the video accompanying this article to learn how to properly assemble and connect the siphon.
What are tees made of?
Most modern facilities use PVC sewer tees. The products have many advantages.
- Easy to install. Any craftsman can install a polymer tee. This does not require additional devices or sealing elements.
- Reliability. The products hermetically connect sewer pipes. They are not subject to corrosion and are resistant to aggressive environments.
- Reasonable price. Plastic products are available to private craftsmen and commercial organizations.
- Light weight. Low weight simplifies storage, transportation and installation of tees.
Plastic does not require maintenance and retains functionality throughout its entire service life.
What types of sewer tees are there?
There are several types of tees for sewerage.
- Straight equal bore. Typical solutions that provide pipe connections at an angle of 90 degrees. The working passages have the same diameter.
- Straight multi-bore. Tees that create branches at right angles. The diameter of one hole is different from the other two.
- With an inclination of 45 degrees. Fittings for horizontal connections. As in the case of straight tees, they can be equal or unequal.
- Revision. Products with control openings. They are used when servicing the highway and have a sealed lid.
Bathtubs and toilets, washing machines and dishwashers are connected via tees. With their help, branch lines are organized and pipes of different diameters are connected.
Connecting the bath to the sewer
To connect the bathtub to the pipes, it is better to use a siphon with an overflow. Its installation requires compliance with two requirements:
- Creating an optimal difference in height between the outlet and drain pipe. The specific size of the drop depends on the height of the siphon outlet.
- Providing access to the siphon, which is necessary for periodic cleaning of the drainage unit.
As for the pipe that will connect the bathtub to the sewer, the best option is hard plastic products. They should have two elbows that will ensure optimal rotation of the elements. If it is not possible to connect the drainage units using rigid pipes, then corrugated pipes are used. When joining pipes of different diameters, adapters are used.
Connecting a bathtub to the sewer consists of the following sequential steps:
- all rubber gaskets are put in place;
- the siphon is assembled and the overflow pipe is connected to the bathtub;
- fastening elements are screwed in;
- using a pipe and a pipe, the siphon is connected to the drain hole;
- The joints are sealed where the bathtub comes into contact with the wall.
All plastic elements are connected without the use of open-end or gas wrenches. The work is done manually. Otherwise, there is a risk of damage to the plastic thread.
After completion of installation work, preliminary testing of the sewer system is carried out. It is necessary to turn on all plumbing fixtures and stock up on 2-3 buckets of water. When the plumbing begins to drain waste water into the system, buckets of water are poured into the sink, bathtub and toilet. If there are leaks, you will have to redo the fastening of the sewerage elements in such places.
What should be considered when selecting tees?
When choosing fittings for sewerage, it is important to consider the following points.
- Dimension. The diameter of the tee must correspond to the diameter of the pipeline, otherwise it will not be possible to install the product.
- Type . The market offers products made of steel, PVC and cast iron. The material of the tee should not differ from the material of the pipeline.
- State . Products without defects are allowed for installation. The presence of the latter will reduce the tightness of the line and increase the risk of blockages.
Experts recommend using certified tees. The products comply with international standards and have a significant service life.
Purchase of sewer tees
sells sewer pipe tees of various configurations. Solutions for industrial, utility and business networks are on sale. The equipment is supplied in original packaging and accompanied by a set of documents.
Sewer tees of 100 mm, 160 mm, 200 mm are offered. The assortment includes various types of products.
EcoMontazh managers will help you obtain information about products. They will tell you how to insert a tee and recommend related materials. Specialists will select suitable products, fill out an application, and coordinate delivery dates.