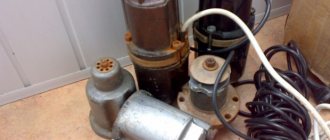
Replacing a pump in a well is carried out only after all checks of its functionality have been completed, which can be carried out without lifting the unit. Such work can be performed either by a specialized organization or independently, with the involvement of household members.
Almost every owner who is familiar with the basics of electrical engineering and has skills in working with electrical measuring instruments (tester or megohmmeter) and plumbing tools can successfully cope with this work. After all, it has long been known and confirmed by numerous examples that no one will do the job better than the owner.
Causes of breakdowns
The rapid depletion of the resource is explained by the difficult conditions in which the equipment has to work. Constant exposure to the liquid in which the unit is immersed, vibration, temperature changes and friction of abrasive particles of water suspension ultimately lead to equipment malfunctions. It should be mentioned that more expensive models, for example, the Gilex or Grundfos pump, are noticeably more durable and reliable than their cheap counterparts.
There are several main reasons why downhole equipment stops performing its functions.
- Wear. The performance of components gradually deteriorates, parts become unusable after a certain period of operation.
- Installing the mechanism above the water level. The equipment begins to work outside the liquid environment, “dry”, as a result of which it is deprived of water lubrication and cooling of the heating working parts. Overheating of equipment can lead to jamming of parts and even melting of plastic components.
- The power exceeds the required level, the unit begins to suck in a large amount of soil from the bottom of the well or well. Constant exposure to abrasive particles significantly accelerates the wear of the impeller, and the part breaks prematurely.
- Lack of voltage stabilizer. The electrical parts of the product, including capacitors, are very sensitive to voltage surges and power failures. If the owner of the equipment does not use a voltage stabilizer, sooner or later the electrical parts of the unit will fail.
- Neglect of prevention. Experts recommend conducting regular technical inspections of equipment 1-2 times a year. Periodically checking the condition of the submersible unit allows you to promptly identify wear of components and other problems. Prevention allows you to prevent serious breakdowns, the elimination of which will cost the equipment owner much more than regular maintenance.
Types of faults
There are several types of faults that most often occur with submersible water pumps.
Doesn't turn on
There are 4 possible reasons why the device does not respond to being turned on.
- Electrical protection. Modern products provide a protection function that operates on the principle of traffic jams on the electricity consumption meter. If unexpected loads or power failures occur, the protection is triggered automatically and stops the operation of the unit. It is recommended to start the mechanism again only after the reason for the operation of the machine has been determined.
- Damage to fuses. Fuses can blow due to wear and tear, but sometimes they fail due to external reasons. If there is a regular burnout, experts advise checking the integrity of the power cable, as well as its connection location.
- Cable damage. To check the power cable, the equipment must be removed, since most of the cord runs under water.
- Protection against dry running. In addition to electrical protection, submersible devices are equipped with a device that controls the level of immersion in the liquid. If the liquid level is insufficient, the device automatically stops operating.
Turns on but doesn't download
In a situation where the switched on mechanism does not supply water, there may also be 4 reasons.
- Shut-off valve. The simplest reason explaining the lack of water pumping is a closed shut-off valve of the device. In this case, turn off the pump, then turn off the shut off tap. Frequently starting the unit with the shut-off valve closed can cause damage, so it is recommended to check the valve before each start.
- Low water level. If the shut-off valve is open, the next step should be to check the dynamic water level and adjust the immersion of the apparatus to the desired depth.
- Check valve failure. If the check valve becomes clogged, it may “stick” and stop flowing water. In this case, cleaning the part or replacing it with a new one may help.
- Intake filter clogged. A clogged filter can also interfere with the flow of water into the system, so you should check its condition and, if necessary, clean the filter mesh.
Productivity drops
If the equipment begins to supply significantly smaller volumes of water, it is recommended to check several assumptions.
- Reduced network voltage. When the voltage is low, the device is not able to operate at full capacity.
- The riser pipe is clogged. As the permeability of the lifting pipe decreases, the performance of the mechanism drops noticeably.
- Clogged fittings in the water supply network. Valves and faucets in the water supply system can become clogged and prevent the fluid from flowing fully.
- Incorrect pressure switch settings.
Too frequent switching on and off
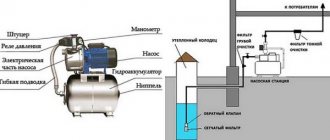
The problem arises when the equipment is paired with a hydraulic accumulator. Frequent switching on and off can occur for several reasons.
- The pressure in the hydraulic tank is too low.
- Rupture of rubber components of the tank.
- Incorrect pressure switch settings.
Pulsating water supply
A pulsating stream of water from the tap indicates a decrease in the water level in the well below the recommended level. In this case, the mechanism should be lowered to the calculated depth as quickly as possible.
The housing is leaking
When the seals wear out, the unit body begins to leak. The location of the leak is easy to detect by the appearance of drips and corrosion. If the seals are not replaced in a timely manner, the product may completely become unusable.
It buzzes, doesn't pump
The machine may make a humming noise but not dispense water for the following reasons.
- The impeller stuck to the device body due to the pump being stored “dry” for a long time.
- The impeller is jammed due to sand, silt, and dirt.
- Damage to the engine start capacitor.
- Low voltage in the electrical network.
Vibrates strongly
Severe vibration predominantly occurs in centrifugal pumps due to worn bearings or loose fasteners. The problem is solved by replacing parts and strengthening elements.
Doesn't turn off
The submersible pump stops automatically turning off if the pressure switch fails, or if the relay has incorrect settings.
How to ring a pump motor – VET engineer
Ideally, in order to check the windings of an electric motor, it is necessary to have special instruments designed for this, which cost a lot of money. Surely not everyone has them in their home. Therefore, it is easier for such purposes to learn how to use a tester, which has another name: a multimeter. Almost every self-respecting home owner has such a device.
Electric motors are manufactured in various versions and modifications, and their malfunctions are also very different. Of course, not every fault can be diagnosed with a simple multimeter, but most often checking the motor windings with such a simple device is quite possible.
Any type of repair always begins with an inspection of the device: the presence of moisture, whether parts are broken, the presence of a burning smell from the insulation and other obvious signs of malfunction. Most often, the burnt winding is visible. Then no checks and measurements are needed. Such equipment is immediately sent for repair. But there are times when there are no external signs of failure, and a thorough check of the motor windings is required.
Types of windings
If you don’t go into details, the motor winding can be imagined as a piece of conductor that is wound in a certain way in the motor housing, and it seems that nothing should break in it.
However, the situation is much more complicated, since the electric motor winding has its own characteristics:
- The material of the winding wire must be uniform along its entire length.
- The shape and cross-sectional area of the wire must have a certain accuracy.
- In industrial conditions, a layer of insulation in the form of varnish must be applied to the wire intended for winding, which must have certain properties: strength, elasticity, good dielectric properties, etc.
- The winding wire must provide strong contact when connected.
If there is any violation of these requirements, then the electric current will flow under completely different conditions, and the electric motor will deteriorate its performance, that is, the power, speed will decrease, and may not work at all.
Checking the motor windings of a 3-phase motor . First of all, disconnect it from the circuit. The majority of existing electric motors have windings connected in star or delta configurations.
The ends of these windings are usually connected to blocks with terminals that have the appropriate markings: “K” - end, “N” - beginning. There are options for internal connections, the nodes are located inside the motor housing, and different markings (numbers) are used on the terminals.
The stator of a 3-phase electric motor uses windings that have equal characteristics and properties, and the same resistance. When measuring the winding resistances with a multimeter, it may turn out that they have different values. This already makes it possible to assume that there is a malfunction in the electric motor.
Possible faults
It is not always possible to visually determine the condition of the windings, since access to them is limited by the design features of the engine. In practice, you can check the winding of an electric motor using its electrical characteristics, since all motor breakdowns are mainly detected:
- A break, when the wire is broken or burnt out, no current will pass through it.
- A short circuit caused by damaged insulation between the input and output turns.
- A short circuit between turns, with the insulation damaged between adjacent turns. As a result, damaged turns are self-excluded from operation. Electric current flows through the winding, which does not involve damaged turns that do not work.
- By breaking through the insulation between the stator housing and the winding.
Methods
Checking the motor windings for open circuits
This is the simplest type of verification. The malfunction is diagnosed by simply measuring the wire resistance value. If the multimeter shows very high resistance, then this means that there is a wire break with the formation of air space.
Checking the motor windings for short circuits
If there is a short circuit in the motor, its power will be cut off by the installed short circuit protection. This happens in a very short time. However, even in such a short period of time, a visible defect in the winding may occur in the form of carbon deposits and metal melting.
If you measure the winding resistance with instruments, you get a small value that approaches zero, since a piece of the winding is excluded from the measurement due to a short circuit.
Checking the motor windings for interturn short circuits
This is the most difficult task in identifying and troubleshooting. To check the motor winding, several measurement and diagnostic methods are used.
Checking the motor windings using an ohmmeter
This device operates on direct current and measures active resistance. During operation, the winding forms, in addition to active resistance, a significant inductive resistance value.
If one turn is closed, then the active resistance will practically not change, and it is difficult to determine it with an ohmmeter. Of course, you can accurately calibrate the device, carefully measure all windings for resistance, and compare them. However, even in this case it is very difficult to detect shorted turns.
The results are much more accurately produced by the bridge method, which measures active resistance. This method is used in a laboratory environment, so ordinary electricians do not use it.
Current measurement in each phase
The phase current ratio will change; if a short circuit occurs between the turns, the stator will heat up. If the engine is fully operational, then the current consumption is the same in all phases. Therefore, by measuring these currents under load, we can confidently say about the actual technical condition of the electric motor.
Checking motor windings with alternating current
It is not always possible to measure the total winding resistance and take into account the inductive reactance. For a faulty motor, you can check the winding with alternating current. For this, an ammeter, a voltmeter and a step-down transformer are used. To limit the current, a resistor or rheostat is inserted into the circuit.
To check the motor winding, a low voltage is applied and the current value is checked, which should not be higher than the nominal value. The measured voltage drop across the winding is divided by the current to obtain the total resistance. Its value is compared with other windings.
The same circuit makes it possible to determine the current-voltage properties of the windings. To do this, you need to take measurements at various current values, then write them down in a table or draw a graph. There should not be large deviations when comparing with other windings. Otherwise, there is an interturn short circuit.
Checking the motor windings with a ball
This method is based on the formation of an electromagnetic field with a rotating effect if the windings are in good condition. They are connected to a symmetrical voltage with three phases, low value. For such tests, three step-down transformers with the same data are used. They are connected separately for each phase.
To limit the load, the experiment is carried out in a short period of time.
Voltage is applied to the stator windings, and a small steel ball is immediately introduced into the magnetic field. When the windings are in good condition, the ball rotates synchronously inside the magnetic circuit.
If there is a short circuit between the turns in any winding, the ball will immediately stop where there is a short circuit. When carrying out the test, the current must not be allowed to exceed the rated value, since the ball can fly out of the stator at high speed, which is dangerous for humans.
Determining the polarity of windings using the electrical method
The stator windings have terminal markings, which sometimes may not be there for various reasons. This creates difficulties during assembly.
To determine the marking, several methods are used:
- A weak DC source and an ammeter.
- Step-down transformer and voltmeter.
The stator acts as a magnetic circuit with windings operating on the principle of a transformer.
Determining the marking of winding terminals with an ammeter and battery
On the outer surface of the stator there are six wires from three windings, the ends of which are not marked and must be determined by their affiliation.
Using an ohmmeter, find the terminals for each winding and mark them with numbers. Next, mark one of the end and beginning windings, randomly. A dial ammeter is connected to one of the remaining two windings so that the arrow is in the middle of the scale to determine the direction of the current.
The negative terminal of the battery is connected to the end of the selected winding, and the positive terminal briefly touches its beginning.
The pulse in the first winding is transformed into a second circuit, which is closed by an ammeter, and repeats the original shape. If the polarity of the windings coincides with the correct location, then the arrow of the device at the beginning of the pulse will go to the right, and when the circuit opens, the arrow will move to the left.
If the instrument readings are completely different, then the polarity of the winding terminals is reversed and marked. The remaining windings are checked in a similar way.
Determining polarity with a voltmeter and a step-down transformer
The first stage is similar to the previous method: they determine whether the terminals belong to the windings.
Next, the terminals of the first winding are randomly marked to connect them to a step-down transformer (12 volts).
The other two windings are connected randomly with two terminals at one point, the remaining pair is connected to a voltmeter and the power is turned on. The output voltage is transformed into other windings with the same value, since they have the same number of turns.
Using a series connection circuit, the 2nd and 3rd windings of the voltage vector are summed up, and the result is shown by a voltmeter. Next, the remaining ends of the windings are marked and control measurements are carried out.
Electric motors are used in many household devices, so if the device in which the unit is installed begins to act up, then, in many cases, diagnostic measures should begin with ringing the motor winding. How to test an electric motor with a multimeter and do it correctly will be described in detail below.
How to call: conditions
Before checking the electric motor for malfunction, you must make sure that the cord and plug of the device are absolutely in good working order. Usually, the absence of a disruption in the supply of electric current to the device can be judged by a glowing indicator lamp.
After making sure that electric current is supplied to the electric motor, it is necessary to dismantle it from the device body, while the device itself must be completely de-energized while performing this operation.
Checking the armature and stator of the electric motor is done with a multimeter. The sequence of measurements depends on the model of the electrical unit, and before ringing the electric motor, you should make sure that the measuring device is in working order.
The most common “breakdown” of multimeters is a decrease in battery charge, in which case you can get distorted results of resistance measurements.
Another important condition in order to ring an electrical unit correctly is to completely suspend any other activities and devote full time to performing diagnostic work, otherwise you can easily miss any section of the electric motor winding, which may be the cause of the problem.
Continuity test of an asynchronous motor
This type of electric motor is quite often used in household devices operating from a 220 V network. After dismantling the unit from the device and visual inspection, during which no short circuit is detected, diagnostics are carried out in the following sequence:
- Measure the resistance between the motor terminals. This operation can be carried out with a multimeter, which must be switched to resistance measurement mode up to 100 Ohms. A working asynchronous motor should have a resistance of about 30 - 50 Ohms between one extreme and middle terminal of the connected winding, and 15 - 20 Ohms between the other extreme and middle contacts. These measurements indicate complete serviceability of the starting and main windings of the unit.
- Diagnose current leakage to ground. To test the unit for electric current leaks, you need to switch the multimeter operating mode to the resistance measurement position of up to 2,000 kOhm and alternately connect each terminal to the motor housing to determine the presence or absence of insulation damage. In all cases, the multimeter display should not show any readings. If an analog device is used to measure leakage, the needle should not deviate during diagnostic procedures.
If deviations from the norm were identified during the measurement process, the unit must be disassembled for more detailed studies. The most common failure of asynchronous electric motors is an interturn short circuit.
With such a malfunction, the device overheats and does not develop full power, and if operation of the device is not stopped, the electrical unit can be completely damaged.
To test turn-to-turn short circuits, the multimeter is switched to resistance measurement mode up to 100 Ohms.
It is necessary to ring each stator circuit and compare the results obtained. If the resistance value in one of them differs significantly, then in this way it is possible to confidently diagnose an interturn short circuit in the winding of an asynchronous electric motor.
How to ring a commutator motor
The collector unit can also be tested with a multimeter. This type of electric motor is used in a DC circuit.
Brushed AC motors are less common, such as in various power tools. The best way to ring such products is to completely disassemble the electric motor.
You can check the armature of the electric motor, as well as ring the stator winding, using a multimeter, which must be switched to resistance measurement mode up to 200 Ohms.
Most often, the stator of a collector unit consists of two independent windings, which need to be tested with a multimeter to determine their serviceability.
The exact value of this indicator can be found in the documentation for the electric motor, but the performance of the winding can be judged if the device shows a small resistance value.
In powerful DC motors of car electrical equipment, the stator resistance value will be so small that its difference from a short-circuited conductor can be tenths of an ohm. Less powerful devices have a stator winding resistance in the range of 5 - 30 Ohms.
In order to ring the stator windings of a commutator motor with a multimeter, it is necessary to connect the probes of the measuring device to the terminals of these windings. If during diagnostic activities a lack of resistance is detected even in one circuit, further operation of the unit is not carried out.
The rotor of a commutator motor consists of a significantly larger number of windings, but checking the armature will not take much time.
In order to ring this part, you need to turn on the multimeter in resistance measurement mode up to 200 Ohms and place the multimeter probes on the collector so that they are at the maximum distance from each other.
In this way, the probes will take the place of the motor brushes and one of the several armature windings can be ringed. If the multimeter shows any value, then without removing the probes of the measuring device from the collector, you should turn the rotor slightly until the next winding is connected to the probes of the device.
This way you can check the winding without much effort. If the multimeter shows approximately the same resistance value for each circuit, this will mean that the armature of the device is absolutely working.
In order to correctly ring this type of engine, it is necessary to check for possible electric current leakage to ground.
This violation can lead not only to failure of the electric motor, but also to an increased likelihood of electrical injury. Checking the armature and stator of a commutator motor for breakdown is not difficult; to do this, you need to turn on the mode for measuring resistance up to 2,000 kOhm. To check the stator, it is enough to connect one terminal to the housing and the second to one of the windings.
To ring this part of the electric motor correctly, during this operation it is forbidden to touch the metal part of the multimeter probes, or the stator housing and the wiring of the circuit being measured.
If you do not adhere to this rule, you can get false positive results, since sufficient electrical potential will pass through the human body. In this case, the multimeter will show human resistance, and not a “breakdown” between the stator housing and the winding.
The possible leakage of electric current to the armature housing of the electric motor is measured in a similar way.
To determine the absence of a “breakdown” to the ground of the device, it is necessary to alternately connect the multimeter probes to the housing and various windings of the electric motor rotor.
In order to test different types of electric motors using a multimeter, you need to purchase a multimeter that has a resistance measurement mode.
Ultra-precision is not required when carrying out such actions, so you can successfully use cheap Chinese devices. Before you test the motor windings with a multimeter, you need to make sure it is working properly.
It should also be borne in mind that an electric motor malfunction can have various symptoms. Even if the electrical device is in working condition, but the engine speed does not reach the maximum value, you should immediately check for possible damage to the windings.
After all diagnostic measures have been carried out and the electric motor has been repaired, the device is tested before installing it in a household appliance or tool.
When carrying out any electrical installation or diagnostic work, it is necessary to completely disconnect the device from the 220 V network or three-phase current.
Statistics show that in most cases the electric motor is to blame for pump failures. It usually fails due to overheating. The insulation of its winding is broken and either an interturn short circuit or a short circuit to the housing occurs.
In order to accurately determine the cause of the malfunction, the pump should be removed from the well. An indirect sign of a malfunction of the electric motor can be the fact that the protection is triggered due to current leakage. Of course, if you have an RCD machine.
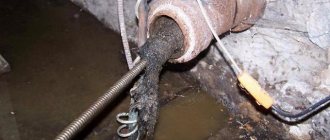
After removing the pump, it must be disassembled to gain access to the electric motor. To do this, you need to unscrew the coupling bolts and disconnect the pump part. Then remove the oil seal. By the way, due to its leakage, a short circuit in the electric motor is also possible. Therefore, if there is the slightest doubt, this part should be replaced.
Next, you need to pull out the studs and disconnect the upper flange of the electric motor. Then remove the rotor. Now you can proceed directly to the nickname.
Nickname of three-phase motor
In this motor, the stator windings are ringed (special equipment is required to detect a break in the rotor (which happens very rarely). An ohmmeter measures the resistance between the phase terminals. All three readings should be the same. The difference indicates an interturn short circuit.
Nickname of single-phase capacitor motor
Also, only the stator windings are checked. There are two of them - working and starting. They have different resistances! And the first one always has less. But the resistance from the common terminal must correspond to the sum of the resistances of these windings.
In conclusion, we would like to say that not all electric motors of well pumps allow rewinding. We carry out diagnostics and testing of submersible deep-well pumps; we can call and check the centrifugal water pump and the entire water supply system from the well, seven days a week.
ingener-pto.ru
Nuances of repair
In the cases listed above, an experienced equipment owner can repair the submersible pump with his own hands - clean clogged parts or install new ones. Repair instructions can be found on numerous videos on the Internet. But experts still recommend contacting special service centers, since the repair of submersible pumps of different brands has its own nuances, which the owner of the equipment may not be familiar with.
For example, with Gilex brand equipment, repairs most often involve adding oil to the engine. Devices of this brand are equipped with oil-filled engines, in which oil leakage can cause malfunctions and damage to other components. To add oil to the Gilex pump, professionals strongly recommend using the original product. Many equipment owners believe that they can add a substitute such as glycerin or transformer oil, but in the end such dubious savings only lead to accelerated wear and tear of the device.
The most common problem with Malysh brand products is loud noise that occurs even without pumping out water. The cause of the problem is a rupture in the central axis of the unit. The noise occurs because the broken axle no longer holds the armature and the membrane. The problem is resolved by replacing the part.
In addition to the fact that service center specialists are familiar with repairing water pumps from any manufacturer, when you contact them for a service, they provide free diagnostics of the devices. Therefore, before starting to repair a submersible centrifugal pump with your own hands, the owner of the equipment must consider all the options and take into account the pros and cons of each of them.
The principle of carrying out preventive work
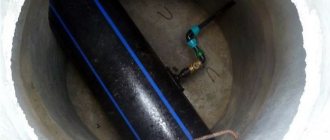
- With the help of one or two partners, you need to carefully lift the unit from the well and inspect the suspended safety rope and electrical cable. If there are minor abrasions/defects, then these fasteners should be replaced. Otherwise, there is subsequently a risk of the pump breaking or burning due to a faulty cable.
- It is important to inspect the pump for the presence of corrosion elements, dirt or deformation of the housing. If necessary, clean/rinse the unit.
Important: if there are accumulations of silt and sand in large quantities on the pump, this indicates that the well is sand-filled. This means it requires washing. In addition, it is recommended to turn on the pump removed from the well in a water tank and listen to the sound of its operation. If extraneous noise is heard, it means that the mechanism of the unit is malfunctioning.