Purpose
There are three types of systems that remove moisture from precipitation from the house: storm water, drainage, and roofing. Roof flashing is a drainage system with the help of which precipitation moisture is collected from the roof and its discharge is organized to designated places for receiving. It protects the roof, blind area, and foundation from premature wear and destruction.
Materials
Since the ebb has a specific purpose, it must meet the following requirements:
- Have increased strength
- Have the ability to resist loads without deforming,
- Be non-corrosive.
On the shelves of the modern market are ready-made castings made of plastics and metals.
Plastic systems are made of weather-resistant plastic - plastisol, polyester, PVC, etc. Advantages of plastic ebbs:
- Attractive appearance that does not age with time,
- Ease,
- Low cost,
- Easy installation
- Silence (very important quality),
- Strength,
- UV resistance,
- Resistance to moisture, chemical compounds,
- Ease of installation,
- Wide range of colors,
- Long-term operation (up to 50 years),
- Wide temperature range -50 + 50 degrees Celsius,
- Finished products have different style solutions.
Minus: the possibility that the system will burst when the water freezes is not completely excluded.
Metal castings have common advantages - durability, strength, resistance to chemicals, withstand high plus/minus temperatures, and are easy to install. Disadvantages - higher prices, noise. By type of metal there are:
- Aluminum ones are quite attractive, since their manufacturing technologies provide a smooth (to perfection) surface and provide the ability to maintain a new appearance throughout the years of service. The metal is protected by a double-sided varnish coating from corrosion. The color scheme is created by the color of the varnish. Product thickness is from 0.8 mm to 1 mm. Advantages of aluminum casting: one of the lightest among metal castings;
- Copper ones are made from oxidized copper, which makes them corrosion-resistant. The main advantages also include a very attractive appearance, strength, and durability. The main disadvantage is the high price;
- Steel, zinc or polymer coated. The thickness is no more than a millimeter. Galvanized products can have a lacquer paint coating that increases water resistance. The polyester coating provides a rich color range and significantly reduces noise.
- Made from titanium-zinc.
Types of roof flashings
Roof flashings can be made of various materials - plastic, metals (galvanized steel, copper). They have different shapes. The purpose of ebb tides is to collect water from the roof and drain it into the drainage system using special devices. This drainage element must have such characteristics as: increased strength, resistance to loads and mechanical stress, the presence of an anti-corrosion coating, and an attractive appearance.
The galvanized steel casting has a thickness of no more than 1 millimeter. Such products are additionally coated with polyester, pural, and plastisol. If the steel does not have such a coating, the house will not be very comfortable to live in: the sound of raindrops is greatly enhanced.
The aluminum casting has a thickness of 0.8-1 millimeters. To protect against corrosion, it is coated with varnish on all sides. To improve the appearance of the product, varnishes of various colors can be used.
Copper castings are subjected to brass plating or oxidation. Elements made of this metal are durable and have an attractive appearance. They will last a long time, but their cost is quite high.
Design
The two main elements of low tide are:
- A gutter (tray) collecting water flowing from the roof.
- Gutters through which collected water is directed to the foundation of the house.
Gutters are channels open at the top, attached under the roof overhang. There are semicircular, rectangular, triangular shapes (rarely used). Contains straight and angular elements.
Drains (pipes) are also prefabricated structures of rectangular (rarely used) or cylindrical cross-section. Their elements can be straight or bent (knees).
The plugs prevent water from draining and leaking along the ends of the gutters. There are three modifications of the plugs for installation: universal, right- and left-handed.
Funnels are installed under the gutters; their purpose is to receive and redirect water into the pipes.
The leaf catcher grille protects the system from large debris entering the drainage system, preventing it from clogging.
Tees are parts required to separate the water flow.
The drain elbow is the final part of the drain that directs the flowing water away from the foundation (into the receiving cavity of the storm drain).
Couplings are parts for connection.
Clamps are used to secure the drain to the wall, preventing its vertical movement.
Brackets - fastenings.
Bypasses are used if the drainpipe needs to go around any obstacle.
Principles of calculations
- The cross-sectional area of the gutter is determined according to SP 17.13330.2011. The following principle is recommended: for 1 m2 of roof area, 1.5 cm2 of gutter cross-sectional area should be provided. For example, for a roof of 100 m2 you will need a rectangular gutter measuring 15 × 10 cm (150 cm2).
- The diameter of drainpipes is determined according to SP 32.13330.2012. The principle is the same as for the gutter. For a roof area of 100 m2, a pipe with a cross-section of 150 cm2 is needed, i.e. with a diameter of at least 138 mm.
- The number of drains is determined from the condition that the length of one gutter should not exceed 10 m. In practice, it is chosen within the range of 5–7 m.
Preparatory work
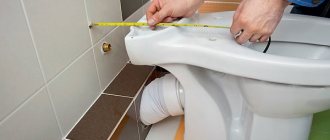
First of all, you need to purchase the necessary parts for the ebb. Their number must be calculated in advance. You can calculate the footage of the ebb tray by adding approximately 10-15% to the length of the perimeter of the structure, which will be used for overlapping at the joints and trimming parts.
When choosing a gutter, pay attention to the brackets available for sale. For the chosen gutter, you need suitable fasteners (ideally original ones), as well as funnels and other parts.
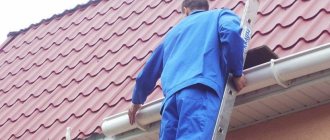
If the finishing materials of the roof have not yet been laid, then use brackets with long holders that are attached to the rafters, with a small recess in the board (shallow recesses are made so that the surface of the holders is flush with the top of the rafters or boards laid on them). If the roof is completely laid, then fasteners with short holders or compact ones are chosen.
Tools:
- Tool for bending bracket holders,
- Hacksaw for metal,
- Screwdriver,
- Level,
- Fishing line or construction cord,
- Self-tapping screws,
- Silicone Grease,
- Marker,
- Adjustable pliers.
By following some simple rules, you can set the tide correctly the first time.
Rules
The most important thing is to install the tray with the correct slope. The minimum slope is at least 3-5 mm per linear meter (according to SNiP, at least 1-2 mm per 1 rm).
To attach a gutter with the desired slope, use a simple method - first attach the outer brackets with the calculated excess of one of them. Then they stretch the fishing line or twine and attach the remaining brackets along it.
Typically, drainpipes are located near the corners of the building.
If the gutter is straight, and nothing interferes with its thermal elongation, and its length is up to 12 m, then it is enough to make one drainpipe.
If, under the same conditions, the elongation of the tray is limited, then a compensating funnel is installed at the end of its slope.
If the roof overhang has a length of 12 m or more, 2 funnels are installed, with a distance of no more than 24 m. And a compensator is also installed.
Provided that the roof gutter surrounds the perimeter, two compensators and two compensating funnels are installed in a paired position.
The design and shape of the tray is selected depending on the amount of precipitation.
The flashing should be installed immediately after covering the roof in order to protect the foundation of the house from rainwater as early as possible. After laying the waterproofing layer on the roof, access to the Mauerlat will also be closed. As a result, it will no longer be possible to attach fasteners directly to it.
Making low tide
Components of a drainage system
Speaking about how to make ebbs on the roof, it should be noted that with your own hands you can carry out not only the work of installing them, but also the work of making them themselves. This can be done in several ways, but it is especially worth noting the most common of them, namely:
- made from galvanized pipe,
- made from galvanized sheet.
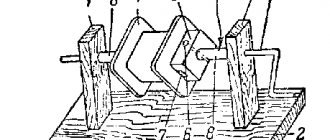
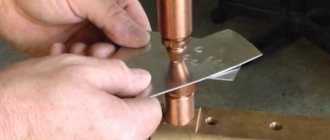
In the first case, a pipe is taken and, using metal scissors (in the case of small thickness), or a grinder (in the case of a more impressive thickness), it is simply cut lengthwise into two halves. After that, the cut points are bent to obtain a more even edge, which also ensures a slightly greater rigidity of the ebb segment.
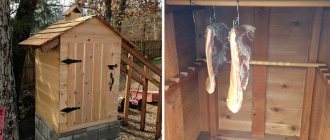
Homemade steel casting
To make a casting using the second method, it is necessary to cut rectangular strips of a suitable width from a galvanized steel sheet, after which, on a special machine or on a suitable blank (for example, a piece of rail), you need to bend the sheet on both sides, resulting in a rectangular gutter. Of course, products produced using such methods are not very attractive from an aesthetic point of view, but they are quite suitable for equipment, for example, a bathhouse in a country house.
Summarizing the above, we can try to generalize some rules for selecting and installing ebb tides. So, first of all, you need to decide on the material for making this structural element. Each of them has its own pros and cons. The next stage is the actual installation work. In this case, it is necessary to ensure a sufficient difference in the height of the installation of gutters to drain water. By the way, it should be added that in order to better understand the essence of the proposed process, it would not be superfluous to familiarize yourself with thematic videos. We can also say that gutters for drainage systems can be made independently.
Once the flashings are installed, it is best to check them. It is better to identify and eliminate possible design and installation errors immediately.
Note! An already installed drainage system needs regular inspection and removal of blockages that will inevitably arise over time. This is especially important in late autumn and early spring, when night frosts are the norm. When stagnant water freezes, it can rupture the gutter, causing the entire structure to fail.
If you pay attention to the drains and clean them in a timely manner, they are able to perform their functions for quite a long time, thereby protecting not only the roof itself, but also the walls with the foundation, and this means protecting the entire building as a whole. You cannot underestimate the little things, because everything big is made up of them.
Installation
Installation details can be seen in the presented photos to make it clearer how to properly install a metal drainage system.
Primary requirements
- To install and secure the tray, use the fastenings included with the drip tray. Depending on the specific conditions, they are screwed to the rafters, fascia board or roof board. (If the roof has no overhang or has a very small overhang, it is allowed to screw them directly to the wall).
- When installing the brackets, it is important to ensure that at the highest point of the tray, its outer edge is at least three centimeters lower than the plane of the roofing. Therefore, installation of fasteners should begin from this edge of the roof.
- The distance between the brackets affects the rigidity of the tray, so the installation step is taken to be 50-70 cm. Fasteners installed at the corners are never superfluous.
- The edge of the roof should be above the longitudinal axis of the gutter, or at a distance of 1/2 the width of the gutter. Otherwise, storm water will splash out beyond its boundaries.
- The distance between the wall of the building and the walls of the tray is 5-8 cm, so that the wall does not become damp or moldy.
- When installing and fastening tray parts, use a 1-2 mm rubber gasket to protect the paint or varnish layer of the parts.
- Gutters are installed taking into account the drainage of water into the storm drain. Therefore, they are placed opposite the storm drain. The distance from the ground to the bottom of the drain is 15-30 cm.
Carrying out work on a pitched roof
Step 1. First of all, you need to mark the axis of the funnel. If the location of the storm drain inlet is already available, then the axis of the drain (ideally) is located directly opposite its center. Otherwise, the location of the pipe is 20-30 cm from the edge of the building (see step 6.) Using a vertical level, mark the axis of the drain. The distance from the funnel to the bracket closest to it should not be less than 5 and more than 15 cm. From the outer bracket to the end of the cornice or front board - at least 5 cm.
Step 2. Installation of fastening parts. All attention here is to maintaining the slope. The outer brackets are installed first. Having screwed one, the second is installed with a difference in height equal to the product of the slope and the distance between the brackets. For example, with a distance of 8 m and a slope of 0.005 (this is 0.5 cm/1 pm), we have a difference of 4 cm. The second bracket is screwed on, taking this difference into account. A fishing line is stretched between the fastenings, along which all intermediate fastenings are installed with the required pitch. It is necessary to install two fasteners at the junction points of the trays so that one of them supports one gutter, the second supports the other. Also, a bracket is placed on both sides of the funnel (no further than 15 cm from its edge).
Step 3: Preparing to install the funnel. The number of funnels is calculated in advance. To do this, determine the projection area of the roof surface (area) from which rainwater will flow into the tray. One drain pipe can receive sediment from an area of no more than 120 sq.m or from a slope length of no more than 12 m (the number of drains is taken according to the minimum parameter). The tray marks the location for installing the funnel. After this, a V-shaped hole with a diameter of up to 11 centimeters is cut out with a hacksaw. The edges of the hole are slightly bent outward using pliers. After this, a funnel is put on the gutter (in the lock) and attached to it on the other side with clamps. A plug is installed at the end of this tray. Before installation, the joint is coated with silicone sealant (transparent).
Step 4. Installation of drain elements begins with the installation of the first element with a funnel. Next, the gutter is assembled. When you start installing the tray elements from the bottom point, make sure that the edge of each next one lies on top of the previous one. Water flowing down should not go under the edge of the overlying element. The main thing here is to correctly position (without turning over) the tray elements and ensure that the joints are made correctly.
Step 5. The contours are mounted on the bottom of the funnel.
Step 6. The drainpipe is installed vertically. If the location of the storm sewer inlet has not yet been determined, then they usually do this: a vertical line is drawn along the vertical level at a distance of 20-30 centimeters from the corner of the building, on which clamps are installed to attach the pipes. The installation step of the clamps is 1 m. The clamp, intended for fastening the bottom of the pipe, is installed and secured at a height of 30 centimeters. At the top, the pipe may have several elements that deflect its progress. This is necessary to accurately position the top of the pipe under the funnel. For this purpose, corner elements – contours – are used. Important detail. The smoother the change in the course of the pipe, the less likely it is for debris to be retained in it. Therefore, it is advisable to use contours with a 45-degree angle.
Step 7. Water is supplied to the roof away from the funnel and from the system with a hose or a bucket of water is poured out. If water did not get past the drain and did not flow through the joints, then everything was done correctly.
If the roof is covered with bitumen shingles, it is necessary to install a drip line. The drip line is placed in a gutter so that drops bouncing off it do not fall under the roofing material.
How to install roof flashing and which material is better to choose: review
Reading time: 7 minute(s) Today, erecting a roof is an expensive procedure, so it is quite natural for the owner to want to do everything to make the roof last as long as possible. As practice shows, if construction technologies are followed and all necessary elements are installed, the roof will easily last for several decades. One of the most important devices includes roof flashings, which provide the building with prompt drainage of water from the slopes during precipitation. We will talk about what such low tides are and what they are like in this article.
What is a roof flashing?
How does it work and what is it for?
Roof flashings are gutters of rectangular, round or triangular cross-section into which water flows from the slopes.
Attention: Experts consider the optimal cross-sectional shape to be round, since in this configuration there are no corners into which debris and dirt can get clogged, which means the house will have to clean the drainage system much less often.
Despite the fact that roofs are specially designed in such a way that precipitation moves by gravity from the ridge to the edges of the overhang, installation of a drip tide is necessary. This is due to the fact that without drainage, the flowing sediments do not have a directional movement and pour out chaotically, endangering the finishing of the facade and destroying the blind area.
As practice shows, high-quality organization of a drainage system not only solves the above problems, but also allows you to save natural resources by collecting and using melt water for irrigation.
Which size should I choose and how to calculate?
In order to install drainage systems on the roof, you need to correctly calculate the required dimensions, because a drainage of insufficient width and depth may not cope with the task assigned to it.
To make calculations, you must have information about:
- the distance between drainage systems and gutter turning points;
- roof area.
Important: To determine the area of the roof, it is necessary to conditionally divide it into elements in the form of geometric shapes corresponding to the actual shape (triangles, rectangles, etc.), calculate the area of each of them and sum up the resulting values.
It should be taken into account that two gutters are installed on each slope with a slope towards the drainage pipe. In this case, the diameter of the gutter can be 100 or 125 millimeters - it should be selected depending on the intensity of the expected load on the drainage system. If the structure is small, it is permissible to install gutters of a smaller diameter.
What materials are they made from?
Today, roof drains are made from plastic and metal, including polyester, plastisol, galvanized steel, aluminum and copper.
Types and characteristics of roof flashings
Plastic
Recently, plastic products have been gaining popularity among roofing accessories. Plastic drainage systems not only have minimal weight, but also fit perfectly together without creating gaps. In addition, installing such elements yourself will not be difficult even for a beginner. At the same time, when exposed to high negative temperatures, the material becomes brittle and bursts, so it cannot be used in the northern regions of our country.
Made from polyester and plastisol
Castings made from polymers such as polyester and plastisol have gained the greatest popularity due to their distinctive features: increased strength, resistance to ultraviolet radiation, noiselessness, high durability and non-degradability.
Another undeniable advantage of such products is their low cost, which allows you to protect your roof and façade from moisture penetration without much expense.
Galvanized
An excellent material option for the manufacture of gutters is alloy (galvanized steel). The characteristic features of such products are: low cost and anti-corrosion properties. At the same time, damage to the top layer of the gutter entails destruction of the metal due to an oxidative reaction with moisture, so such elements must be installed as carefully as possible.
When installing galvanized gutters yourself, you should also remember about the considerable weight of steel and, accordingly, attach the brackets more often than usual.
Aluminum
A distinctive feature of aluminum ebbs is their minimal weight, as a result of which the entire structure does not require reinforced fasteners. However, when it reacts with water, aluminum oxidizes and breaks down quite quickly. In this regard, aluminum gutters must be coated with a protective compound and this procedure must be repeated every season.
Copper
Products made from oxidized copper differ from their “competitors” not only in their noble color, but also in their high degree of corrosion resistance. However, such gutters weigh quite a lot, so installing them yourself is not easy.
In addition, copper castings often become the prey of non-ferrous metal collectors, especially if the building is not constantly supervised.
Photo
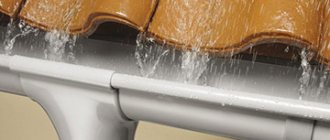
Plastic roof gutters look like this:
This is what properly installed metal drainage systems should look like:
Brackets
Roof flashing brackets are also called gutter hooks and are used to hang the gutter from the rafters.
Such brackets are made from the same materials as drainage systems - plastic and metal. Also come in different shapes and colors. Depending on individual characteristics, such a product can cost from 40 to 1000 rubles per unit.
How to mount: installation instructions
What tools and materials are needed
To install ebb sills on the roof, you need to prepare:
- screwdriver;
- metal file;
- file;
- building level;
- pencils;
- rope.
The sequence of actions when installing ebbs on the roof is as follows:
- Apply markings. Determine the location where the ebb tide is attached, install a funnel (so that the water falls on its edge and not in the center, otherwise during heavy rainfall the water will overflow over the edge of the structure) and, focusing on it, draw an axial line, which will become a guide for subsequent work. Place holders on both sides of the funnel at a distance of 15 centimeters.
- Mark the slope of the gutter. Using one of the edges of the previously installed holder, draw a zero line to the place where the next funnel holder will be attached. The slope per meter of the structure should be about 3 millimeters, otherwise liquid will accumulate in the gutter. To install the next flashing fastening on the roof, it is necessary to calculate the difference that should occur between the fastening elements and multiply it by three.
- Adjust the gutter to length using a hacksaw. Clean the cut area with a file. Place the plug on the end of the pipe. Connect the individual parts of the gutter using inserts.
- After assembling the gutter, secure it to the holders and check for the required slope. It is not necessary to take measurements for this, just pour a little water and make sure that the liquid flows out. If the water remains in place, the slope must be increased.
- Install the drainpipe. You should start working from the funnel. If the length allows, then the pipe and funnel can be connected immediately, otherwise you will need to install an elbow - it will help avoid the formation of splashes and force the liquid to flow into the pipe.
It should be noted that the key to proper operation of the drain is compliance with two rules:
- the roof should fall in the center of the gutter or closer to its inside;
- The minimum slope of the gutter should be 3 millimeters per 1 meter of structure.
In this regard, it is necessary to install a drainage system on the roof very carefully, without rushing.
Video instructions for installing a drainage system can be found here:
What is the price
The cost of a roof flashing depends, first of all, on its material and size. At the moment, the average prices for 1 linear meter of drainage, depending on the material of manufacture, are as follows:
- plastic: from 280 rubles;
- galvanized: from 140 rubles;
- galvanized with coating: from 350 rubles;
- aluminum: from 760 rubles.
Today, Leroy Merlin offers a wide range of plastic and steel roof drainage systems costing from 228 to 520 rubles.
To familiarize yourself with the full range and characteristics of each individual roof flashing, you must go to the appropriate section of the website at https://leroymerlin.ru/catalogue/vodostok.
Installation price
The average cost of installation of ebb and flow sills on the roof is 200-350 rubles per 1 linear meter.
Where to buy roof flashings?
In Moscow
In Moscow, the following companies sell roof gutters:
- "AQUACORRE": official website: https://aquacorre.ru;
- address: Moscow, Zelenograd, Andreevka street, property 13с2;
- telephone.
- official website: https://rsiding.ru;
- official website: https://www.vodostok-ps.ru;
In St. Petersburg
In St. Petersburg, you can purchase roof flashings from the following organizations:
- “Fifth Facade”: official website: https://spb-k.ru;
- address: St. Petersburg, Lyubotinsky prospect, building 4-2, letter B, office 62;
- telephone.
- official website: https://www.profroofing.ru;
- official website: https://krovli-spb.ru;
Thus, high-quality installation of drainage on the roof allows you to avoid premature damage to the facade of the building and the adjacent blind area. That is why the drainage system cannot be neglected.
Did this article help you? We would be grateful for your rating:
6 3
Making a roof sill with your own hands from plastic parts for sewerage
You don’t have to buy a ready-made casting, but make it yourself. A variety of materials are used for this: metal and plastic pipes, sheet metal and even plastic bottles.
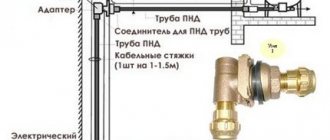
The market provides a wide range of plastic products for sewerage, which allows you to make drains of any shape and size from them. The parts are fastened using conventional clamps and brackets. The main advantage of such ebb tides is their low cost. Parts are selected based on the throughput of the tides. The most commonly used PVC pipes are “saffron milk caps” with a diameter of 110 mm (for the manufacture of gutters it is better to select long elements), with a diameter of 50 mm (for gutters), tees (for funnels).
First, a design drawing is made and the necessary parts are selected. Then the gutter elements are made by longitudinally sawing the pipes (the cut areas are sanded). The elements are connected to each other using glue or using connectors. Attach the ebb under the roof in the same way as described above using purchased or homemade brackets. Cylinders with a diameter slightly smaller than the tray are rolled up from plastic mesh, secured with wire or clamps and placed in ebbs to protect them from debris.
How to make drains with your own hands
Zinc drain
Without inviting a specialist, drainage is easy to do yourself and quite inexpensive. In their manufacture, plastic, aluminum or galvanized sheet metal are most often used.
The simplest thing is to cut lengthwise a thin-walled metal pipe with a diameter of about 150 mm. The result will be: two gutters for collecting water. To prevent corrosion, it is recommended to coat these parts with special compounds or varnish of the desired color.
The last stage of work will be the direct installation of gutters using fastening material in places where moisture accumulates.
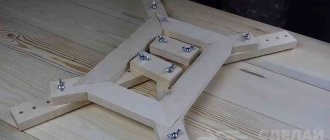
The production of ebb and flow from galvanized steel sheets is not particularly difficult. For this you will need: a sheet of galvanized metal seven millimeters thick, a machine for bending metal structures. This can be done without a machine with a hammer and mallet, using a corner or a piece of rail, but the appearance of the drain will be poor.
The galvanized sheet is cut into strips of the required width and corresponding sheet length. The strip is then placed in a machine where a cast is made from it. The finished elements are coated with a protective compound, dried and prepared for installation.