Thanks to the simplicity and manufacturability of execution, do-it-yourself installation of polypropylene pipes for water supply is becoming the norm today.
The decision to use plastic products is dictated by time; such networks are more durable, they are environmentally friendly, and also have a number of other advantages. But which products are better to choose for water supply - polypropylene or metal-plastic, we will analyze in this article.
Polypropylene or metal-plastic - which is better for water supply?
When choosing materials for water supply, we will consider the advantages and disadvantages of this product when used for its intended purpose. To determine which is better for plumbing - polypropylene or metal-plastic, you need to consider the technical characteristics and properties of the materials.
Watch the video
Based on this, it will be possible to reasonably decide what is better to choose.
Metal-plastic
When planning to use this type of product, the following circumstances should be taken into account:
- The inner surface of metal-plastic pipes is made of food-grade cross-linked polyethylene, which allows drinking water to be transferred through them.
- The next layer consists of an adhesive composition that strengthens the structure.
- Aluminum foil serves as both a reinforcing and sealing layer, since its edges are laser welded during installation. This also represents oxygen protection for the fluid being transferred.
- Next comes another strengthening adhesive layer.
- The outer surface is protected by a thick layer of polyethylene.
Thanks to this device, the product becomes very durable, while remaining flexible enough to allow the formation of marked networks of any degree of complexity. The service life of such a system is declared by the manufacturer to be at least 50 years. At the same time, it is important to purchase high-quality products from a well-known manufacturer, confirmed by quality certificates.
At the same time, metal-plastic products have some disadvantages, expressed by the following circumstances:
- the temperature limit is no more than 75 degrees, which narrows the scope of their application;
- the maximum pressure of the water supply network should not exceed 10 atmospheres, otherwise depressurization of the pipeline may occur;
- the main disadvantage of metal-plastic water pipelines is the widespread use of threaded connections during installation; the main disadvantage is the need for regular maintenance of the system to detect and eliminate leaks;
- It is not recommended to hide such wiring inside the wall, so as not to have to open the surface in search of a possible leak;
- the need to use sealing materials during the installation of networks.
ADVICE! Metal-plastic products should not be used to make nets hidden inside walls. If a leak forms on a threaded connection, the wall surface will need to be dismantled.
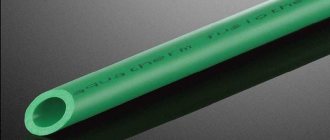
Polypropylene pipes
But still, we should recognize the higher popularity of polypropylene products. The reason for this can be considered the following circumstances:
- In water supply networks, the materials do not emit harmful substances.
- The operating temperature of the transported liquid can be up to 95 degrees with the possibility of a short-term increase to 110. Therefore, polypropylene pipes for hot water supply and heating are more reliable than metal-plastic ones.
The diameters of polypropylene pipes for water supply allow you to create networks with sizes ranging from 16 to 110 millimeters. That is, they can be laid on both external and internal structures. The homologous range of sizes is represented by the following indicators: 10 – 16 – 20 – 25 – 32 – 40 – 50 – 63 – 75 – 90 – 110 millimeters. The standard length is 6 meters.
- The maximum pressure of a polypropylene water supply can be up to 20 atmospheres.
- With high-quality installation, there are no liquid leaks or depressurization of the network.
- Resistance to low temperatures, allowing use when installing open-type external water supply systems. The elasticity of the material compensates for changes in volume even when water freezes.
But the main advantage of products made from such material is their significantly lower price compared to other types of products.
The disadvantages of polypropylene pipes include the fact that the material softens at a temperature of +140 degrees, and when it reaches +170, the product simply floats. When heated, they can significantly elongate and sag.
The quality of the source material is important for polypropylene. The durability and reliability of products depends on this indicator. Unfortunately, it is impossible to control the quality in domestic conditions.
Watch the video
What is better, polypropylene or metal-plastic for plumbing is up to the user of these systems to decide. And the choice depends on many factors, which are given above, but to briefly summarize, polypropylene is ideal for hot water supply, and metal-plastic pipes are ideal for cold water supply.
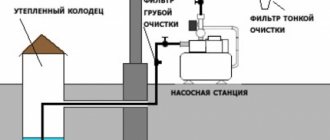
Features of polypropylene water supply in the country
The problem of water supply to the dacha worries many owners of suburban real estate - lovers of gardening. After all, then it will be very difficult to organize complete watering of a personal plot, without which you will only have to dream of a harvest. And the implementation of the alternative option - carrying water from a well or a nearby pond - will require excessive physical costs. The most effective and realistic solution is to install a summer water supply system at a country house using polypropylene pipes.
But before that you need to decide on its location. The water pipeline can be of two types:
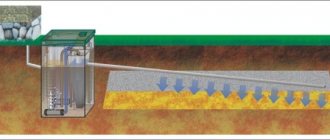
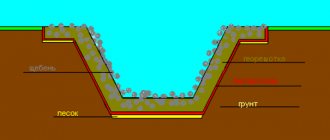
Permanent water supply. It is laid underground and, as the name suggests, does not involve dismantling, at least until it fails. If you follow certain rules, you can use it not only in summer, but also in winter. We are talking about implementing methods that prevent water in the pipeline from freezing in severe frost. One of them is laying a water pipeline at a depth below the soil freezing mark. If this is not possible, the pipes will have to be insulated. However, since the question of how to install a summer water supply system in a dacha using polypropylene pipes is now being considered, it will be useful to know some of the features of the permanent option.
The system is laid between trees in lawn areas at a depth of 25-30 cm. Areas running under the beds, to prevent damage during digging, should be buried 40-45 centimeters or even more. To prevent the pipes from breaking during the winter cold, in the fall, when the watering season is over, the water from the system must be drained. If the slope has not been created, this can be done by blowing with a compressor.
The water supply system, which will be used all year round, must be laid underground, in specially dug trenches
Collapsible system. A water pipeline of this type is laid on the soil surface. The advantages of this option include:
- quick installation and ease of connection to various water sources;
- all leaks that occur immediately become noticeable;
- Requires minimal maintenance.
However, before the onset of cold weather, it is recommended to disassemble such a structure and remove it from the site. Otherwise, in winter its elements may simply be stolen.
Good to know! To create a summer water supply, experts recommend using polypropylene pipes of the PN10 or PN16 brands.
How to choose polypropylene pipes
Plastic pipes are produced in compliance with the requirements of GOST 52145-2003 for polypropylene pipes for water supply. Its requirements are used to guide the production of products from other plastics.
Watch the video
Standards for additional elements for polypropylene pipelines are also regulated here. If you intend to build a polypropylene water supply system with your own hands, you need to study the requirements of this standard in order to properly purchase everything you need, as well as correctly assemble it into the network.
Contents of the label
The first thing you need to pay attention to when selecting polypropylene for water supply is its labeling. It consists of several symbols. One of them informs about the material of manufacture, and, consequently, about its properties:
- Pipes for the production of which homopolypropylene is used, which has increased strength. It corresponds to the designation RRN. The main application is for cold water pipelines, as well as ventilation systems.
- Another marking is RRV. Such polypropylene pipes are suitable for installing heated floors, as well as for the purposes provided for in the previous paragraph.
- The most common is the third type. The material for it is a random copolymer of polypropylene, which ensures the use of products made from such material in heating systems, hot and cold water supply.
- A special type, which allows them to be used at temperatures of about 95 degrees, is designated PPs.
Which polypropylene pipes for water supply are best to choose depends on the specific object, the design of the system, as well as the preferences of the developer.
Watch the video
Color solutions
This is the factor that first of all attracts attention. Polypropylene pipes are available in white, grey, green or black. However, he says virtually nothing. The only difference is the black color - this indicates its resistance to harsh ultraviolet radiation.
In addition to the indicated designations, the labeling contains information about the product manufacturer, size, reference to the ORD (GOST or TU), as well as the class of operating conditions of the product.
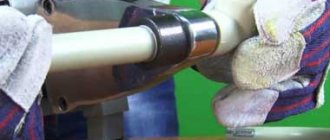
Step-by-step instructions for welding PP pipes
When the scheme has been thought out, everything necessary has been purchased, we begin welding.
Pipe cutting
Use a pipe cutter that provides a smooth end without bevels. You can use a hacksaw for metal, placing the pipe in a miter box. If you cut unevenly, a bead will form on the longer end during soldering, which will block part of the internal passage.
The pipe cutter is designed in such a way that, pressing the wide base against the product, it provides a right angle. When choosing a tool, pay attention to what maximum diameter is available.
Pipe processing and chamfering
Step-by-step instructions for welding polypropylene pipes.
Burrs are removed from the cut pipe and a chamfer is formed on the side that will fit into the socket of the fitting.
There are many types of calibrators, chamfer removers, and screwdriver attachments that cope with this task.
The top layer and foil are removed from aluminum-reinforced pipes. They use a shaver - a cylinder with handles. It is designed for products of the same diameter.
After the operations are completed, the parts are wiped, removing dust and abrasives that spoil the nozzle. It is also cleaned and inspected to see if there is any melted plastic left inside.
Experts recommend degreasing the ends of the parts to be welded in accordance with the installation technology. Without this operation, the joint becomes less durable.
Mark the depth of planting of the PP in the fitting. For products of different diameters, the welded joint deepens differently. This parameter is measured and a mark is applied to the tubular product with a marker. If planted too deep, the passage narrows.
Preparing the soldering iron
The welding apparatus is placed in a convenient place and firmly secured. If the design does not provide for fixation, it is better to work with an assistant so that your hands are free. Then install the nozzle and turn on the power. The soldering iron heats up, which takes about 10 minutes.
Working temperature of soldering +260°C. This is the optimal mode for polypropylene and gentle for Teflon nozzles. It is better for a novice master to buy a tool without setting the temperature - it is set by the manufacturer. When the device heats up, the green LED will light up or the red LED will go out, depending on the model.
Heating and joining parts
Table of heating and connected parts.
After preparing the parts and warming up the soldering iron, begin welding:
- The fitting and pipe are simultaneously put on the nozzle heated to operating temperature. They are inserted with little effort because the nozzles have a slight taper. The workpiece is pressed until it stops.
- The waiting time depends on the diameter of the products. Use the table that is in the instructions for the tool. Violation of the standards leads to defects - the internal diameter decreases due to excessively heated plastic, which forms an influx. Subsequently, water circulation decreases.
- Remove the elements and smoothly insert the pipe into the fitting up to the mark. Hold for 5 seconds, then release. This is the time during which the error can be corrected. You can rotate hot products no more than 10°.
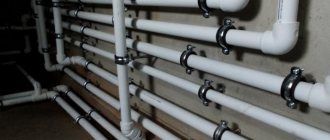
Wiring diagrams for polypropylene water pipes in an apartment
The task of creating an apartment water supply seems simple only at first glance. The water supply wiring diagram in the apartment should provide for the delivery of liquid from the central riser to each console. In a simplified version, this is a kitchen sink, washbasin, bathtub or toilet.
But in practice, a slightly different picture is observed. Additional water intake points appear, such as washing machines and dishwashers (see how to connect to the water supply and sewerage system with your own hands), bidets, circular showers, as well as other additional plumbing consumers. Therefore, there may be a problem with simultaneous delivery of water to many points.
Watch the video - wiring with tees or manifold
Several schemes for distribution of tap water are used with a complicated system of its consumption.
Tee circuit
This distribution consists of a central pipe, from which branches are installed to each console using tees. This is the simplest method of distributing liquid within the system, but has a number of disadvantages.
One of them is the drop in water pressure from one tap to another. Thus, only residual liquid from the system, which may be missing, reaches the end of the network. In addition, if it is necessary to repair or service any console, you have to turn off the entire water supply system, starting from the riser.
The only advantage of this scheme is the economical consumption of materials, as well as ease of installation.
Collector circuit
A feature of this water distribution scheme is the supply of the entire volume of liquid to a distribution device called a collector.
It consists of a metal casing from which there are outlets for several individual points of consumption. Their number can be two to ten. Each outlet is equipped with a ball valve, which allows you to turn off the water at the desired console.
With this connection scheme it is possible to install additional equipment. Thus, additional biological and chemical purification filters, ozonizers, and other devices can be installed on the kitchen supply. Disconnected from the main flow, they will purify only water used for drinking and cooking.
During repairs, you can turn off the water only at the required water point without stopping the operation of the entire water supply.
To install a collector system, you will need a significantly larger number of pipes, but the costs will allow you to use the water supply with the greatest convenience.
Watch the video
After drawing up a diagram of the collector water supply system, it needs to be chalked onto the places where polypropylene pipes will be laid in specific sizes. It is better to entrust particularly complex wiring diagrams to an experienced designer to avoid mistakes.
Materials and tools. Let's get started
Having developed a diagram and made a drawing of it, you can go to a building materials store to purchase the necessary tools.
- First of all, you need to purchase a soldering iron for working with plastic. Plumbers call it an iron. If you don’t plan to constantly install water pipes, you can buy a cheap similar device, since you won’t need an expensive soldering iron with a long warranty;
- polypropylene pipes will need to be cut. Special scissors are used for this. They are inexpensive. However, this operation can also be performed using a hacksaw;
- Angles, tees and other fittings that serve as connecting elements are also purchased. They are made from the same polymer as the pipes themselves. But their diameter differs to a large extent, and it is recommended to purchase them with a small margin ;
- in addition, you will need a building level, a square, a measuring tape, an adjustable wrench, a marker and a rag. Don't forget about gloves too. They will prevent thermal burns while servicing the nozzles.
Before installing a new pipeline, you will need to dismantle the old one. To do this, close the main riser in the apartment. Then carefully remove the pipes. For convenience, they can be cut in suitable places. Unnecessary damage must be avoided. Otherwise, you will be forced to restore the floor and walls.
Before starting work, you should prepare the pipe, fittings for it and simple tools
If you need to replace all water communications in the apartment, you will have to contact the housing office, since without shutting off the riser in the entire entrance, this procedure will not be possible. Moreover, to avoid troubles with neighbors, they should be warned about the impending lack of water.
Stages of installing a water supply system from polypropylene pipes with your own hands
Before starting work, it is necessary, after careful measurements, to cut the workpieces to the required length, and also prepare the fittings necessary for assembly. Installation of a water supply system involves the use of the following components:
- Couplings are used to extend straight pipes.
- Angles - used at pipeline turns to change the direction of network laying.
- Tees, crosses - for arranging branching wiring.
- Contours - used to go around obstacles at the intersection of water supply elements.
In addition to the above, you can purchase other components, such as brackets for attaching pipes to walls, intermediate taps, adapters from size to size and other necessary parts.
Connection of pipeline elements
The process of soldering pipes with connecting elements during pipeline installation is not particularly difficult, but requires precise execution of all process parameters.
Watch the video
First of all, you need to check the compatibility of the elements. The two parts to be joined must not fit into each other when cold. If this happens, it means the parts are defective or incorrectly selected.
Next, you need to prepare a soldering iron. To do this, heating elements are installed on it: for the fitting there is a mandrel that heats it from the inside, for the pipe there is a coupling that heats the end of the pipe from the outside. The operating temperature of the device is 260 degrees.
Before installing the pipe, you need to chamfer the front end along the outer contour of about 1 mm at an angle of 45 degrees. This will ensure smooth passage of the pipe into the fitting hole.
It is important to prevent overheating of the mating surfaces - solid, unheated material must be preserved under the molten layer. Here it is important to maintain the heating time, which will be given below.
After warming up, both parts are removed from the soldering iron and joined together with a counter movement of the hands. Within a few seconds, the material hardens, forming a strong, permanent connection.
A sign of a correct connection is a small, about 1 mm, bead inside and outside the joint. It will not interfere with the passage of water through the pipeline.
When parts overheat, a “skirt” is formed inside the joint, significantly preventing the passage of liquid. This connection is short-lived.
The method of connecting pipes end-to-end is also used, without the use of couplings. This installation method is used less frequently, since it requires rather complex equipment for trimming the joined ends, and the reliability of the joint is lower than when using fittings.
For a successful connection, the soldering iron must be firmly and securely mounted on the workbench. Its readiness for operation is determined by the color of the indicator light; if it is red, it means the device is heating up; when green lights up, it indicates that the operating temperature has been reached.
During the installation process, some of the elements are assembled into separate sections on a workbench; this is easy and convenient. But the installation of the assembled sections into the system has to be done while holding the tool suspended. It's hard to get by with an assistant here.
The cold assembly method is also used using adhesives based on strong chemical solvents of polypropylene. When it is applied to the surfaces of parts, the material softens.
In this condition, the individual parts are connected in the desired position. Since the solvent is very volatile, it quickly evaporates and reverse polymerization occurs, due to which the parts are joined. The adhesive joining method has many limitations and must be used carefully.
What pipes and parts should I buy?
Polypropylene elements for pipelines are available in four versions, each of which is marked in a special way:
- PN10 and PN16: designed for use in cold water supply systems with a maximum pressure of 10 and 16 atm, respectively.
- PN20 and PN25: products for heating and hot water systems. The numbers in the marking indicate the maximum pressure in atm, but they correspond to a temperature of 20 degrees. It should be taken into account that when heated, the strength of polypropylene greatly decreases.
Pipes and parts of the second group have fiberglass or foil reinforcement, which helps reduce the coefficient of thermal expansion. Elements with fiberglass are easier to install, because no scraper processing required. The technology of their production is also simpler, therefore, when choosing such pipes, the likelihood of acquiring defects is reduced.
Polypropylene pipes for hot water
The prices for pipes of the PN16 and PN20 brands differ slightly, so the latter are often used for “cold” water supply as more reliable.
In houses and apartments, PP pipes with a diameter of 25 mm are most often used for wiring the water supply system.
In addition to pipes, the master will need:
- clips for attaching pipes to walls;
- couplings and adapters for connecting pipes of the same or different diameters, respectively;
- corners;
- tees or manifold (depending on the wiring method);
- thermal insulation – sleeves made of foamed polyethylene.
Thermal insulation can also be laid on cold water pipes. It will prevent the formation of condensation and take on the function of a sound insulator.