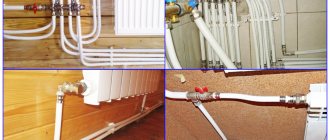
Thermoplastic propylene polymers, compared to traditional polyethylene, have a lower density, as well as higher hardness, heat resistance and resistance to corrosive changes. Welding of polypropylene pipes ensures the most reliable connection of all elements into a single system. Such work must be carried out using special equipment, in strict adherence to technology. Let's take a closer look at the intricacies of soldering PPR pipes.
Welding polypropylene pipes: instructions and video
The days of metal water pipes are long gone.
Materials such as polypropylene, as well as the technology of soldering polypropylene pipes, are today at the forefront of arranging heating and plumbing systems in an apartment or private house. At the turn of the century, residents of old multi-story buildings began to replace the metal pipeline with plastic, which at that time was still far from ideal and today needs another replacement. Statistics show that now more than 80% of pipelines are installed from polypropylene.
In terms of price, polypropylene products are much cheaper than metal ones , and the service life of these pipes is much longer, and the required effort and work for their installation is much less. In addition, the weight of polypropylene is less than that of other polymers, including polyethylene.
Naturally, this fact affects the reduction of costs for the delivery of material, while the compactness of polypropylene pipes can be achieved by laying pipes of a smaller cross-section in products with a larger diameter.
When planning to change a riser or lay a water supply system from polypropylene pipes in your home, there is no need to rush to call a specialist - you can do all the work yourself, of course, if you have free time and desire.
Working with polypropylene pipes
Today, a technology for laying polypropylene pipes has been developed, which includes the installation of products of different diameters , as well as all additional connection elements, inclusions, contours, shut-off and fastening valves.
The configuration system is created in such a way that it makes it possible to design a water supply system of any complexity and configuration. The only drawback of polypropylene pipelines, and even that, by and large, is relative, is the impossibility of desoldering using the welded fastening method.
Therefore, the technology for fastening polypropylene pipes requires extreme care to avoid mistakes during welding.
Any home craftsman can independently master the welding method of soldering by watching a video and reading the instructions, but a beginner in this business will face many possible mistakes , which are usually associated with haste or inattention. Before soldering pipeline elements, you need to verify the accuracy of their dimensions and calculations several times.
Now regarding welding - a method of fastening polypropylene pipes with structural elements and fittings . The tool with which welding is performed is popularly called a soldering iron. And although from a technical point of view this name is incorrect, this clear and simple term has taken root and began to be used even among specialists.
The soldering process looks like this:
- using a welding device (soldering iron), both parts to be welded are heated simultaneously;
- connect them to each other;
- After a relatively short cooling time, the finished fastener is removed from the soldering iron.
This welded joint is so strong and leak-proof that it can withstand almost any pressure in the system.
Soldering iron for polypropylene pipes
The kit for soldering polypropylene pipes includes its own welding machine, which is quite simple in design.
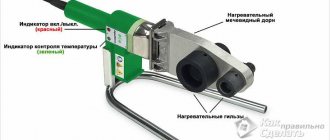
The soldering iron consists of a handle, a heating plate and a thermostat. There are two holes in the heating plate that allow welded parts to be connected in it.
Since when soldering, as a rule, they use directly a pipe and some kind of structural element (fitting) into which the pipe is inserted, the pair of welding elements (nozzles) of the device also differ in appearance.
The most popular pipes used in home plumbing and heating systems are products with an outer diameter of 32 and 20 millimeters . The section marking is on all polypropylene products.
The standard soldering package usually includes 4 pairs of welding elements; they make it possible to perform almost any task - from 20 to 40 millimeters in diameter.
The elements are treated with Teflon coating, which makes making this device with your own hands impossible. And even if you manage to make all the elements on a lathe, which is not difficult, during heating without Teflon coating the plastic will begin to stick to the metal.
Welding Features
One of the main requirements when soldering polypropylene pipes, which is very often not met, is degreasing the walls of the welded areas. Naturally, soldering can be done without this, but the quality of welding will be much lower.
- Before you start soldering , the end of the pipe and the surface inside the fitting element must be wiped with alcohol. Moreover, this will also help remove dust particles and fine abrasives from the surface, which negatively affect the integrity of the Teflon coating of the welding device nozzles.
Before fastening itself, the surfaces of the nozzles also need to be inspected and cleaned with alcohol to prevent hot plastic from sticking, the further mechanical removal of which can damage the Teflon.
- Marking the depth of insertion of polypropylene pipes is also an important point that must be taken into account when soldering.
Fittings of different diameters imply different welding depths. This means that before soldering you need to measure the depth using a ruler or caliper.
In this way, the mistake will not be made of inserting the pipe into the hole of the welding element deeper than necessary. Otherwise, the diameter of the passage hole may be narrowed or the pipe may be completely sealed.
Important! If you decide to learn how to properly solder polypropylene pipes, a video on the Internet or the instructions that come with the welding device can help you.
- Typically, performing markup is a rather labor-intensive process. Experts determine the planting depth of all parts by eye, but this experience is only possible as a result of long practice and not for any master.
To make the task easier, a special device is often made, which makes it possible not only to simplify the measurement process, but also saves time. This device for a pipe 20 millimeters in diameter is made from a piece of pipe 32 millimeters in diameter.
If the installation depth of a 20 mm pipe is 15 millimeters, you need to cut a ring 15 millimeters wide from a 32 mm pipe . It can be used to clearly mark a line that indicates the seating depth, which is quite convenient when you need to solder a large number of elements to each other.
The marking ring can be upgraded by gluing a cardboard or plastic bottom; this will reduce the complexity of marking work to a minimum. These rings can be made for polypropylene pipes of any diameter, with the exception of the largest diameter.
As a rule, self-welding occurs by one person on the floor or on a table. But sometimes, when installing a water supply system, it becomes necessary to solder the pipes at the place where they are installed. In this case, you can’t do without another pair of hands. Moreover, the assistant must be familiar with how to weld plastic products.
When soldering, you should never hesitate. It is necessary to strictly observe the warm-up time for the parts to be joined, which is described in the corresponding table for all diameters, especially if welding takes place at the installation site and there is no possibility of quality control.
The most common mistake is overheating of the elements , which results in a narrowing of the pipeline diameter.
Important! When soldering on site, one person needs to hold the welder while another person connects the fitting and pipe first to the welder's hot nozzles and then to each other. It is not always possible to remove both the fitting and the pipe from the welding machine at the same time. Sometimes one thing remains, and in this case an assistant needs to quickly help with removal.
Welding work on polypropylene pipes
Turn on the soldering iron. The power key indicator should light up. The soldering iron warms up within 15-35 minutes, this depends on the ambient temperature. The operating temperature of the device is 260 degrees. If the welding device is being used for the first time, after warming up it should be allowed to stand for about 5 minutes, and only then welding work begins.
Typical mistakes when working
Now you know everything I could tell you about welding plastic pipes. I just want to dwell a little on the typical mistakes that novice craftsmen make when welding pipes. They were the ones who prevented my neighbor from doing the job right the first time.
Dirty and wet parts
Any experienced craftsman, including myself, always wipes the end of the pipe and the inside of the fitting before starting soldering. This is done at the reflex level. The fact is that during repairs, all the parts are usually dumped on the floor, which is unlikely to be clean. Sometimes I had to dismantle incorrectly assembled pipes, and so, there was usually always a line of dirt or dust there.
Pipes must be cleaned of dirt before welding.
Another worst enemy is moisture. Even a drop of condensed water evaporates when heated, which causes deformation of the joint . By the way, I came across cases where such a “wet” connection withstood even preliminary tests, but cracks still appeared during operation (in my case, after 5 months).
Yes yes, this could happen
And let me remind you once again about the foil. Not a single piece of the metallized layer should get into the connection , since reliability can be completely forgotten.
And yet, it is necessary to clean not only the pipes from dirt, but also the working element of the soldering iron . Sometimes traces of polypropylene remain on the coupling or mandrel. They also need to be cleaned with a rag before you solder the next assembly.
Incorrect placement
As soon as you have completed heating the pipes, you need to connect them immediately. And not just stick the part into the fitting, but position it correctly in relation to each other. This is where problems arise for novice welders.
Once the pipe is inserted into the fitting, it must not be twisted or moved.
Often, after a joint, beginners begin to rotate the products or move them relative to each other, which in no case should be done.
One more thing. There is no need to remove plastic melts near the fitting before the connection has cooled . Otherwise, the assembly can easily be deformed, which will lead to depressurization. By the way, if you heated the pipe exactly as much as indicated in the accompanying table, you will not experience any melting.
Poor quality material
Very often, a welded joint does not work out if you saved money and bought low-quality polypropylene pipes from an unknown manufacturer. I've encountered similar situations. So, even my experience did not help me weld such parts properly.
Even if you solder correctly, it’s not a fact that over time you won’t get such a picture
Therefore, you need to purchase materials only from a trusted store .
Some other smart guys are trying to solder pipes from different manufacturers. I have already mentioned this. Uneven chemical composition does not allow the plastic to be heated correctly, which leads to technology violations.
Violation of assembly rules
Here I will give the violations that I most often encountered in my practice:
- When assembling the unit, the pipe is not inserted into the fitting all the way, as a result of which a gap is formed inside. That is, the pipe wall will be thinner than specified by the technical specifications, and if force is applied (for example, water pressure) in this area, the part may burst.
A gap in the fitting is an error when soldering pipes.
- During assembly, excessive force is applied to the pipe that is inserted into the fitting. The result is plastic melting at the cut, which reduces the internal cross-section of the pipe or completely seals the hole. Both of these negatively affect the operation of the water supply system.
- Use when assembling damaged fittings. For example, you are assembling a pipeline and you only have one corner fitting left, and a crack is discovered on it. Instead of going to the store and replacing it, careless technicians install it into the system. I will not describe the consequences.
Instructions for welding polypropylene pipes
Recently, pipelines made of polymer materials are everywhere replacing metal ones from use. There are many reasons for this: they are more durable, easier to install and operate, and do not require anti-corrosion treatment. For heating and hot water supply systems, the most suitable are polypropylene pipes mounted by welding.
By design, polypropylene pipes can be conventional or reinforced with aluminum foil. Aluminum significantly increases the reliability of the system and reduces the coefficient of thermal expansion of the material. Depending on the conditions under which polypropylene pipes are welded, the instructions for performing the work may differ in some details, but its main essence remains the same.
Heating instructions, exposure time value
When deciding on the heating parameters of the polypropylene pipes being connected, you need to pay attention to the diameters of the parts, which can be found in the corresponding table. Moreover, depending on the dimensions of the polypropylene pipe, it is necessary to change the heating duration, leaving unchanged the pre-selected temperature on the heating element
To ensure high reliability of the coupling joint, the following criteria must be met:
- heating duration;
- the time during which the joint must be fixed;
- the duration of the pause, after which it is allowed to continue the welding operation of the elements being connected.
Factors that can affect the quality of work
Among the nuances that must be taken into account when creating a welded joint of polypropylene pipes, one should highlight the need to manufacture a welding belt, which must have an optimal length. Most often it is the same size as the depth of the cylindrical attachments that are used on the heating element of the welding equipment. To ensure the required size of the joint, it is necessary to firmly fasten the polypropylene pipe to the body of the element.
In cases where welding is performed at subzero temperatures, it is advisable to use warm material, for which purpose it should be kept in a warm room for some time before carrying out the work.
Before carrying out work, the welding unit must be heated to a temperature of 283 degrees Celsius, and the exact mode is determined taking into account the ambient temperature. By acting in this way, it is possible to prevent the occurrence of significant heat losses at the moment when the element to be connected is delivered from the apparatus to the area where the connection is to be made. To determine the optimal heating value and its duration, preheating is carried out, each time adjusting the indicated indicators by one to two seconds.
Equipment and tools for welding polypropylene pipes
Installation of polypropylene pipes by welding ensures maximum reliability and tightness of joints, subject to high-quality work and compliance with technological regulations.
Since pipeline parts connected by welding cannot be re-welded, due attention should be paid to the accuracy of the work, using special equipment and tools to perform it.
The set of tools used for welding polypropylene pipes is as follows:
- soldering iron, also called a welding machine;
- a set of nozzles of various sizes for welding (each nozzle consists of a mandrel for heating the fitting and a sleeve for heating the pipe section);
- special scissors for cutting pipes into sections of the required size;
- end trimmer for processing the edges of pipes before welding (used to remove aluminum foil from the ends);
In addition to this equipment for welding, you must have a tape measure, calipers and an alcohol marker on hand. Having a complete list of tools will allow you to avoid unnecessary fuss when it becomes necessary to determine dimensions on site and perform the job with the highest quality possible.
The main element of the equipment is a machine for welding polypropylene pipes (or soldering iron) with a set of nozzles. The device is a heating device, similar in principle to a conventional iron. To automatically maintain the set temperature parameters, the soldering iron is equipped with a thermostat.
The heating surface of the soldering iron has holes for attaching nozzles of various diameters (standard sizes of nozzles included in the welding kit: 20, 25, 32, 40 mm). For the convenience of working with pipes of various diameters, most machines for welding polypropylene pipes have the ability to connect several types of nozzles at once.
Warming up polypropylene
Installation of polypropylene pipes includes two stages: heating of the joining areas and connection. The part is put on a nozzle of the appropriate diameter. The pipe is installed in the sleeve up to the limiter for the entire stripped length, and the fitting element is placed on the mandrel until it stops. It is necessary to control the heating depth; the pipe must be located in the sleeve without distortion until it stops at the limiter. Maintain the necessary time to warm up. The holding time and soldering temperature of polypropylene pipes depend on the product parameters; the table displays all the important welding parameters at a room temperature of +20⁰.
The heating time must not be exceeded, otherwise the surface will be deformed, which will lead to distortion of the geometry and the inability to join the parts without gaps. When joining molten sections inside the pipeline, polypropylene swelling appears, which hardens into large ridges. Protruding material reduces the passability of the highway.
Table of welding delay values Source montagtrub.ru
Welding plastic pipes is impossible without a technical pause of a few seconds after heating, which is necessary to remove parts from the heating element. In a cold room, during this period the heated areas have time to cool down, which deteriorates the quality of the joining. To ensure a strong seam, it is recommended to increase the heating time by a few seconds so that the material melts more strongly. The optimal additional time is calculated by selection, taking into account:
- ambient temperature;
- nominal pipeline cross-section;
- holding time for warming up.
The temperature is set within 255-265⁰. If it exceeds 270⁰, the seam will turn out thin and unable to hold the water pressure. This occurs due to the rapid heating of the outer layer until it melts. At the same time, the material does not have time to warm up deeply, so diffuse penetration of polypropylene into adjacent areas of the parts does not occur.
Stages of pipeline weldingSource svarkaspec.ru
Welding work
Welding polypropylene pipes is not particularly difficult and does not require special education for the performer of the work. In order to ensure the strength and reliable sealing of the welding joint, it is enough to follow a strict sequence of actions according to the regulations.
Preparatory work
The preparatory work performed before starting welding of parts includes the following:
- development of a pipeline diagram;
- determination of places for attaching pipes and fittings to walls;
- punching holes in the walls if necessary;
- marking and cutting pipe sections according to the diagram and field measurements;
- before final welding of the pipeline, all its elements must be laid out on the table or floor in an order repeating the connection diagram in order to avoid assembling the structure in the wrong sequence and damage to the material;
- if there is aluminum foil in the pipe structures, it is necessary to use a trimmer to clean it at the ends of the parts being welded to prevent contact of the reinforcing element with water;
- At the ends of the pipe elements to be welded, using a marker, you need to mark the depth of entry into the fitting. Preliminary measurements of the depth of fitting parts are carried out with a caliper. The marking allows you to clearly control the immersion of a section of pipe into the nozzle sleeve when heating the parts with a soldering iron.
In addition to the measures listed above, before starting welding, it is recommended to degrease the parts to be joined. Degreasing is done with a cotton swab moistened with alcohol. Processing the internal surfaces of the fitting and the outer ends of the pipe will ensure better welding of pipeline elements.
Warming up the soldering iron to operating temperature
Depending on the type and diameter of polypropylene pipes, the operating temperature of the nozzle will differ. Welding of polypropylene pipes with aluminum reinforcement is carried out at a surface temperature of the nozzles of 260-300 degrees.
In order for the soldering iron for welding polypropylene pipes to reach operating temperature, you need to set the thermostat to the appropriate position and turn it on.
The readiness of the device for operation will be indicated by switching the signal light. Depending on the type of soldering iron, the alarm notification methods may differ, so before starting work, you must carefully read the operating instructions for the device.
Heating of pipeline elements
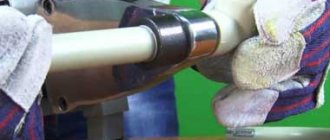
To connect pipeline parts according to the designed diagram, it is necessary to thoroughly heat them using nozzles of the appropriate diameter. Both the pipe and the fitting are simultaneously heated . The fitting elements are placed on the mandrel of the nozzle, and the pipe is inserted into the sleeve.
The entry of pipeline elements into the sleeve of the welding machine occurs under the influence of slight physical force. The depth of insertion of the pipe into the sleeve must correspond to the previously taken measurements of the corresponding fitting. The heating time of the welded parts depends on their diameter and usually ranges from 8 to 16 seconds.
Connection of pipeline elements
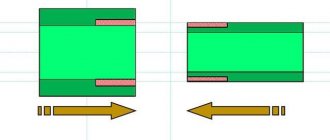
The connection of polypropylene pipe parts and fittings should be done as quickly as possible to avoid temperature losses of the heated material. The joining of elements is carried out in one smooth forward movement. Rotation of the fitting and pipes during their connection is not allowed.
The connected structure of the pipeline section must be securely fixed until the polymer material gains strength. Depending on the diameter of the pipeline, the setting time can range from 10 to 20 seconds. In some cases, it is necessary to keep the welded parts in a fixed state until they cool.
After welding has been completed and the material has cooled, the joints can be cleaned of plastic deposits. Processing is carried out in order to give the welded structure a neat and aesthetic appearance. Sometimes excessive amounts of polymer material can prevent sections of pipeline from being securely seated in the mounting clips.
The video below clearly explains how to weld polypropylene pipes:
How to use a machine for soldering plastic pipes?
Are you planning to install the plumbing yourself? Want to learn how to solder plastic pipes? The simplest solution is the coupling or, as it is also called, socket connection method using fittings. It's fast, simple and inexpensive. All you need is a special soldering machine and a few hours of free time. You will quickly master this process - our article will help.
Today, more and more practical owners, accustomed to doing everything in the house with their own hands, are mastering plumbing work. Indeed, why call a plumber, wait for him all day, monitor his work and pay a lot of money for it. For example, installing plastic pipes in the bathroom and kitchen in an ordinary apartment can cost more than 3,000 - 4,000 rubles, and this does not take into account the cost of materials. You can save a lot of money if you do the installation yourself. There would be a desire and a tool suitable for the job - a special soldering iron and several auxiliary devices. We'll tell you which ones exactly.
What will you need for work?
Welding or soldering water pipes at home does not require expensive and difficult-to-use equipment. Today, every owner can acquire a special tool and forget about the services of a plumber forever. Here is a list of what is used when soldering the pipeline:
- soldering iron for plastic pipes with a set of nozzles of different diameters;
- pipe cutting knife;
- tape measure for measuring the length of elements when cutting them;
- marking pencil for marking the length of the heated section of the pipe;
- gloves made of heat-resistant material to protect hands during work.
You can buy all this in a set. Household soldering irons for sleeve welding of plastic pipes are sold with everything necessary for the job. Typically, the tool and accessories are packaged in a case for easy storage and transportation. Pay attention to the diameter of the nozzles for the soldering iron - it should match the diameter of the pipes that you are going to solder. Purchasing the simplest kit can cost only 1,500 – 2,000 rubles, which is half the cost of a plumber’s services. Agree, this is beneficial. In addition, the tool will be useful to you in the future, for example, when installing a water supply system in a village or country house.
Preparation of pipes is the key to their tight connection
Before we talk about how to solder plastic pipes, we will tell you how to prepare them for this.
First, they are cut to size based on the length of the pipeline, bends and branches. Don't forget to leave a small margin for the pipe to fit into the fitting. Then the edges are cleaned: smooth, neat edges without jagged edges or irregularities are much easier to join. If you use reinforced polypropylene pipes, then the top layer of plastic and reinforcement must be removed. This will prevent delamination of the material at the seam during operation and reduce the risk of leaks. It is recommended to degrease the cleaned surfaces and wipe them dry before heating them on the soldering machine.
The preparatory stage will not take you much time, but you will facilitate further work and ensure the reliability of the connection of the elements.
Soldering process. Step by step guide
Once you have a pipeline plan outlined and the products are cut to size, you can begin connecting them. It is better to assemble the elements not at the installation site, but on the table - it will be easier, especially if you are working alone. When it is necessary to solder pipes at the place of their installation, connect an assistant who will hold the elements to be connected, and you will work with the tool.
Now let's talk about how to use a soldering iron for pipes. The actions can be described in three steps.
Step 1. Connect the device to the network. Place it on a flat surface and install nozzles of the required diameter on the heating element. Turn on the heat button. Set the desired temperature - as a rule, for polypropylene its value is 260 °C. Wait until the working part heats up. For each model, depending on the power, this time is set individually, as a rule, it does not exceed 15 - 20 minutes. By the way, if you have a soldering iron with two heating elements, you can use both at once for faster heating. However, when the operating temperature is reached, the second one should be turned off to reduce the load on the device. You can start soldering 5 - 10 minutes after reaching operating temperature: you need to let the working attachments warm up.
Step 2. Install the elements to be connected on the soldering iron nozzles: a fitting is attached to the mandrel, and a pipe is attached to the sleeve. This heats up the inner surface of the fitting and the outer part of the pipe. Heating must be carried out simultaneously. The plastic melts within a few seconds - after which the elements must be quickly removed.
Step 3. The joining of the workpieces is carried out manually. A piece of heated pipe is inserted into the heated socket of the fitting. You need to connect the elements the first time, under no circumstances separate or rotate them, otherwise the seam will not be sealed. After joining, allow the elements to cool for a few minutes.
It is important to observe the thermal exposure time for the plastic and the hardening time of the connected elements. This depends on the diameter of the pipe and the thickness of its walls. How to find out the appropriate time interval? This table will help.
| Pipe diameter, mm | Warm-up depth, mm | Heating time, s | Cooling time, min |
| 20 | 14 | 5 | 3 |
| 25 | 16 | 7 | 3 |
| 32 | 20 | 8 | 4 |
| 40 | 21 | 12 | 4 |
| 50 | 22,5 | 18 | 5 |
| 63 | 24 | 24 | 6 |
By maintaining the recommended time, you will receive a high-quality and tight connection as a result. If you overdo it and overheat the plastic, it will float and clog the hole in the pipe - then water will not pass through, and after installation it will be difficult to find the problem area. If there is insufficient heating, there is a possibility that the parts will not be connected tightly - the seam will allow water to pass through, which will eventually cause a leak. And further. When starting to solder plastic pipes for the first time, practice on unnecessary pipe scraps so as not to spoil the ones cut to size. After trying several times, you will easily bring the actions to automaticity and will be able to repeat the algorithm with parts for the pipeline.
Now you know how to solder plastic pipes and what tools you will need. In a short time you can install a water supply system in your apartment, country house or business. If you do everything right, you will have a reliable system. After all, plastic pipes last a very long time: they can withstand temperatures from -20 to +90 °C, and are not subject to rusting and plaque deposits on the internal walls. By personally carrying out all stages of the work, you can be sure that all connections will be of good quality and will withstand the operating water pressure. The service life of such a pipeline can reach 100 years! And just imagine that you will do this with your own hands.
In our online store you can buy everything you need for pipeline installation: polypropylene pipes, fittings, soldering apparatus. You don't have to buy it from different places - you'll get your products delivered in no time and you can get to work! Make a choice and place an order through the website. If you need advice, call the manager at 8-800-333-83-28.
www.vseinstrumenti.ru
Welding polypropylene pipes with your own hands: soldering rules for beginners
Installation of plastic pipes can be done by yourself using simple welding equipment for socket diffuse welding. We tell you how.
Photo: Andrey Dachnik
Polypropylene pipes are currently widely used for laying water supply and heating system pipelines in private homes.
When PPR pipes and fittings are heated on the bells of the welding machine, local depolymerization of polypropylene occurs, and when the surfaces of the pipes being welded are tightly aligned and cooled, mutual diffusion of the material and repolymerization occur. Thus, if all the subtleties of welding technology are observed, the welded surfaces of pipes and fittings become one.
Impact of errors on welding quality
Experts note that the most common mistakes are neglecting the requirements for pipe preparation and temporary standards. They often skip degreasing and do not pay attention to the condition of the edges, cleanliness and dryness. Such errors lead to a violation of the integrity of the connection.
Overheating of the walls of polypropylene pipes leads to a narrowing of the internal diameter of the node connection. Also occurs with excessive compression. As a rule, it is impossible to clean the duct. And such a malfunction, along with distortions, causes rupture or clogging of the channel.
In rare cases, early failure of the assembled line is due to dissimilar materials relative to the manufacturer. This happens even after professional installation. The reason is that each manufacturer uses its own technology and uses its own recipe. As a result, pipes may have different heating, fixing and cooling rates. Therefore, it is worth using blanks with fittings from one manufacturer.
Equipment for diffuse socket welding of polypropylene pipes
To work you will need:
- Pipe cutter The most common option is pipe shears. However, such a pipe cutter does not guarantee an even cut and may partially deform the pipe. A smoother cut is achieved when using a circular pipe cutter for plastic pipes. If you don’t have a special cutting tool, you can use a fine-tooth hacksaw and a miter box.
- Trimmer. When using pipes reinforced with metal foil in heating and hot water supply systems, to prevent delamination of the pipe walls during water hammer at high temperatures, it is recommended to remove the layer of internal foil up to 2 mm. The trimmer also allows you to obtain an even cut chamfer and remove possible burrs.
- Ruler and pencil. The recommended welding depth must be measured and marked on the pipe. If you do not follow the norms for deepening pipes into fittings during welding, polypropylene beads may form inside, narrowing the lumen of the pipes. Also, marks on the pipe and fittings are useful for welding pipes in a certain relative position.
- Alcohol wipes. The welding site of a polypropylene pipe must be thoroughly dust-free and degreased to prevent the formation of capillary passages in the thickness of the material being welded.
- Welding machine with replaceable socket attachments (mandrel couplings). For most cases, a conventional and inexpensive welding machine with a sword-shaped heating element with a power of up to 1 kW is suitable. Such a machine can weld pipes with a diameter of up to 63 mm. Professional welding machines are distinguished by greater power and more accurate temperature control. Also, professional devices allow you to simultaneously heat two pairs of sockets of different diameters, so as not to waste time replacing them when welding pipes of different diameters. For welding PPR pipes in hard-to-reach places, there are welding machines with a thin round heating element, which can be located either straight or at an angle of 90 degrees. The sockets for such welding machines are made as a single unit with a hole for the heating element between the coupling and the mandrel. When choosing a welding machine, it is important to ensure that the included sockets are coated with a Teflon non-stick coating (denoted as PTFE) to prevent plastic sticking to the sockets. For domestic use, two heating indicator lights are sufficient: red (operation indicator) and green (indicator that the set temperature has been reached). The heating control handle must have clear graduations and good fixation in the selected position. There will be no unnecessary clamp on the stand of the welding machine: it allows you to secure the machine so that it does not move when disconnecting heated pipes.
Required Tools
For work we will need:
• polypropylene pipes themselves;
• a special apparatus for welding such pipes;
Welding machine
• a hacksaw for cutting them, a special cutter is often sold complete with a welding machine; for large volumes of work, you can use a ring cutter or special scissors;
• degreaser (ethyl or isobutyl alcohol); It is prohibited to use acetone in this case, as it can soften the plastic;
• chamfer: its internal part resembles a pencil sharpener, however, since the chamfer must be removed evenly, the knives are located at a different angle; You can replace the bevel remover with a regular file and knife;
Beveler for plastic pipes
• shaver: a tool for removing the reinforced layer (if our pipes have a reinforcement layer).
Shaver
Main stages of work
To get better at it, you can first try to practice and connect a couple of pipes. For this:
1. Take a pipe of the required size.
2. We clean its edges from burrs formed during cutting with a file or chamfer.
3. With a pencil, mark at the end of the pipe (see photo) which section we need to melt, that is, we mark the place where the fitting will be put on.
We mark the place of adhesion with a pencil
4. Treat the pipe and fitting with a degreasing compound.
5. Firmly fix the welding machine to the table.
6. Its kit includes nozzles of different diameters. We take the required nozzles (one for the fitting and one for the pipe) and attach them to both sides of the device.
7. Set the temperature to 260°.
8. As soon as the lights go out (this means that the device is warm enough), you can start working. The average heating time is 2-3 minutes.
9. We put a fitting and a pipe on the hot nozzles (there are two of them) up to the pencil mark. Do not put too much pressure on the parts to be welded or rotate them.
Butt welding machine. The fitting and pipe are put on the hot nozzles
10. We count down the required amount of time. The heating time is always indicated in the instructions. For example, for a 25 mm pipe it is exactly 7 seconds).
The heating time of the device depends on the diameter of the pipe
11. Quickly and carefully remove the heated parts, slightly holding the welding machine.
12. Connect them with each other. Excessive pressure on them or rotation is also unacceptable.
13. We wait a few seconds.
14. If we did everything correctly, we get a perfectly smooth, homogeneous connection.
How long to heat
Before you start welding plastic lines, the welder must be placed in a convenient place and firmly strengthened. Then you can install the attachments. Only now can the equipment be connected to power. Next, the device should warm up. This will take about ten minutes.
When the desired temperature is reached, the indicator on the unit should go out. It thus signals that the device is ready for operation.
For a hot apparatus, it is recommended to equip a stand, because the master’s hands must be free to fasten the heated parts.
Useful tips
Beginners, getting acquainted with the welding machine for the first time, should listen to the following recommendations:
• the reinforced layer on a section of the connection must be removed, otherwise the connection will be inhomogeneous and unstable;
• when purchasing a device, it is not necessary to spend extra money and purchase a model with a thermostat, because we will need only one temperature setting of 260°C; using other modes may result in a poor connection;
• water must flow through the pipes freely; To prevent an obstacle in the form of frozen plastic from forming at the welding site, you should not put too much pressure on the molten parts when joining; however, weak pressure is also unacceptable - the length of the connection for reliable fastening will not be enough; this can lead to the formation of vortex and pressure drop in the system;
• the basic rule of such soldering: the fitting is put on the nozzle first, and only then the pipe; The countdown begins when both parts are on the device;
• polypropylene sets in 4-8 seconds, but you shouldn’t let it go right away - for it to completely harden, you need to wait 20-30 seconds;
• the parts must be motionless when cooling; the slightest shift can break the tightness of the connection; therefore, before starting soldering, it is better to prepare special clamps for fixing them; they can be made from any block of wood or strong wire;
• cooling the resulting assembly with water or a stream of cold air is prohibited - the connection will be fragile;
• do not heat the pipe and fitting for more than the prescribed time - the polypropylene will be deformed; with less time for heating, the connection of parts will be difficult;
• with proper welding, part of the plastic should form a slight overlap on the coupling;
• you can check the quality of your work by cutting the connected section in half; you should see an even monolithic connection without deformations or voids at the junction.
Which pipes to choose?
Polypropylene pipes are divided into three main types:
• glass fiber reinforced: since polypropylene is capable of expanding when heated, reinforcement is used to neutralize thermal expansion (changes in pipe dimensions when heated); Such products are used for laying pipes of a heating system when it is heated to 90°C: with a standard wall thickness of 3.5 mm, their internal diameter is 25 mm;
• reinforced with foil: the principle of operation is similar to the previous one; withstands greater heat up to 95°C;
• without reinforcement: they have the same diameter, but the walls are slightly thinner - 2.8 mm.
For cold water supply, you can use any type of pipe, but it is most rational to install ordinary single-layer pipes without reinforcement in the system. After all, their cost is lower. In heating systems heated above 70°C, it is better to use foil-reinforced products. It is better to use fiberglass only in cases where the heating system does not heat above the specified limit.
Why is cleaning necessary?
The principle of welding pprc pipelines is to heat the polymer material to a viscous state. Then the hot pipe comes into contact with the coupling, resulting in soldering of the joint. However, reliability may decrease if aluminum foil used for reinforcement is in the contact zone. There will be no contact of polymers in this place, which can lead to depressurization.
The solution is to clean the reinforced pipes. Its features are as follows:
- Removing the foil layer at the soldering site will not reduce the maximum pressure value.
- If this is not done, gradual destruction of the joint is possible. The risk increases with frequent water hammer in the water supply system.
- Older models of polypropylene pipes have an outer layer of foil. Their diameter is 1.8-2 mm larger than the standard one. Without stripping, the pipe will not fit into the coupling socket.
A similar technology is used for all types of polypropylene pipelines. An exception is the use of products with fiberglass reinforcement. When heated, it partially melts and does not reduce the reliability of soldering. But for such models it is necessary to increase the heating time depending on the diameter.
Important: the heating temperature for pipes of different diameters is the same - up to +280°C. Contact time with a soldering iron is from 5 seconds (16 mm) to 80 seconds (160 mm).
Various methods of welding polypropylene pipes
Today, welding of polypropylene pipes is performed in different ways.
New construction materials, including polypropylene, make it possible to create reliable and durable mechanisms for water supply, heating and sewerage.
The technology for welding polypropylene pipes is well established.
Equipment that is easy to handle has been specially created for these needs. In real conditions, polypropylene pipes are welded with your own hands using a soldering iron.
The use of one technique or another is determined by the specific situation.
In order to carry out high-quality installation of the pipeline, it is necessary to know the technical and operational characteristics of polypropylene products.
How to solder - a description of the process technology for beginners
It is recommended to equip a stand for a hot apparatus, because the hands of a novice master should be free. Otherwise, it will be impossible to weld the structure.
The temperature is set on the regulator to +260 degrees Celsius. This indicator is called optimal for melting polypropylene products. It is also safe for the Teflon coating of nozzles. There may be no regulator on the device.
This does not mean at all that such a welding unit is not suitable for joining plastic well. This happens for the reason that a temperature other than the specified norm is not used for heating plastic materials. Therefore, there is no need to place much emphasis on this issue.
After this, they begin to do the soldering themselves. The fitting and pipe are simultaneously put on the nozzles. It is necessary to insert the workpiece and the fitting element with noticeable force. This is dictated by the fact that each nozzle on the heating device is made in the shape of a cone with a slope of five degrees.
Only the internal diameter of the surface corresponds to the nominal value. The pipe blank must be inserted all the way, but it must not be pressed further. Strong pressing in this situation can result in the formation of an internal thickening.
Self-welding of polypropylene pipes involves quickly joining heated polypropylene parts. It is also important to remember that the created structure cannot be rotated or moved until it has completely cooled.
It will only take a few seconds to correct a small flaw. Any movements afterwards can have a detrimental effect on the tightness of the created unit.
Features of polypropylene pipes
The first thing to note is that a polypropylene pipe is a complex technical product.
Currently, the industry produces three types of these products:
- for cold water supply;
- for hot water supply;
- for heating systems.
Compared to metal pipes, polypropylene products have less weight with equal strength. The elements are connected to each other using welding.
The machine for welding polypropylene pipes allows for the installation of extended communications.
The welding machine has a compact size, which allows you to work in hard-to-reach places.
Rust, lime deposits, dirt and corrosion do not form on the inner surface of polypropylene pipes. Heating lines are laid from reinforced pipes.
The video shows the process of connecting individual elements when installing a heating system in a private house.
The technology for welding polypropylene pipes is simple and accessible for use at home. The set for welding polypropylene pipes contains all the tools necessary for the job.
In some cases, a soldering iron and a device such as an iron are used for welding polypropylene pipes. Such treatment is impossible with metal pipes.
Elementary calculations show that using polypropylene parts is much more preferable than metal products. This also applies to large diameter pipes and the most common sizes.
In order to choose the appropriate type of product, you need to know their classification and labeling.
During manufacture, the PN designation is applied to the pipe and a digital code indicates the degree of maximum pressure that the product can withstand.
You need to make a choice with knowledge of the subject, and immediately purchase a welding device. To install pipes yourself, you will need special equipment.
Temperature standards
Welding of polypropylene pipes, as already indicated, must be carried out according to existing rules. Everything must be done slowly and correctly. All this applies to temperature. When arranging a pipeline, it is very important that not only the welding temperature of polypropylene pipes is maintained, but also the time.
Each welder comes with instructions that contain all the necessary time and temperature standards for products made of different materials. Violation of these recommendations will lead to a decrease in the internal diameter and reduced water circulation in the system.
Experts also tell beginners that it is important not only to simply choose a temperature of 265 degrees. When working, you should pay attention to the following additional nuances:
- The diameter that the pipe system has.
- Ambient temperature.
- Warm-up duration.
Particular attention is paid to the outside air temperature. During installation operations, it is impossible to avoid small interruptions that occur during the removal of heated parts and their coupling.
To avoid the effect of rapid cooling at low temperatures, the polypropylene structure is heated a little longer. The recommended time period is approximately three seconds. But, in each case this is decided individually.
When deciding the issue of temperature standards, it is necessary to take into account the diameters of the parts being fastened. This also affects the duration and degree of warming up.
Welding tools
Before you begin installing a pipeline made of polypropylene parts, you must prepare properly.
The welding device must be selected after the technical documentation for the pipeline system has been developed.
The choice is determined by technical parameters and economic considerations:
- maximum size;
- ergonomics of the device;
- the cost of the device.
Installation of small-diameter products, up to 63 mm, can be successfully performed using a manual device. If it is necessary to connect products with a large diameter, from 63 mm, then mechanical devices are used.
This kit for welding polypropylene pipes is used when laying long pipelines.
The set of welding tools includes special scissors that are designed for cutting polypropylene and nozzles of different diameters.
A special device for cleaning the surface of a product before welding. The surface of the parts must be degreased. For these purposes, ethyl or isobutyl alcohol is used.
Acetone should not be used as it loosens polypropylene. The heating temperature reaches almost three hundred degrees. Therefore, you need to use gloves when working.
The video shows a hand-held device for welding pipes and the sequence of actions during operation. It is more convenient to connect elements in a private house with its help.
Handheld device
By its design, the device is a compact product that takes up little space. The main element of the device is a heating mirror on which the nozzle is attached.
In everyday life, such a device is called a soldering iron or iron. In order to set a certain temperature level, the welding device is equipped with a control and adjustment unit.
The panel has LED indicators and switches to turn the device on and off. The operating temperature for welding polypropylene parts varies from 260 to 280 degrees.
The operating rules for the device are the same as for any other electrical device.
The main parameters by which you need to choose a device when purchasing are:
- power;
- number of attachments on the mirror;
- presence of a stand.
The greater the power of the heating element, the faster the nozzle heats up. This parameter determines the performance of the device.
One attachment or several can be attached to a soldering iron. The quantity varies depending on the design of the device and the size of the soldering iron.
Practice shows that when connecting the system in your home, two nozzles will be enough. For such systems, pipes with a diameter of 20 and 25 mm are used.
The connection and routing of the pipeline is carried out using connecting elements called fittings. These products have different configurations - angle, tee, cross.
Fittings should be treated in the same way as polypropylene pipes.
When welding reinforced parts in hard-to-reach places, you must strictly adhere to the established period of time for heating and fixing the connection.
A table has been compiled especially for installers who work in their home, and it indicates the optimal modes for heating and connecting two elements.
The video shows a fragment of connecting parts in an inconvenient place to work.
Mechanical apparatus
Mechanical welding units are designed to ensure the connection of large diameter pipes.
The mechanical device has a more complex design than the manual version.
The welding unit is assembled from the following components:
- support frame;
- control block;
- pipe grip;
- leveling liners;
- saw for cutting pipes;
- heating mirror.
The device, despite its complex structure, has a compact design. Installation of the pipeline is carried out according to the principle of butt welding.
The operating instructions prescribe a certain sequence of actions. First, the ends of the parts to be joined are cleaned.
Then the pipes are heated, and their temperature must reach the melting threshold. At the final stage, the pipes are connected and pressed tightly against one another.
The clamping equipment is supplied with the device.
A welding unit with such a device allows you to weld polypropylene pipes in the field when laying heating lines.
The video shows a machine for welding large-diameter polypropylene pipes.
How to use a machine for welding plastic pipes - operating nuances
Content:
When preparing to repair or install a pipeline, specialists decide in advance which pipes they will work with. In most cases, professionals use plastic. This material has positive properties for creating strong and durable communications. To carry out installation you will need a welding machine for welding plastic pipes.
The use of plastic is becoming increasingly popular. When constructing a pipeline, preference is given to this material. Therefore, for such work you need special equipment, which comes in different types.
When faced with the question of how to choose a welding machine for plastic pipes, you can take into account the fact that the operating principle of all devices is the same.
The welding process is not complicated, it does not require professional skills or consultation with an experienced welder. To weld plastic products, it is enough to know the structure and operation of the device. To gain a little experience, you can practice on an extra piece of pipe.
Welding methods:
- Diffusion butt welding. This is butt welding, this method is mainly used for pipes with large diameters.
- Electrofusion. This type of welding is carried out using couplings that contain an electric spiral.
- Coupling. For this type of welding, pipe fittings - couplings, bends and other elements - are installed at the joint.
The principle of welding is the melting of plastic material, during which the parts are joined. Therefore, all three methods can be called diffusion.
Machine for sleeve welding of plastic pipes
Sometimes in an apartment or private house it is necessary to resolve economic issues such as replacing or repairing a water supply system or installing a heating system. In such cases, sleeve welding is used.
A welding machine for gluing plastic pipes will help you carry out the work; this tool is also called a soldering iron or iron.
How to prepare the machine for welding work
The device connects pipes of different diameters. This is a fairly simple device for welding plastic pipes, consisting of nozzles and a heating plate. The attachments are fastened thanks to special sockets in the device.
To install them correctly, there are several recommendations:
- In order for the welding quality not to suffer, the coating of the nozzle must be clean, so before installing it, the nozzle must be checked. If this is not done, then during the welding process, possible contamination will cause an unpleasant odor and will also have a bad effect on the work.
- Uniform heating depends on correctly placed nozzles; they should not extend beyond the edges of the plate.
- If welding work is to be done with pipes larger than 40 mm in diameter, then the nozzles must be placed in the sockets located behind the heating plate.
Operating mode setting:
- When the equipment is connected to the network, the indicator on the start button lights up.
- You need to wait some time until the machine for welding layer pipes warms up to the desired temperature. The duration of warming up depends on external temperature factors and the power of the device used. Usually you have to wait from 10 to 30 minutes.
- It is necessary to monitor the heating process; if the fastening devices do not press the nozzles well, they should be tightened more tightly.
- It is important to control the heating of the device. To quickly check the temperature of the welding machine, you can use a measuring device or a font indicator. If you do not have such a tool at home, then according to the instructions you need to wait time.
- If there was a need to take a break from work and turn off the device, then to reheat it you need to follow the same steps.
It is better to use the device about five minutes after it reaches the desired operating temperature. This is done when starting the first welding operation.
How to care
First of all, you need to properly care for the machine for welding plastic pipes. At the end of the work, the device must be disconnected from the electricity and left to cool on its own. Under no circumstances should it be cooled with water.
It is equally important to monitor the nozzles and prevent moisture from accumulating on them. When planning to install them, it is not recommended to use tools that would harm the Teflon coating. This also applies to screws; when screwing, you cannot use pliers.
Sometimes dirt can form on the attachments. When this happens, it is better to use soft, but not fibrous, wipes. Paper ones remove dirt well if you moisten them with alcohol. If you cannot cope with the contamination, then the nozzles need to be replaced, since using uncleaned ones will negatively affect the quality of work.
Butt welding
This welding method is used for pipes with a diameter of 50 mm and larger. To connect plastic pipes, a welding machine is used, which works in the same way as a coupling device. For large volumes of work, semi-automatic and automatic stationary machines are used.
Electrofusion welding
An electric coupling is an element with which plastic pipes are connected. A coupling is put on the connection joint, through the contacts of which voltage is supplied. Thus, the spiral located inside it begins to heat up.
The advantage of this method is that the set of welding equipment consists of a small number of tools. In addition to couplings, the composition includes only tools for processing joints.
The only drawback of this welding method is the considerable cost of the pipeline per linear meter.
If you decide to install or carry out repair work on a plastic pipeline, then you need to purchase a special welding machine.
Basically, in order to connect plastic pipes at home, it is enough to have a small sleeve welding machine equipped with nozzles.
trubaspec.com
Welding technology
Equipment for welding and installation of heating or water supply systems should be prepared in advance. Welding technology has been perfected down to the smallest detail.
The whole process consists of three simple steps. First you need to prepare the parts to be joined. Then heat them until they melt. The melting point depends on the type of material.
And the third stage is the connection of two segments. The video shows how this is done. Practice shows that the larger the diameter of the pipe, the longer it needs to be heated.
A soldering iron is used to connect small-sized products. The heating interval must be as prescribed in the instructions.
Before turning on the welding unit, you should prepare the pipe sections and fittings. The design of the heating system must be displayed with marks on the walls at the mounting points.
The parts that will be welded are also marked with a marker. All elements to be connected must be dried and degreased. They are then inserted into the device and heated.
The soldering iron must be at the appropriate temperature. After heating, the parts are removed from the nozzles and connected using uniform movements. No rotation.