How to make a wax press with your own hands - drawings, video
Amateur beekeepers very often make wax presses with their own hands. Wax, which is purified in industrial and home conditions, has high performance qualities, and varies in the number of the purest product at the very end.
What is a wax press and what is it used for? A self-made wax press is a very reliable and economical mechanism. A wax press can be called a device for separating wax mass from frames.
The device makes it possible to obtain a pure substance, almost without impurities, by separating and compressing solid raw material residues. The operating principle of all wax presses is the same.
Manual
This is perhaps the simplest wax press in design and use. It can be purchased by all interested beekeepers and successfully used for amateur purposes. This device is very compact, its height is only 43 centimeters and its shape is a tapering cone. This is clearly visible in the presented photo.
Design
This hand-held device consists of three main parts: an iron mortar with pressing grids, a special pressure screw and a wooden frame. Up to five nesting frames can be loaded into the iron cone-shaped body. The design of this press allows you to process the honeycombs quite quickly, albeit manually. Iron parts made from durable steel to withstand high temperatures. The shape of the pressing screw is designed in such a way as to extract the maximum amount of wax from the processed raw materials.
Principle of operation
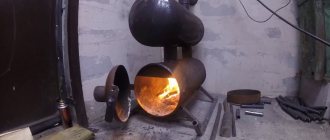
One of the very first stages of a wax press is melting the raw materials. It happens in a mortar. You need to place about 2-3 kilograms of raw materials in a small bag, put a pressing grid on the bottom and pour water into the mortar. It should completely cover the bag. Then the mortar is placed on the fire or stove and the raw material is heated to a boil. After about 15 minutes of boiling, a homogeneous porridge-like mass should form inside. Next comes the pressing process itself.
Pressing
After boiling, the mortar is removed from the heat and placed under the pressing screw. Place a grid on top of the bag and secure the screw, then press firmly on the bag with liquid raw materials. When pressed, the wax should float to the surface of the water, which fills the entire mortar. It is poured into a separate tank and pressing operations continue. In order to maintain the liquid state of the wax, you should constantly add hot water and keep the mortar over the fire. Boiling and pressing is repeated several times until the wax stops floating.
Advantages:
- Compact and lightweight;
- Ease of use;
- Good performance;
- Ease of use in the amateur apiary;
- Saving money (heating, electricity).
This is interesting: Drains made from plastic bottles
Specifics of manual wax press
The manual wax press is quite easy to use. The characteristic difference is compactness. The shape is conical and tapered, and the height does not exceed 43 centimeters.
A manual wax press consists of the following parts:
- pressed gratings;
- wooden frame;
- pressure screw;
- iron mortar.
The conical iron body includes 5 socket frames. A wax press like this continuously processes bee honeycombs without much time investment. Due to the fact that the iron part is made of steel, there is excellent susceptibility to high temperatures. The pressing screw has a specific shape, thanks to which it is possible to obtain a sufficient amount of beekeeping product.
What is a wax press and why is it needed?
A self-made wax press is an economical and reliable mechanism. A wax press is a device for removing wax from frames. The device allows you to obtain a pure, almost pure substance by separating and compressing the solid residues of the raw material.
The operating principle of all wax presses is the same. The raw materials are brought to the required temperature. Hot wax in a special bag is placed in the pressing compartment, where the liquid fraction of the raw material is expelled under pressure or by centrifugation. Clean wax is poured through a special chute or through holes made into a prepared container. The remaining solid waste is removed. All parts of the mechanism are thoroughly washed and dried.
Important! Care should be taken when working with hot raw materials, as wax is a flammable substance.
When putting the wax press into operation, you must make sure:
- no defects or damage to the mechanism;
- integrity and stability of the tank;
- location of the device in places that exclude the possibility of fire;
- the strength of the bag or fabric used for the melted raw material;
- availability of protective equipment (thick clothing, gloves, glasses).
A homemade mechanism is an economical way to obtain a substance of sufficient purity. The operating time of different wax presses is almost the same. One full spin cycle will take 3 - 4 hours. However, the amount of product processed varies:
- for industrial machinery – 10-12 kg;
- Kulakov apparatus – 8 kg;
- manual wax press – 2 kg.
Each wax press has its own advantages and disadvantages. Before choosing a device, it is necessary to evaluate the expected production volumes, the purposes for which the wax is produced and the permissible amount of wax residues in solid waste. It is also necessary to determine where the spinning will take place. When using automatic mechanisms, a stable connection to power lines is required. A homemade wax press works by heating it from a fire or gas burner.
Pressing process
The pressing technique in beekeeping also remains unchanged, regardless of the typology of the apiary wax press. The difference will only be in the speed of its production and the purity of the output.
A manual wax press is placed on the fire (stove, fire), honeycombs tied in a linen bag are placed on the bottom of the mortar, water is poured on top and a grate is placed. Bring to a boil and boil for about 15 minutes. After which the mass is sent under the pressing screw. When you press on the bag, the wax will rise above the water. It is removed and the cooled liquid is removed. Until the end of the action, you can add hot water or put the mortar back on the fire. As soon as wax particles stop appearing, you can stop pressing.
Regarding military-industrial complex 1, when using it, the process of obtaining a product is more automated and, accordingly, faster. It works as follows: water poured into the tank reaches the desired temperature and is maintained automatically; honeycombs placed in fabric (linen) are placed in the separator compartment. The extraction method is the same as in the previous case. The product can be squeezed out an hour after adding the raw materials. The purest wax ends up on the surface of the tank, from where it is drained into a separate container.
What is a homemade wax press?
Modern beekeepers use homemade wax presses of various types, which we will talk about below, but now let’s look at the principle of operation of this device, which is important for any home apiary; it is identical for all models, regardless of their design and material of manufacture.
The remains of wax honeycomb on the used frames are heated to the required temperature, after which they are easily removed from the wire and sent to the pressing compartment, where the liquid component is expelled from them by centrifugation or under pressure, solid waste is removed, and clean wax is drained through a chute into a prepared container.
The full cycle spin time when using such a device takes 3 – 4 hours.
A homemade wax press allows you to obtain highly purified wax, and this is not its only advantage. Other strengths of this mechanism, without which not a single home apiary can do, include:
- Light weight and compact dimensions;
- Ease of use and care;
- Energy saving;
- Decent performance.
And, most importantly, this device can be made independently based on training videos that are available on the World Wide Web.
Voskopress
Good day, dear subscribers of my blog.
I am glad to meet you again. Today I want to discuss with you a homemade wax press - a device designed for extracting wax from honeycombs.
It, as you may have guessed, can be done with your own hands. To do this, you will need basic skills and simple plumbing tools. A drawing of a homemade wax press can be found on the Internet, as well as video tutorials on how to make it.
If you don’t want to bother or are limited in time, then wax press, both new and used in Russia, can be bought in a specialized beekeeping store or on trading pages on the World Wide Web.
Voskopress is necessary for all self-respecting beekeepers. It allows you to easily separate the wax from the frames, obtaining a pure substance, almost completely free of foreign impurities, suitable for further use, by pressing the solid residues of the honeycomb after honey collection.
Voskopress Kulakova
The device, created specifically for wax cleaning, is distinguished by its reliable design and low energy consumption. The device consists of:
- from a metal tank;
- separator;
- coarse sieve;
- pressure handles.
To place the merga in the separator, use bags made of unbleached flax. The device is equipped with a heating coil for melting the wax: this stage is fully automated. By separation, pure wax is separated from solid waste.
A tank half filled with water is heated and the water is brought almost to a boil. The wax in the linen bag begins to melt. The separator and sieve are lowered to the bottom of the tank. The raw material mixed with water is boiled for about an hour until a wax film appears on the surface of the water. Next, the cleaning process takes place within half an hour. The wax drains away.
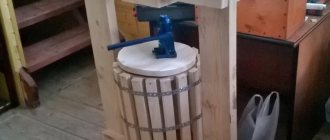
Metal bee wax press
It consists of a mortar and a screw with a “spike”, mounted in a fixed frame. The frame, in turn, is movably connected to a wooden base. The boiled raw material, wrapped in burlap, is placed in a mortar. The latter is pushed under the “press” of the internal wall. The raw materials are boiled in a separate tank.
Standard metal bee wax press: 1 - mortar; 2 - screw; 3 - fixed frame; 4—cast iron “pulp”; 5 - wax that has floated to the top; 6 - platform; 7 - bag of raw materials.
When the screw rotates, the raw material is compressed, and wax and water fill the mortar. At the end of pressing, the liquid is poured into the settling tank by tilting the wax press to the side. The metal wax press has the following significant disadvantages: 1) due to the fact that the mortar is metal, the boiled wax raw material in it cools quickly, which makes pressing difficult; 2) it is difficult to create a lot of pressure in a low, wide mortar. As a result, wax yield decreases; 3) tilting the press to drain the wax and water makes the work laborious.
Types and models
You can easily make a manual bee wax press with a productivity of up to 2 kg of pure wax in one cycle:
- From a jack;
- From a gas cylinder;
- From a metal can;
- From a washing machine drum.
We are talking about the Lisitsa wax press, popular among amateur beekeepers, which is actively used in home apiaries, the main structural element of which is a gas cylinder.
A worthy alternative to it could be the Kulakov wax press - something between a manual and an industrial mechanism
. In one working cycle it will produce up to 8 kg of pure wax. Regardless of which version of the wax press you choose, whether you make it yourself or buy a ready-made one at a beekeeping store, this device will be useful in your home apiary.
This is interesting: Making a fence from a metal profile with your own hands
Wax press from a gas cylinder
After a little modification, a gas cylinder can become a convenient and inexpensive tank for a wax press. To make a wax press from a gas cylinder, it is necessary to cut off the bottom of the cylinder for stability and weld the end with a flat sheet of iron. You can weld the supports along the edges so that the tank does not tip over during operation. To improve heat retention, the tank is lined with thermal insulation material (foam, wood, polyurethane foam, etc.).
Craftsmen who make a wax press with their own hands use a car jack as a screw. It must be secured with a welded transverse strip of steel. A hole is made in the tank to let the wax out.
The manufacture of the mechanism is shown in the video:
Types of equipment, their design and principle of operation
There are three main types of wax press: manual, Kulakov, industrial (factory). They have the same purpose, but the dimensions and design are different:
- Handmade design. This device has the simplest design. This is a 43cm cylindrical container that holds 5 frames from a slot. The design is equipped with an iron mortar with gratings, a special pressure screw and a wooden support. A manual wax press works simply: the raw material is heated in water, turns into a liquid state and is squeezed out.
- Voskopress Kulakov. This design is represented by an electric tank with a water heating element and a drain tap, a separator, an upper and lower sieve, a power drive and a filter bag (usually made of flax). The principle of operation of the Kulakov wax press is similar to manual equipment, but the process is automated - the water is heated by a heating element, which also maintains the temperature in the future.
- Industrial (factory) type wax press. This type of equipment is the most complex. It is used by large production-scale enterprises, but in small apiaries its use is unjustified. A special feature of this type of device is the type of output product - wax tape. The design of the equipment consists of a large-sized hopper with an electric heater and a special drum from which the wax tape is removed. Vacuum tanks, special attachments and discs for varying wax strip widths are also provided. This installation is used for large volumes of raw materials and requires special operating and maintenance skills.
The quantity and quality of the raw materials obtained depends on the type of equipment used. With a manual type of construction, processing 2 kg of honeycomb will take 3-4 hours. During the same time, Kulakova’s Voskopress will process twice as much raw material, and industrial equipment processes 5 kg of raw material per hour.
Disadvantages of wax press
- It is impossible to create force on the pressure plate, the screw mechanism.
- When the screw mechanism comes into contact with wax, it can soon corrode.
- To make your own pairs, you need to use special, sophisticated technological equipment.
- When wax comes into contact with steam, it can lose all its qualities, resulting in a large amount of spoiled raw materials.
In this case, it is very important to create a design that provides good pressure on the pressure plate, so it will be possible to obtain a large amount of high-quality wax, it will also simplify and improve technological production, and it will be possible to preserve it for a long time.
Thus, each beekeeper likes a different look so that the wax press is comfortable to use. For small apiaries, a manual one is suitable, but for production you must use an electric one.
Devices for straining wax
To strain out the wax, the easiest way is to use a wooden box, to which, instead of the bottom, a metal mesh with cells measuring 2X2 or 3X3 mm is nailed. Two bars are attached to the sides of the box, protruding beyond its edges, with the help of which the box is suspended on the edges of the sump. An ordinary wooden tub can serve as a sump. It is recommended to place a thin piece of burlap on the mesh, and pour the boiled raw materials onto it in portions. Burlap provides better wax release. In this case, the raw materials must be mixed with a wooden stick, washed several times with boiling water and lightly squeezed.
The simplest way to strain wax from boiled raw materials:
1—raw materials; 2—wax; 3—water.
Sterilizer. It serves to disinfect (sterilize) wax obtained from foulbrood bee colonies by boiling it at 120°. The most acceptable sterilizer in apiary conditions is the Shishkin design, which is a tank with double walls, between which some mineral oil (for example, autol) is poured. Wax is loaded into the internal tank (made of aluminum). Then, when heated on the stove, the temperature in it is brought to 120° and the wax is kept for 30 minutes, after which it is drained through the bottom tap into the wax sump. The diameter of the internal tank is 340 mm, height 525 mm. The sterilizer is also used to evaporate water from wax and remove foreign impurities from it.
Wax sterilizer: 1 - internal boiler; 2 - external boiler; z—autol; 4—grid; S—sediment; c - firebox; g - melted wax.
To disinfect wax and other purposes, many beekeepers use a sterilizer of a simpler design. A cauldron is placed in a small brick oven. Another one of the same shape, but smaller in aluminum, is inserted into it. Autol or other mineral oil is poured into the space between them. The wax is placed on top of the inner cauldron. It is better to provide the latter with a tap for draining sterilized wax. In order to clean the wax from mechanical impurities, a metal grate is installed in the internal boiler.
How to make a wax press with your own hands
Nowadays, it is quite difficult to find homemade wax presses, since it is not easy to make them. But many experienced beekeepers have experience constructing this equipment themselves. Some people make the device using parts from a washing machine.
This is perhaps the easiest way to make a structure such as a wax press.
To construct, you will need two cases from non-working washing machines. The lower part of one is completely cut off, and the curved bottom should not touch the floor. The resulting hole must be welded with stainless steel, because... This part of the device will be on the stove and boil the liquid.
The second machine needs to be completely disassembled, leaving the lid and the upper stainless cylinder. Now one part of the machine is installed on another and they begin to work.
Tools and materials
To make a wax press yourself, you will need:
- Iron pipe, height (70-80 cm), diameter 25 cm.
- Round sheet of metal for the bottom, 20 cm in diameter.
- The thicker metal disk that will be used for the press is also 20 cm in diameter.
- 80 cm hairpin with tape thread.
- A table without a lid, the height of which is 60-70 cm.
- Three rods made of metal or steel (2 x 15 cm, one – 20 cm).
- Wooden blocks with a cross section of 3x2.5 cm and a length of 70-80 cm.
- A thin metal bar, 30 cm long.
- 30 cm metal rocker.
- Wooden disk, 18-19 cm in diameter.
- Sackcloth.
- Basin or bucket.
Step-by-step instruction
The scheme for assembling this version of the wax press is as follows:
- Wooden blocks are placed from the inside of the pipe, so that the distance between them is 1.5 - 2 cm. They must be fixed from the inside. After this, the diameter of the pipe from block to block should be 20 cm.
- The bottom of the structure will be made of a metal disk. It is necessary to weld a metal block about 30 cm long to it. After welding the edges of this block to the bottom of the pipe, we will get the bottom. Through the remaining hole at the bottom, the wax will be poured into the container located below.
- Iron rods are welded on the sides of the pipe. With the help of these rods, the device can be hung on a rocker.
- Iron bars (thin) are placed on the table parallel to each other. Vertically, we place a pipe between them and secure it.
- Now you can start assembling the wax press itself. A strip-threaded stud is welded to a metal disk. These parts must be placed parallel to each other, the pin should be in the center of the disk. Now we screw the rocker arm to the stud, and attach a metal rod parallel to the already attached disk to the opposite edge of the stud. It turned out to be a handbrake.
- At the bottom we place a container in the form of a bucket or basin, and place burlap inside the structure.
Advantages and disadvantages of using different types of wax press
Manual wax presses, despite the simplicity of assembly and control, have a number of positive aspects:
- compact in size;
- relatively light in weight;
- economical;
- gives a good wax yield.
The disadvantages include such points as the labor intensity of the heating process itself, because it is not easy to control the constantly high temperature of the raw material in the mortar. However, due to the low cost of components, such fireboxes are the most common in amateur beekeeping. Kulakov’s device is an optimized option between a manual and industrial pressing mechanism. Its advantages include:
- guarantee of purity of the extracted wax;
- high degree of productivity;
- process automation;
- ease of maintenance.
VPK 1 has practically no drawbacks, except for one thing: buying a new device is quite difficult, and its cost will not be small (from 10-12 thousand rubles).
Disadvantages of a homemade wax press compared to an industrial one
When squeezing wax using a manual mechanism, the beekeeper spends much more time than when using industrial automated devices.
But due to the low cost of consumables, such devices are quite common in private beekeeping. The best option for a private apiary would be the Kulakov wax press, which effectively squeezes out the substance and does not require complicated maintenance.
Also, manual mechanisms have such a disadvantage as the need to tighten the bag of molten merva. The procedure requires special care, but it is irreplaceable: the tighter the bag is twisted, the more quality the product will be at the end.
Instructions for use
Features of using a wax press depend on its type. The manual device is used according to the following algorithm:
- Place a grate on the bottom of the mortar.
- Place a bag of 2 kg of honeycomb in a mortar.
- Pour in water – the entire bag should be filled.
- Place the structure on the fire, keep the boiled raw materials on the fire for another 15 minutes until the mass becomes homogeneous and mushy.
- Remove the mortar from the heat, install the pressing grid and screw.
- Press on the raw material bag, pour the wax that floats to the surface into a container.
- Add hot water and heat the mortar - this is necessary for the wax to become liquid.
When using a manual wax press, you must always act according to the same algorithm. When the wax no longer floats to the surface, the process is complete.
Kulakov's wax press should be used as follows:
- Place the structure on a flat surface.
- Pour hot water into the tank – fill it halfway (at least 30 l).
- Turn on the heater.
- Insert the bag into the separator.
- Grind the raw materials by hand, place them in a bag in layers of 3 cm, each lined with drainage material.
- Close the filled bag by pressing it with the upper sieve.
- Install the separator in a tank of water.
- Boil the raw materials for at least 2 hours.
- Install the power mechanism, use the lever to set the rod to spin mode - the process lasts at least an hour, the frequency of the efforts slowly increases.
- Open the tap at the top of the tank, placing a clean container in advance - the squeezed wax will drain here.
When working with the Kulakov wax press, the amount of raw material directly depends on the spin time. To speed up the process, add hot water (90 degrees) and pre-boil the raw materials for at least 2 hours.
Regardless of the type of wax press used, the final stage in working with it is cleaning the device. After thorough cleaning, all equipment is completely dried. Ignoring this measure will shorten the life of the device.
Operating principle of the device
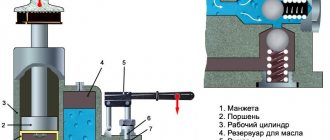
The essence of the screw press is as follows.
- It has a loading ladle into which raw materials are poured for processing.
- Using a handle, rollers covered with a grater cloth are driven.
- Due to the rotation of these devices, raw materials are drawn into the space between them. This is how peeling occurs.
- After the cleaning process is completed, both the husks and sunflower seeds fall into the lower bucket.
- This mixture is sifted.
- It is necessary to replace rollers with a grater cloth with rollers with a completely smooth surface. It is with their help that the spin cycle will take place.
- The peeled seeds are again poured into the upper ladle.
- The devices have a lever that adjusts the gap between the rollers. At this stage, it must be moved to the second position in order to reduce the gap between the elements to achieve the desired result.
- After rolling, you will get a porridge-like mass, which must be pressed to make vegetable oil.
Operating principle of a manual wax grinder
The apiary wax press works as follows:
- It is necessary to melt the appropriate raw materials in a special container. Take a special bag and place 2 kilograms of beeswax in it. Before doing this, place the pressing grid at the bottom of the bag, then pour water into the mortar. It should be remembered that the water level should not exceed the height of the wax bag. Heat the mortar over the fire until the contents boil thoroughly. After twenty minutes you will get a homogeneous structure.
- The next step is the pressing procedure. The mortar is removed from the heat and placed under the appropriate screw intended for pressing. A special grid is placed on top, a screw is attached, and then the bag containing the raw materials is pressed with all force. At this moment, you can notice the appearance of wax in the water in the mortar. The water is drained into a separate vessel, and the process continues further. It is important to note that the wax remains in a liquid state, so hot water is periodically added and the mortar is heated on the stove. Manipulations are performed until the wax runs out.
Advantages of a manual wax grinder:
- efficiency;
- compactness and lightness;
- high performance.
How the wax press works
As for the mechanism of action and obtaining the finished product, all known types of pressing equipment for the production of beeswax work according to the same scheme, therefore, for the most part, beekeepers, understanding it, prefer to make them themselves.
Conventional homemade wax melters are metal or wooden tanks that must withstand elevated temperatures; heating can be supplied via an electric heating element; the simplest designs are usually placed on an open fire or stove. It is important to achieve the optimal melting degree. As soon as the merva is softened with the help of a sieve, compression is performed, so the slurry remains at the bottom, and the purified product rises to the top.
Kulakova
This is another type of device for wax extraction, often used in domestic apiaries. This wax press is also called VPK-1. The main tasks that the developer set when creating his device were maintaining the purity of the wax and a minimum of effort during use. And he managed to turn them into reality. Many professional beekeepers call it one of the best modern devices.
Design
This wax press consists of the following parts: a tank for heating raw materials (electric), a separator and a sieve for filtering wax, a pressing mechanism, bags for storing raw materials (mostly linen). Kulakov's entire assembly apparatus weighs 12 kilograms and, compared to a manual device, can hold up to 40 liters of liquid wax. This wax press also includes a heating heater, so when working with it you no longer need to separately put a mortar with raw materials on the fire. Heating is done automatically.
Principle of operation
Water is filled halfway into the metal tank, and automatically when turned on it heats up to 90 degrees. Then the manually crushed raw materials are placed in a linen bag, which is located inside the separator. At this time, the desired temperature is maintained automatically. There is a sieve on top of the separator. Then, using a pressure mechanism, the sieve and separator are lowered into the tank, where the hot melted raw materials are already located. Add water to it and leave to cook for about an hour. As soon as a film of wax appears on the surface of the water, you can move on to the next stage.
Pressing
The wax takes a long time to wring out, about forty minutes, but the result is a clean, high-quality product. As the press operates, the wax, as in the first case, rises to the surface of the water, from where it is drained. After finishing the press, the unit is disconnected from the network, disassembled and all parts are cleaned. In this case, it is important to thoroughly clean and rinse the separator, sieve, and bag. After drying, the wax press is again ready for work and a new loading of raw materials.
Advantages:
- This device extracts wax of the highest category in terms of purity and quality;
- High performance;
- Automatic operation.
How to make it yourself?
Tools and materials
- Iron pipe with an internal diameter of 25 cm and a height of 70-80 cm.
- Metal disk for the bottom, 20 cm in diameter.
- A thicker metal disc for a press with a diameter of 20 cm.
- Hairpin with ribbon thread 80 cm long.
- A table without a lid, 60-70 cm high.
- 3 metal rods, 2 of equal length approximately 15 cm, the third approximately 20 cm.
- Wooden sticks with a section of 3 cm by 2.5 cm (WxH). The length of the bar will correspond to the height of the pipe, that is, approximately 70-80 cm.
- A thin metal bar, 30 cm long.
- Metal rocker 30 cm long.
- Wooden disk, 18–19 cm in diameter. Used already during the practical use of the wax press.
- Bucket and burlap.
Step-by-step instruction
- We place wooden blocks along the inside of the pipe at a distance of 1.5–2 cm from each other. We fix them firmly inside. As a result, the diameter of the pipe becomes 20 cm (from one bar to another).
- We will make the bottom from a metal disk. We weld an iron block about 30 cm long to the disk. Then, by welding the edges of this iron block to the lower edge of the pipe, we get the bottom. So, there remains a hole between the edge of the pipe and the edge of the metal disk. Everything will be squeezed out through it and go into the bucket. The details of fastening are in the video below.
- We weld iron rods on the sides of the pipe on top. The edge of the rod should be slightly higher than the edge of the pipe. We do this procedure so that in the future it will be easy to “hang” the rocker arm on them.
- We place two thin iron bars parallel to each other on a table without a lid. We place the pipe vertically between them and fix it tightly. You can additionally take iron corners to secure the pipe in a circle. As a result, part of the pipe must be below the level of the table top. To better understand the described instructions, we suggest watching the following video, which clearly shows all the clarifications and nuances.
https://youtube.com/watch?v=pK5Hlec8j04
- We make the design of the press itself. We weld the metal disk for the press to a stud with a tape thread. They should be placed perpendicular to each other. The pin is in the center of the disc. Next, screw the rocker arm onto the stud. We fix the metal rod on top (from the other edge of the hairpin), parallel to the disk (which is already placed on the lower edge of the hairpin). This will be our so-called handbrake.
- We place a bucket for the final product under the table.
- Place burlap on the inside of the pipe.
How to use?
First you need to boil the dry product - turn it into a liquid mixture. Next, we pour this liquid form of raw material into a device lined with burlap. At this stage, the wax is already beginning to flow into the bucket. After pouring the product into the pipe, cover the raw material with the edges of the burlap, and then press it down with a wooden disk with a diameter of approximately 18–19 cm. We do this so that later in the process we do not stain the oppression parts with wax.
We install the bend on the side rods and turn the handle. The wax is poured under pressure into a bucket from the ducts between the wooden beams inside the pipe. To better understand the entire operation of the constructed device, according to the instructions described above, we suggest watching the video.
https://youtube.com/watch?v=oI3cE8JcINI
Designs and varieties
There are several types of bee presses, the principle of their operation is always the same: using pressure and hot water, the honeycombs must release wax, which is collected using a filter when pressing on the container with raw materials. Interestingly, beekeepers prefer to collect wax presses for the apiary themselves, taking into account their own harvest volumes. But there are also ready-made products that can be bought in online stores or through advertisements in newspapers.
How to use
Before using the wax press, the dry product must be boiled to a liquid consistency. Afterwards, the resulting mixture is poured into a machine with burlap. Almost immediately, the wax begins to gradually flow into the container installed below.
Now you need to cover the liquid product with the edges of the burlap and press it down with a wooden disk on top. This is done so that the oppression parts do not get dirty while working with wax. Now you need to install the bend on the side rods and turn the handle. The pressure applied causes the wax to flow into the bucket.
Having a wax press in your apiary is an excellent way to earn extra money, even for amateur beekeepers.
Let's consider the typology of pressing equipment for an apiary:
- Manual apiary wax press is a barrel (usually made of aluminum or stainless steel), in the middle of which there are meshes, they move in the mortar under the influence of a pressure screw, which in turn is driven by a handle, which is turned by the beekeeper.
- The Kulakov apparatus (VPK 1) is a rather complex mechanism; it is compared with industrial ones, because it is almost impossible to assemble the unit at home. It consists of a metal reservoir (dimensions vary), a separator that is electrically operated, a grid and a pressure lever.
- Factory or industrial - can be found exclusively in enterprises with high product turnover. They are a room-sized installation with a tank into which honeycombs are thrown in large quantities without processing, the firebox is heated by electricity, and the output is a cast or pressed wax tape, the width of which is adjusted by equipment settings.
Wax press - the secret to quickly obtaining high-quality wax
What is a wax press, where and how is it used, what types of such technology exist and can you do it yourself? In this article we will try to reveal all these issues to you in detail and give some tips that should not be neglected.
What is wax press?
A wax press is a device designed to extract wax from honeycombs. An irreplaceable thing that every beekeeper should have. If you are engaged in beekeeping and have such a thing, then the sale of products will be carried out without any delays. Each type of wax press has different characteristics, weight, general appearance, method of application, and so on.
Specifics of a manual wax press
The manual wax press is quite easy to use. Its advantage is its compactness, the approximate height is no more than 43 cm. It has a narrowed conical shape, so the dimensions are not so important. Following the drawings, it can easily be made at home. This wax melter consists of four main parts:
- a frame made of wood;
- a mortar made of iron;
- push-type screw;
- grates through which the contents are pressed.
The main part is made of high quality steel, so high temperatures are not a problem. It can also be replaced by making it, for example, from a gas cylinder. There is another variety - this is a wax-press fox, made by yourself.
Principle of operation
The first thing to do is to melt the raw materials. This is done in a special container. To do this, take approximately two kilograms of wax and place it in a special small bag. We place it on the bottom of the container, having previously placed a grate there. After this, water is poured in, and the water level should completely cover the bag of wax.
Then put the mortar on the fire and boil the contents. After approximately 20 minutes of boiling, a homogeneous consistency will form inside. Next we move on to the next stage, which is called “pressing”.
After all the contents have been properly boiled, the wax must be removed and placed under a special screw, which, in fact, will perform the pressing. Before pressing on the wax bag, you need to install a special grill on top of it. By applying pressure with the screw, the wax, passing through the grate, will protrude on top of the water. This liquid is drained and the process is repeated.
But do not forget that this whole procedure is done on a burning fire, so it is necessary to sometimes add new water to the mortar. The procedure must be repeated until the wax runs out. You will understand this as soon as it stops appearing after pressing on top of the water in the homemade product.
Characteristic features of the Kulakov VPK 1 design
A fairly common type of device, which is often found in apiaries. With its help, beekeepers relieve themselves of work, since the resulting wax is purified and does not require much attention in processing. While praising this device, many cannot even imagine how they would cope without its intervention.
General information
Raw materials should be brought to the required temperature level
Hot wax in a special bag is placed in a pressing compartment, where, under the influence of pressure or even by centrifugation, they try to expel the liquid raw material fraction. Wax in its pure form should be drained through a special chute or even through created holes into a pre-designated container. The remaining solid waste will be removed. All elements of the mechanism should be thoroughly washed and dried.
Please note that care must be taken when working with hot materials as wax is a flammable substance.
When starting up the wax press, you need to make sure the following:
- Availability of protective equipment (gloves, thick clothing and glasses).
- The strength of the fabric or bag used for molten raw materials.
- Location of the device in a place that excludes the possibility of fire.
- Integrity and stability of the tank.
- No defects or damage to the mechanisms.
Compound
A homemade device is an economical way to obtain a substance of sufficient purity. The operating time of all kinds of wax presses is almost the same. Full 1 cycle of push-ups takes from 3 to 4 hours. However, the quantity of processed products differs:
- Manual wax press – 2 kg.
- Kulakov apparatus 8 kg.
- For an industrial type mechanism from 10 to 12 kg.
Each of these devices has its own disadvantages and advantages. Before selecting a device, it is necessary to evaluate the estimated quantity of products, the purposes for which the wax is made and the permissible number of wax residues in solid waste. It is still necessary to determine where the push-ups will take place. When using an automatic mechanism, a stable connection to electrical transmission lines is required. A homemade wax press will work by heating from a fireplace or even a gas burner.
What are the varieties?
Wax presses can be divided into the following types:
Manual beekeeper. It is mostly accepted in small apiaries, and is also valuable by amateur beekeepers. The volume of the device is usually small, no more than 30 to 40 liters. The advantage of the wax press is its small size and relatively low cost. The disadvantages include the need for constant manual heating and insufficient cleaning quality.- Industrial. It is the size of a small room, and the tank is used to clean large quantities of wax in a special enterprise. A tape of wax or even wax in liquid form will come out pure and ready for future use. It is unlikely to make such a device in your own home.
- Kulakov is a device that is a compromise between a manual creation device and an industrial type assembly. It will allow you to obtain high-quality cleansing wax at home.
What types are there?
Wax presses are divided into the following types:
- Manual beekeeper. It is mostly used in small apiaries and is valued by amateur beekeepers. The volume of the device is usually small, does not exceed 30 - 40 liters. The advantage of the wax press is its compactness and relatively low cost. Disadvantages include the need for constant manual heating of raw materials and insufficient cleaning.
- Industrial. The size of a small room, the tank is used to purify large quantities of wax in a specialized facility. The output wax tape or liquid wax is pure and ready for further use. It is unlikely to make such a device at home.
- Kulakova. A device that is a compromise between a hand-made mechanism and an industrial assembly. Allows you to obtain high-quality cleaning wax at home.
Features of the device
The wax press is very convenient and easy to use. Its characteristic feature is its compactness. The shape of the device resembles a cone, it is narrowed, with a maximum height of 43 cm.
The wax press consists of the following parts:
- pressed gratings;
- wooden frame;
- pressure screw;
- iron mortar.
Quite often in modern apiaries they use the Kulakov wax press. Another name for this device is VPK-1. When creating this device, the developer set himself the task of maintaining the purity of the wax, while spending a minimum amount of effort. He succeeded, because to this day beekeepers consider this wax press one of the best.
Features of a manual wax press
One of the easiest to use is a manual wax press; it has a conventional design. It's easy to buy. The manual one is distinguished by its compactness, reaching a height of no more than 43 cm, its shape is narrowed, conical.
The device consists of four parts:
- Iron mortar.
- Pressing grids.
- Special pressure type screw.
- Wooden frame.
The conical iron body contains five frames from a socket; with the help of such a press you can constantly process honeycombs without spending a lot of time on it. The iron part is made from steel, which is strong enough to withstand high temperatures. The pressing screw has a unique shape, so you can get a lot of waxy bee product from the raw material.
Let's look at the devices separately and in more detail.
Voskopress Kulakova
How to make a Kulakov wax press with your own hands? The device, made specifically for wax cleansing, is distinguished by a high degree of reliability of its design, as well as a low degree of electrical energy consumption. The device is made from:
- Separator.
- Metal tank.
- Pressure handles.
- Coarse mesh sieve.
To place the merga in the separator, bags made of unbleached flax are used. The device is equipped with a heating coil to melt the wax - this stage is fully automated. Through separation, the process of separating pure wax from solid waste occurs. The tank, which is half filled with water, is heated, and the water should be brought to almost a boil. The wax in the linen bag begins to melt. The separator and sieve are usually lowered to the bottom of the tank. The raw material, which is mixed with water, should be boiled for an hour until a wax film forms on the water surface. Next, the cleansing process takes place within ½ hour, and after that the wax should be removed.
Is it possible to create a device with your own hands?
To create a wax press yourself, you need to have a fairly large capacity container into which water will be poured and raw materials will be placed. A drum from a washing machine is often used for this. Some beekeepers prefer to use a wooden barrel, but this material will not be cost-effective. It is difficult to clean the inside of a wooden barrel, and constant changes in temperature and humidity will cause the wood to swell. There is a risk that the device will disintegrate into its component elements during operation. In terms of durability and reliability, it is preferable to use a metal vessel. For the squeezing process, a steam piston and screw are used. Water should be poured into the container through small holes that are drilled inside the body. The material used for the filter is denser than flax. It is preferable to take burlap, and even thick gauze. It is almost impossible to repeat Kulakov’s wax furnace at home, since a number of parts can only be made and put into operation at the factory.
Wax press from a gas cylinder
There is another option. Do-it-yourself wax press from a gas cylinder is a non-standard solution, and after a little modification it can become a convenient and inexpensive tank for making a wax press. To create a device from a gas cylinder, you need the bottom of the cylinder for stability; weld the end with a flat sheet of iron. You can weld the supports along the edges so that the tank does not tip over during use. To improve heat retention, the tank will be lined with thermal insulation materials (wood, polystyrene foam, polyurethane foam, etc.). As a screw, craftsmen make a wax press with their own hands and use a car jack. It must be secured using a welded transverse strip of steel, and holes are made in the tank to allow the wax to escape. The making of the device is presented in the video.
Please note that it is better to use jute bags for raw materials, they are very durable. As a last resort, polypropylene bags are allowed (they will need to be changed much more often, after 1-2 spins).
Operating principle of a hand-held device
The manual device is used by both professional beekeepers and amateur beekeepers.
The melted raw materials in durable bags will be placed in a pressing-type apparatus, where, under the influence of a screw, the liquid wax fraction will be gradually squeezed out. The cleaned wax will come out through the holes into the prepared container, and the waste will remain in the bag. When using a manual device, an inconvenience may be the need to tightly tighten the bag of molten merva. This must be done with caution, but the procedure is required - the tighter the bag with raw materials is twisted, the more purified wax the beekeeper will receive at the exit. A manual wax press will differ from a factory wax press or even from a Kulakov machine with less power and productivity. The wax will be of excellent quality, but it will not always be possible to squeeze it dry.
The waste will contain 15...40% wax, and some beekeepers sell the waste at a reduced cost to owners of automatic or even industrial wax presses that can squeeze the wax dry. But for amateur purposes, manual mechanisms are the best choice in terms of cost-quality ratio.
How to make it yourself?
Making a wax press at home is quite difficult. But experienced beekeepers choose different methods for themselves to achieve the goal of making such an apparatus with their own hands. So, the method presented below will give a boost to beginners in beekeeping. Tools and materials can be easily found at the nearest scrap metal point and purchased for little money.
Tools and materials
- Iron pipe with an internal diameter of 25 cm and a height of 70-80 cm.
- Metal disk for the bottom, 20 cm in diameter.
- A thicker metal disc for a press with a diameter of 20 cm.
- Hairpin with ribbon thread 80 cm long.
- A table without a lid, 60-70 cm high.
- 3 metal rods, 2 of equal length approximately 15 cm, the third approximately 20 cm.
- Wooden sticks with a section of 3 cm by 2.5 cm (WxH). The length of the bar will correspond to the height of the pipe, that is, approximately 70-80 cm.
- A thin metal bar, 30 cm long.
- Metal rocker 30 cm long.
- Wooden disk, 18–19 cm in diameter. Used already during the practical use of the wax press.
- Bucket and burlap.
We place wooden blocks along the inside of the pipe at a distance of 1.5–2 cm from each other. We fix them firmly inside. As a result, the diameter of the pipe becomes 20 cm (from one bar to another). We will make the bottom from a metal disk. We weld an iron block about 30 cm long to the disk. Then, by welding the edges of this iron block to the lower edge of the pipe, we get the bottom. So, there remains a hole between the edge of the pipe and the edge of the metal disk. Everything will be squeezed out through it and go into the bucket. The details of fastening are in the video below. We weld iron rods on the sides of the pipe on top. The edge of the rod should be slightly higher than the edge of the pipe. We do this procedure so that in the future it will be easy to “hang” the rocker arm on them. We place two thin iron bars parallel to each other on a table without a lid. We place the pipe vertically between them and fix it firmly. You can additionally take iron corners to secure the pipe in a circle. As a result, part of the pipe must be below the level of the table top. To better understand the described instructions, we suggest watching the following video, which clearly shows all the clarifications and nuances. We make the design of the press itself. We weld the metal disk for the press to a stud with a tape thread. They should be placed perpendicular to each other. The pin is in the center of the disc. Next, screw the rocker arm onto the stud. We fix the metal rod on top (from the other edge of the hairpin), parallel to the disk (which is already placed on the lower edge of the hairpin). This will be our so-called handbrake. We place a bucket for the final product under the table. Place burlap on the inside of the pipe.
How to use?
First you need to boil the dry product - turn it into a liquid mixture. Next, we pour this liquid form of raw material into a device lined with burlap. At this stage, the wax is already beginning to flow into the bucket. After pouring the product into the pipe, cover the raw material with the edges of the burlap, and then press it down with a wooden disk with a diameter of approximately 18–19 cm. We do this so that later in the process we do not stain the oppression parts with wax.
We install the bend on the side rods and turn the handle. The wax is poured under pressure into a bucket from the ducts between the wooden beams inside the pipe. To better understand the entire operation of the constructed device, according to the instructions described above, we suggest watching the video.
Characteristic features of Kulakov’s design
Kulakova's Voskopress is in demand and respected at many apiaries in various regions. A name such as VPK-1 is often found. This design meets all necessary requirements. Thanks to this design, the beekeeper does not have to spend extra time processing the wax, since it is produced clean. According to many beekeepers, Kulakov’s design is a real godsend for beekeeping.
Making such a design with your own hands is quite difficult. The total weight of the device is 12 kg. Capacity – 45 liters of liquid wax. As for the manual wax grinder, its performance is much lower. The kit should include a corresponding heater responsible for heating, which occurs automatically.
Main components and operating principle of a sandblasting machine
According to the principle of operation, sandblasting is similar to a spray gun, which is used to spray paints and varnishes. The main element of the installation is a compressor that creates the necessary pressure. Thanks to this, the sand enters the main line, from where it passes into the nozzle and bursts out. The abrasive hits the workpiece at high speed, resulting in its cleaning.
Main components of sandblasting:
- Compressor.
- Cranes.
- Connecting fittings.
- Dispensers.
- Hoses.
- Electrical cable for connecting to the network.
One of the most important elements is the nozzle. It is made of tungsten or steel coated with boron compounds. This significantly increases wear resistance. Cast iron, ceramics or ordinary steel can also be used. But such parts last much less. For homemade sandblasting, many craftsmen grind a nozzle from old car spark plugs. The cost of the part is very low.
Why do you need a wax press in the apiary?
A wax press means a special mechanism for separating wax from honeycombs. Using the device, you can obtain a pure substance, which contains virtually no foreign impurities, and then compress the solid residues.
Regardless of the configuration and internal structure, the operating principle of the installation is identical. The raw materials are brought to the required temperature and then immersed in the pressing compartment.
Under the influence of centrifugation, the liquid fraction of the initial mass is processed. Clean wax is gradually drained through a chute or through holes into a container, and the remaining components are removed. All parts of the mechanism are washed and dried.
Using a wax press in an apiary is justified due to several advantages:
- Ability to extract pure product of the highest quality.
- Productivity.
- Full automation of the process.