Because the home's foundation is below ground level, the basement is often flooded with groundwater and sediment. The premises become unsuitable for storing property and food supplies. Moreover, large volumes of moisture in the soil create pressure on the foundation walls. Water can violate the integrity of the structure, making its way into the room through the joints of walls and floors and other, even the smallest cracks. Waterproofing and properly done basement drainage will help protect the room from the negative effects of the environment.
Walling
Building walls is one of the simplest tasks: they are simply built to the required height from the selected material.
If the walls are assembled from individual bricks or blocks, then a water-repellent additive must be added to the cement mortar for the joints, prepared from the same cement, that was used to fill the bottom.
Monolithic walls should be filled with the same composition as the bottom.
However, for better waterproofing, it is much more convenient to build walls from blocks, since they can be coated on the outside with special liquid rubber, which causes the material to absorb water and collapse.
It also wouldn’t hurt to cover the finished walls with a layer of waterproofing.
Determining the groundwater level
If in swampy or low-lying areas the close passage of groundwater does not surprise anyone, then flooding of the cellar in dry areas can be an unpleasant surprise for the gardener.
Groundwater is a rather unpredictable thing: it can not only accumulate in lowlands, but also flow down from the mountains or rise to the surface when the snow cover melts.
Therefore, so that the funds and effort spent on construction are not in vain, it is necessary to check their availability in advance.
Finding out the level of groundwater is not at all difficult, and the verification operation must be carried out during the flood period, when they come as close to the surface as possible in order to protect against unexpected spring flooding.
To work, you only need an ordinary drill no shorter than two meters (the average depth of a standard cellar) or, as it is popularly called, a brace and a rod made of any material of the same length.
With this drill, a simple hole is drilled to the maximum depth, which is left for a day, after which it will be necessary to determine the result.
After the required time, a rod is immersed in the hole, the moisture content of which at a certain length from the ground will indicate the depth of the flooding.
If the rod remains completely dry, this is a great success, meaning that the site is completely dry and ideal for construction, however, more often than not, water is present at some level.
When assessing the result, it is necessary to remember that also in a day, like a test well, the pit dug for the cellar will be filled with groundwater to the same depth.
We recommend watching a video on the topic:
Therefore, in order to avoid diving during construction when the water level is too high, you must either choose another location or purchase a special drainage pump (not to be confused with a regular water pump) for the duration of the entire construction.
The essence of the internal drainage system
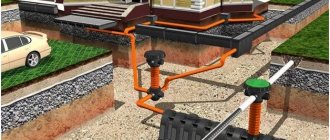
The drainage system is a structure designed to collect and remove excess moisture from groundwater or condensate from the basement of a house.
Scheme of basement waterproofing with equipped drainage system.
Drainage systems can have different design expressions, new variations appear constantly, so that there is a choice in a certain situation. You can invent your own model and introduce amendments to the design if you know the basic elements of the drainage system. Drainage under the house consists of a system of pipes (drains), wells and pumps. Drainage pipes are the basis; they collect excess moisture through holes or joints and take it to the collection point - wells. When natural outflow is difficult, submersible pumps are used, which are placed at the bottom of wells - they force water out of the house. A mandatory principle when installing drainage is the slope towards the wells.
Flood prevention
When a room is flooded, it is important to maintain the integrity of the foundation. Over time, stagnant surface water not only acquires an unpleasant odor, but also threatens to destroy floors and walls. Due to moisture, mold appears and defects occur in the roof. When choosing how to get rid of groundwater in the basement of a private house, they usually choose one of the two most effective methods.
Drainage system
The drainage system consists of a wide pipe, a trench and a deep well. It collects groundwater that enters the room and removes it through natural drainage or a pump. The constructed system prevents liquid from penetrating into the basement and maintains normal water levels in the area. The easiest way to build drainage is during the construction of the basement.
Laid drainage Source ghard.ru
The drainage system operates using a wide pipe with a diameter of at least 90 mm. Holes or oblong holes are made in it through which excess water flows. For proper operation of the system, it is important to comply with the following conditions:
- dig a trench with a slope around and below the basement floor to effectively collect liquid;
- protect drainage with crushed stone or other filter material;
- lay a pipe to the central sewerage system, where the bulk of surface water flows.
The drainage system is installed according to the following algorithm:
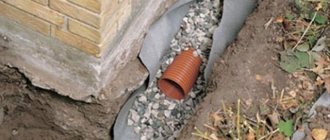
- A trench is dug around the foundation . It should be below the level of the basement floor and on a slope for efficient drainage of water. Nearby, at a distance of 12-15 meters from the building, a deep well is being dug, into which the water flow flows through laid pipes.
- A geofabric sheet is laid in the trench . The structure is covered with a 10-centimeter layer of crushed stone.
Geotextiles and coarse crushed stone in the pipe system Source vival.ua
Making the bottom
The bottom is a very important element, representing both the floor and the foundation of the future cellar. A lot will depend on the correctness of its construction.
Whatever the method of drainage and the level of groundwater (even if there is none at all), the base is prepared in exactly the same way as for drainage pipes: compacted sand, geotextiles, and then a coarse fraction.
Then the formwork is assembled for the future concrete slab, the bottom and walls of which are lined with roofing felt or film, which will not allow water to escape from the cement into the ground during pouring until it hardens.
The thickness of the lining should be about 20 cm, and it must be reinforced, otherwise the floor will crack due to ground movements, especially characteristic of flooded areas.
Pouring also needs to be done at the same time, if possible, so that the concrete sets all at once, otherwise the slab will not be monolithic, will quickly collapse, and will also be able to allow moisture to pass through.
Cement for the floor must be taken of the highest quality possible, for example, M300, and when pouring it, use special additives that provide a water-repellent effect.
The floor in the basement pit will take much longer to dry, so it will be possible to erect walls no earlier than after 28 days.
Video description
For a clear overview of the main stages of creating a drainage system in a private house, watch this video:
You should remove leaves from your gutters in the spring or fall. Blocked ducts cause liquid on the roof to flow down the walls and into the foundation, increasing the likelihood of basement flooding. You can also run the gutter outside the house or install it in a pit. The structural parts are securely fixed with concrete mortar.
Also, to prevent external surface water from flowing into the basement, it is necessary to close the ventilation surfaces and empty the room of property and food. During heavy rains, look at how liquid accumulates around the building and observe the main flow.
In case of floods, the house may be left without electricity. Installing an emergency power system will help. The installed generator must provide electricity to vital equipment for the home: furnace, heating system, refrigerators, drainage pumps, etc. It is important to choose the right place to install the generator; it must be dry and isolated from groundwater.
How to mount and install an iron box for a cellar at a high groundwater level
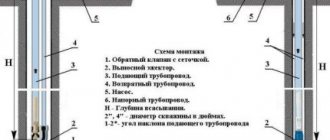
It is not necessary to make a container the entire height of the cellar. It can be made in the form of a trough with low sides, the dimensions of which depend on specific conditions and the extent of flooding. On the sides of such a container there must be fastening wings, by which the “trough” can be removed from the cellar and lowered into it.
Construction of a cellar in places with a high ground level: 1- trough-type box made of sheet steel; 2 – a piece of half-inch pipe; 3 – tap; 4 – mounting wings; 5 – fastening the box to the ground.
At the bottom of the box, in one of its corners, you need to weld a pipe with a tap built into it. This locking element of the structure must be located at the end of the pipe, the height of which must be at least half a meter. Next, they begin to disinfect and paint the box. To do this, it is first treated with orthophosphoric acid, then coated with red lead for iron.
On the outside, additional waterproofing is carried out to prevent rust: a layer of bitumen is applied to the surface of the box. If everything is done correctly and carefully, such a container will last for many years and will not give a single leak.
Upon completion of the work, they begin to lower the box into the pit that was dug to construct the cellar. In conditions of high water and high groundwater level, the pit will always be filled with water. If formwork was not installed along the walls of the pit, the height of the iron container should be greater than the depth of the pit. Otherwise, if the groundwater level is high, the walls of the pit will quickly be washed away by water. The box is lowered into it after opening the tap. It will gradually sink and sink to the bottom, as water will flow into its interior.
After the container is firmly in place, its position is fixed by concreting the outer wings. After this, the water is pumped out using any powerful pump. Upon completion, close the tap. All that remains is to complete the simplest work: make a cellar lid and install a staircase. In a similar way, you can make a viewing hole for a car if the garage is located in an area with a high groundwater level.
https://youtube.com/watch?v=eKg24j5LKg8
External drainage
Along the entire perimeter of the future structure, it is necessary to dig drainage trenches about 40 cm wide, preferably 20-30 cm below the proposed base.
It is necessary to dig trenches at a slight slope so that the water drains faster, and to make digging easier and the bottom does not wash away, you need to dig so that the shovel goes towards the flow of water.
Then, at the bottom of the trench, a compacted sand cushion is created, which is covered with geotextile to prevent mixing of layers.
It is important to remember that some inexpensive types of geotextiles conduct water in only one direction, which must coincide with the direction of water flow in the trenches. Larger drainage material in the form of pebbles, expanded clay or crushed stone is laid on top of the geotextile
Larger drainage material in the form of pebbles, expanded clay or crushed stone is laid on top of the geotextile.
Special drainage pipes made of asbestos or polymers, equipped with holes on top or on all sides, are laid in prepared trenches and connected into a single system.
If there is too much groundwater, then it is likely that at the place of its main exit from the drainage pipe system it is necessary to dig a special reservoir into which it will flow during a flood or after rains, and then seep out of it back into the ground.
The storage tank will also have to be protected from the soil sliding with geotextiles, concrete walls or a large plastic container.
When filling drainage trenches with pipes, the operation is repeated: first sand, then geotextiles, then gravel.
The area under the bottom of the cellar is leveled with gravel. The advantage of external drainage is that it removes water before it reaches the structure, but requires a little more excavation.
When is drainage needed?
To reduce the cost of construction, owners refuse to do drainage, preferring waterproofing.
If the soil on the site is clayey, then moisture will remain in it for a long time.
Savings are justified if:
- Groundwater is below the foundation level.
- The house stands on sandy soils that are highly permeable to moisture.
- There are no swamps or ponds nearby that overflow their banks in the spring.
However, basement drainage is necessary when development is carried out in a risk area. You need to pay attention to the following signs of excess water in the soil:
- The site is sloping or located at the foot of a slope along which precipitation flows.
- There were cases of flooding of the area during snowmelt and seasonal rains.
- The soil around the foundation contains clay or loam, which impedes the distribution of moisture.
A geodetic examination will help determine the type of soil and the need for basement drainage.
Semi-buried cellar
If the groundwater level is very high, and there is little money to build a cellar with your own hands, then it is better to build a semi-buried cellar.
- The top fertile soil is removed, then a hole up to a meter deep is dug.
- The bottom is leveling out. Sand is poured 10 cm thick and compacted well, after which a 15 cm layer of crushed stone is laid and also compacted.
- Reinforcement is laid on the crushed stone and formwork is built.
Layout: semi-buried cellar
- Concrete is poured in a layer of 8 cm.
- Waterproofing is laid on the floor surface and a screed is made.
- The walls are built of brick. Wall height 2 m.
- The roof is made monolithic.
- The walls are sheathed on the outside with extruded polystyrene.
- Additionally, the entire structure is waterproofed with rolled bitumen materials.
- The cellar is filled with earth, leaving only the entrance open. The land can be planted with grass or ornamental plants.
Semi-buried cellar in a summer cottage
Pipe for drainage water
The optimal solution for draining drainage water from the basement is a low-resistance HDPE pipe. Such a tube can be laid without connections. The diameter corresponds to the pump discharge pipe. It is advisable to first lay the pipe vertically to a level equal to the discharge mark. The passage in the basement wall must be made through a casing, carefully sealing the passage with cement mortar and applying a layer of penetrating waterproofing. Outside the building, the pipe is laid in a trench. The laying depth can be higher than the freezing depth of the soil if its slope towards the discharge is greater than 0.005. Open pipe installation is not recommended.
Construction of a monolithic concrete cellar
You can build a waterproof concrete cellar, either semi-buried or completely buried in the ground, as follows.
When the water level drops, we dig a pit for the cellar. If the depth of the pit is more than two meters, then we must install formwork to avoid unexpected ground collapses.
- We level the bottom and lay waterproofing material.
- We pour a layer of sand 10 cm high onto the waterproofing and compact it, add crushed stone on top and compact it tightly.
- We cover the formwork along its entire height with thick film or roofing felt.
Construction of a concrete cellar
- At a distance of 10 cm from the first formwork we install the second. We cover the walls with waterproofing material. We lay reinforcement between the formwork and pour concrete.
- We pour concrete in a circle, gradually increasing the formwork and reinforcement.
- After a week, the formwork is dismantled, the floor surface is reinforced with mesh and filled with concrete. Additional waterproofing is carried out after the concrete gains strength.
You can build a concrete hydraulic lock in a slightly different way:
- a pit is dug, the bottom is leveled and a cushion is made of sand and crushed stone with obligatory compaction;
- formwork is made and 10 cm thick walls and floors are cast from concrete;
Concrete formwork
- after 14 days, the entire surface of the concrete is thoroughly coated with hot bitumen and waterproofing is glued in two layers: along and across;
- The formwork is erected again, reinforced and a solution 8 cm thick is poured.
Advice. Add special hydrophobic additives to the concrete solution, which will give the composition water-repellent properties.
Caisson cellars
Plastic caisson for cellar
Caisson cellars are completely different from concrete ones both in structure and appearance. But this particular option is one of the best when it is necessary to build a cellar on water, or if groundwater passes close to the surface. In this case, the cellar is a box made of plastic or stainless steel with sides and fasteners, thanks to which, subsequently, this same box can be removed from the pit and lowered back.
- In the corner of the box, a pipe with a shut-off valve is placed (welded) vertically.
- The outside of the box is covered with waterproofing (bitumen), and the inside is painted with special paints (for iron).
- Open the valve on the pipe and lower it into the pit. This allows water to fill the box.
- When the box reaches daylight, it is poured with concrete from the outside (to fix it in the ground), then all the water that got into the box is pumped out through a pipe with an open tap, and only after that the tap is closed.
- At the end, a ladder is installed inside the box to create ventilation and a roof for the cellar.
This is interesting: How to build a dugout: we explain point by point
What you will need to install a drainage system
Tools:
- bayonet and shovel shovels;
- level or hydraulic level (water level) with a length of at least 5 m;
- bucket.
Materials:
- drains (you can use PVC sewer pipes with a cross-section of 110 mm and drill holes in them with a diameter of 2-3 mm in increments of 4-5 cm);
- coating waterproofing material based on bitumen or liquid rubber;
- penetrating composition for strengthening concrete (“Penetron” or “Penetron Admix”);
- geotextile for drainage;
- gravel or crushed stone of medium fraction;
- sand (coarse-grained quarry sand, not river sand);
- drainage sewer well (you can use a wide plastic barrel, having previously cut off its bottom).
How to get rid of groundwater in the basement
rlotoffski 2-03-2014, 19:00 21 479 Construction
OK
Groundwater problem and possible basement flooding
- two complex issues that should be resolved at the stage of construction of a country house. Ignoring these points can lead to such undesirable consequences as destruction of the foundation, its subsidence, flooding of the basement and damage to all its contents, as well as the floors of the first floor. How should protective measures be taken to prevent disaster? If the problem could not be avoided, what should I do? You may find the following information helpful.
What causes groundwater to rise?
For example, this could be floods of nearby rivers or an increase in water levels caused by heavy rainfall. Can we influence the first factor? We personally, as summer residents, are unlikely. But we can provide for the fastest removal of precipitation.
How to drain groundwater?
So that groundwater in the basement of a country house does not create problems, it simply should not be there. To do this, it is worth taking protective measures. What should we include? Well, firstly, this is timely drainage and secondly, waterproofing.
Waterproofing is necessary from moisture contained in the soil in any case, even when groundwater flows significantly below the level of the basement floor, without affecting the underground part of the structure. You can treat all concrete surfaces with special water-repellent compounds and seal wall-to-wall and wall-to-floor joints.
Thanks to its special properties, the substance, introduced under pressure using special equipment, quickly fills all existing external and internal voids, hardens, thereby reliably blocking the access to water. You can forget about flooding basements if, in addition to waterproofing, you take care of the drainage system on the site.
Option 1.
Using a drill, we will make several wells with a minimum diameter of 10-15 cm and an average length of 3-5 meters.
As a rule, this length is sufficient to provide liquid access to permeable layers through dense clay layers, which retain water, causing it to accumulate.
As a result, water does not accumulate in the upper layers of the soil, for example during rain or melting snow, but flows freely and deeply through the impermeable layers of the soil. And very quickly! It is recommended to make such wells along the entire perimeter of the basement and in its surroundings.
Option 2.
You can also build a drainage system as follows. First of all, it is necessary to assess the nature of the slope at the summer cottage, which in turn will determine the degree of slope of the pipes. In addition, the larger the diameter of the pipe, the greater the slope. Thus, the independent flow of water in the direction opposite to the site is ensured.
We dig trenches around the perimeter of the house and another one or two in the direction from the house to drain the liquid. They should be about 1.5 meters deep, 0.4 m wide, and the exit slope should be below the basement level. We cover the bottom with waterproofing tecton, then with geotextile (the width of the material should be sufficient to cover subsequent elements of the entire system).
If the basement is already flooded.
If there was no talk about organizing waterproofing during construction, and the basement is flooded, then it is urgent to drain it, and then think about the drainage system.
A properly laid network of drainage pipes will collect and drain not only groundwater, but also melt and rainwater, constantly protecting the foundation and basements from excess moisture. Drain the flooded room using a submersible drainage or fecal pump.
There is nothing complicated in their design or operation, which does not prevent the devices from effectively solving their problems. The choice of model depends entirely on the composition of the liquid in your area, the number and size of foreign particles in it. The drainage pump will do an excellent job with clean or heavily contaminated water.
www.kak-sdelat.su
Become the author of the site, publish your own articles, descriptions of homemade products and pay for the text. Read more here.
OK
Light pit in the basement
For natural lighting of basement floors, windows are often installed below ground level. To do this, recesses are constructed in the ground near the outer wall of the building and light pits are equipped.
Such structures serve certain purposes:
- protecting windows from contamination: debris, fallen leaves, snow;
- additional natural ventilation devices;
- restrictions on space in front of windows.
Pits can serve as technological openings through which various equipment and large items are supplied to the basement;
Light pits are installed both in residential buildings and in commercial and industrial buildings. They can be of various shapes: semicircular, square, rectangular and trapezoidal.
The modern construction market offers a wide selection of ready-made structures for constructing pits.
Pit housings can be purchased from, which is a distributor of the global manufacturer of surface drainage systems ACO (ACO Drain Passavant GmbH).
The products are presented in 14 standard sizes: from 80×60 to 150×200 mm, depth from 40 to 70 mm.
Figure 7. Light pit design.
Table of standard sizes of ACO light pits.
| Pit body depth (mm) | Pit body width (mm) | Pit body height (mm) |
| 40 | 80 | 60 |
| 40 | 100 | 60 |
| 40 | 100 | 100 |
| 40 | 100 | 130 |
| 40 | 125 | 100 |
| 50 | 80 | 80 |
| 50 | 100 | 80 |
| 50 | 100 | 100 |
| 50 | 100 | 130 |
| 50 | 125 | 130 |
| 70 | 150 | 100 |
| 70 | 150 | 150 |
| 70 | 200 | 100 |
| 70 | 200 | 150 |
Ready-made light pits can be installed at different depths. Suitable for windows located at a distance of up to 180 centimeters from the ground surface.
All pit elements are made of plastic and fiberglass. The equipment is adapted to Russian conditions and is capable of operating effectively in all climatic zones.
Water entering the pit is drained through the outlet. Water is discharged into a storm sewer or drainage system.
The pit can be equipped with a basket for collecting debris and leaves, a siphon and a check valve.
Figure 8. Light pit arrangement.
ACO light pits provide ventilation and natural light to basement spaces. Due to the functional use of basements, the usable area of buildings increases. In addition, natural lighting in the basement saves energy.
ACO Self rain inlet made of polymer concrete with a cast iron grate with a galvanized steel edging...
In stock RUR 9,358
Buy in cart
Attachment for ACO Self rainwater drain to increase height without grille
In stock RUR 3,135
Buy in cart
ACO Self rain inlet made of polymer concrete with a stainless steel grate with galvanized edging...
In stock RUR 20,958
Buy in cart
Universal corner element ACO HEXALINE plastic (90 g).
In stock 550 rub.
Buy in cart
All about basement drainage in a private house
The dangerous location of the site in places where there is a large accumulation of water inevitably dictates the need to arrange drainage in the basement in order to avoid flooding, as well as to prevent destruction of the foundation.
When is basement drainage required for a private home?
Basement drainage in a private house is needed in the following cases:
- at a high level of groundwater;
- the location of the site on a slope, which leads to the accumulation of sediment on it;
- if the spring flood affects the area of the land plot on which the private house is located;
- the soil is clayey or loamy;
- There is a body of water near the land plot (pond, lake, river, streams, etc.);
- if reeds and willows grow nearby.
If these circumstances are not identified, this does not mean that basement drainage is not needed. Savings by owners of private houses on the drainage system can lead to the problem of basement flooding.
Even if there is very little water in a given room, this can lead to the formation of mold and fungi.
These formations affect the integrity of the walls and basement floor, and lead to the destruction of the foundation.
There are times when you have the choice not to drain your basement. But they are more the exception to the rule.
And they are used only for the purpose of initial savings when building a house. Subsequently, drainage should be installed outside and inside the basement.
So, these cases include:
- groundwater is located half a meter below the basement floor level;
- the land plot where the house will be or is already located is located on an elevated area where precipitation does not accumulate;
- not near bodies of water.
However, such situations are quite rare. Therefore, drainage from the basement is necessary and mandatory.
External drainage around the foundation
The external version of the basement drainage system can be presented in two varieties:
- wall-mounted, which is located at the base level and is not suitable for dilapidated houses.
- annular.
The wall drainage system is done like this:
- As soon as the foundation hardens, the wall areas need to be insulated and impregnated with moisture-resistant agents.
- Trenches are dug 60 cm deep.
- You need to choose a place for the drainage well. It is selected relative to the natural slope of the land. In this case, this well must be located at least 10 meters from the foundation of the house.
- The bottom of the trench must be covered with geotextile with one edge supported on the wall. This is necessary to freely cover the bedding in the groove.
- Next, 10 cm of crushed stone is poured onto the geotextile. You can use gravel.
- Taking into account the slope, perforated pipes are laid in the trench. The entire system of these elements is closed into a single highway.
- The top of the pipe should be covered with a layer of crushed stone and coarse sand.
- The remaining edge of the geotextile is placed on top.
- After this, the pit must be covered with a layer of soil.
The second option - ring drainage is done like this:
- Trenches are dug. Their size should be 40 cm wide. And the depth is set lower by half a meter than the foundation of the house.
- Slope noted
- 20 cm of expanded clay, crushed stone or gravel is poured into the trench.
- After this, geotextiles are applied.
- Perforated pipes are laid out in grooves into the general contour.
- Inspection drainage wells must be provided at corner locations.
- Next, another layer of geotextile is needed.
- After this, the entire trench should be covered with waterproof gravel. You can also use sand.
The ring drainage system is suitable for all houses, including dilapidated ones. It is installed at a distance of one and a half meters from the base of the foundation.
Internal drainage in the basement
Before installing drainage inside the basement, the room must be drained and the walls must be covered with a waterproofing compound. Otherwise, the principle of laying pipes is very similar to that used outside the house.
Installation of internal drainage in the basement floor.
- First, the layer of earth is removed to the base of the foundation. Trenches are made in concrete using a jackhammer.
- Drainage pipes and inspection wells are installed around the perimeter of the room.
- The pipes are covered with crushed stone or gravel.
- A concrete screed is being made.
- Waterproofing and a new floor are placed on top.
- Water is collected in a tank and removed outside using a pump.
- If geotechnics allows, excess moisture is drained into the sand cushion under the foundation.
Internal drainage can be combined with external drainage. This method is effective when groundwater in the area rises and floods the basement, bypassing the ring drainage.
To install a drainage system, you can use the services of specialists or do the work yourself, which will cost much less. In the second case, the cost of drainage will be equal to the cost of the building materials involved.
Basement drainage device
The first thing that needs to be done is to develop a project that will determine the depth of the pipes, their diameter, and the location of water drainage (reclamation ditch, storm sewer, river, etc.).
Once the project is in hand, it is necessary to dig a ditch on a slope. It is worth considering that the initial drainage must be installed when pouring the foundation. This method is considered optimal, because excavation costs are minimized. If this is not possible (for example, the house has already been built), drains must be laid at a distance of no closer than 1.5 meters from the outer edge of the foundation. With this layout, subsidence of the house during work is practically eliminated.
The depth of the trench for pipes is determined by the calculated slope. Depending on the intensity of the discharged wastewater, it varies from 2 to 5 mm per 1 meter. The bottom is equipped with a filter layer (to remove excess) or a waterproof base. The differences are determined only by geodetic tests, which approve one or another method.
Tecton or geotextile can be used as a waterproofing material. The main tasks of such fabric are to protect the basement drainage from silting and premature failure. Being an excellent filter material, geotextiles support the filtering properties of crushed stone and sand. Next, pipes are laid for drainage, after which the entire structure is again wrapped with overlapping geotextiles. Sand, sawdust, and turf are poured on top. Water passes through sand or sawdust as if through a filter. This eliminates the risk of clogging drain pipes. Thus, it can be argued that the throughput of pipes is affected not only by the frequency and size of perforations, but also by the properties of the filter materials.
Inspection wells are installed in the corners of the house, and a pumping well is installed at the lowest point of the system. An additional element to prevent the penetration of moisture into the basement is the installation of a clay castle at a distance of 0.5-1 meter from the wall of the building.
After the installation of the basement drainage is completed, you should start waterproofing the walls, floors, corner joints and surfaces inside the basement. To do this, you will need a waterproofing substrate and a self-expanding waterproofing cord designed to hermetically seal the corner joints of the walls and floor. They reliably prevent moisture from penetrating into basements.
Installation of drainage systems
The drainage of a private house is a closed system of perforated pipes connected by inspection wells to control patency. The pipes are laid in the ground at an angle towards a large tank or sewer. This device allows you to concentrate moisture and remove it away from the foundation.
Diagram of the water drainage system from the foundation.
The main tank is periodically drained using a pump. The collected water is used for household needs or removed outside the site.
Modern drainage pipes and tanks are made of polymer materials. They are easy to transport and install, even if the owner arranges the site with his own hands. Plastic pipes are produced in different lengths and diameters. Materials are selected depending on the type of soil and the amount of moisture that needs to be removed throughout the year.
The perforated pipes that make up the drainage can become clogged with silt and soil particles. To increase the service life of the system, the pipes are sprinkled with crushed stone and wrapped in geotextiles. This filter traps large particles and directs water to the drainage holes. At the request of the home owner, more expensive materials can be used, for example, coconut fiber.