It’s not often that you have to make a sewer well with your own hands. As a rule, such a serious undertaking occurs during the construction of a new house. Or, perhaps, you bought yourself a ready-made house or cottage.
The first moment of happiness has passed and now you need to think about how to make your purchase more comfortable and suitable for a normal life. It is very important to create comfort that it has a water supply and sewerage system.
It is not for nothing that when they write in advertisements for sale “a house with all amenities” or “a house without amenities,” they mean the presence or absence of the above-mentioned systems.
If there is no water supply or internal sewage system in the house, you will have to do some serious work.
The first step is to decide how to make a sewer well.
Of course, you can hire specialists who will perform all the necessary calculations and work. But this is a rather expensive pleasure, so many people decide to make a sewer well for a dacha or a country house with their own hands.
Well
Where to begin?
Of course, before starting construction, it is necessary to draw up a detailed diagram of the sewage system of a country house. Only under this condition can you avoid mistakes and not do the same work several times.
At the initial planning stage, the following activities are carried out:
- It is necessary to determine the location of the drainage well. It is better if it is a platform that is located below the level of the house.
- Now you need to determine the point where the downhill sewer pipe will exit the house.
- Next comes the stage of drawing up a diagram to scale indicating the dimensions of the pipes. In this case, you need to calculate the number of connections. The quality of the system depends on how accurate the measurements are. In addition, at this stage it becomes clear what materials and in what quantities need to be purchased.
Sewerage construction: progress ↑
Sewage system diagram
If a private house previously had a sewer system and work is required to update or supplement it, then you can use previously laid paths.
If the existing arrangement is not suitable for solving new problems, then the entire installation is carried out again.
- To install sewerage into a private house, it is necessary to open the floors. There are some cases where this procedure can be avoided: if there is enough space under the floor for a person to move. However, when old houses were built, the floors were laid directly above the ground, so they had to be spread out to do the work.
- Next, they begin digging a trench into which the main sewer pipe will be laid. To determine its depth, you need to dig a hole under the foundation and measure the resulting distance. If it exceeds one meter, then this depth of the pipe will not allow it to freeze in winter. If necessary, the trench is deepened; if for some reason this is not possible, then insulation is carried out at the point where the sewer pipe exits the house.
- Then they continue to dig a trench on the street right up to the drainage well, while making a slope that will ensure unhindered flow of water through the pipe. To determine the slope angle, the following rule is followed: for every ten meters of the route, the depth of the trench should increase by half a meter.
- A layer of sand, the thickness of which should be at least 15 cm, is poured onto the bottom of the trench section located on the street. This will allow the pipe to take a comfortable position and withstand the pressure of the soil poured on top.
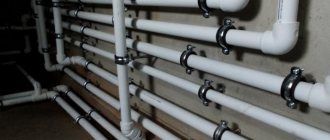
- Afterwards, the pipes are laid in the trench, joining them together with special connecting elements, which provide for the connection to them of secondary pipes coming from other drain sources. Plastic pipes are produced in two-meter and three-meter lengths, so choose those that are more convenient for installation in a given private house. Their thickness must be at least 100 mm. In places where blockages are possible, experts recommend installing inspections. Through these special removable plugs in the pipes, the pipe is cleaned using a steel cable.
- Internal sewerage wiring in a private house is carried out using special adapters connecting sewer pipes of different diameters. After all, the thickness of the outlet from the washbasin, kitchen sink, shower stall is 50 mm.
Types of wells for sewer systems
Before you figure out how to make a sewer well, you need to find out what types of these structures will need to be included in the diagram.
The system may include the following types of wells:
- Perepadny;
- Observation;
- Turning;
- Cumulative;
- Filtration.
It often happens that one structure is built to simultaneously perform several functions.
As a rule, the structure of a sewer well consists of a working chamber and a neck covered with a hatch. What design features do certain types of these structures have?
If the sewerage pipeline is long enough, then you cannot do without the installation of inspection wells. Their functions are to provide monitoring of the system and ease of cleaning in case of blockage.
Advice! According to the rules, the distance from the sewer outlet from the house to the first inspection well should not exceed 12 meters. But it should not be placed closer than three meters from the foundation. Subsequent inspection wells are located at a distance of 15 meters from each other.
A rotary well is installed if it is impossible to ensure a straight line arrangement of the pipeline. At the place where the pipe turns, a well is installed that can simultaneously be used as an inspection well.
Construction of a differential well for a local sewerage system
Drop well
A drop well is necessary if, due to the natural topography of the site, it is impossible to lay sewer pipes with the required angle of inclination.
As a rule, the design of a sewer drop well differs from the usual one in the presence of a drop.
However, if the height difference between the pipes in such a well is less than 400 meters, then you can do without installing this additional part. You can assemble the lowering for the drop well yourself.
It consists of a straight cross, a pipe and an elbow. If plastic pipes are connected, the elbow should be at 45 degrees; when using cast iron pipes, the required angle is 135 degrees. The lowering is attached to the wall of the well using clamps.
Advice! The presence of a cross in the upper part of the lowering is a prerequisite, since otherwise it will be very difficult to clean in case of blockage.
Storm drainage in a private house
Storm drain
Storm drainage helps avoid flooding of the site and buildings on it in the event of precipitation. The rainwater drainage system consists of:
- Roof drains. These are gutters that collect moisture from precipitation and drain it into the sewers through funnels at their ends.
- Water paths on the ground or in concrete. From the drainpipes, water enters these funnels and flows through them to the collection point. Such paths should be made at a slight slope so that water can easily drain
- Places for collection and disposal of sedimentary water
There are three types of storm drainage:
- Ground . Ditches, ditches and drainage areas are located above the surface. It is mainly used if the volume of precipitation is small and there is an architectural opportunity to install a sewerage system
- Underground . With an underground system, all drainage elements, except home ones, are hidden under a layer of soil
- Combined . When combining systems, some of the structures are left above the ground, and some are hidden underground
When you have selected the type of storm drain, you can begin its construction.
Installation of a rainwater drainage system
Storm drain
1 Project stage. Storm drainage can be designed separately from the main one or together. It is necessary to roughly understand how much water will need to be diverted from the site. You can go to the websites of meteorological services and look at statistics for past years.
2 Next, buy the necessary materials and you can begin installation. Install roof gutters first. Next, install water paths and grooves. It is better to do this simultaneously with laying and paving paths on the site.
Water paths can be laid in trenches. Dig a trench 10-15 centimeters long. Place small crushed stone or decorative stone at the bottom. Lay pipes and channels on top. Next, the system is tested.
Sewage also requires inspection and maintenance. Below we will consider the maintenance of water and sewage systems.
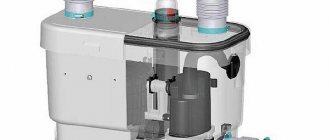
Drain well device
Drain well made of rings
The drain well serves as a reservoir for the accumulation and primary treatment of wastewater . When choosing a place to place it, you must adhere to sanitary rules, according to which the drain well is located at a distance of at least five meters from the foundation of the house.
It is extremely important to locate it as far as possible from the water intake point. For clay soils, this distance should be more than 20 meters, and for sandy soils - more than 50.
As a rule, the design of a sewer well is a round or square tank, the bottom of which is filled with concrete.
It is extremely important to ensure that the bottom and walls of the tank are as tight as possible to prevent untreated wastewater from seeping into the soil.
The simplest drainage wells must be periodically cleared of their contents using a sewer truck. More advanced systems based on stepwise water purification (septic tanks) require cleaning much less frequently.
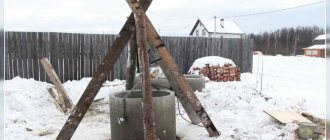
Sewer wells are usually made of brick, collar stone, concrete or reinforced concrete. In the latter case, it is convenient to use ready-made well rings.
The internal surfaces of a brick well are plastered with cement, and the bottom is covered with concrete. The outside of the well is insulated with a thick layer of oily clay. The well cover is made of reinforced concrete. As a last resort, you can use boards made of tarred wood covered with roofing felt.
Very often, owners wonder how to install a sewer system with reinforced concrete wells? Indeed, the use of ready-made well rings made of reinforced concrete significantly speeds up the construction process.
To build such a well, you first need to prepare the foundation. To do this, first make a “pillow” of well-compacted crushed stone, which is then filled with solution.
Rings are installed on the finished base; depending on the depth of the well, from 3 to 5 pieces are required. To install the rings, you will need to use equipment, since they are quite heavy. To achieve tightness, the seams between the individual rings are coated with a solution.
Sanitary standards
When deciding whether to make the well airtight or leave a certain number of holes for wastewater outlets, it is worth familiarizing yourself with GOST standards. Sewage wells with more than 1 m3 of drainage must be sealed. Otherwise, it is necessary to equip a sufficiently high-quality cleaning system.
If the standards are not followed, the bacteria that live in the soil will not cope with water purification. Sewage will enter the soil and agricultural crops.
According to established standards, if you need to build a sealed well, it should be concreted. It also needs to be coated with a sealant. However, it is worth considering that to create a sealed well you will need to prepare a lot of consumables. It is also worth taking care of private wastewater removal.
The most popular option is to build an installation with a filter bottom. Through it the purification of impurities will be carried out.
Attention! If you decide to build a well with a septic tank, you must meet certain requirements. For example, the depth is calculated according to the soil type.
Drop, nodal and rotary type wells are completely sealed. It is also worth remembering that when draining domestic water into the sewer, you should not install a filter well. This is due to the drainage of chemicals and detergents. Repair of sewer wells after proper installation is extremely rare.
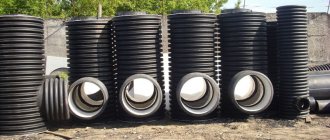
Ready-made plastic wells
The simplest option for arranging a well is to install a ready-made plastic blank . Such wells had not previously been used in Russia, since the plastic could not withstand severe frosts. But with the invention of new types of plastic, this problem was solved.
When choosing this option, the scheme of sewer wells will be extremely simple. Plastic tanks are available in different diameters and with ready-made holes for pipe connections.
The construction of plastic wells is no different from the usual reinforced concrete ones. But installing them is much easier, since they have less weight and ready-made holes for pipes. While in reinforced concrete rings these holes have to be punched using a special tool or manually.
Plastic wells have the following advantages:
- Tightness. This circumstance ensures the environmental safety of using such products;
- Strength and resistance to aggressive environments;
- Ability to withstand temperatures from plus 70 to minus 50;
- Easy to install and install.
Materials
So, now I will try to list the main materials for production that are generally accepted and from which such wells can easily be built.
- Concrete rings.
In my opinion, the most durable material of all. 70% of all sewer wells are made from them. However, the disadvantages are a lot of weight, it is difficult to do it yourself, you need to pay money to the team. And given that you can’t drive my car “on its back,” this option was absolutely not suitable for me.
- Brick.
Of course, you can lay out brickwork; such pits were also made before. BUT there are also many disadvantages here: - it needs to be brought, moved, in a cesspool you need to somehow make a foundation for the masonry (which is very difficult given the muddy bottom), then lay out the masonry of the well (which would be difficult for me, an inexperienced “brick maker”), after that everything should dry, etc. In general, there is a lot of hassle, again, you can’t handle it alone, so this option was also dropped.
- Plastic pipes or special wells.
This option was also considered. Somewhere I spotted large plastic pipes (it was necessary with a diameter of approximately 700 mm to 800 mm), or buy a ready-made version for the sewer system. These are now on sale, it seems like this is the solution. Easy and most importantly forever! However, here again an unpleasant surprise awaited me. A linear meter of such a pipe costs about 6,000 rubles! And I needed to go deeper at least 2 meters - 12,000 rubles, another minus is that such pipes had to be transported from another city to order, and this, as I was told, would wait about 1 month, and summer is leaving! The rains are just around the corner. I’m generally silent about ready-made wells, here they are all practically for septic tanks, and they cost a lot of money, the simplest one that I managed to find was 17,000 rubles, and again it’s heavy and I can’t carry it to the site alone! In general, I also refused!
- Old tires.
It can actually be done; my neighbor on my line has such a well. A big plus is its reliability; rubber resists water well and practically does not collapse (although nothing lasts forever)! It seems like a solution, but this also has its own disadvantages - if you make it from passenger car tires, then the diameter turns out to be very small! If you make them from trucks, everything is fine, but here’s where to find them, I needed about 7–8 pieces, and even used ones cost money, and not small ones, many take them for reuse (welding on rubber), so “loosely lying around” " I did not find. The solution was also eliminated due to the difficulty of finding material.
- Do it yourself . I thought for a long time, the decision to make a “cylinder” myself, from a sheet of stainless steel, was ripening in my head - just bend it and install it, it turned out to be quite cheap, but the steel should be about 1 mm thick, so I began to go around and select sheets. Again there was a minus, if you buy a sheet and bend it lengthwise, then the diameter of such a design turns out to be very small! If you bend it across, there was more, but it was also not enough! Then somehow these sheets would need to be secured. It's a chore!
As you can see, it was really difficult, I struggled with the choice for a long time - I racked my brains, it seemed like an easy task, but the distance of the site from the road and the narrow path did their job. I was ready to agree to a large plastic sewer pipe - expensive, but what to do with it! But then fate gave me a gift.
Filter well device
The last element of an autonomous sewage system is a filter well . It receives water that has undergone preliminary degrees of purification in the first chambers of the septic tank.
When planning to build a filtering sewer well for a summer residence, you need to know that its design is similar to a storage device, but has its own characteristics.
So, when constructing the base of a well, concrete is not laid in a continuous layer, but along the perimeter of the shaft, leaving the soil in the center of the future well free. Thus, the edge of the lower ring of the well will rest on the concrete base, and the bottom of the well will not prevent water from penetrating down.
For additional filtration, drainage holes are made in the lower compartment of the well, placing them at a distance of 50-100 mm from each other. When building such a well from brick, gaps are left during laying.
The bottom of the well is covered with a meter-thick layer of filter material - crushed stone, gravel, broken brick. The same backfill is made outside along the perimeter at the bottom of the well. The inlet pipe is located at a height of 500 mm from the upper edge of the backfill, which is covered with a water barrier board so that the falling stream does not erode the layer of filter material.
Advice! There is no need to cut the inlet pipe flush, otherwise the incoming water will flow along the wall, which will lead to erosion of the backfill. It is better to make this pipe protrude 50-80 mm into the well.
Installation of rings under a reinforced concrete septic tank
The user's septic tank is a classic and well-developed scheme of concrete rings combined into two wells connected by overflows.
The first well has a sealed bottom, the second is a filter well, without a bottom, will be perforated and sprinkled with crushed stone.
This septic tank scheme “works” only when the groundwater level is low and the soil has good absorption capacity. With a high groundwater level, the second well will soon be flooded with groundwater with all the ensuing negative consequences.
This article describes how to make a surface septic tank from Eurocubes at a high groundwater level. According to the user, at first he wanted to buy “GOST” concrete rings. After searching, I found the following suggestions:
- concrete ring with a diameter of 1500 mm - 3840 rubles;
- concrete ring with a diameter of 700 mm - 1580 rubles;
- transition cover from a ring with a diameter of 150 cm to a ring with a diameter of 70 cm - 3800 rubles;
- bottom for a concrete ring – 5300 rub.
The last amount (the bottom for the first sealed well) did not fit into the planned budget at all. Having asked the manufacturer why the bottom is so expensive, the user found out that the bottom for a ring with a diameter of 1500 mm has a diameter of 2000 mm. Hence the high price.
PavelTLT
At first I wanted to fill the bottom of the first well with self-mixed concrete, but I decided to look for more. As a result, I found “non-GOST” rings and a bottom that suited me, which are made by local small manufacturers, at an affordable price and of good quality. In the end I bought:
- bottom with a diameter of 1800 mm - 1 pc. — 2400 rub.;
- ring with a diameter of 1500 mm, a height of 900 mm – 2 pcs. — 3100 rub.;
- ring with a diameter of 1500 mm, a height of 600 mm – 2 pcs. — 2500 rub.;
- cover “15” with a hole for a ring with a diameter of 700 mm – 2 pcs. — 2400 rub.;
- ring with a diameter of 700 mm, a height of 600 mm – 4 pcs. — 1250 rub.;
- polymer-sand hatch – 2 pcs. — 1250 rub.
Delivery of the rings by truck with a manipulator and their installation cost 3 thousand rubles.
When installing the rings of the first well, the joints were coated with cement-sand mortar, and fragments of flat stones were inserted between the rings of the second (filtration) well (for drainage).
The picture below shows that the depth of the pit and the trench are the same, and the top of the ring protrudes by the planned amount.
The user left the installation of the hatches “for later.”
To check the wells, PavelTLT, using “12” fittings, welded a 3 m long ladder along which you can go down to inspect the system.
The next stage is the completion of the filtration well and the final hydraulic check of the assembled sewer system.
How to disguise a sewer well?
Of course, a sewer well for a dacha is a necessary thing. However, it does not decorate the site in any way, especially since the place for its location is chosen not for reasons of beauty, but in accordance with construction and sanitary standards.
As a result, it may turn out that the well ends up in the most inappropriate place in the garden. However, it’s not difficult to find a way out here - you just need to decorate the well, turning a disadvantage into an advantage.
The only condition is that when coming up with decoration methods, you need to take into account that access to the well must be ensured at any time. For the rest, you can rely on your imagination.
You can “cover” the well with the help of decorative shrubs, you can make a removable flower bed, or install a light, collapsible wire frame on top of the well and plant climbing plants around it. You can place an artificial boulder on top of the hatch, since it is hollow inside; moving it to another place, if necessary, will not be difficult.