The lack of a central water supply near the site forces homeowners to solve the problem on their own. One of the options for arranging an autonomous source is digging a well.
Unlike wells, the construction of such a water intake will not require expensive tools and expensive driller services. At the same time, the labor-intensive digging technology requires compliance with certain rules. Studying the intricacies will allow you to build a well yourself using a simple entrenching tool.
What do you need to know before you start digging a well?
Before you start building a well, you need not only to stock up on tools and materials, but also to find a suitable place on the site. We wrote about finding a place for water for a well here. It is important to foresee all the unpleasant accidents associated with this process and choose the optimal time for carrying out the work.
When is the best time to dig?
In order for the well to always be filled with water, it must be built at a time when the groundwater has dropped to its maximum depth. This period usually occurs at the end of summer and ends in late autumn. It is possible to dig a couple of weeks after the onset of frost. If work is carried out in the spring, then during drought and winter the mine will be empty due to a drop in the groundwater level.
All excavation work must be completed before the start of the rainy season.
On quicksand, the optimal time for excavation work is considered to be mid-winter. During this period, unstable soil layers are strengthened under the influence of negative temperatures.
What risks might there be?
Before starting work on digging a well, it is worth assessing and eliminating the risks associated with it. If you take care of your safety in advance, you can take the necessary precautions.
- When lifting the soil upward, the rope holding the bucket may break. Its contents will spill out onto those at the bottom of the shaft.
- It happens that during the process of digging a well, gas begins to escape intensively inside the trunk. It is able to displace the air necessary for breathing. If a person works alone, he is not always able to notice a gradual increase in gas concentration. As a result, fainting may occur. In a very deep mine, there is sometimes little oxygen simply due to its difficult supply from the surface.
- Passing quicksand requires you to be careful. In such conditions, it is better to work with a partner who is ready to lift the partner upstairs in an emergency.
Safety precautions
Digging wells will be safe if you take steps to protect yourself in advance.
- Knowing the structure of the soil and the characteristics of the aquifer in the area where the work will be carried out, it is necessary to calculate the likelihood of the presence of perched water, quicksand, and gas emissions.
- If the aquifer consists of very loose rocks, a wooden floor is made at the bottom of the well while the work is being carried out. A gravel filter is placed on top of it.
- It is necessary to inspect the condition of fastenings and ropes daily before descending. It is better to work in a helmet.
- To check the air quality in the mine, a bucket with a candle is lowered into it. If the fire does not go out, you can go down. If it goes out, you need to pump air from the surface.
We dig only downwards and by hand
Another method of digging is “closed”, without the use of equipment, although it will not be possible to do without a winch, because the weight of the rings is more than 500 kg (depending on the size).
Work progress
The progress of work is also quite predictable:
- First we mark the circle for the future placement of the well , which should also be 20 cm larger than the ring.
First, a shaft is made for the first ring, and then the well is dug
- We dig a round hole so that the first ring can be immersed in it, but not completely - let up to 10 cm remain above the ground (the standard height of the rings for these purposes is 90 cm, so the hole should initially be 70-80 cm deep, take into account subsidence of soil under the ring).
- We install a winch over the pit.
There is no need to bring in a crane to lower the rings; the cost of digging a well can be significantly reduced if you create such a device yourself
- We feed the first ring, attach it to the rafters and lower it into the hole.
- To say that carefully leveling the position of the ring is an understatement - the position should be simply perfect both vertically and horizontally; here, in no case can you do without a level.
- We install the second ring on top and concrete its connection with the first.
- We deepen the hole in the center by 80 centimeters.
- We continue to remove the soil closer to the edges of the hole so that the rings go down spontaneously under their own weight.
Helpful advice! It is generally accepted to extract soil this way - from the center to the edges. But we advise you to change tactics, if the ground is hard, we advise you to change tactics and start work from the place under the ring, gradually moving to the center. It will be more convenient, as experienced craftsmen say.
- Work on building up such a stand of rings continues until water appears below.
The cost of digging wells largely depends on the timeliness of all work - it is very important not to delay concreting the joints
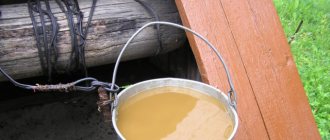
- The first water, along with the lowest soil, is removed and while work is suspended for 12 hours, so that the well is filled with water.
- After this time, the bottom is cleared again.
- It is likely that such cleaning will have to be repeated more than once until persistently penetrating so-called “water veins” appear clearly at the bottom of the mine.
- When this is noticed, the well is left for 20-30 hours.
- Then we pump out the water, clean the bottom and proceed to organize the bottom of the structure in the form of a multilayer structure of the following type:
- a layer of fine sand;
- a layer of coarse sand;
- a 30-centimeter layer of shungite, a mineral that has very high absorbent and disinfecting properties; it has long been used in the construction of wells;
- then lay a layer of medium-sized pieces of coal;
- on top - quartz crushed stone;
- even higher - silicon chips.
Helpful advice! The given six layers at the bottom of the well are an ideal design option; always strive for this. But if you want to save money, speed up and simplify the process, you can combine the two lowest layers without sacrificing thickness, just like combining the two top ones. As the topmost layer, we recommend adding quartz deposits in the form of medium-sized rounded stones.
Water and stones are the two main reasons for the situation when rings get stuck while digging a well
How to choose the right place?
The first step is to find where a suitable aquifer is located on the site.
The water in the well should be at a depth of at least 10-15 meters so that dirt does not get into it from the surface of the soil.
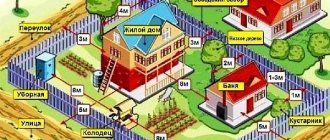
Minimum distance between objects on the site
For a water intake structure, it is necessary to choose a location where the risk of contamination by wastewater is eliminated. A farm yard with pets, garbage and compost pits, landfills and septic tanks should be located no closer than 20-30 meters from the future well, and located below it in terms of relief.
You should not install a source closer than 5 m from a residential building, so as not to disturb the stability of its foundation.
How do you know when to stop digging?
According to the technology, soil is removed inside and below the ring. Because of this, it settles under its own weight. The soil that is removed will serve as a guide. Usually the water is between two waterproof layers. This is often clay or limestone.
The aquifer is usually sand. It can be small, like sea water, or large with interspersed small pebbles. Most often there are several such layers. As soon as the sand begins to flow, it means that we should expect water soon. As soon as it appears at the bottom, you need to dig for some more time, removing the already wet soil.
If there is a strong influx of water, you can stop. The aquifer is not very large, since there is a chance to go through it. In this case, you will have to dig until the next one. The deeper, the cleaner the water will be, but how much deeper, no one can say for sure.
After this, the well is pumped - a submersible pump is installed and the water is pumped out. Thus, it is cleaned, deepening it a little, and in addition its flow rate is determined. If you are happy with the speed at which the water is rising, you can stop there. If not, you need to quickly go through this layer. The soil continues to be washed out with a running pump until this layer is passed. Then they dig to the next aquifer.
If you are satisfied with the incoming water and its quality, you can build a bottom filter. It consists of three layers of stones of different fractions, which are laid on the bottom. This is necessary to ensure that as little silt and sand enters the water as possible. For this filter to work, you need to place the stones correctly:
- The largest stones are placed at the very bottom. These are quite large cobblestones. But in order not to greatly reduce the height of the water column, it is better to use the flattest stones. They need to be laid out in two layers, and they do not need to be laid closely, but with small gaps.
- The middle fraction is poured in a layer of 10-20 cm. Their dimensions should be such that pebbles or stones do not fall into the gaps of the lower layer.
- The topmost shallowest layer. Pebbles and small stones in a layer of 10-15 cm. They are necessary for the settling of sand.
With such a mound of fractions, the water will be cleaner: first, the largest inclusions settle on large stones, and as you move upward, smaller ones become smaller.
Types of shaft wells
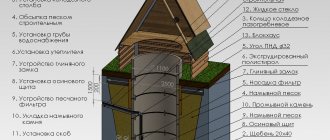
Mine wells are considered the most common. They are designed for groundwater layers lying no deeper than 25 m. Structurally, the source consists of the following main elements:
- Header.
- Trunk.
- Water intake part (mine support).
Depending on the location of the support, wells are divided into the following types:
- Imperfect. The support does not rest against the waterproof underlying layer. Water enters the shaft through the side walls and bottom. During the construction of this type, the free-flow aquifer extends no more than 2/3 of its height. Deeper depth of an incomplete well does not change the flow rate.
- Perfect. In such a well, the water intake part rests on a water-resistant layer. The influx of liquid occurs only through the side walls.
- Perfect with a sump. In this type of well, the shaft support is equipped with an additional water tank. This makes it possible to deepen the mine beyond the aquifer into the underlying aquifer and thereby increase production. Drinking supplies with this water intake are significantly greater than in the previous one.
Do-it-yourself well at the dacha
Well assembly
Concrete well option
Such a well is assembled in two ways. First, a round or square shaft with a diameter of 1.25 m is dug out and the rings are lowered into it one after another. This option is suitable for stable soil. If soil shedding occurs, then we use the second option.
We dig a shaft to the height of one ring and lower it. We dig underneath.
The ring lowers itself. When the lowering occurs to the next level, we install the second ring. Let's dig in again. The rings themselves easily sink under their own weight. We repeat the procedure until groundwater.
For better immersion of the rings, it is worth purchasing a shoe that is equipped with a cutter along the lower edge. You should only work with a level. To ensure that the rings fall smoothly, leave a groove at the edge of the ground and use a board. To more conveniently lift soil and water, use a tripod.
When the well is assembled, we make the bottom. It is best to use crushed stone. It will help to avoid soil contamination of water. We seal the seams between the rings with linen rope. We cover the ropes with a solution of sand, liquid glass and cement.
Wooden well option
Installing a well from a log house is very difficult and expensive. Before starting the main work, we dig a hole with a depth of average human height.
Then we follow the planned plan. Larch crowns are installed at the bottom of the resulting pit. The prepared log house is assembled in order. The joint gaps must be treated with a sealing agent using tow.
This must be done for the lower layers up to 3 m high. After laying out the first part, you need to dig out the earth from under the middle of the beams of the initial structure. When all the earth has been cleared, spacers are installed and the earth is cleared from the corners of the well.
Next, we will fix the safety ropes to the base of the log house in the well. To do this, you can use a winch. The spacers are removed, as a result of which the structure begins to sink into the well under its own weight. If distortions occur, you can tap the top with a sledgehammer to level the structure.
Using this method, the frame is built up from above and lowered to the bottom. This way you can install the log house to a depth of 6 meters. At this level, the structure is jammed with spacers, which are made 50 cm longer. They need to be inserted into the prepared recesses from below.
The appearance of increased humidity in the air and soil indicates the proximity of an aquifer. The construction of a well from a log house does not provide for any strengthening elements. It is very strong and durable.
Apart from the fact that over time the water will become bitter.
Protecting the well from surface water
We dig a pit at the level of the first two rings. Using liquid bitumen mastic, we waterproof the outer surface of the rings. Using any foamed polymer, we create thermal insulation. We fill the foundation pit with clay (clay castle).
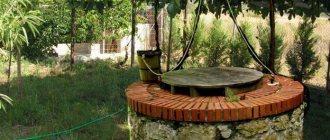
Appearance
It is better to equip a well made of concrete or wood after a month, when the soil has settled. A blind area is made a meter from the well. It is filled with concrete or compacted with crushed stone.
We also build a canopy to prevent debris from falling into the water. If you are using a water pump, it is ideal to cover it with a tight lid, leaving only room for the hose. If you use a bucket, then there are many options. You can choose any one you like.
Increased frost resistance
To insulate and avoid water freezing, you should build an insulated house.
If you have a pump and hose, then it is better to remove it from the street during severe frosts. In the case of a piped water supply from a well, it is worth considering the depth to which the soil freezes. When laying, insulate the pipes.
This way you can protect yourself from unnecessary hassle associated with freezing. It doesn’t matter which well you decide to build at your dacha. Follow the instructions and safety precautions. You will succeed.
https://youtube.com/watch?v=jlGxI-7byYY
Required Tools
Before carrying out excavation work, you will need to prepare the following tools:
- shovels with shortened handles (bayonet for digging, scoop for excavating rock);
- ladder;
- pickaxe and crowbar for breaking dense rocks;
- buckets and rope for lifting soil;
- a wheelbarrow for removing the extracted rock from the well;
- slings or ropes for installing reinforced concrete rings;
- tripod with winch;
- construction spirit level or plumb line to control the vertical of the shaft;
- drainage pump;
- protective equipment - gloves, safety rope, safety helmet, goggles.
In addition, for self-construction of wells from reinforced concrete rings, you will need to purchase the following materials:
- Reinforced concrete rings.
- Sealing compound or mastic.
- Mounting brackets.
- Medium or coarse gravel is necessary for the formation of a bottom filter.
Considering the weight and large dimensions of reinforced concrete rings, it is better to construct wells together with an assistant.
Safety at work
Constructing a well manually is considered hard and labor-intensive work that requires compliance with safety precautions. The following rules will help preserve the life and health of workers:
- All types of work performed in the well shaft must be carried out wearing a protective helmet. This will protect your head from possible falling earth, stones, and construction equipment.
- Use only high-quality and high-quality equipment - winches, blocks, buckets with reliable handles, strong ropes and cords, carabiners with reliable fixation. Constantly monitor his condition.
- When lifting buckets of soil, do not stand under the load. You should stick to the opposite side of the shaft.
- You cannot stay in the mine for a long time due to harmful conditions - cold, dampness, the possibility of methane entering, which are detrimental to the health of the worker. When performing work, it is necessary to observe a shift schedule.
Only by following the correct work technology and safety precautions can you quickly and efficiently dig a shallow well yourself.
Digging methods
Depending on the soil in the area where the work will be carried out, construction can be carried out either open or closed.
- Closed type. If the soil is loose, with sand, the pre-dug shaft will crumble. In such cases, the well is dug from under the rings, which, sliding along the walls of the trunk, fall down under their own weight.
- Open type. If the soil contains a lot of clay, then the walls of the mine will be strong and there is no need to worry about deformations. In this case, an open construction method should be used. First, they dig a shaft, then install rings, fasten them with staples, if they do not have locks, and cover the seams with mortar.
Technology with alternate installation of rings
Before starting construction, you need to take a responsible approach to the choice of rings. Not only the taste and quality of water, but also the durability of the entire structure depends on them. Concrete elements with interlocking connections are considered the best. They are easier to install. If a well is built in an area with moving soils, such rings will not move relative to each other.
The entire process of digging using a closed method is represented by the following stages:
- Using a winch and tripod, the first ring is lowered to a given place.
- Then they undermine it, forcing it to sag under its own weight.
- After the first ring has sunk by 1 m, a second one is placed on top of it, connecting to the first in a lock or fastening with staples.
- Cover the seam with cement mortar.
- The remaining rings are installed in a similar manner. The latter is installed when water first appears.
- At the bottom, a filter of about 50 cm is made from stones and crushed stone.
- As waterproofing, the top three rings are coated with bitumen mastic on the outside and wrapped with roofing felt.
- A clay castle 2 m deep and 1 m wide is made around the top part.
- A gate and a roof are placed on the head.
The advantages of the closed method of digging wells with reinforced concrete rings include the following:
- Visual control of installation.
- Timely identification and elimination of errors.
- High-quality sealing of rings.
- Preventing soil from collapsing in a mine.
disadvantages :
- Limited space in the trunk.
- Helper needed.
Technology with installation of rings to reach the aquifer
Open digging involves excavating soil to the full depth of the well. Upon reaching the underground source, reinforced concrete rings are lowered into the shaft. The method is suitable for dense, stable soils that are not prone to crumbling.
The procedure for performing excavation work is as follows.
- Preparing the template. From two slats equal to the diameter of the shaft, a device is knocked together in the form of a cross.
- Markings are made on the soil surface and the fertile layer is removed.
- Next, the soil is excavated and lifted.
- Having dropped 1 m, they install a tripod with a lifting mechanism and continue excavation work.
- As the trunk deepens, its size and vertical position are regularly monitored using a template and plumb line.
- Once the aquifer is reached, well rings are lowered into the shaft, connecting them with brackets. The joints of the first two rings are sealed with special compounds.
- To settle the trunk by one or two rings, water is pumped into the aquifer, followed by removal of soil masses.
- The last ring of the trunk is installed so that it protrudes 0.5 m above the soil level.
- At the final stage, the gaps between the concrete shaft wall and the soil are filled and compacted.
- At the top of the shaft, a waterproofing castle is formed from clay, on top of which crushed stone is laid.
- The construction is completed by installing the gate and roof.
The main advantages of the open method include:
- Unlimited mine depth.
However, this method is not without its disadvantages :
- It is difficult to control the quality of installation and the tightness of joints.
- There is a high probability of the mine walls collapsing.
- The method is not suitable for constructing wells on unstable soils.
- The large weight of the structure does not allow adjusting the position of the concrete rings inside the trunk.
- There is a high probability of contamination due to loose filling of the space between the external wall and the ground.
Foreground: Safety
Well digging technology begins with choosing a location and taking initial measurements for the selected frame material
First, you have firmly decided on the level of your aquifer. For a well, it should be no deeper than 20 meters.
Otherwise:
- it is better to stop at drilling a well, for which you will need to issue a passport;
- in addition, if the well is deeper than 20 meters, you will also have to issue permits for it; less than 20 meters does not require documents.
Secondly, let’s say right away, we advise you to take a very simple and much safer path - digging a well in an open way. Another thing is that this method is not always applicable from the very beginning, and it is almost never possible to limit yourself to open digging until the very end; you still have to dig down with shovels.
Digging sewer wells is no different from digging wells for water, but the absence of water greatly simplifies the whole process
Open way
One inconvenience is that a well is being dug here with an excavator. If your soil is too heavy or there is enough area around to turn it into a plowed field, then the open method will be both much faster and much safer.
- from the surface itself to the aquifer, all work is carried out first with soil, which there is no fear of collapsing;
- the depression created will have the shape of a funnel, but its depression, already in the water, should be at least 20 cm larger than the reinforced concrete ring, which will lie at the very bottom;
- using a winch, lower the first ring down and level it as carefully as possible;
- We lower all the others sequentially onto this ring for the well from above, leveling them and filling them with soil on the sides;
- before backfilling, the seams between the rings are concreted both inside and outside;
- if all work is carried out sequentially, special sealants are used to work on the seams, and the backfill is thoroughly compacted and done with coarse sand with the addition of crushed stone, then the algorithm will ultimately lead to the very top, to the head of the well;
- upon completion, you only need to concrete the joint between the uppermost ring and the ground.
Regardless of what layers of soil you encounter when digging a well, all work must be carried out with the utmost precision and accuracy from the very beginning.
Helpful advice! Compacting the outer soil around the rings is very important, but we do not recommend doing it too vigorously. In any case, avoid putting excess pressure on the joints between the rings. The displacement of the rings relative to each other can happen completely unexpectedly, but correcting this error may require too much money, especially if the joint is not the last one.
How to get past quicksand when digging a well?
Quicksand is a mixture of sand, sandy loam, colloidal and clay particles with water, hermetically sealed in the soil and under pressure. The thickness of such a layer, lying at a depth of several meters from the surface, can be 2-10 m. A sign of the presence of quicksand can be considered the sudden appearance of failures in the mine shaft, its slow or rapid filling with a fluid plastic wet sand mass.
Why can't you touch quicksand?
Quicksand have enormous destructive power. The viscous, mushy sandy mass can very quickly completely swallow a person inside the mine.
Under no circumstances should wet sand be pumped out. This will cause a change in pressure inside the quicksand. Due to disruption of soil stability, multiple soil collapses inside the well shaft are possible. Filling a mine with quicksand is somewhat similar to the movement of liquid in communicating vessels. It stops only when the pressure in the cavity where the sand-colloid mixture was located is balanced with the pressure in the barrel.
Quicksand protection
A well with quicksand can be completed if a concrete ring of slightly smaller diameter than the shaft is lowered immediately into the shaft. Further work must be carried out with a gradual settling of the wall elements, digging them from below.
The joints, in order to avoid ruptures at the seams and deformation of the shaft, must be reinforced with metal staples.
You can use removable movable formwork to make a monolithic pouring of concrete.
In order to provide timely assistance to the diggers if necessary, you need to work as a team.
What to do in case of a landslide?
When a powerful quicksand is formed during digging, the mine collapses almost instantly. It is impossible to overcome such a cavity in the ground even with the help of industrial drilling. It is better, if the area of the site allows, to try to dig a well in another place.
The only way to pass such quicksand is to build an Abyssinian well. A galvanized steel pipe of small diameter with a point at the end and holes on the sides at the bottom is driven into the ground. As you deepen, additional pipe sections are screwed into the coupling connection. At the end of the work, connect the pump.
Preparing for work
As the old saying goes: victory loves preparation. This fully applies to such a labor-intensive process as digging a well. Errors in the initial assessment of the scope of work and changes in plans during the process lead to additional expenses, delays, or even simply the creation of a deep hole without a functional purpose. To avoid them, you should prepare well.
Aquifer assessment
To avoid senseless waste of money and effort, before deciding how to dig a well in a dacha with your own hands, a hydrogeological study of the area is carried out. The best option for exploration is drilling. However, then it is better to start creating a water well. A less expensive and faster option is a simple survey of the owners of neighboring plots where they have their own wells.
General diagram of aquifers and design solutions used to obtain water Source remont-rz.ru
Before you dig a well with your own hands, you should find out the answers to the following challenges:
- Depth of the water surface during periods of floods and droughts.
- How many meters should be dug for a water intake source and the reasons for this decision.
- Doesn’t water have a “habit” of leaving the source if the summer is exhausting with heat and does not bring rain for two or three weeks?
- What kind of soil was extracted from the well: clay or sand.
- During the work, did you have to lift up a large stone or break a boulder with a chisel?
Usually, there are no problems with how to dig a well with your own hands. Dacha plots are located mainly on flat terrain, where pronounced relief structures are not observed. Wells dig into easily mined sediment.
Assessment of geological conditions of the area
On flat terrain, soil layers lie predominantly horizontally. The water between them is almost at the same level at different points. In other words, the geological conditions will coincide with the state of affairs of the neighbors.
Classification of groundwater according to conditions in the earth's crust Source banyabest.ru
The assessment involves taking into account possible deviations due to groundwater movement. For example, if there is a ravine with a spring at a distance of several kilometers. The values will differ greatly if you plan to dig a well on a hillside. Additionally, in this case, natural drainage significantly reduces the volume of water received due to its outflow from the slope.
Verkhovodka deserves special attention. This is a small accumulation of groundwater located at a depth of 2-4 meters from the surface. They try to avoid it, and if they are “lucky” to meet it, then block it. Its water abundance and level of occurrence periodically change, in addition, the perched water is very often polluted by various domestic wastewater.
Guidelines for safe operation Source www.ddm-stroy.ru
Location determination
When considering how to properly dig a well in order to get the maximum possible and the minimum of problems, we pay attention to the following points:
- Eliminate contamination. The well must be removed from potential problem points in the dacha. Domestic and household structures, cattle pens, cesspools, compost heaps contribute to water pollution - if they are located within a radius of at least 20 meters. If you plan to dig a well with drinking water, such objects should not be located nearby at all. Alas, for small plots of land this is not always possible.
- Optimal location. The distance between the foundation of the house and the well being created must be at least 5 meters. The water intake structure draws in water like a whirlpool, and with it soil particles. There is a constant process of replenishing the drained reserves, which in the long term leads to erosion of the foundation if the well is close to each other.
- Reduce costs. If you plan to install a water supply system, it is recommended to make the route as straight as possible - it has a positive effect on the ease of maintenance and the amount of money spent.
Optimal installation of water supply to the house Source vodoprovod-klin.ru
Well design features
For traditional wells, the maximum depth is 30 meters. Digging to great depths is difficult and dangerous, and often impractical. If the water lies deeper, it is better to stop at the well. Provided that the depth allows, it is advisable to make a post with a margin.
Concrete rings are most actively used as a material for walls and at the same time as their preferred shape. But, regardless of the final choice, the structure must have a water intake part (provides the flow of liquid), a trunk and a cap crowned on top. To understand how to make a well in a country house, you need to understand the functional purpose of the different parts:
- Water intake part. This is the name of a section of a mine located in an aquifer. This element ensures that liquid enters the source.
- Trunk. Part of the structure from the water surface to the surface of the earth. It is created to strengthen the walls of the source and protect it from possible ground collapses.
- Header. This is the part of the well located above the surface of the water. The base rises by 0.7-0.8 meters. A crane or gate is used to manually lift the water. To provide protection from negative atmospheric influences, a well house is built.
Schematic representation of a well Source i.mycdn.me
Depending on the characteristics of the water intake part, the structures are distinguished:
- Imperfect. The water receiving part is immersed in the water-saturated layer by approximately 70% of the capacity of the water carrier. The well is not installed on the stop. The flow of water is ensured both through the walls and through the bottom of the structure.
- Perfect. The water receiving part is completely buried in the aquifer. The base of the shaft is supported by a waterproof layer. The influx of water comes only through the side walls.
- Perfect with a tank. It is envisaged that the water intake part rests on the waterproof layer. The supply comes through the walls. The water receiving part is supplemented by a reservoir made in the aquifer located under the aquifer.
Basic digging tips
How to maintain vertical digging?
To control the verticality of the excavation, plumb lines are attached to the top of the shaft. Before using the next ring, you need to check the verticality of the barrel using a level.
How to level a shaft?
If the rings are already in place completely, the barrel cannot be leveled without removing them. But during the work, when only the last 1-2 m of the shaft are bent, you can dig up the bottom of the shaft in the right place and settle the entire structure, loading it from above.
Where to use clay?
To prevent the well from becoming polluted by water runoff from the surface, it is customary to make a clay castle 2 m deep and 1 m wide outside around the top of the trunk, starting from the surface. This formwork will protect the well shaft in winter from damage associated with soil heaving in the freezing zone.
What to do if you stumble upon a stone or slab?
During excavation work, you may encounter obstacles in the form of stones and even slabs. You can try to break pieces of loose rocks such as limestone and shell rock with a sledgehammer or a hammer with a hand chisel. If the boulder is large and the rock is hard, you will have to call drillers.
When can you use a well?
Immediately after the well is built and the time limits set for hardening the cement mortar are met, water is pumped out of it to 3/4 of its volume. Sometimes this procedure must be repeated several times before the liquid becomes clear. The well is now ready for use.
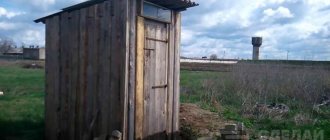
Sewage wells
These wells are important elements of external sewerage. Therefore, such a problem as digging a sewer well is quite simple to solve. You can do this yourself, without resorting to the help of specialists, whose services are quite expensive.
There are the following types of sewer wells:
- Inspection wells, which serve to view and monitor the operation of the entire sewer network and clear blockages. They are constructed only with a significant pipeline length.
- Rotary wells are installed at pipeline turning points and can also serve as inspection wells.
- Drop structures are installed in places where pipes drop due to the complex terrain of the soil.
- Nodal. The construction of such water units is not possible everywhere. How to understand that a well is dug in the right place? This is quite simple - they are built at the distribution points of node systems.
- Storage and filtration wells used for wastewater. They are designed for cleaning and accumulation. They are installed at the end of the pipeline system in places where there will be convenient access for a sewer truck.
The material for sewer wells can be concrete or reinforced concrete, brick and rubble stone, plastic or wood. The work process is no different from digging a storage facility for drinking water, so it is better to figure out in advance the question of how to dig a well.
Basic mistakes when digging wells
- If the location for water intake is chosen incorrectly, the water in it may not meet drinking standards or may be completely absent.
- The use of low-quality materials will cause the fragility of the structure.
- Due to poor connections in the seams, the rings often come apart, the trunk is deformed, and the well is filled with perched water.
- Turbid water mixed with sand enters the well if the problem with quicksand was not resolved during its construction.
If you want to make a good well with your own hands, you can dig it yourself, guided by the above rules. It is important to remember that such work does not tolerate half measures. If you cannot devote enough time and attention to it, it is better to turn to specialists.
Well made of concrete rings
So, if the place for the future well has been chosen, the materials have been prepared, you can begin the actual digging process. How to properly dig a well from concrete rings? It must be said that this work is difficult, because the weight of the rings is quite decent. It is difficult to install them manually, but possible: for this you should use, for example, a manual hoist suspended on a tripod made of wooden beams.
The initial stage is digging a hole
The construction process occurs as follows:
the initial stage consists of digging a recess along the diameter of the concrete ring. The bottom should be horizontal and level enough for the ring to fit there without tilting. Then you need to dig the ground inside the ring, transporting the soil to the surface using a bucket. Under its own weight, as it is dug, the ring will begin to fall; when the first concrete ring has deepened enough, the next one needs to be installed on top;
if the rings no longer lower under their own weight, this means that a deviation from the vertical axis has occurred. In this case, it is necessary to place a shield on the top ring, on which you then need to throw many bags of soil and stones. After some time, the rings should lower, then you can continue digging;
When water appears, the digging process continues, and the water is pumped out by a pump. When the water arrives too quickly and water-bearing veins are already visible, digging should be stopped;
Together we roll the rings for the well
Insert the rings into the recess
The last ring came at the right time
- Well-washed, large stones are placed at the bottom of the well, and a layer of washed gravel and crushed stone is poured on top of them. Such a filter will prevent sand from entering the water. And around the upper ring it is necessary to make a clay castle, it will protect the well from water from the surface;
- Before using it for its intended purpose, the well must be pumped, thus flushing out the water-bearing veins. When 8-20 hours have passed, washing can be stopped;
If you take this work seriously and responsibly, the question of how to dig a well will not seem overwhelming and overly complicated. And the fact of personal participation in the digging process will always please.
Finding water for a well: practical recommendations
These recommendations are based entirely on physical properties. Those who do not trust signs can perfectly use them.
We put glass jars
Using jars to find water
So:
- In the morning we place glass jars of the same volume throughout the area and turn them upside down to the ground;
- The next day in the morning we check exactly in which places condensation has appeared. Most likely, there is an aquifer there.
Lay out brick or salt
In this method you will need what is in each pulp:
- We choose the moment when the soil dries out after the rains;
- Take dry salt or red brick, broken into small pieces;
- Pour the prepared material into an unglazed clay pot;
- Then you need to weigh everything and record the readings, then wrap it in gauze and bury it half a meter into the ground;
- We wait a day, take out the pot, then remove the material and re-weigh it. A significant difference in mass indicates that the aquifer lies very close. It is quite possible to use silica gel as a modern moisture accumulator.
Using a barometer
Its essence is as follows. If there is any water source nearby, the depth of the water can be determined by the change in pressure.
So:
- You will need an aneroid barometer. From the physics course we remember that every 13 meters the pressure drop is 1 mm Hg. Art.
- It is necessary to measure the air pressure in two places: near the shore of the reservoir and in the immediate place where the well is being dug.
- The calculation is quite simple. Let's assume that the pressure drop is 0.5 mmHg. Art., therefore, the water is at a level of 6-7 meters underground.
Exploration drilling
This is the most thorough and reliable method, which involves drilling for exploration purposes. Guaranteed results are required. An exploration well is drilled at a depth of 6-10 meters.
Test drilling to find water
- For this you need an ordinary drill; you can use a homemade one, if you have one.
- Once you locate the aquifer and the presence of water becomes obvious, stop drilling. Everything is ready, the last question remains to be solved - a well or a borehole?
Attention: The selection of the method or method for searching for water does not affect the service life. Both the well and the well will serve you approximately the same - a couple of decades, but with careful operation and appropriate care. Please note that a well is preferable if the water is deep and the soil is full of stones. Stones will significantly complicate the work of the drill. If the water layer is located at a depth of 10-15 meters, then a well is more suitable, especially for small volumes of water consumption. If deeper, make a well.
Indication using aluminum or wicker frames
These are perhaps the most ancient methods; they were used by monks to look for sources of water and to choose a place to build monasteries.
Method No. 1
Searching using frames
So:
- We find two pieces of aluminum wire 40 cm each and bend one part 15 cm long at a right angle.
- We insert them into a hollow tube, which is best cut from an elderberry by removing the core.
- Make sure that the wire rotates freely in the tube.
- We put a tube in each hand and walk around the area. The ends of the wire should be turned left and right. If a water-bearing vein is discovered under your feet, the wires will converge towards the middle. If water passes to your left or right, the ends of the wire will turn in this direction. Once you pass the aquifer, the wire will again turn in different directions.
- Having noticed the place where the aluminum meets, walk again, but choose a direction perpendicular to the previous one. If the location of the closure is confirmed, you can start digging a well there.
Method No. 2
Finding water using a vine
So:
- It is necessary to cut a branch from the vine, on one trunk of which there are two forks located at an angle of 150º to each other.
- We take it home with us and dry it.
- At the dacha, we place the ends of the branches in both hands so that the trunk is located in the middle and points upward.
- We walk through the area. You should look for water where the trunk bends towards the ground.
Aluminum with a vine gives a signal that there is water in the ground. However, this may also be perched water, which is not suitable for a well. Therefore, having found places with high humidity, preliminary drilling should be carried out to find out how deep the aquifer is.
And you shouldn’t think about how to find an old well, which may already have been in this area. Underground water courses change over time. So get together and decide the place yourself. There are instructions. All the work can be done entirely with your own hands and without incurring costs. On our website you can find many articles on this topic.
Types of designs
Essentially, any such structure is made in the form of a deep shaft reaching an underground aquifer. The quality of drinking liquid directly depends on the depth of development. Closer to the surface there are deposits of H2O, suitable exclusively for technical purposes (irrigation). Due to the large amount of contaminants that fall underground with rain and melted snow, this water cannot be drunk. Often even after additional filtration.
Abyssinian
For its construction, a shallow mine (only 5-10 meters) is developed in the place where water resources occur. The casing column is a perforated pipe. Through small slits, a liquid medium enters inside. To lift it, use a hand pump or surface pump. The life-giving moisture from this type of well cannot be called pure. For domestic use, installation of a cleaning system is required.
Shakhtny
Perhaps this is the most common type of structure used by summer residents in their suburban areas. The mine is made to a depth of up to 15 m. To build the source, rings made of reinforced concrete or plastic (a fairly popular material recently) are used. With the help of special equipment, building such a structure will not be difficult. However, you can do without it. Design features make it possible to carry out work with only shovels, crowbars and containers for liquid and soil.
Key
Typically, a landowner decides to equip such a structure when there is a place on his land where water comes to the surface—a key. This happens when an aquifer encounters an obstacle (hard rock) in its path and rises to the top. It is very convenient when there is a spring at your summer cottage. It takes very little money and time to develop it.