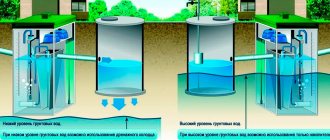
For many owners of suburban areas, groundwater is a problem. Located close to the surface, they pose a danger to foundations, basements and cellars, destroying them or preventing them from being fully used.
In the photo - surface drainage of the site
It is necessary to distinguish:
- a permanent groundwater horizon, which should be taken for granted, since you cannot do anything with it;
- perched water, which is formed from precipitation or melting snow. You can minimize its harmful effects with your own hands, quickly and without special financial costs.
However, to resolve the issue, it is necessary to understand where the perched water comes from in order to develop a mechanism for getting rid of it. Without knowledge about the nature of the soil and its features in your area, it is almost impossible to do this.
Why does the site need drainage?
In simple terms, water that falls on the ground in the form of precipitation seeps through the soil and goes into aquifers.
The speed of this process is influenced by two factors:
- groundwater level (GWL);
- soil type.
If the soil is sandy or loose, the water will drain quickly. And if it’s clayey, then slowly. At the same time, it accumulates in the so-called lenses, increasing the ground level. In this case, problems cannot be avoided.
If the soil is not clayey, the water drains quickly. And there may not be any problems with high water. However, often the waterproof layer is located close to the surface. In this case, although not constantly, the water will also stagnate on the surface.
In addition to problems with dampness and flooded basements, high water poses another danger. This is an increase in the heaving of the earth. As you know, in winter liquid freezes and expands. Moreover, such pressure is created inside the soil that it can destroy the foundation of the house. Therefore, the sooner the issue of drainage of perched water from the site is resolved, the better. It is for this purpose that drainage wells are drilled on it.
Groundwater
How drainage works
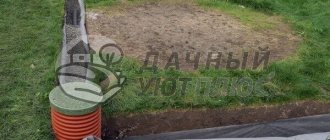
The main task in the fight against perched water is to help it pass the waterproof layer as quickly as possible. This is exactly what drainage wells do. The operating principle is very simple. A hole is made in the ground to a depth of several meters and through it moisture leaves the soil.
The well must meet two conditions:
- It must completely pass through the first waterproof layer of soil;
- You cannot reach the aquifer.
Those. When the clay layer is passed through, the drilling work ends. If you reach the aquifer, moisture from the site will flow into it. And in a place with it, all the dirt washed away from the top layer of soil will fall into clean water. Which will not be very good, because... Wells and drinking wells are fed from these layers.
LiveInternetLiveInternet
Groundwater is a rather big problem for many summer residents. And for the foundation, cellars and basements, they are generally very dangerous, since they either do not allow them to be fully used, or they generally threaten to destroy the foundation and, as a result, the entire building.
We must distinguish between a constant level of groundwater, with which we cannot do anything, and we must simply take it for granted and carry out construction taking into account their availability. And the so-called “overflow” - groundwater formed as a result of melting snow or rainfall. We can deal with them, or rather minimize their harmful effects, quite quickly and inexpensively. First of all, we need to understand the mechanism of their formation, then the method of getting rid of them will be clear.
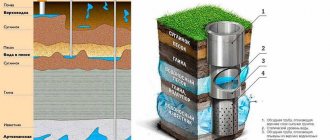
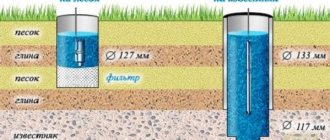
As is known, soil is usually a very heterogeneous structure of alternating more or less permeable layers. Permeable soils include sandy soils (sandy loam), and waterproof soils include clay soils (loams). Water penetrates into the soil from above, in the form of melt or rainwater (frame 1 of the picture). The topmost layer of soil (soil) is usually permeable and water drains quite quickly down to the first impervious layer. And after that it begins to accumulate in underground “lakes” and so-called. "lenses". (frame 2) Sometimes the reserves of accumulated water in these lenses are so large (hundreds and thousands of cubic meters) that they are mistaken for permanent groundwater and placed in wells and boreholes. But more often it is only a few cubic meters of water, or even hundreds of liters. Water from these gradually drains down and is distributed over the lower layers of permeable soils. Thus, flowing from “floor” to “floor” of waterproof layers, water flows into permanent groundwater.
Those who have predominantly sandy soils on their site experience the effects of high water literally 1-2 months a year, during intense snow melting or heavy rainfall. But even during this time, water can cause a lot of trouble, washing away the foundation or flooding the basement. For those whose soil on the site is quite waterproof, with a high clay content, high water poisons life all year round, and even in winter. Soil saturated with water is extremely heaving (when water freezes, it increases its size by 9%), which makes construction extremely difficult.
Therefore, in order to save yourself from problems with high water, it is necessary to carry out drainage work, i.e. ensure guaranteed and rapid drainage of perched water in a certain place. This is usually done using drainage wells (Frame 3). By “piercing” several water-resistant layers by drilling out the soil with a drill, we thereby open a direct and quick path for perched water from the very bottom. It is a mistake to think that you need to drill “to the water.” There is no need to drill until the water is reached. Since a permanent aquifer serves as a source of drinking water, sending unfiltered perennial water into it can spoil the quality of this water. And although it is now universally not recommended to use this water without filtration, there is no point in aggravating the situation, and it is necessary to drill to the minimum required depth. After all, having pierced even one or two upper water-resistant layers, we have entire horizons at our disposal, ready to accept high water. It is the very top water-resistant layers that create problems for us, and sometimes it is enough to pierce only them to get rid of the perched water.
It is believed that a so-called hydraulic cone with an opening angle of approximately 90 degrees (45 degrees from the vertical axis of the well). Those. The closer to the well, the more efficiently it drains the soil. In fact, all this is quite arbitrary, since everything greatly depends on the structure of the soil, the location of waterproof layers in it, etc. But as a starting point for calculating the number of drainage wells, their location and frequency, depth is quite suitable. The diameter of the well does not matter much, since a well with a diameter of even 100 - 150 mm will ensure the removal of a huge amount of water. And if there are a lot of wells, then even more so.
To construct a drainage well, we will need the most readily available materials: large crushed stone (it is better to wash it) or expanded clay; some polypropylene fabric (garbage bags are made from it) or non-woven material such as “Agril”, “Spunbond”, fiberglass, etc.; stapler with staples, a thin wooden strip as long as the depth of the well. Of course, you can also use a special drainage pipe, incl. homemade. True, this makes the work somewhat more expensive, but it makes it much easier.
First of all, we drill the well itself using a drill. Its depth is determined by the needs and structure of the soil. For example, in my case it is about 3-4 meters. At this depth, most of the clay waterproof layers on my site end. Although permanent waters begin only at a depth of 12 meters. But in this case, it is important to provide quick access to multiple permeable layers capable of receiving and distributing a large amount of water.
After this, it is necessary to make the so-called. "stocking". The fabric is needed to protect the well from rapid silting and being covered with fine sand. Of course, it can also be sewn on a sewing machine, precisely in the form of a pipe, with a diameter slightly larger than the diameter of the drilled hole and the same length. But I don’t have a sewing machine, so I decided to staple the polypropylene fabric to a long wooden strip. The lath in the well will rot over time, of course, but its only purpose is to give the fabric the shape of a pipe until the well is filled with crushed stone.
If you use a rigid drainage pipe, then of course there is no need to fill it with anything. Backfilling a well with crushed stone aims to preserve the shape of the well and serves as a kind of casing pipe. The water permeability of crushed stone (not the stones themselves, but the structure) is absolute; water leaves through the crushed stone instantly. Therefore, we carefully fill the well with washed crushed stone to the very top.
All that remains now is to cover the top of the well with some kind of waterproof cover (for example, a piece of PVC film) and cover it with a small layer of earth. The well will not be visible, but will do its job for many years - drain rain and melted groundwater down, where it will no longer cause harm to your basement or foundation.
In conclusion of the article, I would like to note a situation that is often encountered on forums: “We have solid clay, it’s difficult to drill, water is close,” etc. Firstly, nothing can be said unambiguously until you have done a test drilling of the soil to a depth of at least 2-3 meters. Maybe behind a 2-meter layer of clay sand begins. Secondly, clay is really difficult to drill. But at least one test well must be drilled in order to KNOW the true state of affairs. Thirdly, there are many indirect signs indicating the level of permanent groundwater. So write to the forum and we’ll discuss it.
Drainage and drainage wells on the forum
Konstantin Timoshenko © 04/23/2010
Well placement diagram
Naturally, one drainage well per site is not enough. Moreover, they can be divided into several types:
- to lower the groundwater level;
- to protect foundations;
- to protect the root system of trees from excessive moisture.
To protect buildings, drainage is located near the foundations, throughout the rest of the site - in places of greatest accumulation of moisture. To avoid excessive drying of the soil, holes located in gardens and vegetable gardens are made smaller in depth.
Typically, the number of points required for a site is calculated based on the depth of the wells. It is assumed that the area effectively covered by one point is equal to the area of a circle whose radius is equal to the depth of that point.
For example, if there is a drainage with a depth of 6 m, then its working area is calculated using the formula for the area of a circle. Those. it is equal to 38m2.
Well layout
A drainage well will help solve the groundwater problem
Many owners of suburban areas are faced with a groundwater problem. If the amount of precipitation is more than the earth can absorb, the water can pose a danger - it can flood the foundation of a house, basements, cellars, which will subsequently lead to their destruction or inadequate use. Regions that are prone to such flooding must be provided with drainage structures. A drainage well is one of the methods of drainage, thanks to which excess moisture drains down from the surface. Drainage is a method of drying a certain area by collecting and draining groundwater into natural (rivers) or artificial (canals) depressions.
There are several types of drainage well:
- horizontal - a well in the form of a system of connected gutters in a horizontal arrangement (trench);
- vertical - a well with a special drainage pump (well);
- combined - in the form of horizontal drainage in connection with wells that absorb excess moisture.
A drainage well for drainage is an excellent way to avoid flooding and erosion of building foundations, dampness in basements and protect trees in the garden.
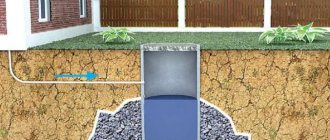
An absorption well is a drainage structure designed to drain water-bearing surfaces by draining water from them by gravity through the well to a special depression location. Water absorption wells perform the functions of a water reduction structure. They help to avoid flooding and protect the room from dampness.
In order to make an absorption well for drainage, you must:
- study the soil throughout the area and determine the depth of the soil layers capable of receiving water. It is important to remember that if the surface is clay, then the structure must be made quite deep.
- The structure must be built in a place far from various buildings.
- The structure must be greater than the freezing depth of the soil.
- It must be taken into account that the shallower the depth of water absorption of the soil, the larger and wider the structure should be.
- It is also important to create a filter system below, which can be created from gravel or crushed stone.
The main function of this design is to transfer collected water into the ground at great depths.
Well drilling
There is no specific figure that would be suitable for any site and determine to what depth it is necessary to drill. Therefore, for each specific case, it is determined by location, usually 4-10 meters. Although there may be more.
Ideally, exploratory drilling is carried out first, on the basis of which a soil map is drawn up and drainage points are calculated.
For drilling, you can use special equipment. This option will be the fastest, but not the cheapest. Therefore, for self-drilling, the following methods are most often used:
- Rope-percussion.
- Hand drill.
If the point is made close to buildings, it is not recommended to use the rope-impact method. Vibration from impacts can damage the foundation.
Percussion drilling
In this case, a drainage well with high groundwater is made using a bailer. The bailer is a piece of thick-walled pipe 1-2 meters high. At the bottom there is a valve for collecting soil, at the top there is a fastener for the cable, and on the sides there are windows for removing soil.
To drill wells, the bailer is suspended on a cable and dropped into a hole in the ground. As a result of the impact, soil is forced into the pipe, after which it is removed and cleaned.
It is most convenient to use a lifting mechanism so as not to remove the bailer from the pit manually. Because You need to make a lot of effort to get the difficult pipe, the weight of which is added to the mass of the earth being removed. As a lift, you can use a high tripod, to which a rotating mechanism is connected through a system of blocks.
Sequencing:
- It is most convenient to do the initial deepening with a hand drill;
- when the hole is deep enough, a lift is installed above it, and a bailer is connected with a strong cable;
- it is inserted into the edge of the well and released into free fall;
- then it needs to be raised 1-2 meters and released again. Repeat this several times;
- after this, the bailer is taken to the surface and cleaned.
Thus, you drill a drainage well with your own hands. But this method has its limitations. For example, drilling a well in sandy soil can only be done with a casing pipe.
Bailer with lifting mechanism
Drainage well in the garage. Step-by-step instructions for making drainage in your garage with your own hands
The main problem in garages equipped with an inspection pit or cellar is considered to be high humidity. In some cases, the situation reaches the point where puddles accumulate on the floor and the garage begins to flood. An effective way out of this situation is to equip a drainage system that removes excess moisture, helping to keep the room dry. We'll look at how to make drainage in a flooded garage below.
Why do you need to drain water from the garage?
Draining excess water from the garage helps keep the garage dry and prevents problems such as:
- mold formation on the walls of the room;
- corrosion of metal parts.
Moisture in the garage appears due to:
- close proximity of groundwater to the surface;
- large amounts of precipitation;
- the fact that the owner often washes the car right in the garage or next to it.
If the garage is equipped with drainage, the interior will always be dry.
Note! It is advisable to build a drainage system in conjunction with the garage. If you forgot about it, don’t despair. There are ways to equip a garage or basement with drainage after construction.
Drainage options
There are several options for drainage systems to cope with excess moisture:
- surface drainage;
- trench;
- drainage using a storage tank;
- borehole
Each of them has advantages and disadvantages that are worth considering separately.
Surface
Suitable for those buildings that were not initially equipped with drainage, and already during operation there is a need to remove excess moisture entering the building.
Surface drainage is a system of trenches that are installed in the most vulnerable place of the garage - at the junction of the wall and the ground. It is better to concrete the trench or pave the bottom with metal drains, which will prevent moisture from penetrating into the soil.
Advantages of the option:
- does not require serious expenses;
- quickly constructed;
- prevents moisture from accumulating in front of the gate.
Minuses:
- is not suitable as the main method, since it does not solve the problem of moisture formation due to groundwater.
Trench
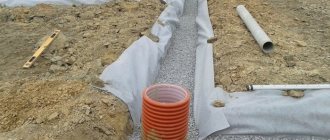
Another way to remove excess moisture, which is implemented as follows:
- at a distance of one to three meters from the garage, a trench with a depth of at least 0.5 meters is dug;
- the bottom of the trench is covered with a layer of sand;
- a layer of geotextile is laid on top of the sand;
- plastic pipes connected to each other are laid in the trench;
- holes are drilled in the upper part of the pipes into which moisture will drain from the soil;
- the pipes are covered with a layer of geotextile. This will protect the holes from clogging with earth;
- The pipes are filled with soil, after which it is compacted.
Advantages of the method:
- helps combat groundwater.
Minuses:
- It is necessary to have a place where water will flow from the pipes - a ravine, well or pond.
Using a storage tank
This method is suitable for rooms that are often flooded. Construction algorithm:
- A hole is dug in a garage or cellar into which a plastic barrel is placed.
- The floor of the room must be poured with a slope towards the barrel.
- Cover the surface with expanded clay chips.
- Cover with geotextile.
- The top layer of the floor is covered with a board.
- A pump is lowered into the barrel, which will turn on automatically when it is filled to a certain level.
Pros:
- the room is not afraid of even strong floods.
Minuses:
- If the power goes out, the barrel will overflow and water will start pouring out onto the floor.
Note! Trench and borehole methods are considered modified versions of the surface method. They work best in combination with other options.
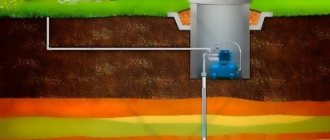
Borehole
The well method is similar to the use of a storage tank. Only, instead of a barrel, a well at least 2 meters deep is drilled in the ground. A pipe of suitable diameter is lowered into it, in the walls of which holes are drilled. The floor around the well is covered with a layer of crushed stone, after which it is covered with waterproofing.
Drainage arrangement
First of all, a site plan is made with the approximate location of drainage points. After this, you need to calculate the amount of materials needed. To construct a well you need:
- crushed stone or expanded clay with which the hole will be filled;
- casing plastic or asbestos pipes or polypropylene fabric with wooden slats.
The walls of the well must be protected from silting. Therefore, you need to decide in advance on the arrangement method. Because The cost and timing of the work depends on this.
Options:
- use of casing pipes;
- hand-made protective bag made of polypropylene fabric.
Both options have their place and do their job well. The principle of operation is the same. A well is drilled to the required depth, its walls are protected with water-conducting material, and crushed stone or expanded clay is poured inside. In this case, the diameter of the point does not matter much.
Arrangement sequence:
- Using a hand drill or bailer, a hole of the required depth is made. Usually it is no more than 10 meters. As drilling progresses, you need to control the composition of the soil reached by the drill. After the first waterproof layer has been passed, you need to go down another 1-2 meters. It is important not to miss the moment and not reach the aquifer.
- When the hole is made, you need to arrange the walls. If the option with a pipe is chosen, it is simply lowered into the well 15-20 cm below ground level. First, holes are drilled in it along the entire plane.
- If you choose the fabric option, it will be a little more complicated. You will need wooden slats along the length of the well. Fabric is nailed to them so as to form an improvised pipe. To make your work easier, you can make several rings from thick wire to use as guides.
- The resulting structure is lowered into the ground and covered with crushed stone. It performs two functions. Firstly, it prevents the walls from collapsing, and secondly, it filters all the water passing through it.
- After this, the well is covered with any waterproof material. You can use a piece of polyethylene or something else - it makes no difference. It is important that the top is sealed.
- The structure is covered with earth.
This completes the construction of the drainage well. Depending on the depth and complexity of the soil, all work takes 1-2 days.
What materials are wells made of?
Drainage wells can be made from different materials that differ in their properties:
1. Concrete. This is a traditional material for making drainage wells. The easiest way to install a structure is from concrete rings installed one on top of the other. The walls and bottom can also be filled with concrete, especially if the drainage well is made by yourself. To do this, it will be necessary to construct formwork. Concrete is a durable and strong material, but with prolonged contact with water it gradually begins to crumble and crack.
2. Brick. They line the walls of a well, the bottom of which is filled with concrete. Brick is less durable than concrete, but it is convenient to lay even alone. It is rarely used for the manufacture of drainage systems.
3. Plastic (polymer) wells. They are increasingly replacing other materials used in drainage systems. Plastic containers have a number of advantages:
- resistance to extreme temperatures. They can be operated in a temperature range of -60+50 degrees;
- plastic is a lightweight material, so the installation of such a structure can be carried out independently, without the involvement of construction equipment;
- Installing a plastic drainage well is quick and easy. If necessary, the material can be easily cut to the required size, which is impossible to do with concrete rings;
- inert to various aggressive substances;
- they are not afraid of corrosion and oxidation;
- have strength comparable to metal and concrete;
- perfectly tolerate mechanical and hydraulic loads;
- plastic containers do not rot and are not damaged by rodents and insects;
- plastic containers can be placed at any depth and in soil with any structure;
- The durability of a plastic tank is about 50 years.
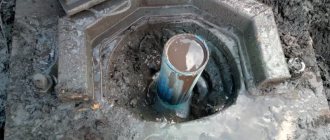
An example of a completed plastic well for drainage.
Most often, corrugated pipes of various diameters made of polyvinyl chloride are used as drainage containers. A drainage inspection well, or one having another purpose, made from such pipes, has sufficient rigidity to resist being pushed out of the ground by groundwater.
When many people hear the word geotextiles, this is the most common question. And in drainage systems this material is extremely important and is widely used due to its properties.
If you are looking for the best dry closets for your home, prices, reviews and features of their operation are described in our separate material.
We described the characteristics of the Brooks pump here. It can do an excellent job of pumping water out of storage tanks.
Other drainage systems
Considering the time it takes to make one point and the physical costs, we can conclude that this option is suitable for small areas. If the area to be drained is large, other methods are used.
Drainage systems are made, which include channels with special pipes, and collectors for water collection. The drainage network is laid throughout the entire territory. In this case, it makes sense to involve specialists who can make a soil map and correctly calculate drainage.
Making complex systems on your own is not entirely advisable. Because it is required to carry out exploration drilling work, as well as make calculations that require at least special knowledge. In addition, it is advisable to use special equipment - making such systems manually is too time-consuming and expensive.
Drainage system on site
Thus, making a drainage well system in a small area is not so difficult. The main thing is to do this on time and not let the water run high. In general, experts recommend making a drainage system before the start of construction work. Otherwise, the foundations of buildings may cause deep subsidence. If you close your eyes to this problem, flooded basements, dampness on the walls and rotting of garden crops are guaranteed.
Previous articles Next articles
Related Posts
- 05.03.2017.
Do-it-yourself water supply at home from a well
- 05.03.2017.
Self-repair of drinking wells
- 05.03.2017.
How to drive a water well yourself: work order
- 22.02.2017.