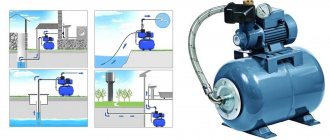
Well drilling is completed, what next? It is necessary to organize a water supply that allows you to wash dishes, take a shower, water plants and connect household appliances. Connecting a pumping station to a well will help solve the problem. However, for a positive result, you need to know exactly how to do this.
We will tell you how to better organize automated water supply for a country house or favorite summer cottage using surface pumping technology. The article we presented describes in detail the technological rules and principles of circuit assembly. Taking into account our advice, you can easily set up the system with your own hands.
Why is a pumping station needed in an autonomous water supply system?
In most cases, a well or well is installed as a source of drinking water. The first option is preferable, since the quality of water from the well is much higher. Lifting to the surface and direction into the water supply system is carried out using a submersible pump with appropriate equipment or a surface pumping station. The station can be used at a well depth of up to 10 m. This is due to the limitation on the suction height of the circulation pump.
The use of a pumping station has a positive effect on the operation of the water supply system. Compact equipment effectively solves the following problems:
The equipment is designed to lift water from a source.
- Lifting water from a source and supplying it to the water supply system of the house.
- Maintaining constant pressure in the pipeline and protecting against water hammer that may occur when starting the pump.
- Protecting equipment from frequent switching on.
- Creating a water supply in case of power failure.
The presence of a hydraulic accumulator and a pressure switch allows the pump to turn on not every time the tap is opened, but when the set response value is reached. Reducing the frequency of starts significantly increases the service life of the equipment.
Types of pumps for wells and their functions
Pumps for supplying water from a well can be immersed in narrow wells to great depths or mounted on the surface. The operating principle of the device and its installation is as follows:
- Its main elements are impellers mounted on one shaft.
- Their rotation occurs in diffusers, which ensures the movement of liquid.
- After the fluid passes through all the wheels, it exits the device through a special discharge valve.
- Fluid movement occurs due to pressure differences, which are summed up across all impellers.
There are several types of such equipment:
- Centrifugal. Such a pump allows the supply of clean water without large contaminants.
- Auger. This is the most common device, capable of pumping liquid with an admixture of particles per cubic meter of no more than 300 grams.
- Vortex. Transfers only water purified from contaminants.
Despite the differences, all types of pumps serve to perform similar functions:
- Supply groundwater to private houses and cottages.
- Participate in the organization of irrigation systems.
- Pump liquid into tanks and containers.
- Provide comprehensive water supply in automatic mode.
When choosing a pump for a site, the following criteria are taken into account:
- Initial equipment dimensions. They need to be taken into account to ensure certain technological tolerances when placing the pump in the well.
- Power of the electricity source. Borehole pumps are manufactured single- and three-phase.
- Device power. This parameter must be determined in advance based on the calculated pressure and water consumption.
- Pump cost. In this case, it is necessary to choose the right price-quality ratio of equipment.
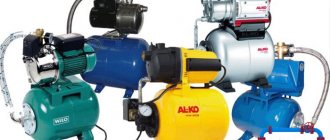
Types of household pumps
Pumps for wells are divided into submersible and surface. Such units have some advantages over others:
- Large water intake depth, which is inaccessible to any other type of pump.
- Ease of installation.
- No rubbing parts.
- Low noise level.
- Long service life.
The photo shows the types of submersible borehole pumps.
Submersible Well Pumps
Advice: It is very important to ensure that the equipment is properly and correctly arranged and to use only high-quality materials. Violation of installation technology or the use of poor materials can lead to:
Violation of installation technology or the use of poor materials can lead to:
- Pump breakage.
- Its premature failure.
- When dismantling, it is impossible to lift the pump.
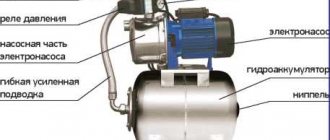
Design features of the pumping unit
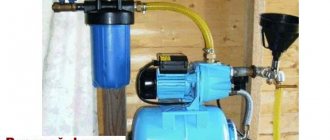
Depending on the pump used (submersible or surface), pumping stations can be block-type or mounted from separate elements. The installation consists of:
- pump;
- hydraulic accumulator;
- fittings;
- pipelines;
- automation block.
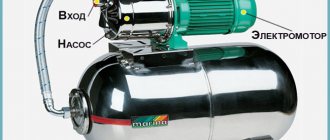
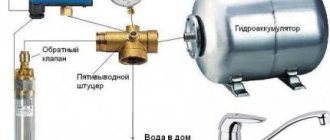
The pump is a centrifugal unit of surface or submersible type. It is designed to lift water from a well (well) and supply it to the water supply system. With a small intake of liquid, the main part of it ends up in a hydraulic storage tank, which serves to maintain a constant pressure in the system. A filter is installed on the pressure pipeline to remove mechanical impurities that rise with the flow of water from the well.
Equipment Features.
The battery consists of a metal case and a pear-shaped rubber membrane. Between the walls of the tank and the membrane there is air under a pressure of 1.5 kg/cm². When filled with water, the bulb expands, which leads to an increase in pressure.
The operation of the pump is controlled by a special relay. If the pressure in the system rises above 3.5 kg/cm², a signal is sent to turn off the pump, and when the value reaches 1.5 kg/cm², it turns on. A pressure gauge is installed for visual monitoring of system parameters. It is also used to configure the pressure switch.
A check valve located on the pump discharge line prevents water from draining from the water container. Due to the fact that the system is under constant pressure, the possibility of water hammer occurring when starting the centrifugal pump is prevented.
SUMMER OPTION FOR WATERING AN AREA WITH INSTALLATION OF A WELL CAP
If you are going to use the well exclusively for summer irrigation, then the option for its arrangement will be the least labor-intensive and, accordingly, the cheapest.
After all, you only need to install a pump with a water-lifting pipe and a well head.
If desired, you can install compact automation that allows you to control the well pump depending on the water intake, without using bulky hydraulic storage tanks.
| Summer arrangement of a well for irrigation. | Summer construction of a water well. | Summer well construction. |
| Summer well construction without a caisson. | Summer well construction price. | Summer well construction on a turnkey basis. |
Where to begin
After completion of the well drilling work, the organization that carried out the work issues a passport to the homeowner. It indicates the characteristics of the source (depth, distance to the water surface, height of the water column) and flow rate (well productivity). These parameters are necessary to calculate the water supply network. Knowing the number of sampling points and water flow, the required pump performance is determined. Another important parameter is the pressure, or pressure in the system.
Using the available values, the operating point of the pump is determined. This is the main characteristic used to select the power of the pumping station. You can purchase the unit assembled or buy all the elements separately. If the distance to the mirror is more than 10 m, this will have to be done.
Manufacturing and connecting a pumping station to a well with your own hands will significantly reduce its cost.
Installation diagrams
Before installing a pumping station, you need to choose the optimal location for it.
This takes into account:
- distance from the station to the source;
- humidity and temperature conditions at the pump location;
- availability of space for repairs and maintenance;
- the ability to soundproof the room.
After choosing a location, the water pumping station is installed step by step:
- Work begins with preparation. A solid base with a flat surface made of wood, concrete or brick is created for the transfer pump. You can use a special metal bracket.
- Since the unit begins to vibrate strongly during operation, leaks may appear at the joints of the pipes. Therefore, before connecting the pumping station, a rubber mat or special pads are placed under its supports. Anchor bolts can be used to securely fasten the legs.
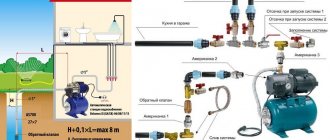
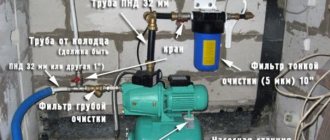
- In order to ensure uninterrupted water supply, it is necessary to ensure a constant supply of liquid from the source. It is necessary to follow the instructions on how to properly connect the pumping station to the well, protecting it from freezing. To do this, dig a straight trench in the direction from the source to the foundation of the house to lay pipes in it, preferably with a cross-section of 32 millimeters.
- Pipes are laid below the freezing mark of the ground. When forming a trench, take into account the slope in the direction of water intake. When groundwater lies close to the surface, the pipes are placed above the critical level, but at the same time they are insulated or a heating cable is used.
- When the pipeline is located above the ground, high-quality thermal insulation and heating are required; for this, basalt-based mineral wool can be used.
- Before connecting the pumping station to the water supply, they complete the water intake unit with a surface device and a built-in ejector, connecting polypropylene pipes to the end along with a check valve and a metal mesh, which performs the work of a coarse filter. The check valve ensures stable filling of the pipes with water. To fix it, use a coupling with an external thread. When operating a submersible pump, you only need a pipe and a check valve - it already has a filter of this type.
- The pump weighs a lot, so a strong cable is required to hang it. When lowering the water intake unit of a structure with a surface pump, take into account that the gap between it and the bottom of the well or borehole must be at least 1 meter. For a submersible unit it is 0.5 meters.
- Next, in accordance with the connection diagram of the pumping station, a hydraulic accumulator and a control unit are placed using a five-pin fitting; it is placed in a convenient location in the pressure pipeline. Then a pressure switch and pressure gauge are mounted to it. The storage tank is connected to the side entrance of the fitting.
- All piping elements of the pumping station are complex units, and the breakdown of one of them leads to a malfunction of the water supply system. For this reason, shut-off valves are installed at each site so that it is possible to carry out local repairs by disconnecting a certain part of the structure. This is best done using an American type tap (for more details: “American tap - rules for using fittings for connections”).
- It is advisable to provide in advance the possibility of draining water from the system. Therefore, a branch is made in the pipeline from a tee with a drain valve. A coarse filter is installed on the water supply branch, and a fine filter is installed on the pressure branch.
- Then consumers are connected to the station, the first of them will be the distributing collector.
- The electric motor of the pump is characterized by high power, so a separate power line must be allocated for it. The electrical connection diagram for the pumping station provides for grounding and connection of a voltage stabilizer.
- During the installation process, you need to check the pressure in the air chamber of the accumulator. Its value compared to the switch-on pressure of the unit should be 10% lower. The setting is performed in operating mode. Preliminary values for a tank with a capacity of 20 - 30 liters are 1.4 - 1.7 bar, and for a tank with a volume of 50 - 100 liters 1.7 - 1.9 bar.
- When you install a pumping station with a surface-type product yourself, you need to fill the working part of the system before starting. Unscrew the plugs from the filler hole located at the top of the pump. When the pipeline is equipped with a filler funnel, use it. Water is poured in until it begins to flow out, and then the valve is tightly closed.
- The pump is connected to the power supply during startup. To remove any remaining air that has entered the funnel, open the valve on the pipeline.
- You need to not only know how to properly connect the pumping station, but also how to start it. After turning it on, water should appear from the outlet of the pressure pipeline or a slightly open water tap. When this does not happen, the pump is stopped, water is added and it is started again. After a successful start of the equipment, it is run in and the pressure switch and valve body are adjusted. Most often, adjustment of the pressure switch at the pumping station is performed by a specialist.
Choosing a location for installation
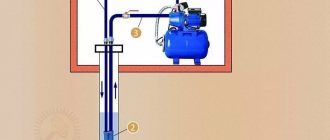
The efficient operation of pumping equipment largely depends on its location. It should be located in close proximity to the well. Most often, the installation is placed in a caisson.
Place for installation.
The size of the pit should ensure ease of installation and subsequent maintenance of the mechanisms. The walls are laid out of brick or monolithic concrete and insulated.
The equipment must be installed on a foundation. It can be concrete or made of channels and secured with anchor pins. The suction pipeline is inserted into the wellbore through an adapter. The location of the installation in a caisson has a positive effect on the operation of a surface centrifugal pump, since the distance from the pump to the water surface is reduced.
If a submersible pump is used, then the equipment can be installed at any distance from the source. The most suitable place would be the insulated basement of the house or a heated extension. A general requirement for all premises is the absence of moisture, because otherwise, not only equipment failure is possible, but also electric shock.
Most often, the station is placed away from the center of the room (caisson) in order to increase the area for work. The equipment should not touch the walls, as this arrangement leads to additional noise during pump operation. Vibration damages the protective coating, resulting in corrosion.
Installation in a separate building solves the noise problem, but it does not allow quick access to the equipment. Some homeowners drill a well during construction and place it in the basement of a residential building. This scheme is the most economical, but replacing equipment and preventive maintenance of a well with a station is difficult.
Installation of a submersible electric pump for installation in a well
To install a submersible electric pump in a well, work is performed in the following order:
- Screws a plastic adapter coupling into the outlet of the unit to connect the pressure pipeline. If there is no built-in check valve, install your own, mounting it first at the outlet of the electric pump, then screw on the fitting for connecting HDPE pipes.
- They attach a pipe to the pump and fix it with a plastic cuff, thread a cable through the ears of the housing and connect its ends at the outlet using two special clamps, the free end is screwed to the main cable with electrical tape.
- Connect the power cable, cable and pressure hose together using electrical tape or zip ties in 1 meter increments, making sure that the power cord is secured without tension.
- The electric pump is lowered into the well to a predetermined depth. To do this, measure and cut the pressure pipe to the required length, insert it into the head, to which the cable is tied.
- After a dive, you can immediately check the operation of the electric pump without connecting to the pipeline, if the liquid supply corresponds to the passport data, connect the entire water line and then monitor and regulate the operation of the equipment with automatic devices.
Rice. 8 Preparing the downhole electric pump for immersion
To connect a well pump to a water supply system, devices are used that automate its operation, prevent frequent startup and reduce the load on the line. They can be independently assembled in one module, installed in a living space, or left in a caisson pit with a borehole head.
How the assembly process works
Assembly process.
When installing a block pumping station, the assembly process consists of connecting the suction and pressure pipelines. A filter with a check valve is connected to the pipe lowered into the well; it is removed from the wellbore through a downhole adapter or through a cap.
The suction line must be sealed, otherwise air will enter the hydraulic network through leaks, which will lead to pump failure. Shut-off or shut-off and control valves are installed on the pressure pipeline.
Assembling the station from individual elements begins with tying the membrane tank. First of all, a fitting with 5 outlets is installed. It connects directly to the hydraulic accumulator. Then a pre-configured pressure switch, pressure gauge and water supply inlet are installed. The free outlet serves to connect the pump pressure pipe. Experts recommend installing submersible units in wells deeper than 10 m. The use of these pumps solves problems associated with the equipment of the suction pipeline, installation of an ejector with additional pipes, etc.
Most often, withdrawal from the well is carried out through the well head. The pressure pipeline is laid to the house in a trench below the freezing level of the soil.
When the assembly of the hydraulic part is completed, installation of electrical connections begins. Wires from the network are connected to the input terminals of the pressure switch, and the output is connected to the pump starting unit. It will be correct to supply power through a separate circuit breaker.
Be sure to carry out a test run and check the tightness of the connections. The first filling of the hydraulic tank is done gradually so as not to damage the membrane.
WINTER OPTION WITH INSTALLATION OF WELL ADAPTER
The cost of installing a water well according to the “winter option” can be reduced by refusing to install a caisson, “replacing” it with a well adapter, which is installed on the casing and allows you to bring the water pipe below the freezing level.
However, the downhole adapter has many disadvantages (complexity of installation on a two-pipe well, difficulties with lifting a pump located at a depth of 60 m, extreme difficulty in installing a pumping unit at a depth of over 60 m, etc.).
Another inconvenience is the need to place a hydraulic storage tank and automatic control in the house. Having weighed all the pros and cons, the conclusion does not allow us to talk about the advantage of the downhole adapter (except for the price) over the caisson.
| The downhole adapter is installed at a depth of 1.8 meters, and the well cover covers the casing. | To construct a well without a caisson, a well adapter and a well cap are used. | To set up a turnkey well, you need a high-quality well adapter and cap. |
Installation recommendations
The equipment must be installed on level ground and secured to prevent movement. Before the first start-up, it is necessary to measure the air pressure in the membrane tank; it should be 1.5-2 kg/cm². If its value does not correspond to the specified values, then you need to pump up or bleed the air. The hydraulic accumulator must be installed vertically so that the membrane does not come into contact with the walls of the housing.
The room with the pumping station must have a water collection system.
There is no need to configure the relay, since it has standard settings. If they need to be changed, the work should be carried out in accordance with the description, after first turning off the power supply.
In the room where the pumping station is located, there must be a system for collecting water and draining it into a special pit. The equipment must be installed in such a way that if it is necessary to replace an inoperative element, the entire installation does not have to be dismantled.
Connection with submersible pump
Pumping stations with submersible pumps are successfully used for wells and wells of any depth. Submersible pumps come in several types:
- vibration;
- centrifugal;
- drainage (well).
Regardless of the type of pump, they must all be below the water level. The water cools the pump, preventing it from overheating.
The connection and operation of the vibration pump is highly dependent on the frequency of the electrical network. To operate, some models of pumps from Western manufacturers require a network frequency of 60 Hz, instead of the 50 Hz that we have. Such a pump will work, but its effectiveness will be debatable.
Before lowering the pump into the well, it is necessary to check the tightness of the connecting screws. Since the pump is vibrating, they tend to unwind. The vibration pump must be inspected regularly.
Centrifugal submersible pumps in some cases are the only solution for lifting water from any depth. They have a large number of impellers (20 or more), which provides high pressure at the pump outlet. This in turn increases the length of the pump. Therefore, such pumps cannot be used in wells with a small water column.
The pump is installed at the maximum depth of the well, at least 50–70 cm from the bottom of the well. The pump is secured to a metal or polyamide cable. A check valve is installed on the pump, and then a pressure supply pipe.
1 - check valve with filter; 2 - submersible pump; 3 - cable
Depending on the manufacturer and model, the length of the electrical cable may not be sufficient for installation in the well, then it is necessary to arrange a hermetic cable coupling. The other end of the cable is attached to the eye bolt of the head, securely fixing the pump in the well.
The advantage of this scheme is that the hydraulic accumulator with the automation unit can be placed in any convenient place.
Submersible drainage pumps can also be used to organize a water supply system for a small house with 3-4 water outlets. Depending on the model, they create a pressure of up to 1.5 bar and have high performance. Drainage pumps operate quietly in contaminated water or water with solid impurities up to 5 mm, industrial models - up to 120 mm.
What elements of a pumping station can you make yourself?
To reduce the cost of the pumping station, you can make a pumped storage tank with your own hands. A gas cylinder or other cylindrical container is used as a body. In such devices, a membrane is not used, and the water outlet is organized through a siphon tube. The pressure in the air cushion is created such that the pump turns on at a level that does not allow air to enter the system. Lifting and releasing pressure is carried out through a nipple installed in the upper part of the housing.
Instead of pressure switches, level sensors can be used. The pump turns on when the lower value is reached, and turns off when the upper signal is reached. In this case, the pressure in the system is regulated by an air cushion.
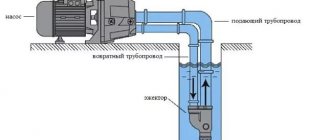
Connecting a station with a surface pump
Pumping stations with a surface pump can only be used if the distance from the water surface to the pump inlet pipe is no more than 8 m.
For example, if you have a well or borehole with a depth of 12–13 m, and the distance to the water surface is 10 m, then the pumping station must be “buried” to a depth of 2.5–3 m.
In such cases, pits are installed or a more technologically advanced solution is the use of a caisson.
It should be remembered that although all manufacturers call their products self-priming, neither a vortex nor a centrifugal pump are. In order for the pump to work and not fail, it is necessary to fill the pump housing and supply pipe with water. This will ensure reliable starting of the pump.
The end of the suction pipe should be at the maximum depth, and the height from the bottom should not be less than 100–120 cm.
Installation should begin by installing a check valve with a coarse filter on the pipe. The filter will prevent large impurities in the form of stones and sand from entering the water supply. The check valve will provide support to the water column and protect the pumping station from idling. Connections must be carefully sealed to prevent air from entering the plumbing system.
1 - check valve with filter; 2 - pumping station; 3 — adapter for a plastic pipe; 4 - shut-off valve; 5 - caisson; 6 - to the water supply of the house
A shut-off valve, an American valve, and, if necessary, an elbow and an adapter with a coupling to a plastic pipe are installed at the entrance of the pumping station.
In the case of a well, you can use ready-made heads that are already equipped with a pipe outlet and an eye bolt. Additionally, the head seals the mouth of the casing pipe, increasing the flow rate of the well.
A water supply system is connected to the pump output.
How to do a test run
The main condition for this is that the pumping station is filled with water, including all lines, as well as the hydraulic accumulator. Water enters the device through the filler hole. Turning on the power and starting the engine is carried out after the shut-off valves have been opened. After this, water gradually fills the pressure pipe. This is necessary in order to displace all the air from it. As a result, pressure increases. As a rule, this parameter can take values from the range from 1.5 to 3 atmospheres; when the limit is reached, the equipment turns off.
Thus, the effective operation of such equipment is ensured not only by the correct choice of model suitable for use in certain conditions, but also by proper connection. And for this, it is first decided where the equipment will be installed, after which a hermetically sealed connection of the equipment with the internal and external pipelines is organized.
Using recycling
The recirculation line serves to maintain water pressure in the supply and protect the pump from idling. It is necessary to understand that this wastes part of the pump power.
To organize recirculation, a tee must be installed on the pressure pipe of the water supply system. It is advisable to install a shut-off valve on the recirculation line. It will provide regulation of water flow. The second tee must be installed on the suction pipe in a convenient place and connected to the recirculation pipe.
1 - tee; 2 - shut-off valve; 3 - recirculation pipe
When repairing or servicing the water supply system, in order not to relieve the pump pressure and refill it with water, install a tap on the accumulator, then you will leave water under pressure in the accumulator. After the repair, simply unscrew the valve and the pump with the pressure pipe will fill with water. In most cases, the hydraulic accumulator reserve is sufficient to fill the pump and start it.
Such simple actions will increase the reliability of the uninterrupted operation of the system.
Connection nuances
The first thing to consider is where to install the accumulator in the water supply system. It is also worth installing filtration at the entrance to the house. Filters of different types and sizes can be found in. We will tell you about other installation features below.
Expansion tank piping
It is attached to one of the fitting holes using a flexible hose. Thread diameter – 1 inch. But you can do without it, then all the automation (sensors and measuring instruments) will be built directly at the entrance of the hydraulic tank.
Settings upon connection
Factory standard relay thresholds are from 1.4 to 2.8 bar. In this case, initially air of 1.5 atmospheres is pumped into the air chamber. In order for the membrane bulb to be filled to maximum values, you can change the parameters, but only slightly. They must match the tolerances of the pump.
Optimal pressure
The membrane will remain intact longer if there is 0.1-0.2 bar more in the water supply than in the hydraulic tank. We offer a formula that will allow you to determine the most appropriate value:
V Atm.= (Hmax+6)/10, where Hmax is the highest water intake height, for example, if a shower cabin is installed on the 2nd floor, then this will be it.