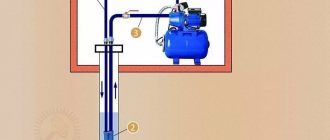
A pumping station is excellent equipment that allows you to automate the process of drawing water from a well. A set of technical devices activates the launch of the system when it is necessary to replenish supplies and turns off the units at the right time. The level of comfort will increase incredibly. After all, even outside the city it is necessary to enjoy the achievements of civilization, don’t you agree?
However, it is not enough to just buy incredibly useful equipment; you need to know how to install and connect it. We invite you to read the article, which covers all the issues in great detail. This information will be useful to all owners of suburban housing, no matter whether the pumping station is connected with their own hands or hired workers are invited to install it.
In our article you will become familiar with the types of pumps used in groundwater intake systems. Also here are all possible options for the location of equipment and connection to an autonomous water supply. The information is supported by diagrams, photo materials and videos.
Types of pumps used
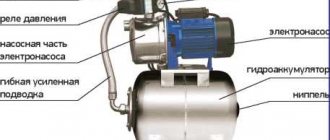
Ready-made pumping stations are installations with a surface pump that extracts liquid from the well due to vacuum. An ejector can be included in the design of the pump itself, or it can be remote - in this case it is located in the well.
However, when assembling and installing a pumping station with your own hands, you can also use a submersible or well pump, especially if you already have one.
Most often, ready-made pumping stations are used, in which all the main elements are already assembled and configured. During installation, it is enough to connect the power cable, water intake and pressure pipelines
Models with internal ejector
Installations with a built-in ejector are capable of lifting water only from a shallow depth - up to 8 m. But at the same time they provide powerful pressure exceeding 40 m.
They are not afraid of air getting in, so it is not necessary to fill the system with water before starting work - the station will first pump air and then start supplying water.
They have good performance and reliability. The disadvantage is the high noise level, which is why they are installed in the house only if there are ancillary soundproof rooms.
When installing a station with a surface ejector pump, it is necessary to take into account not only the depth of the water surface, but also the horizontal section of the supply pipeline
Models with external ejector
Stations with a remote ejector are installed when it is necessary to extract liquid from a great depth - 20...50 m. In this case, the ejector is lowered into the well (well) as part of the intake unit. Two hoses from the installation are connected to it - pressure and vacuum (suction).
According to the first, the liquid is supplied to the ejector and forms a vacuum region in the suction chamber, the second - lifts up water from the well. Such units are characterized by low noise levels. They do not consume a lot of electricity, but their efficiency reaches only 30-40%.
The use of an external ejector allows you to create in the water supply pipe the pressure necessary for transporting water and significantly increase the depth of its intake
Submersible pump type
Systems with a submersible (well) pump produce virtually no noise; water can be drawn from any depth and at a sufficient distance from the well or well from the building. It is not afraid of small leaks in the pipeline and air leaks.
However, submersible pumps are quite expensive. They require clean water - installing a powerful filtration system solves the problem, but in this case it will need to be cleaned regularly. Repair and maintenance are complicated by the need to lift the unit to the surface.
Not suitable for sources with impurities in water of more than 2 g per 1 m3 - filters quickly become clogged and the pump stops functioning (+)
How to choose?
But in any case, there is: A suction pipeline that is lowered into a well or well.
In the well, a shelf is attached to the wall; in the case of a well, the pit is deepened. Place the ring with the bottom down, and the ring with the lid on top.
Before starting the installation with a surface pump for the first time, it is necessary to fill the working part of the system with water.
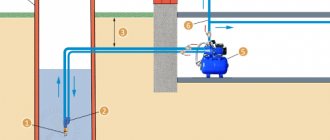
The most important benefit of civilization that owners strive to equip their country house with is a water supply system. Selecting an installation scheme Depending on the depth of the hydraulic structure, one of two pumping station connection schemes can be used. Depending on the depth of the hydraulic structure, one of two pumping station connection schemes can be used: a single-pipe scheme is suitable when water is lifted from a depth of no more than m ; a two-pipe scheme is used when pumping water from a well or well more than 10 m deep. Water supply pipelines must pass either below the freezing depth of the soil or be properly insulated. This method of installing a pumping station is good because if everything is done correctly, the system works without problems.
More on the topic: Pue frequency of grounding checks
Screw P is used to adjust the switching pressure, and screw DR is used to adjust the shutdown pressure. If necessary, air must be pumped up using a compressor or car pump. Water is poured in until it begins to flow out, and then the valve is tightly closed.
If there is a connection, it is advisable to make an inspection well. In a separate building located above the wellhead or well.
Basic installation and connection diagrams
The end of the pipe is placed in a well or borehole. The pumping station provides the following benefits: Increases the efficiency of the water supply system. This scheme makes access to the station somewhat difficult. If water is taken from a river, lake or pond, it must be used only for household needs or irrigation.
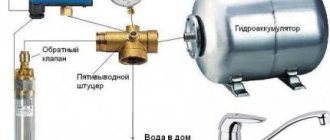
When using a surface pump, a plastic water pipe is installed in the well. You can also secure the legs more securely using anchor bolts. It is possible to construct large-sized caissons in which pumping equipment can be placed. It is best to connect them using a five-pin fitting, which is mounted in the pressure pipeline in a convenient place. How to quickly start a pumping station. The film was shot with a Bravis A3 action camera
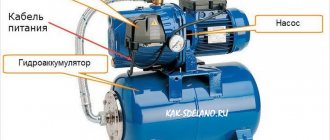
Design and principle of operation of the hydraulic accumulator
The starting current of the pump exceeds the operating current by 3-5 times and has a destructive effect on its design. Therefore, the pump life depends on the number of starts. To reduce them, a membrane accumulator must be installed in the system.
In the home water supply system it performs the following functions:
- Protects the pump from wear and increases its service life - thanks to the liquid reserve in the membrane compartment, the number of unit starts is significantly reduced.
- Maintains constant pressure in the water supply and protects against pressure changes.
- Eliminates the occurrence of water hammer in the system , which has a destructive effect on connected devices and pipeline fittings.
- Provides some water supply in case of power outage.
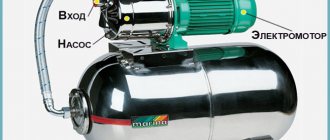
The device is a sealed vessel, the internal volume of which is divided into two containers by an elastic membrane. One of them is filled with air, and the second is intended for pumping water.
The pressurized air in the hydraulic tank squeezes out water and maintains pressure for some time even in the absence of electricity
The hydraulic tank works as follows. Water is pumped into an elastic container until the upper pressure threshold is reached. The pump then turns off.
The pressure in the system is maintained by an air gap in the accumulator; the compressed air plays the role of a damper. When the volume of water decreases (consumed by consumers) and the pressure reaches the lower set limit, the pump turns on again and fills the hydraulic tank with water.
A hydraulic accumulator is selected based on calculations that take into account the number of residents, the number of water consumption points, the maximum permissible number of pump starts and its power, and the required pressure in the system.
Insufficient working volume of the tank will lead to constant activation of the pump and its wear. A container with a reserve threatens stagnation of water and a decrease in its quality, with a harmful effect on the inner surface of the membrane.
Image gallery
Photo from
Hydraulic accumulator in pumping station circuits
Hydraulic accumulator for systems up to 150 l
Horizontally oriented hydraulic accumulators
Vertical hydraulic tank in a water supply system
Install a pressure switch
The pressure switch is installed immediately after the pump
The following recommendations are related to work directly with the liquid supply pumping station itself. According to the technical parameters, the unit can produce a maximum fixed pressure. Usually this is 3-5 atmospheres. In our case, the Grudnfos MQ 3-45 station produces 4.5 atmospheres.
If water is pumped from a storage tank, the pressure in the pipeline will also be 4.5 atmospheres. In the case of withdrawal from main water supply systems, the situation is slightly different. Water from the main pipeline is supplied at different pressures. If the pressure in the water supply rises to 3 bar, plus the station power of 4.5 bar, the result will be about 7 bar. In any case, such an indicator will have a very negative impact on the operation of the entire pipeline system in the room. The butt joints of the fittings, the pipes themselves and other important structural elements may be damaged.
To prevent this from happening, a pump station pressure switch must be installed at the outlet of the pumping station. That is, at the input, for example, 7 bar, after passing through the pressure switch it will be 4 bar (if you set this value), which is necessary for the normal operation of the entire system. The design of the regulator itself provides the ability to adjust the water pressure to suit specific operating conditions. As a result, as soon as the station reaches the set 4 bar, the relay gives a command to turn off the pump.
Pump station control unit
A standard set of pump station control devices consists of a fitting, a pressure switch and a pressure gauge and is installed on the pressure pipeline.
The pressure gauge is used to monitor the current pressure in the system, and the relay is the most important element for controlling the pumping station. It controls the supply of water to the pressure tank according to specified parameters and ensures automatic operation of the pump, turning it on and off.
The main operating elements of the relay are the minimum and maximum pressure springs, which are triggered when the pressure in the network reaches the value specified by the settings. At low pressure, the spring opens and closes a contact that turns on the pump motor.
Exceeding pressure compresses it, and when the maximum threshold is reached, the contact opens. The pump turns off and the water supply stops.
The automation unit is a more complex device with advanced capabilities. In addition to switching electrical circuits when responding to increases and decreases in pressure, the automation unit protects the system from dry running.
Image gallery
Photo from
Pressure switch for pumping station control
Pressure switch components and design
Pumping equipment control unit
Expanded functionality of the automation unit
When choosing a control device for stations pumping water from shallow excavations, it is better to give preference to the option with protection against dry running.
It will protect the pump from overheating and turn it off if for some reason (dirt has entered, the liquid level in the source has dropped below the intake unit) water stops flowing into the system.
The sensitive elements of the pressure switch are two springs. The large one is set to the minimum pressure, the small one is set to the difference between the minimum and maximum
The pumping station operates in cycles, each of which can be divided into two stages:
- The pump turns on and lifts water from the source. It fills the system and hydraulic tank until the pressure exceeds the upper threshold. After this, the pressure switch turns off the pump motor and the water supply stops. The pumping station goes into sleep mode.
- When consumers are turned on (opening taps, using water-consuming equipment), water comes from the hydraulic accumulator tank. Fluid flow from the hydraulic tank is carried out until the pressure drops to the lower threshold. This causes the pump to turn on again and the water to rise.
The number of cycles per hour must not exceed the maximum number of starts allowed for the pump used.
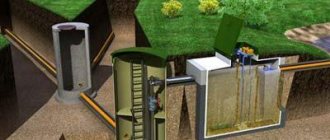
Why is a pumping station needed in an autonomous water supply system?
Having decided to install a pumping station on a well that already exists on a personal plot, you should first understand why such an installation is needed. If we talk about those tasks that can be effectively solved by pumping stations for wells and wells, then this should include:
- lifting water from a well or well and its uninterrupted supply to all points of the autonomous water supply system;
- ensuring stable flow pressure of the liquid medium transported through the pipeline system, as well as the absence of air pockets in the elements of such a system;
- ensuring the supply of water to the pipeline system for a certain period even in cases when the electric pump does not work, which can happen due to its breakdown or failures in the power supply network.
The summer pumping station will provide water supply for irrigation and household needs in the warm season
Unlike individual pumps, which are also used for pumping water from a well or a well, pumping units provide a more gentle operation of the equipment, since the electric pump included in such stations does not turn on every time the taps are opened at water collection points, but only at those moments when the level of liquid in the accumulator drops to a critical level.
Advantages of using a pumping station
Installing an autonomous water supply in your home provides independence and comfort.
The pumping station provides the following advantages:
- Increases the efficiency of the water supply system.
- Increases the operational safety of equipment and pipelines.
- Provides a certain (depending on the capacity of the hydraulic tank) supply of water and its supply even when the power supply is turned off.
- Maintains constant pressure and stable water pressure.
- Increases the durability of appliances and household appliances connected to the water supply system.
- Automatic operating mode (timely switching on and off of the pumping unit) reduces equipment wear and energy costs.
- Possibility to choose the installation location of the unit.
- It has compact overall dimensions and light weight.
- Easy to install.
In rural areas, cottage and holiday villages, water supply communication networks often suffer from low pressure and unstable pressure.
In this case, the pumping station can be connected to an existing main water supply - this will solve problems with pressure drop and lack of pressure in the water supply.
The use of a pumping station in an autonomous water supply scheme will not only significantly increase the level of comfort of living conditions, but also significantly increase the working life of devices installed in the water supply system
Water connection
Connecting the pumping station to the water supply.
(Click to enlarge) As a rule, the pumping station is connected to the water supply if there is not enough pressure for the heating equipment.
In order to connect the system to the water supply you need:
- The water pipe must be disconnected at a certain point.
- The end of the pipe that comes from the central line is connected to the storage tank.
- The pipe from the tank is connected to the pump inlet, and the pipe that is connected to its outlet goes to the pipe that leads to the house.
- Laying electrical wiring.
- Equipment adjustment.
You may be interested in an article about Gilex Jumbo pumping stations. Read the article about setting up and adjusting the pumping station yourself here.
Pump installation technology
Before starting installation work, it is necessary to decide on the location of the pumping equipment.
Step #1 – choosing a location
When planning the placement of the unit, it should be taken into account that:
- The location of the pumping station in close proximity to the water source ensures stable suction and smooth operation of the equipment.
- The installation location must be dry and warm, well ventilated.
- The equipment must not touch walls.
- It is necessary to ensure free access for repair work and preventive inspections.
The option of installing a pumping station with a surface pumping unit, especially with an internal ejector, should be carefully considered, since such a system has a high noise level.
There are several installation options. Let's look at them in more detail.
Option #1 – in the house
The most optimal place for the proper functioning of the station is a heated room. It is ideal if the house has a soundproofed boiler room.
An extreme option is to install equipment in common rooms (corridor, bathroom, hallway, pantry). But in this case, it is placed away from the bedrooms and sound insulation is provided - for example, by making a casing or cabinet.
The best option for installing a pumping station is to install it in a separate room in a house with a well drilled directly under the building
Option #2 – in the basement
Quite often, a pumping station is installed in the basement or basement. However, care must be taken to create optimal conditions for placing the installation - the room must be sound, heat and waterproof.
You can arrange a special box in the underground, with access to the equipment through a hatch.
A warm, equipped basement with good water and sound insulation and ventilation is ideal for installing pumping equipment
Option #3 – in a well
The pumping station is installed on a specially constructed platform in the well. The depth of the installation surface must be such that all equipment is below the freezing level. The well itself is insulated from above.
The disadvantage of this scheme is difficult access to the equipment.
With sufficient width and depth of the well, as well as pump power, the station can be installed in the well on a special bracket or platform
Option #4 – in a caisson
A room of sufficient width for subsequent maintenance is arranged around the well, buried below the soil freezing level. At the surface of the earth, the caisson is closed and insulated, leaving only a small hatch for maintenance.
The pit device will allow the use of a pump with a built-in ejector in cases where the depth of the water surface from the surface of the earth is 9-11 meters.
Installing the unit in a well caisson provides protection against freezing of equipment and complete noise insulation
Option #5 – in a separate building or extension
In this case, no noise will be heard in the house. However, simply insulating such a room will not be enough; heating will also be required. This leads to additional costs for electricity and heating systems.
When installing a station with a submersible pump, there is no problem with sound insulation. All elements of the system, except the pump itself, are installed in any heated room of the house.
Installing a pumping station in a pavilion equipped on the street will protect you from the main disadvantage of this type of equipment - noise during operation
Having decided on the installation location of the pumping equipment station, we begin its installation.
Step #2 – carrying out preparatory work
Prepare a solid base for the pumping unit - concrete, brick or wood, and level the surface for installation. You can use a special metal bracket.
Since the pump vibrates quite strongly during operation, backlashes form in the pipeline connections and leaks appear. To reduce vibration, as well as its destructive effect, rubber pads or a mat are placed under the pump supports, and the installation itself is securely fastened - the legs are screwed with anchor bolts.
The main condition for the uninterrupted operation of a pumping equipment station is the unhindered flow of liquid from the source.
The main problem that needs to be solved with year-round water supply is protection from freezing. Therefore, a trench is dug under the pipeline - from the foundation to the well or caisson (pit) of the well.
The trench should be straight in plan, preferably without turns or bends, so as not to reduce the pressure. To prevent the effects of negative temperatures on pipes, they are buried below the freezing level of the soil in the area.
When forming a trench, it is necessary to take into account a slope of 0.03 towards the water intake to drain liquid from the pipeline during the conservation period.
In the case of closely located groundwater, the water supply system is laid above the critical level, but in this case it is insulated and an additional heating cable is used. Also, serious thermal insulation and heating will be required if the water supply is installed above ground level.
If the pipeline passes through the air, or lies shallow, then heating and serious insulation are necessary
Step #3 - assembling the water intake unit
The water intake unit depends on the type of pump used.
- With a standard connection scheme , a station with a surface pump and a built-in ejector is a check valve with a mesh filter connected to a polypropylene pipe through a coupling.
- Installation with external ejector . A check valve with a mesh filter is screwed onto the suction compartment of the ejector, and two pipes are connected on top.
- When using a submersible (well) pump , a coarse filter is included in its design. Therefore, a check valve and a pipe are connected to the unit. The pump has a decent weight, so it is suspended on a strong cable.
The assembly is lowered to the required depth, taking into account that the minimum distance from it to the bottom of the source is 1 m when using surface pumps and 0.5 m for submersible (well) pumps.
It should also be borne in mind that the level of the water table changes throughout the year - in summer it decreases. If the suction depth is on the verge, then during this period you can completely lose the water supply.
Depending on the diameter of the well, the design of the ejector unit varies. Water circulation occurs either through two pipes, or according to the pipe-in-pipe principle
Step #4 – installation of station surface elements
Fundamentally, the installation schemes for a pumping station will differ depending on which pumping unit is used.
The basic rule: any additional device is installed through American ball valves and check valves. This will allow devices to be removed for replacement or repair without having to drain all the water from the system.
It is also necessary to provide for the possibility of draining water from the system - for this, a branch is formed in the pipeline by installing a tee, to which a drain valve is connected.
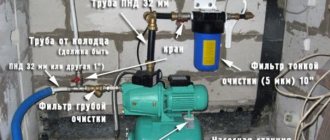
It is advisable to install a coarse filter on the supply pipeline. On the pressure side (in the line leading to consumers) there is a fine filter.
Installation of a finished surface-type station is not difficult, since the main elements of the system are already connected to each other. It is a hydraulic accumulator with an electric pump and a control unit installed on it.
In addition to the main fittings, a device is installed in such a system to fill it with water before the first start-up. Similar to the drain device, a tee with a connected ball valve and funnel is inserted into the pipeline.
When assembling the pipeline, all connections should be sealed with flax, FUM tape or sealing paste to prevent air from leaking into the system
You can read more about the features of choosing a pumping station and the rating of the best offers on the market according to equipment owners in this article.
In other cases, the system elements are installed independently. When installing a surface station, a pipeline (or two pipelines, if a remote ejector is used) from the well is connected to the pump.
Next, install the hydraulic accumulator and control unit. For a station with a well pump, these will be all the main surface elements in the circuit. The most convenient way to do this is to use a 5-pin fitting, which is mounted in the pressure pipeline in a convenient place. A pressure switch and pressure gauge are screwed into it.
A hydraulic accumulator is connected to the side entrance of the fitting. For ease of maintenance, it is connected through a ball valve with an American connection and a drain is arranged.
Connect consumers to the pumping station. Most often, the first element is the cold water distribution manifold.
This system is less sensitive to air ingress, but all joints must be sealed
Step #5 – first launch of the station
The electric motor of the pump has more power, so it is better to provide the pumping equipment station with its own power supply line, arrange grounding and install a voltage stabilizer.
Check the pressure of the air chamber of the hydraulic accumulator. It should be 10% less than the pump activation pressure. However, this setting is done in operating mode. First, it is necessary to achieve the following values: for a hydraulic tank with a capacity of 20-30 l - 1.4...1.7 bar, with a capacity of 50-100 l - 1.7...1.9 bar.
Before starting the installation with a surface pump for the first time, the working part of the system is filled with water. To do this, unscrew the plug from the filler hole located in the upper part of the pump.
If the pipeline has a filler funnel, it is better to use it. Pour in liquid until it is completely filled and begins to flow out. Then the hole (valve) is tightly closed.
When filling the system with liquid through the filling hole of the pump, it is convenient to use a regular funnel
Startup sequence:
- The pump is connected to the mains.
- The valve of the filling funnel of the pipeline with a surface pump is opened slightly to remove any remaining air that has entered the system.
- Turn on the unit - within 2-3 minutes water should flow from the outlet of the pressure pipeline (or an open water supply tap).
- If the liquid does not flow, the pumping equipment is turned off, water is added to the system and turned on again.
After a successful start, the equipment should be “run in” and, if necessary, the settings of the valve body and pressure switch should be adjusted.
Check valve
The check valve is considered the most important element in the water supply system.
Its main purpose is to prevent leakage. In order for the system to work continuously, it must always be filled with water. A check valve prevents water from flowing out of the system by allowing water to flow in only one direction.
This element consists of a spring and a locking element, which are located in the cylinder. As a rule, such an element is placed either in the area in front of the station or at the inlet of the suction pipe. The presence of a check valve allows you to avoid filling the station with water before each operation.
It is better to install the check valve in a vertical position (the arrow on the body should point upward). This will increase the service life of the element.
Of course, it can also be installed horizontally, only then during operation will dirt settle on its walls, which can lead to clogging.
Basic operating rules
After putting the pumping station into operation, periodic maintenance is carried out. It is necessary to clean the coarse filter promptly. Without this, the performance of the installation gradually decreases, the water flows in jerks, and a completely clogged filter will lead to “dry” operation and shutdown the system.
The frequency of purification depends on the content of impurities in the pumped water.
You can read information about common pumping station breakdowns and how to fix them in the following article.
Once a month, or after a long period of inactivity, winter conservation or repair work, check the pressure in the air compartment of the hydraulic accumulator. If necessary, air is pumped up.
When using the station only in summer, it is necessary to drain all water from the system before frost sets in.
General information
Preparing the pump location
There are different ways to position pumps. You can make a pit near the well, or put the equipment in a dedicated room inside the building. Third installation method: under the floor, or on a shelf in a well (this does not apply to a well).
Determining the suction depth of the pump
An important technical characteristic is the maximum depth level at which the pumping device can suck.
It indicates from what distance the pump can lift liquid. The station is capable of transporting liquid from a source 9 meters deep. Reference! Suction depth is the distance from the pumping equipment to the water layer. The pipe for pumping liquid can be installed at any depth, but the pump will pump water from the height at which the water layer is located.
For a deeper well, you will have to use a different type of pump: submersible; pumping stations equipped with an ejector are also used. In this case, water can be pumped from a depth of up to thirty meters. However, such equipment is more expensive.
If there is only a shortage of one meter to install a simple pump, the station is mounted inside the well or on top of it. A shelf is installed inside the well for pumping equipment, and pits are built in the wells. You need to know that the volume of water in sources can vary depending on the time of year; in summer it decreases. At a critical suction depth in summer, there may be no water in the source. When the water level rises, its supply will resume.
How to save equipment
It is important to pay attention to the safety of equipment. When installing the pump near a building where people permanently live, the installation can also be carried out in an insulated shed.
Attention! The room in which the pumping equipment is installed should not freeze in the winter.
If you need to install a pump in a country house where people don’t live in winter, then the situation is different. It is important that the pump is not stolen. You can install the equipment in the house, or in a room that is not conspicuous. Another installation option is a recessed caisson, which is camouflaged from others. You can also build a shelf inside the well, then you do not need to build a house over it, but install a lid with a strong lock. Hinges are welded on the walls of the well, holes are drilled on the lid through which locks are hung.