When considering a particular building, an uninformed person may mistake the drainage system for something insignificant, more likely even a decoration than a functional element.
An experienced builder, on the contrary, sees in this structure the cornerstone on which the well-being of the entire building rests.
After all, water in the construction industry is the main damaging factor, which, even according to all the rules, can make a house unsuitable for use in a short time.
How to properly drain water from a roof and where can moisture be drained to minimize its impact on the base and foundation?
Types of drainage systems
A building can have one of two types of drainage - internal and external.
Interior
Mainly used on flat roofs. Includes the following elements:
- pipelines;
- receiving funnels with a collector;
- connectors that allow cleaning of the system.
Outer
The vast majority of private and country houses are equipped with just such an external drain.
Such widespread use is due to the simplicity of the design and ease of installation.
Even a non-specialist can do it, you just need to purchase or make a set of parts yourself:
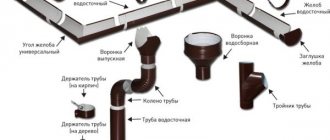
- Horizontal gutters: absorb moisture flowing from the roofing.
- Vertical drainpipes for draining water from the roof: through them, water flows down and is removed from the building (there is an elbow at the bottom of the pipe).
- Funnels: act as a transition element between gutters and downpipes.
- Caps: installed at the ends of gutters.
- Fastening parts (gutter brackets and pipe holders).
The efficiency of the drainage system largely depends on the shape of the gutter. The cross section of this element can be:
- semicircular;
- rectangular;
- trapezoidal.
Experience has shown that the best drainage of water is provided by gutters of the first two types.
In addition to the standard set of elements, the drainage system may include:
- Storm inlets: redirect water flowing through drainpipes into storm sewers.
- Mesh Liners: Installed in drains to retain leaves, twigs, and other debris that could clog the downspout.
- Drippers: thanks to these elements, water flows better from the edge of the roof.
Depending on the area of the slope, the size of the drainage system is selected:
- with a gutter diameter from 70 to 115 mm and pipes from 50 to 70 mm: used on the roofs of gazebos, sheds and small houses;
- from 115 to 130 mm (gutter) and from 75 to 100 mm (pipe): suitable for average houses with a roof area of about 100 sq. m;
- from 140 to 200 mm (gutter) and from 90 to 160 mm (pipe): option for a large mansion.
How to make a roof drain yourself
Let's look at how to make a personal drain from plastic pipes, since this is the simplest and most effective option. As practice has shown, the best materials for this matter are plastic sewer and ventilation pipes.
To work you will need the following tools:
- Bulgarian.
- Screwdriver or screwdriver.
- Roulette.
- Cord or thread.
- Self-tapping screws.
- Sandpaper.
- Level and plumb.
- Marker.
- Silicone sealant.
- Scaffolding or stairs.
And as materials you need to purchase:
- Plastic pipes with a diameter of 80, 90 or 110 mm, from which gutters will be made. They are cut in half.
- Plastic pipes with a diameter of 50 mm, which will act as vertical pipes for drainage.
- Plastic fittings, which will be funnels, connecting the gutter and vertical pipe.
- Diversion corners and elbows, thanks to which gutters can go around the corners of the building, and change the direction of vertical drain pipes to the desired location.
- Plastic pipe plugs, which will also need to be cut in half.
- Plastic brackets and iron clamps.
First of all, you need to decide on the cross-section of the pipes, which depends on the area of the roof itself. There is a special calculation formula that can be used to determine the required diameter. If the area of the roof slope is 50 m2 or less, then it is better to use pipes with a diameter of 80 mm. At a time when the area of the roof slope is 125 m2 or less, then 90 mm pipes are chosen. And when the area of the roof slope is more than 125 m2, a pipe with a diameter of 110 mm is required.
Advice! Funnels, bells and adapters will also be required, but their diameter is determined based on the diameter of the pipe that extends from the gutter.
Now we will make the gutters - this is the most difficult work, requiring precision and correct calculations. Pipes will be used as gutters, which must be cut in half lengthwise. It will be easy to cut them, but making it straight is difficult. From one pipe you will get two identical gutters. Here's what you need to do:
- Take a pipe of the required diameter and place it on the boards. For ease of work, secure the pipe with a self-tapping screw to the board.
- At the very top, on the front side of the pipe, moving a couple of centimeters away, screw a self-tapping screw into it exactly in the middle. Do the same thing differently. There is no need to tighten the screws all the way.
- Stretch a thread between them. Make sure everything is smooth.
- Now use a marker to mark the cut line on the pipe.
- Remove the thread and, focusing on the markings, begin sawing the pipe with a grinder. For safety reasons, wear safety glasses. Make sure to cut the pipe evenly, since the non-specialized type of gutters will depend on this.
- It remains to do exactly this and on the opposite side of the pipe. Only now the pipe is fixed to the board in two places, because by sawing the pipe, you have made two separate parts of it.
- Depending on the number of gutters needed, cut all the pipes intended for this purpose.
- Using sandpaper, clean the cut areas on the pipes.
This is how you can make gutters yourself, which will become the basis for a water drainage system. Now you just need to connect the elements of the gutters together, taking into account the required length on each wall. The finished gutters will be connected to one another using self-tapping screws. Since these are sewer pipes, one end of which is wider, it is possible to connect them quite simply;
- One gutter is inserted into the other with an overlap of 5–10 cm.
- Using a screwdriver or self-tapping screw, secure them together in three places: on the sides and bottom.
- The finished mount can be lubricated with silicone sealant to prevent water leakage.
- To make corner gutters, you need to take an elbow and cut it in half using the method you are already familiar with.
- At this stage, in the places where the vertical pipes will be placed, you need to insert a plastic fitting and secure it with self-tapping screws. Again, it is necessary to seal the joint with sealant.
Advice! When connecting the elements to each other, do not screw the screws in too tightly so that the connection points have little movement. That is why the structure will move under the influence of wind and different temperatures without collapsing.
It is possible to say that your roof drainage system is ready, all that remains is to put everything together and install it in the intended place.
All stages are demonstrated in detail in the material:
Choosing drainage material
Modern roofing systems for draining rainwater from the roof are divided into metal and plastic. Let's look at the advantages and disadvantages of both varieties.
Metal
This category includes systems made from the following materials:
- carbon (black) steel;
- stainless steel;
- copper;
- titanium;
- aluminum.
The most affordable, and therefore the most common, are drainage systems made of ordinary steel.
To prevent corrosion, it is coated with zinc (galvanic method or hot-dip galvanizing) or polymers. Gutters with a polymer coating look very attractive because they are made in color.
However, plastic is a fairly soft material and even with minor mechanical stress it is easily scratched, as a result of which the metal begins to rust.
Copper drainage system
Galvanized steel is more durable in this regard, so those homeowners who are primarily interested in functionality and durability prefer it. Today, many manufacturers apply pural on top of zinc - a polyurethane coating with the addition of polyamide, which performs a protective and decorative function.
Products made of stainless steel, copper and other metals have a spectacular appearance, but are very expensive, so they can only be seen in elite mansions.
Metal gutter systems have two advantages:
- strength;
- wide range of operating temperatures (resistance to severe frost is especially important).
Flaws:
- heavy weight;
- high price;
- complexity of installation (special tools for cutting and welding are required);
- danger of corrosion.
The metal system will look most harmonious on a roof made of metal tiles and corrugated sheets.
Plastic
Various polymers are used to make drainage parts, but in the vast majority of cases polyvinyl chloride is used.
It does not have the disadvantages characteristic of metal products, that is, it is cheap, lightweight, resistant to corrosion and easy to process.
In addition, plastic can be shaped into any shape, so polymer systems often have more interesting designs than metal ones. But PVC parts are easy to damage, and in extreme cold they become too fragile. For this reason, they are not recommended for use in regions with harsh winters.
Plastic drainage goes well with non-metallic roofing, for example, bitumen shingles.
To ensure reliable fixation of the drainage system, use only metal fasteners, even if only plastic parts are used.
When choosing a drainage system material, you should take into account the average amount of precipitation falling during the winter. If the likelihood of icing of the system is high, it is better to install a metal structure.
To preserve buildings and plantings, you need to be able to properly organize the drainage system. Installation of a drainage system around buildings and sites - types of drainage (open, backfill, closed) and creation with your own hands.
You will find a water supply diagram for a private house with connection to centralized networks here.
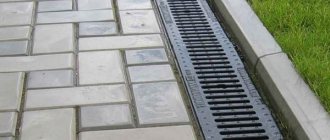
You will find everything about storm drainage trays in this topic https://aquacomm.ru/cancliz/zagorodnyie-doma/avtonomnaya/livnevaya/lotki.html. Concrete, plastic, polymer-sand storm water inlets and their main parameters.
Advantages of drainage from sewer pipes
Why were we looking at a structure that was made of plastic pipes? There are a couple of reasons for this. One of them is that it is the easiest thing to do yourself. As you can see for yourself, there are no particular difficulties during assembly, and the process itself is quite simple. The plastic system has a couple of advantages:
- Low price. In case your funds are limited, this is the perfect option for you. Since the material and all additional elements cost little, and no one will need to pay for the work, you have the opportunity to allow yourself to do this.
- Wide range of products. In construction stores you can purchase pipes of various diameters and colors, fittings, elbows and fastening elements.
- Little weight. That is why you have the opportunity to easily transport pipes, and, more importantly, install them in their places. You can do all the work yourself, without the help of friends or relatives (this will allow you to do without Magarych).
- Plastic is easy to work with. Pipes using a grinder or a hand saw. Everything cuts like butter. Based on this, you won’t have to make any special efforts to cut the pipe in half.
- Sewer pipes do not corrode and are resistant to temperature fluctuations and ultraviolet rays.
If you have additional questions, ask them below in the comments to the article. If you have already made such a drainage system, share your experience: how long has it helped you, whether there were any troubles during installation or during operation, that you are able to give advice to inexperienced craftsmen.
Read also:
- Installation of heating cable for drainage.
Installation of a drainage system
The drainage installation process includes the following stages: system design and installation.
Project development
The goal of the project is to determine the quantities of all parts that will need to be purchased. The following are taken into account:
- Drainpipes along one gutter should be installed at least every 10 m (remember that each pipe begins with a funnel).
- The step between the brackets for plastic gutters is 50 - 60 cm, for metal gutters - 80 - 100 cm.
- Holders (clamps) along the drainpipes are attached in increments of 1 - 2 m and must be installed at the joints.
The length of gutters and drainpipes, and accordingly the number of parts from which they are assembled, depends on the size of the building. It should be taken into account that at the bottom, each drainpipe is equipped with a branch, which is installed at a height of 30 cm from the ground.
Stages of installing a roof drain
Don't forget to count the number of corner pieces. It will depend on the shape of the building in plan.
Couplings for parts of gutters and pipes, plugs and fasteners should be purchased with a reserve, since all this little stuff “loves” to get lost and break, especially if the installer does not have enough experience.
Pay attention to the material of the seals. Rubber parts are suitable only for moderate climates; for severe frosts, rubber should be chosen.
Installation work
How to install water drainage from the roof? Installation of the system begins with securing the gutters.
If the roofing has not yet been laid, long brackets should be used that are attached to the rafters or eaves board.
Otherwise, that is, when the roof is already ready, short brackets are used, fixed to the front board.
Fastening for draining water from the roof on long brackets is more reliable, so it is advisable to install the drain before installing the roof.
The gutter must be laid with a slope of approximately 2–5 cm per 1 m of length. First, taking into account the difference in height, the outer brackets are fastened, then a cord is pulled between them and the remaining fasteners are installed along it.
Corner elements and funnels must be fixed with brackets on both sides.
For greater reliability, the assembly of the composite gutter should be performed at the bottom, and then the finished part should be delivered to the installation site. If you assemble the system by weight, the connections may turn out to be of poor quality.
If the gutter design does not provide couplings, its individual components should be connected with an overlap of 25 - 30 mm, installing rubber or rubber seals at the junction.
When connecting gutters to each other or to corner elements, there is no need to push the parts into the seal until it stops. Leave a gap of 3 - 4 mm, which will provide the material with the possibility of thermal expansion.
Gutter design
The water should flow into the middle of the gutter. Also, when installing the part, it should be taken into account that during heavy rain, the flow of water will deviate slightly away from the house due to its higher speed. The gutter is turned slightly so that its outer edge is 6 mm lower than the inner one. This technique will prevent water from entering the façade during heavy rain.
The ends of the gutters are closed with plugs using silicone sealant.
The procedure for performing installation work:
- It is necessary to attach a drip line to the roofing board, which will prevent water from accumulating under the roof. It should extend into the gutter approximately 15mm.
- According to the project, funnels are installed in the gutters to drain water from the roof.
- The assembly of drainpipes is carried out moving from top to bottom. The distance between the pipe and the wall should be from 3 to 8 cm. The pipe should not be placed close to the wall, since fungus can develop in this place due to the formation of condensation.
The clamps holding the pipe should be secured to the wall with dowels (walls made of brick or concrete) or self-tapping screws (wood).
The blind area protects the foundation of the house from the accumulation of rain moisture and groundwater. Technology for constructing a blind area around private buildings: concrete blind area, its waterproofing and insulation, read on our website.
We will look at a review of Sololift pumps for autonomous sewage in this material.
Installation of PVC gutters
Let's look at the specific features of installing different types of gutters. The simplest way to install a drain in a house is to construct a drain made of polyvinyl chloride.
The technology for installing PVC gutters is very simple and in general terms repeats the five main elements of gutters construction that we have already mentioned. However, there are a number of its own features:
- PVC pipes are very light and can be installed independently, however, given that the standard pipe length is about 2 meters, and the work will have to be carried out at the height of the house, using ladders or scaffolding, it is advisable to do it with at least two people;
- Pipe cutting is carried out by regular sawing, which is very convenient since it does not require special equipment. It is advisable to carry out sawing with a new or newly sharpened and sharp tool in order to ensure the least amount of burrs that will not allow subsequent elements to be firmly secured into the lock;
- All elements of PVC pipes are very simple and are installed using the fastening materials included, as a rule, in the purchase kit.
Where should the water be drained?
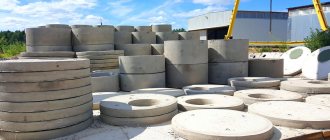
If the house is located on a hill, concrete gutters can be laid on the ground under the drainpipes, through which the water will flow down.
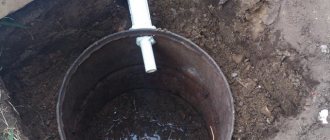
If the terrain or surrounding buildings do not allow for natural drainage of water, a drainage pit is constructed.
If there is a well or well on the site, the pit should be located close to it.
Typically the dimensions of the drainage pit are 1 or 2 m . To prevent the walls of the excavation from crumbling, it is lined with brick from the inside, leaving a hole on one side for the inlet pipe.
The water entering the pit will gradually go into the ground.
The pipe leading to the drainage pit is laid in a trench with the greatest possible slope, and it should be located below the freezing depth of the soil. At a shallower depth, the pipe or soil above it should be insulated.
And yet why
The drain is an integral part of the design of the entire house. Its presence is extremely important for several reasons. It is possible to notice a house that does not have a drainage system on the roof only at the construction stage, since in most cases this system is done first of all. And all because it performs serious functions:
- Protective function. Thanks to the drain, precipitation does not fall on the walls, foundation, steps and blind area. This is the main purpose of the drain. During the time it is absent, the basement of the house lasts for 5–10 years. Water will fall on the foundation and go into the ground, causing the foundation to erode. Moreover, water marks, smudges and stains may appear on the walls, which will spoil the aesthetic appearance of the entire building. And the steps of the porch will collapse over time.
- Collecting rainwater from the roof. This is especially significant for owners of a large vegetable garden or garden, since rainwater is an excellent way to water the plants. If the drain pipe is diverted into a special container, a barrel or a huge tank, then after a good rain, you will have an additional source of water. This is not only good for the soil, but also for your wallet. The presence of such technical water will not hurt anyone.
- A decorative element for your home. If you make a beautiful cast with your own hands, you can complement a non-specialized picture of a house, giving it a complete look.
All this makes the drainage system an important component of the entire building. It goes without saying that it is possible to do without it in some cases, but this threatens with undesirable consequences.
It must be emphasized that it is also prohibited to drain with a swift hand; in order for it to function correctly and for a long time, it is necessary to fulfill some requirements:
- The product must have great strength, resistance to various mechanical deformations and high loads. It must withstand strong gusts of wind, hail, the weight of thick snow in winter, etc.;
- Durability. The material must be resistant to various external factors, corrosion from water, and withstand temperature changes and precipitation.
- Last, but important, is a good appearance, since no one wants one detail to spoil the entire façade.
It is fundamentally important to fulfill all these requirements, then your efforts will not be in vain. But what kind of material can a drain be made from, and which one will be better? Let's define it.
Roof drains - design, functions and installation
The durability of the roof depends on many factors: the correctness of the calculations, the quality of the roofing material, as well as compliance with the installation technology. However, even such a small thing as draining water from the slopes has an impact on the life of the roof. Organizing a well-thought-out drainage system is an important stage of construction, which experienced roofers do not forget about. In this article we will talk about the drainage device for rainwater, how to choose the right one, and then install this drainage element with your own hands.
Drain system design
When installing a roof drain for a small building, it would be appropriate to use a gutter up to 110 mm in size and a pipe up to 75 mm in diameter. If the roof area is large, then the gutter and pipe are required larger -130 mm and 100 mm, respectively. For buildings with a large roof area, you will need a gutter 200 mm in diameter and a pipe 150 mm in size. The length of the gutter directly affects the downspout - if its length exceeds 8 m, then two downspouts will need to be installed.
To install drains with your own hands, you will need certain materials and tools:
- pipes and gutters;
- connection elements;
- gutter plug;
- rubber seals;
- funnels for receiving water;
- glue and sealants;
- hacksaw or grinder.
It is important to pay attention to some nuances before making roof drains with your own hands. The gutter should be attached to the roof and wall at an angle relative to the drain pipe, which will ensure efficient drainage of water. You need to carefully study the instructions included with the purchased kit, which should contain a detailed installation diagram.
Gutter: practicality, beauty and economy
It would seem that the simple task of arranging a drainage system for rainwater or snow and ice flows in a house actually requires a systematic approach. Drainage in a private house plays a significant role in the safety of the structure of the house, in particular the walls and foundation. Drainage for the roof can be organized according to a standard scheme, using simple technologies. But its proper installation will require both knowledge and certain experience. If the roof drain is installed without the required slope or without the use of other technological features, then water drainage will be difficult, and you may end up with excess moisture accumulation directly under the roof. In any case, an amateur approach to drain construction can lead to unpleasant consequences, including the collapse of drains.
However, in addition to purely practical applications, the arrangement of high-quality drainage decorates the facade of the building. It gives it solidity and indicates the thoughtfulness of the entire structure. If a properly executed drainage system is combined with an effective drainage system, then the foundation of a private house will serve the owners for a very long time and impeccably, since it will not be subject to constant erosion. Now, water will not sharpen the stone, but will serve for the benefit of the owner, either for watering or for other household needs.
To sum up our short story, it should be noted that a correct and high-quality drainage system will not only save the house from external influences, but will also make the design more impressive and can save money on house maintenance, in particular on watering.
DIY drains
The roof drainage system consists of gutters, pipes and funnels. If you can make gutters yourself, it is advisable to use ready-made funnels (with a wide neck, overhead or walk-through). Gutters can have a rounded shape or be a rectangular box. You can make drains of any shape with your own hands.
The rectangular gutter is made from a strip of sheet steel, the thickness of which does not exceed 1 mm. To bend metal, the easiest way is to use an appropriate machine, but the work can also be done using a mallet. The rounded gutter is half of a thin-walled steel pipe cut lengthwise along the central axis. Pipes should be cut with sharp metal scissors. When using an angle grinder, the likelihood of rapid corrosion of the sections and then the entire gutter increases significantly
.
Self-made elements of the drainage system must be protected from corrosion using protective and decorative paints and varnishes. Particular attention should be paid to the edges and joints of the mounted structure.
Calculation of the drainage system
The calculation of the drainage system is performed at the design stage of the house. When developing a roofing scheme, it is necessary to determine the diameter of the gutters and the location of the funnels. Gutters of standard diameters are most often found on sale - 80 mm, 100 mm, 125 mm. Funnels should be installed at intervals of no more than 24 meters, the optimal distance between two funnels is 8-12 meters - in this case, a significant slope of the gutters is not required.
The ability of the system to effectively drain melt and rainwater is calculated based on the following parameters: per 1 sq. m of roof (in horizontal projection) should account for 1.5 sq. m. see the cross-sectional area of the gutter and funnel. Calculation for a drain with a diameter of 100 mm: the cross-sectional area of the gutter is 78.5 square meters. see, which allows for the removal of storm water from the roof, the horizontal projection area of which reaches 52 square meters. m.
Appropriate amendments are made to the calculations if the climate of the region where the house is being built is characterized by aridity or rainfall above average.
Having developed a general design diagram for draining rainwater from the roof, you can use a special program for accurate calculations, which is provided by various manufacturers of materials for installing drainage systems.
When designing a structure, it is necessary to take into account the weight of its elements. Particular attention should be paid to systems made of heavy materials, since they create a serious additional load on the foundation. In particular, it is not recommended to install copper gutters and pipes on houses with strip foundations.
Plastic plums
Plastic roof drains have a very affordable price and a successful combination of long-term operation and ease of installation. The set of plastic gutters includes:
- gutters;
- pipes;
- funnels;
- couplings;
- fastening, corner, connecting elements;
- pipes
Installation of a drainage system.