A cast iron bathtub is a durable, wear-resistant and impact-resistant sanitary product that has been used as a washing container for hundreds of years. Previously, bowls made from this difficult-to-process heavy alloy had no worthy alternative. But even now, when construction stores are full of more modern and varied steel and acrylic models, they continue to be in demand.
The popularity of a cast iron bathtub is explained by the fact that despite its fairly high cost, it has a long service life and repairability. After 10-15 years of use, when the enamel turns yellow or becomes cracked, to restore the original appearance of the product with your own hands, it is enough to cover the bowl with a new layer of paint.
Why restore your bathtub yourself?
Restoring the enamel or completely restoring an old bathtub will be much cheaper than buying, delivering and installing a new one and disposing of the old one. We don’t argue - this is not the easiest job, but it is quite within the capabilities of an unprepared person. The main thing is to take your time and do exactly according to the instructions, then everything will definitely work out.
If you are afraid of ruining something, call the specialists. Finding such masters is not a problem: websites and newspapers are full of advertisements. In addition, probably someone I know has already done a similar procedure. But remember: the cost of the technician’s working time will be added to the cost of the consumables that we calculated for each option.
For example, one of the companies offers a bathtub restoration service for only 4,500 rubles. It seems like a small overpayment for the saved time and quality. But this cost does not include preparatory work: cleaning the bathtub, dismantling and reinstalling the drain, removing paint and enamel and a bunch of other little things. In total - about 8,000 rubles. There is a difference.
Method No. 1. Restoring the bathtub using bleaching and polishing
If the enamel of a cast iron or steel bathtub does not have large visible cracks or chips and is simply darkened or yellowed, we restore its whiteness and smoothness by polishing and bleaching. The procedure is simple and safe for the enamel: the coating of a good bathtub can be polished several times. It changes color because microcracks appear on its surface. As a result, dirt and other deposits accumulate there - this is what we will fight with.
Preparing the necessary materials
We buy a cleaning bleach for the bath at the hardware store. In any supermarket you will find a dozen items. You can also use folk remedies: vinegar, chlorine bleach, car cleaner. You will also need a rotary or vibration type sander. Rent it from friends or buy it - it’s a useful thing and will come in handy around the house.
Whitening
First, thoroughly wash the bathtub with detergent and cleaning powder, remove all dirt with a sponge or stiff brush. Then apply bleach to the clean surface of the bathtub. After the time specified in the instructions, rinse off the bleach with plenty of water. If an acid is used as a bleach, add soda to the water: the alkali neutralizes the acid (chemistry, grade 7). Repeat the treatment in those places where darkening or yellowing remains.1.
Polishing
Before polishing, try bleaching and polishing some of the most dirty areas. If visible cracks remain, it means that the enamel coating has worn out and requires restoration or even replacement. If everything turned out well, great. Start with coarse sandpaper, then medium sandpaper, and finish with polishing paste. Products that are used to polish cars are perfect.
Pros and cons of bleaching and polishing
The main advantage of this method is its low cost: a sanding machine will cost you from 500 to 2500 rubles, a bleaching agent - about 500, sandpaper - 200 rubles per package. Total: 1200 - 1500 rubles if you buy the cheapest grinding machine. The time can be completed in one day: the bath will be ready for use the same evening.
Unfortunately, polishing will last for a year or two, no more: the enamel layer becomes thinner, but the temperature and mechanical effects remain the same. Then - only replacement.
Preparatory work
Practice has shown that restoration of enamel on a cast-iron bathtub occurs according to the same scheme: preparing the bathroom - cleaning the plumbing - washing the bathtub - dismantling the siphon - degreasing the surface - protecting the floor and walls from paint, acrylic, glue - restoring the enamel.
All points, except the last one, relate to preparatory work. Therefore, we will put this type of work into a separate section and consider it in detail.
Materials and tools
To carry out preparatory work you will need:
- old newspapers or packaging cardboard;
- polyethylene film;
- acetone or white spirit - degreaser;
- "Tsinkar" - rust converter;
- approximately 5 rolls of P60 sandpaper;
- 1-2 rolls of P600 sandpaper (people call it “zero”);
- scotch;
- masking tape.
Will help you with your work:
- electric drill or screwdriver with an attachment for grinding enamel;
Electric drill with grinding attachment.
- knife or scissors;
- slotted screwdriver;
- soft, lint-free rags - needed for work with grease solvent and rust converter;
- respirator.
Preparing the bathroom for work
In the room where the enamel of the cast-iron bathtub will be restored, there should be no unnecessary objects that could fall on the newly applied layer of paint, as well as household appliances - dust from the grinding wheel can get even into places protected by film. Therefore, personal hygiene products are taken out. The curtain and holder are removed. The washing machine is moved into the corridor or wrapped in film.
The ventilation hole is covered with paper - this prevents drafts that can carry dust from the apartment onto the undried paint. In a combined bathroom, metering devices are protected from dust with plastic film and tape.
Cleaning the bathtub surface. The liquid consistency of the paint does not allow you to hide the slightest flaws in the surface being painted. Therefore, it must be perfectly smooth, while still clean and dry. It is difficult to achieve this condition of the enamel coating of an old bathtub. It takes significant effort and time.
First, the peeled parts of the coating, rust and dirt accumulated in microcracks are removed. Work is carried out either manually, using P60 sandpaper, or using a power tool with a grinding attachment.
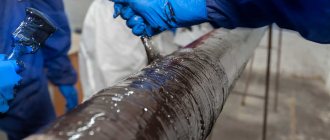
Rusted areas are treated with a rust converter and then sanded. Chips and cracks are filled with car repair compounds. Cleaning should be carried out over the entire surface of the bowl, paying special attention to the curves of the bath.
Attention: when working manually, it may be difficult to hold the sandpaper in your hands. A simple small block of sandpaper around which you can wrap will help.
The process is completed by passing fine-grained sandpaper over the entire surface of the bath. The initial movements are rectilinear, the final ones are circular. After the operation is completed, the sides and bottom of the font are rubbed with the palm of your hand to reveal the smallest irregularities. If problem areas are found, work with sandpaper is resumed.
Washing sanitary equipment. Any grinding work is accompanied by the formation of a dust cloud, which settles on the ceiling, walls, and surface of the bathtub. It is imperative to remove dust - it may end up on fresh paint. Therefore, the ceiling, walls and plumbing (taps, mixer, sink) are washed with hot water from a shower hose. The bowl itself is thoroughly washed with liquid detergents.
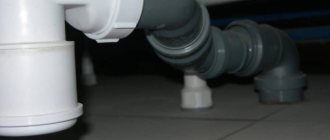
Disassembling the siphon. It is unlikely that it will be possible to protect a drain with overflow from paint. It's easier to remove them. For this:
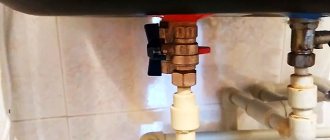
- All water supply taps to the bathroom are closed. If this is not possible, you need to make sure there are no leaks at the taps. If they exist, repair work is carried out;
- remove the drain with overflow using a screwdriver: unscrew the mounting screws. If they are rusty, you will have to use brute force and buy a new drain pipe. It is not necessary to remove the corrugated pipe from the sewer pipe. If an unpleasant odor appears, plug the drain and overflow holes with a rag.
Degreasing the bath. Paint does not adhere to a greasy surface - work is required to degrease the enamel. To do this, wipe the bottom, walls and sides of the bathtub with a rag soaked in acetone or white spirit.
In this way, it is possible not only to remove fatty deposits, but also to remove remaining dust and dirt. After wiping, wipe the surface with a well-washed but dry palm. Hand pass along the sides and walls from top to bottom, driving the remaining fibers to the bottom. The dust particles are removed from the bottom into the drain hole.
Protecting the room from paint drops. You can paint the bathtub with a brush or using a spray can. In both cases, there will be tiny droplets of paint on the wall and floor that are difficult to remove. You can protect them using old newspapers and plastic film. The paper is laid overlapping on the floor and secured with masking tape (adhesive tape), the walls are covered with film. The sink and faucet with taps are also closed.
The walls are covered with polyethylene.
Method No. 2. Restoration of a bathtub with self-leveling acrylic
Renewing a bathtub with acrylic is a little more expensive and takes longer. You need to strip off the old enamel from the bathtub and apply a new coating based on acrylic resin.
Preparing the necessary materials
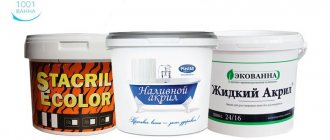
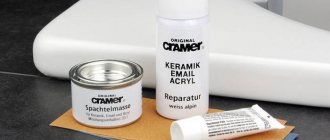
Arm yourself with a sander with a coarse abrasive, a drill with a wire brush, or regular coarse sandpaper. You will also need metal putty. Where to buy? In any hardware store. There you can buy a special filling composition for bathtubs based on acrylic resin. For example, “Stacrylic” or “Liquid acrylic”.
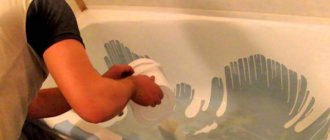
Removing old enamel and preparing the surface
First, carefully remove all old enamel. It will be noisy and long. Afterwards, rinse the bathtub with a degreaser and dry thoroughly. Fill large unevenness and roughness (and there will certainly be some) with the metal putty you are already familiar with.
Next, disconnect the bathtub from all plumbing: remove the faucet if it interferes with the process, and be sure to disconnect the drain. Place a container under the drain hole - excess prepared mixture will drain there. Prepare the composition. To do this, mix liquid acrylic with hardener in the proportion indicated in the instructions and mix thoroughly. The mixture should be viscous and fluid.
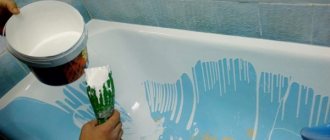
Filling a bathtub with acrylic
Carefully and evenly pour the mixture onto the edges of the bath so that it flows down to the bottom of the bath.
There is no need to correct or “help” the composition - it will flow to the bottom itself and leave a coating of the required thickness. Please note that acrylic coating is applied in one or more layers. Before applying the next layer, let the previous one dry thoroughly (at least a day). Leave the updated bath alone for several days: the acrylic composition needs 3 to 5 days to completely dry. If you covered the bathtub in several layers, wait at least a week.
Pros and cons of using acrylic
We have good news for you: the service life of new self-leveling enamel (subject to careful care) is up to 5 years. Then the procedure will need to be repeated. However, this method will cost a little more than the previous one: a grinding machine costs from 500 to 1200 rubles, liquid acrylic for a 1.7 m bath - about 2000 rubles (for one layer of coating), detergent - about 200 rubles, putty for metal - 700 Total: 3400 rubles (with the most inexpensive sander).
Another disadvantage is that you will have to spend more time. The whole process will take two to three days: a day to clean off the old enamel, wash and putty, and a day or two to pour and dry the mixture. You will be able to use the bathroom only after 5 days.
Dyeing technology
The instructions on how to paint a cast iron bathtub at home have two main sections:
- preparation of the composition;
- painting with a brush or spray can.
Preparation of the composition
Stirring paint is usually considered a simple task. But not in this case. There are many nuances here.
- Many types of paints require heating. This can be done in a water bath by placing the jar in a container of hot water.
- Mixing the components must be carried out in strict sequence. Changing the order may cause the paint to cure instantly.
- Stirring is carried out in parts, because the paint sets quickly (after 40-45 minutes), and must be applied in 2 layers.
All this is indicated in the instructions printed on the can. Therefore, strict adherence to the letter of the recommendations is mandatory.
Painting with a brush
Painting is carried out after preliminary surface preparation. At first glance, the painting process itself is not complicated - you just need to apply a vertical stripe and rub it to the sides. Difficulties arise precisely in the process of rubbing the paint on the sides. The thick and viscous mass is poorly distributed on an unpainted surface. Need experience. Therefore, many craftsmen are not very willing to take on this type of work. But after a little training, you can do the bathtub restoration yourself.
The work is performed in the following sequence:
- the drain is closed with a plastic cup;
- the diluted paint is poured into a small container;
- paint is applied liberally to the brush;
- a vertical strip of paint is applied from the bottom to the edge of the side;
Important: to prevent the brush from leaving hairs on the painted surface, it must be soaked in warm water.
- the applied paint is rubbed to the sides. The effort on the hand should be maximum. Otherwise, you won’t get a smooth, drip-free surface;
- the second stripe is applied at such a distance from the first that there is enough paint to treat not only the unpainted area between the stripes, but also half of the surface already painted with the first stripe, i.e. overlap;
Attention: only the first layer of enamel is applied overlapping. There is no such requirement for subsequent layers.
- After painting the entire surface with tweezers (touching the paint with your hands is strictly prohibited), remove the hairs from the brush.
Smudges appear approximately 10-15 minutes after applying the paint. They can be removed with a used (without paint) brush, moving upward to the point of formation. Sagging in the area of the drain and overflow is cut off with a knife after complete polymerization (drying) of the enamel.
The second and third layers are applied after the first has dried or 15-20 minutes after completion of the primary painting. The specific time for starting work on applying the next layer is indicated in the instructions.
The application of subsequent layers must begin from the place where work began. The technique is the same, except that there is no need to overlap the paint.
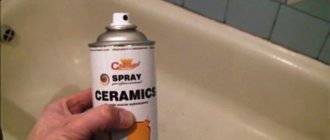
Spray painting
The spray paint is ready for use. Shake it before starting work. If there is a ball inside, you need to shake it for several minutes (see instructions). The can must be held vertically at a distance of 30 cm from the surface.
During work, the door, vents and hood must be closed - the smallest dust can get onto the painted surface with air currents.
At the end of the painting work, the bathtub is closed for a day - during this time you cannot go in there. It is advisable to postpone the first use of water procedures for 10 days, despite the fact that the enamel dries from 2 to 5 days.
Method No. 3. Restoring a bathtub using a liner
And finally, the most expensive and most effective way to update a bathtub is an acrylic liner. The principle is clear from the name: an acrylic liner is installed in an old bathtub according to size. It is not necessary to remove the old enamel. Of course, some things will have to be removed and removed. But first things first.
Preparing the necessary materials
You will need bathtub detergent, foam to hold it in place, waterproofing sealant, and the liner itself.
Surface preparation
Rinse and degrease the inside of the bath thoroughly and let it dry thoroughly. Next, remove the decorative screen or false panels and carefully remove the row of tiles that touches the tub.
Installing the liner
First, apply a fixing compound - two-component polyurethane foam - to the inner surfaces of the old bathtub. Insert the finished liner into the bathtub. After this, treat the joints with polyurethane foam or waterproofing sealant. Return the tiles and false panels to their place.
In principle, you can use the bath immediately, but it is better to pour water into it and leave it like that for a day. Under the weight, the liner will “sit down” and take the shape of an old bathtub.
Pros and cons of using an earbud
The main advantage of this method is that a bathtub with an acrylic liner will last at least 15 years. But there are also disadvantages: ready-made liners are sold only for standard-sized bathtubs. For a non-standard bathtub, you will have to make it to order, and this is more expensive, you understand.
The high cost is also not encouraging: a standard acrylic liner of size 1.5 will cost about 4,000 rubles, a 1.7-meter one will cost from 4,800 and more. Polyurethane foam for fixing will cost about 300 rubles. Silicone sealant for joints - approximately 200. Bath detergent - 200. The total, according to the most conservative estimates, will be about 5,000 rubles.
Why does the enamel on a cast iron bath deteriorate?
The enamel layer does not deteriorate so quickly; the layer will last 10-15 years. At home, you can enamel the surface; you will need to use new paint and completely cover the bathtub. Bathtub enamel repair may be required due to the following defects:
- The appearance of a yellowish tint is due to contact with water with elevated levels of iron;
- Chips occur on the surface after an impact or fall of any product with force;
- Scuffs, their formation is associated with improper cleaning of the surface; you should not use abrasives and hard tools;
- Cracks are formed under the influence of changes in water temperature and mechanical stress.
It is better to quickly eliminate minor defects, then there will be no need to proceed to global filling of new enamel.
The appearance of a yellowish tint is due to contact with water with elevated levels of iron.
Useful tips
- Wash enamelled steel and cast iron bathtubs, as well as bathtubs with an acrylic coating, with hot water and detergent or laundry soap.
- Wipe the bathtub dry: the water contains impurities that are deposited on the walls of the bathtub and eat into the enamel. Remember the scale in the kettle - these are the same deposits
- To avoid damaging the enamel or acrylic coating, do not use metal sponges or abrasive powders to clean the bathtub. Give preference to brushes made of plastic or natural bristles
- Products such as “Komet” or “Domestos” contain aggressive substances that can corrode enamel. Use them as little as possible, and only for the heaviest stains. Do not use them to clean acrylic bathtubs - special products are sold for them
- Do not place objects in the bath that can scratch the enamel or acrylic coating: stools, metal buckets and basins. Be careful not to drop heavy objects into the bathtub, which could chip the enamel or damage the acrylic.
If you follow these simple rules, your updated bathtub will last you a very long time. Live easy!
Signs of coating wear
In many respects, a cast iron bathtub is superior to its competitors. It is capable of excellent heat retention, cannot be deformed and does not increase the noise of running water. Even due to its long service life, the product, like any other, loses its appearance and characteristics over time.
You can recognize the wear of the coating by a number of the following signs:
- The enamel has become rough.
- The coating absorbs rust and dirt, which can only be removed with considerable effort or cannot be removed at all.
- Chips or cracks have appeared on the enamel surface.
The formation of any of these signs indicates a violation of the bathroom coating and the need for its restoration or replacement.
Before giving preference to one or another option, you need to find out the advantages and disadvantages of each of them, so you can determine the most suitable one for yourself.