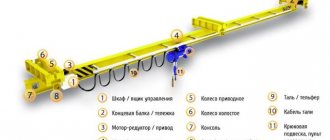
How to weld a ladder from a metal corner - instructions and video
The layout of a house very often involves the presence of a staircase, either as a lift to the floor or to the attic.
Having welding skills, it will not be difficult to make a simple metal ladder yourself. The ladder is made of corners and a welded metal plate between them.
How to weld a staircase from a metal corner with calculation will be described below.
Where to begin
I.
Basic requirements:
- The width of the stairs is within 800÷100mm.
- The steps of the stairs should be clearly visible at any time of the day.
- Mandatory installation of handrails for stairs with more than 3 steps.
- The supporting elements must withstand a load of 180÷200 kg, for railings – 100 kg.
- The slope of the stairs depends on the installation location:
- no more than 38° – residential premises.
- no more than 45° - for apartments.
- 63÷74° – for attic stairs.
Calculation of the angle of the stairs
- A gap of 5÷6 cm must be maintained between the stairs and the wall.
- If the staircase is installed on a building of 2 or more floors, it is necessary to make a common span between the staircase and the house.
- The staircase to climb above the 1st floor must be fireproof.
II.
Decide on the installation location
III.
Calculation. Entrust the calculation of the optimal load-bearing capacity to a specialist and use ready-made drawings. Single-span and single-cantilever beams are subject to calculations for rigidity and strength. Deflection of loaded elements 1:400, load 1:300 kg/m2
The optimal combination of staircase parameters:
2H+A=0.64 m
H – step height, optimal height 160÷180mm or 180÷120mm.
A – step width 200÷320 mm.
The number of steps is determined based on the angle of inclination of the stairs and the size of the steps. The total height is measured and divided by the number of steps.
Important!
The height of the steps should be the same.
Handrail height: not less than 900mm.
- The span height is 2850 mm, the height of the steps is 160÷170mm. h=2850/160=178, rounded = 190mm, for a more comfortable step and maintaining proportions
- Number of steps: 2850/190=15 pcs.
- We check the ratio: 2*190+260=640 mm.
- We determine the length AB: 260 mm*15pcs=3900mm; NE = 2850mm.
AB 2 =e 2 +b 2 =x 2; AB = 3900 2 +2850 2 = 4830 mm = 4.83 m and 5 mm for the profile.
Note!
The flatter the staircase, the more material costs will be required.
If, when calculating, the step turns out to be insufficiently deep to install the foot, it can be lengthened by overhanging the upper step over the lower one, a maximum increase of up to 50 mm is allowed.
IV.
Drawing. The main elements of a metal staircase are: corner, channel and I-beam. The steps can be made of metal sheets or gratings, finished with a special protective or decorative material. The finishing depends on the installation location of the structure; wood and stone can be classified as universal. When using stairs outdoors, special preventive pads can be used.
Drawing of a staircase in two versions.
Materials and tools
I.
The material for the steps is sheet or lattice rough steel 2÷3mm thick
II.
Blanks:
- Corners 45 x 45 mm.
- Channel dimensions 150 x 200 mm, material thickness 8 mm or I-beam. Instead of a channel, a more rigid profile pipe can be used, which will reduce vibration when walking. The lighter the profile, the less reliable it is; this must be taken into account when creating a staircase.
Note!
Parts made of ordinary stainless steel and aluminum must be painted.
III.
Tools and protective equipment:
- Welding machine, electrodes.
- Protective clothing in the form of a mask, mittens and goggles required during machining.
- Primer and paint.
- Bolts and nuts, welding seam.
- Cutting discs.
- Grinding discs.
- Tape measure and marking pencil.
- Rack.
- Vise.
Execution of work
I.
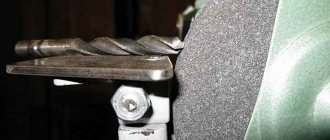
From the available corner blanks, make corners of the required sizes and, using welding, connect them into an L shape in the right and left versions. During the work, all sharp corners must be sanded. Monitor the quality of the seam.
II.
You can also add fillets cut from rebar under the brackets.
III.
Make markings on both right and left stringers for installation of step channels.
IV.
Then install the beam, install the upper part with anchor bolts to the wall, and weld the lower part to the metal platform.
V.
According to the applied markings, weld the steps: fillets and support units made from angles.
VI.
Welding is carried out with control of horizontal level and verticality.
VII.
Connect the stringers together using corners the size of which is equal to the width of the step.
VIII.
Weld the running gear of the steps and the riser.
IX.
Install handrails. Welding of corners is carried out along the outer part of the stringers.
X.
Cover the stairs with primer and let dry. Paint all structural elements.
For more information on how to weld a staircase from a metal corner, watch the video:
A staircase is a critical and complex assembly to manufacture. But with proper calculation and compliance with safety precautions, the work and the result will please the eye and wallet.
Stairs made from angle and channel: calculation, production and installation of an iron frame
Contents
1. Introduction
2. Stairs made of channel and angle: 5 main mistakes during frame installation
a. Calculation of stairs from channel and corner
b. Installation of a staircase frame made of channel and angle
c. The correctness of ordering a staircase project from a pipe corner
c. Project of an iron staircase from a corner and a channel
e. Manufacturing of stairs from channel and angle
3. Jambs in stairs are visible
4. What does the staircase frame consist of?
5. Why do ZLMK make staircase frames from channel and angle bars?
Introduction to the article
In 2014, there were no companies in the Moscow region that specialized in stairs with a metal frame and all contractors made all the stairs in a row.
Starting in early 2015, I started working on stairs and decided to focus on one segment of stairs in particular.
Why? Because I analyzed staircase companies and found that the quality of the products produced is less than satisfactory, because you have to delve into all the nuances of all types of stairs and it is impossible to achieve great quality of the product. It’s like with doctors: all doctors with golden hands are engaged in one type of activity (let’s say my best friend is a surgeon for complex situations with the jaw and he simply does not undertake other operations).
It’s the same with stairs, in pursuit of short-term profit, many contractors agree to make any order, anything, and this is bad for the client from a quality point of view and bad for the manufacturing company from a business point of view.
Stairs made of channel and angle: 5 main mistakes during frame installation
Following me in 2015, my competitors began to multiply in Moscow and the Moscow region, companies that, like me, began to specialize exclusively in metal frames. I, like the head of any business, monitor competitors. And this is what I discovered.
Firstly, without immersing themselves in the details, contractors, and even more so shabatniks, make such mistakes, as a result of which the client then, at best, overpays for complex staircase cladding, and in the worst case, which is most often, he completely remakes the frame for the staircase from a corner .
I'll tell you more about this now.
Calculation of stairs from channel and corner
It all starts with choosing a contractor. The first mistake: the customer finds a welder, even if he has a drawing or design project, he goes to the welder with this and says: “make me a metal staircase frame according to this drawing.”
Even if they make you a metal frame for the stairs from a corner and you don’t kick your welder out of the house during the installation itself, everything will come to the point that in six months, when you need to sheathe this metal frame of the stairs with wood, a wood installer will come and he will simply say: “This staircase cannot be covered with wood, it needs to be completely redone.” This is the first time.
And the second case is when you find a contractor who deals with metal structures. And you don't pay attention to what he does at all. Metal structures are different. First of all, you need to find a contractor who makes stairs on a metal frame, who knows all the nuances of stairs, knows how to correctly calculate the stairs, and how to install the ideal staircase in your particular case.
You need to find a specific contractor who, firstly: deals with stairs, and secondly, deals with stairs on a metal frame. This means that he will not only be able to make a metal staircase frame, but will also be able to cover it with wood. This can only be done by a contractor who knows both the nuances of wood and the nuances of metal.
Installation of a staircase frame made of channel and angle
Incorrect measurements of the staircase opening.
There is one basic rule: measure twice, cut once.
If you use this rule, everything will be fine. It is necessary to double-check three main dimensions seven times: the height between floors, the length of the staircase opening itself, and the width of the staircase opening.
Because if you make a metal staircase frame according to the wrong dimensions, you won’t be able to fix anything later. It will be necessary to completely redo the design.
Even if a staircase specialist comes to you, still double-check his measurements, because there is a human factor in our business.
Please also note that measurements between floors must be taken from the floor of the first floor to the floor of the second floor. Attention : not from the ground floor floor to the ceiling, but from floor to floor.
It is also important to consider how much the floors on the first floor will rise and how much the floors on the second floor will rise.
This is necessary so that all steps are the same size. By following this simple advice, you can avoid the most basic and popular mistakes in measuring stairs. The correctness of ordering a staircase project from the corner of a pipe
The third mistake is that the measurer or the person who is going to make the staircase does not take into account the nuances and features of the object itself. Things to consider:
- The presence of a doorway,
- Presence or absence of a window opening The ladder should not extend beyond the door or window opening!
- Curvature of the walls. Let’s say you look like it’s ninety degrees, but in fact it’s eighty-nine degrees. And during installation this causes a problem.
- Wall material. This is necessary in order to understand whether we can attach to the wall or not. And if we can strengthen ourselves, then in what way?
- Availability of communications in the walls and floor. Let’s say that it doesn’t happen that you have a heated floor in your house, the installer, not having this information, breaks through the heated floor with a puncher and in the end everything will need to be redone. To prevent this from happening, this must be taken into account.
- The critical point! This is the distance from where you stand on the stairs to the ceiling. This distance must always be at least two meters.
If you take into account these six basic nuances, then most likely you will not have a jamb in the manufacture and installation of the stairs.
Project of an iron staircase from a corner and a channel
The most important thing is that the person who will design the stairs for you has experience in designing stairs on a metal frame.
If you have avoided previous mistakes, then the chance that there will be an error at this stage is minimal, provided that the person doing the project has experience in designing stairs.
It is important that there is a gap of ten centimeters between the marches
This is necessary so that the railings from the lower flight are not above the railings of the upper flight, but there is a distance between them.
To prevent it from happening like this:
Here they did not provide a gap between the flights of the frame for the staircase from the corner.
If they had made a gap like here, the gap between the flights was 10 cm, then this situation would not have happened.
And since they made a metal frame without a gap between the marches, it turned out to be such a jamb. The photo shows the metal frame of the ladder that is higher in the tree
You also need to take into account technical gaps: between all walls there must be gaps of at least two centimeters in the metal. And also, if you noticed in the previous paragraph that your angles are not ninety degrees, but 89 or 88 or 91 or 92, i.e. If there are any differences, then this needs to be taken into account in the project.
It is important that there is a two-centimeter gap on all sides.
And in the longest flight of stairs, make a gap of three, or better, four centimeters. If you have walls made of aerated concrete and the density is less than 300 D, then it is better to place support legs under the staircase frame so that we carry the load on the floor.
If you have a monolithic end of the ceiling , then the fastening is done in the usual way, through the reinforcement and the fiftieth corner.
If the end of the ceiling is wooden , then fastenings must be made through large self-tapping screws.
If you take these basic points into account when designing a staircase, then everything will be fine during installation.
Manufacturing of stairs from channel and angle
This is the installation of a metal staircase frame on site.
As in the previous point, the following is important: that the installation team has experience in installing metal staircase frames.
Second, and most importantly, have the crew install the metal stair frame based on the shop drawing that was designed by the stair designer. It is also extremely important to start installing the stairs not from the bottom of the stairs, but from the top, so that all errors reach the last step. Also, before proceeding with the installation of the stairs, you need to double-check using the measurement sheet and the working drawing whether the dimensions in the project coincide with the actual ones on site.
If after this everything is fine, then we attach it through a metal corner of the fiftieth size to the end of the ceiling.
Let me remind you that if the end of the ceiling is monolithic, then we are fastened through reinforcement; if the end of the ceiling is wooden, then we are fastened through wood grouse, which is what we call large self-tapping screws.
Jambs in stairs are clearly visible
So that you don’t think that I unfoundedly staged anti-advertising for competitors, look at a few examples of how “not to do it”:
When making this frame, the welders did not bother about how to later sheathe this staircase with wood (namely, how the false frame made of MDF would be installed to the end of the staircase frame), and the result was a real hack.
But the weld is like that of a 3rd category welder 
Here the “masters” did not think through the width of the staircase frame and installed fences that rest on the floor of the first floor. A. this means that a person going up to the 2nd floor will not be able to use the left side of the fence
Here they installed a metal frame and did not foresee that the width of the staircase should be made to match the width of the opening, so in the end they made the staircase wider.
The contractor realized that he had messed up when the frame had already been sheathed and all that remained was to install the fences (maybe earlier, of course, but this did not save the situation) and installed the fences 10 centimeters to the left. Perhaps the customer didn’t even notice it, but he overpaid at least 5% of the cost of the material only because the steps could and should have been made narrower.
By the way, I found this photo on Avito from an ad for installing a staircase frame from a corner and am showing it to people who want to install a staircase frame using a welder.
After reading all of the above, you understand that, as in any other product, quality does not mean cheap, but not only that!
To finish you off on the spot, watch the video about the terrible truth about the installed staircase frames from 8 people
And a control shot - watch this video of how 48 customers rated our work for June 2021
What does the staircase frame consist of:
And here's how the frame is sheathed in wood
Why do ZLMK make staircase frames from channel and angle bars?
There are some competitors who make stairs not from a channel and an angle, but from a professional pipe and an angle. And I conducted an experiment, made a ladder not from a channel, but from a professional pipe, and in fact, this has both its pros and cons.
Pros: the channel itself is heavy, it is difficult to saw, it is difficult to lift, but its design is more reliable. The channel is more expensive, the professional pipe is cheaper.
There are competitors who do not use a channel, but a professional pipe, and save money due to the fact that the design is cheaper for them. This is due to the fact that the professional pipe itself has a small thickness (it is thin, maximum 2 or 3 millimeters), and the channel is large and massive. It has the reliability of a railroad track, but a little smaller, of course, simpler. Many stairmen save money by using a professional pipe rather than a channel and doing this as a way to save money.
From a technical point of view, a channel is better than a professional pipe, because the professional pipe is thin and when you start welding a corner to the professional pipe, it begins to bend and you get a stringer, which should be perfectly even, but it turns out bent. In fact, the design turns out not to be geometrically smooth, but with some of its own flaws. But when you start welding a corner to a channel, this doesn’t happen, because the metal itself is thick.
It is better to install a ladder on a channel, because it will be more reliable and will not bend, but from a professional pipe it will be less reliable, thinner and will begin to bend.
But this in no way applies to staircases on professional pipe, which are made on an open frame. Now we are talking only about closed type stairs, made from a channel and an angle, or from an angle and a professional pipe. Because when open type stairs are made, they are made using a slightly different technology and are welded semi-automatically. There is naturally more jewelry work, so the metal does not begin to bend there. More effort is required from the installation team and manufacturers. Another welding technology allows us to ensure that the professional pipe itself does not bend.
But, if you use the same technology on closed-type staircase frames, say on a professional pipe, then this staircase will cost more than ours and it will not be profitable to make it at all. Therefore, stairmen who make a closed-type staircase frame from professional pipes risk that the quality will be much lower.
If you decide to make a staircase yourself, watch this video “How to calculate a staircase”
and look how I installed the staircase frame in the townhouse
and I analyze in detail why I chose this staircase configuration and tell all the technical nuances verbatim.
Do-it-yourself staircase from a profile pipe
An interfloor staircase is a highly complex structure that requires competent calculation. Errors made during design significantly reduce not only the convenience, but also the safety of the product. As a rule, a staircase from a profile pipe is made by professionals who are thoroughly versed in the specifics of designing staircase structures. It is quite possible to make a staircase from a profile pipe, the main thing is to create drawings and perform the calculations correctly.
Advantages
A metal staircase made from corrugated pipe has a number of advantages compared to ready-made models made of metal and wood, which can be purchased at your nearest hardware store:
- Long service life, but subject to correct calculations, production and installation;
- Possibility to develop designs of any size and type;
- Harmonious combination with any interior style;
- Possibility of production and installation regardless of the degree of readiness of a private home. For example, installation can be performed even if the building has already been built;
- Efficiency of production;
- The ability to create a compact frame staircase for a small house;
- The possibility of producing stairs with a lightweight frame structure, since the steel profile has a high safety margin.
How to choose a profile?
Before making a staircase from a profile pipe, you need to choose the right profile option. The optimal cross-section is from five to seven millimeters. The width of the metal section is selected taking into account design features. So, for example, if the frame has a single broken stringer in the central part, a profile of 60x80 millimeters will do. For a single straight stair stringer you will need a profile of 50x100 millimeters. If you plan to use two straight stringers, both the first and second types of profile will do. The welded frame for the steps must have a separate profile of 25x25 mm.
Main settings
A metal staircase made from a profile pipe will be perfectly manufactured with proper design, if the engineer has selected in advance:
— Number of spans; — The value of the slope angle, which does not change for each span. Their number does not matter, the main thing is the unity of the indicator; — Span height; — Characteristics of steps: width, number, height; — Method of connection in the presence of at least two spans (winder steps or platform); — Dimensions of the opening for the stairs.
The calculation is based on individual measurements, since they will differ in a particular room. A metal frame for a staircase made from a profile pipe must be created taking into account the average step length. Otherwise, using the stairs will be uncomfortable.
Sequencing
If you need a staircase made of a profile pipe, the photos on the page will tell you the best options. Let's write down the sequence:
- Pre-mark the work site - according to the resulting markings you will lay out the stair elements;
- Mark the profile pipe taking into account the drawings, then cut it into pieces at a 45-degree angle;
- Align the parts so that they form at right angles;
- Sand the ends with a grinder;
- After cutting out all the parts, lay them out on the table and secure them with clamps;
- Take your time to cook - use welding to make potholders;
- After making sure that the results are correct, connect all the elements completely;
- After re-checking, make the final welding of the iron corrugated pipes with a continuous seam;
- Clean the frame with a grinder until you obtain a flat, smooth surface;
- After completing the work, place them on the two parts of the frame and check the geometry is identical. It must be perfect;
- Degrease and paint the stringers;
- The staircase to the second floor from a profile pipe and its frame are secured in this way: weld the stringers to the reinforced concrete floor reinforcement, or secure the structure with dowels and anchors;
- Once you have finished installing the frame, begin attaching the steps and railings (if they are included in the drawing).
For finishing you can use different materials - wood, glass, stainless steel and so on. It all depends on your preferences and the overall style of the interior. Selecting decorative materials in Moscow will not be difficult. When the staircase made from a profile pipe with a platform is ready, you need to check it for creaks.
If it is important for you to know how to weld a staircase from a profile pipe, the videos on our page will tell you what to do.
How to weld a metal ladder
Despite the many companies offering construction-related services, many save money by relying on their own strength, doing construction work with their own hands. A necessary element of a two-story house is a staircase, which you can also make yourself by welding from a metal profile. How to weld a metal ladder correctly?
How to weld a ladder?
Staircase design
Preparations for assembling the staircase frame must begin at the stage of drawing up the overall project. It is desirable that the project allows a straight flight of stairs to fit into the interior, since the frame for such a flight is much easier to make on your own.
Select the type of support. In our case, it can be a stringer or a bowstring made of a rolled steel profile, usually a channel. Each type has its own advantages and disadvantages; it cannot be said that any specific type is definitely better; the choice must be made based on specific conditions.
Option with stringer
The assembly technology in both cases will be approximately the same: the classic bowstring involves cutting the step into a groove, but at home it is difficult to make grooves in a steel channel, so in any case the step will lie on supports from the corner. But it’s easier to make these supports for a bowstring: in this case, it’s enough to weld a piece of angle to the side of the channel. But in the case of a stringer, in order to install a support on top of an inclined profile, the corner will have to be cut accordingly.
It is easy to calculate the required length of the metal frame beams using the Pythagorean theorem, given the dimensions of the projection of the flight of stairs onto the floor (we will see it in the drawing in the project) and the rise of the flight, that is, the difference between the heights of the levels that the flight of stairs will connect.
We calculate the number of steps by dividing the rise of the flight of stairs by the desired rise of the step and taking the whole part. For example, the rise of a flight of stairs is 3.5 m, the desired step rise is 18 cm. 3.5/0.18=19.4444444. This means we will have a march with 19 steps, the rise of each step is 3.5/19 = 0.1842 = 18.42 cm.
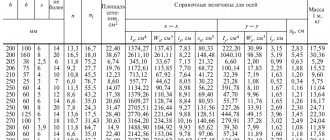
We will select channels for support beams according to the tables that are in the standards (SNiP III-18-75 “Metal structures”, DBN V.2.6-163:2010 “Steel structures”), taking into account the weight that the structure will have to withstand, and elevation angle.
Assembling the stairs
To install metal beams, they must be cut into place. Since the profile has a large mass and is inconvenient to manipulate, we use a template from a board of a suitable size. Place the board in place and mark the cutting line.
- We apply the cut template board to the channels, mark and cut.
- We weld the profiles to the frontal beam built into the walls
- On one of the beams we make marks for supports for the steps. If we have a bowstring frame, we achieve strict horizontal marks using a level. If there is a stringer, then we place the corner blank under the support in place and mark the cutting line on it according to the level.
- Having welded the supports to the beam, we once again check with a level that the installation is correct.
- We transfer the markings to the second beam. To do this, we use a level and a piece of board equal in size to the width of the step. If the flight width is large, you can use a spirit level.
- Next, you need to weld the supports to the second beam.
- The staircase frame is ready, the steps can be made from solid wood.
If, according to a project, we need to weld a staircase with a turn, then it is better not to take on a screw structure without the appropriate experience. It is better to assemble a two-flight staircase with an intermediate platform. The frame for the platform can be welded from the same profile as the beams of the march frame, strengthening it on the beams built into the walls. To mark the profile we use the same principle of template boards. We lay a ceiling of boards on top of the platform frame. We carry out welding work only in conditions of good ventilation, observing safety requirements and not neglecting special clothing.
No. 4. Calculation of stairs
The main thing is to make all measurements correctly. In this matter, it is better to be even overly pedantic and boring, otherwise you may end up with a frame that is completely different from what you want. Experienced experts advise double-checking the measurements taken by the contractor if you hire him.
At the first stage, it will be necessary to measure the following parameters:
- the height of the future staircase from the floor of the first floor to the floor of the second floor. Please note - not to the ceiling of the first floor, but to the floor of the second floor. It is also worth taking into account the need to carry out work to level the subfloor and take into account the type of finishing material in order to understand the final floor level;
- the length of the opening from the end of the ceiling to the outer wall; it is better to measure the length several times, since due to the curvature of the surfaces in different parts, this indicator may differ. When calculating, take the minimum value;
- opening width, from wall to wall, it is also better to double-check the width from different sides.
It is best to carry out calculations in special programs. By the way, they are used by professionals when designing stairs, but you can also independently calculate a simple single-flight straight staircase:
- When all the initial parameters and the angle of inclination of the staircase are determined, we calculate the length of the staircase itself. This is easy to do using the Pythagorean theorem. It turns out that the floor of the first floor and the line perpendicular to it, drawn to the supposed end of the staircase on the second floor, are the legs of a right triangle. Let the length of the flight be 400 cm and the height 250 cm, then the hypotenuse or the length of the staircase itself will be 472 cm. This is the length of the stringers, which are made from channel bars;
- the number of steps depends on the height of the riser. The latter is ideally 15 cm, but in reality it can be 16, 17, 18 and even 19 cm. The number of steps is calculated for each parameter. To do this, the height of the stairs must be divided by the height of the riser. With a staircase height of 250 cm, we get: with a riser of 15 cm, the number of steps is 16.7, with 16 cm – 15.6, with 17 cm – 14.7, with 18 cm – 13.8 and with 19 cm – 13.15. If you round it up, you can build a staircase with the number of steps from 13 to 17;
- Let's say an option with 14 steps and a riser height of 18 cm is chosen, then the depth of each step will be 400 cm/14 = 28.6 cm, which is an acceptable value;
- if the stairs are not straight, then the calculation becomes a little more complicated. Thanks to the use of interfloor platforms and winder steps, it is possible to implement a design that is as comfortable as possible for ascents and descents in a small area. If there are no clear requirements in advance on how the staircase should be located, then several options can be considered. The simplest option after a straight staircase is a staircase with one interfloor landing. Its width will be equal to the width of the opening (take 2 m as an example), and the standard length is considered to be 1 m. If the length of the shaft is 3 m, and 1 m is allocated to the landing, then 2 m remain for the flights of stairs. With a step part of 25 cm, the number of steps will be 200 cm/25 cm = 8 steps in each flight, and if you consider the platform as a step, then the total number of steps will be 17 pieces. Now you need to calculate the height of the riser, for which the height between floors must be divided by the number of steps. With a height of 280 cm, this parameter will be 280/17 = 16.47 cm, rounded to 16.5 cm. Excellent! The error due to rounding is compensated by the lower step, which will be slightly different from the rest. The gap between marches must be at least 10 cm;
- the floor of the second floor can be used as the last step, then the height of each riser will be reduced by about 1 cm;
- To make sure that the calculation is done correctly, you can draw the profile of the future staircase with a pencil on the wall even before the installation work begins. If suddenly the location of the shield or heating radiator was not taken into account, but at this stage all this will be revealed. You may have to make the landing not clearly in the middle of the stairs, or make other changes. The video explains very well how to calculate the stairs.
We all try to design the perfect staircase, but, alas, this is not always possible. You can double-check your calculations and evaluate how comfortable the design will be using the following formulas, where a is the step part, cm, and b is the height of the riser, cm:
- a – b = 12-15 cm;
- a + b = 45-46 cm;
- 2b + a = 60-64 cm.
Try to make several staircase designs with different numbers of steps, different riser heights and step depths, calculate staircases of different designs, and only then choose the best one from the resulting options. Making all the calculations is not as difficult as it seems.
If difficulties arise, you can order a staircase design from specialists. There are also successful examples of using ready-made projects from the Internet, which can be slightly edited to suit individual requirements. According to the drawn up project, a metal profile is purchased, preferably with a small margin.
Making a metal staircase with your own hands
In the manufacture of staircases, materials such as wood, metal, glass or concrete are used, and the question arises which material is better to use and which is more practical. Metal has a number of advantages compared to other materials; it has a longer service life than wood, does not require constant maintenance like glass and is lighter than concrete structures, so making a metal staircase with your own hands looks like a more attractive option compared to the others.
Design features of metal stairs
Before you begin manufacturing and installing a staircase structure, you must:
- decide on the choice of model by design
- choose a manufacturing method
Types of metal stairs according to their structural characteristics are divided into six options:
- On a metal stringer - a beam located in the center of the staircase under the steps is the load-bearing element of the staircase structure, on which brackets (fillies) are attached to secure the tread and riser.
- On two stringers, the beams are also located below the steps, only at the edges of the staircase structure.
- On bowstrings - two beams are used, located at the ends of the stairs, between which the steps are fixed.
- Screw type - a support pillar is installed in the center, to which the steps are attached in an upward spiral.
- On bolts - the steps are secured with specially made bolts (bolts) to the load-bearing wall.
- Modular type - consists of ready-made factory units of the staircase structure, assembly is extremely simple according to the attached instructions.
Anyone can make a metal staircase with their own hands according to the above listed design options, but it is worth noting that a more labor-intensive project in execution will be a screw version, in terms of performing calculations of technical characteristics and the amount of materials.
Design Features
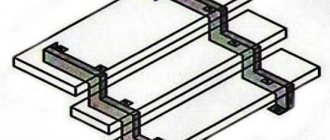
The need for bends on the channels arises when installing a rotary staircase. This design has an unusual shape. To reproduce the plan, wedges are made in the places where the turns are located. Welds are reinforced with steel plates. They are placed at the junction. In the absence of the necessary experience, preference should be given to straight-flight designs. If a turn is still necessary, installation difficulties are resolved by installing an additional platform.
There are also plenty of options for cladding. For this you can use stones, wood panels, tiles and glass. The staircase can be decorated with forged elements. Contrary to popular belief, interesting decisions do not always result from significant material expenditure. Expensive finishing is not affordable for everyone.
To ensure absolute safety, stairs made of metal angles are equipped with railings. They are made from various materials, and the shape may also differ. These parameters are determined taking into account the wishes of the owner and the location of the structure. Another important factor is material well-being.
Methods for manufacturing metal staircase structures
Types of metal stairs according to the manufacturing method are divided into three options:
If you do not have blacksmithing skills, making forged metal stairs at home is a difficult task, the only option is to turn to professionals for help and order manufacturing and installation from them, or after making your calculations, order individual elements of the stairs from a blacksmith, and have the assembly and installation done yourself. Forged staircase structures are exclusive in production, since the forging process is still done by hand.
The material for manufacturing cast metal structures is cast iron; this manufacturing method is expensive and only practical on a production scale.
Welded metal stairs are much easier to manufacture compared to forged or cast ones; with the right desire, anyone can weld a staircase with their own hands at home, but this work also requires basic knowledge of welding.
(Click on image to enlarge)
Types of staircase structures
Metal stairs differ in the type of supporting frame:
- on stringers - the steps rest on top of one, two or three beams;
- on bowstrings - the ends of the treads are fixed on the side surfaces of the supporting crossbars;
- on rails - the supporting frame is assembled from elements in which the steps and railing posts are connected by a spacer-bolt of a special design;
- suspended on cables;
- cantilever - fixed in the wall.
Installation of a metal staircase can be carried out by welding or assembly from individual parts or entire modules. The metal of the structure remains visible or is lined with wood, MDF, laminate, clinker tiles.
The following requirements apply to the layout of stairs according to ergonomic calculations:
- minimum march width - 900 mm;
- the optimal ratio of step height to its depth is 1:2;
- tread width - 220-300 mm;
- tilt angle - 30°-45°;
- fence height - 900-1200 mm.
Important. For safety reasons for small children, the distance between railing posts or balusters should not exceed 150 mm.
When installing fences, you can provide a second row of handrails.
Combination options
The most traditional option for combining materials is a metal frame with wooden steps and fences. Fillings made of glass, plastic, and composites are less common. Read also the article about wooden stairs to the second floor, we are sure that the material will be very useful to you.
The supporting structure is made of channels, angles or profile pipes. The steps and railings are installed, and the frame is sheathed with finishing materials.
The wood finish is durable and lightweight. If you completely cover the staircase with solid wood, the illusion of an all-wood structure is created. The wood is varnished, waxed, tinted or painted in different colors.
Laminate finishing is an alternative option for cladding with valuable wood species. Wood fiber panels are cheaper and easier to install. The elements are cut out and fixed on a plywood backing. A high-quality plate is quite wear-resistant and mechanically strong.
Ceramic or clinker tiles, porcelain stoneware are the most suitable options for finishing metal street stairs, although they are also used inside the house. They are not afraid of water, dirt or frost. The anti-slip coating prevents falls in winter, and sharp heels on hard surfaces do not leave marks.
The metal frame is so strong that it can withstand heavy concrete steps. They are made prefabricated or monolithic.
The fencing is made in the form of:
- elegant openwork lattices;
- curved or straight metal rods;
- figured carved balusters made of wood or polyurethane;
- colored plastic panels;
- transparent glass inserts.
Important. By combining a metal frame and various finishing materials, the staircase design becomes practical and decorative.
Set of necessary tools
- Welding machine and electrodes
- Welding mask
- Protective canvas suit and gloves
- Protective mask or goggles
- Bulgarian
- Edged and ground discs
- Drill or screwdriver with a set of metal drills
- Vise and adjustable clamp up to 800 mm
- Primer, white spirit (solvent)
- Metal brush
- A set of measuring instruments: tape measure, metal ruler, caliper, square, pencil or colored marker
After we have prepared the tool, to answer the question of how to weld a ladder, we decide on the sequence of work.
A set of necessary tools and materials
To make a staircase from a metal profile with your own hands at home, you need to have the following tools:
- Bulgarian;
- welding machine;
- drill;
- roulette;
- square;
- level;
- clamps;
- hammer;
- paint brush;
- marker.
List of materials:
- profile pipe in the required quantity;
- steel corner;
- fittings;
- channel;
- base for steps;
- finishing (wood, plastic, forging, glass);
- handrail overlays;
- paint, anti-corrosion agent.
Working with electric tools requires compliance with safety precautions. It is necessary to prepare a canvas suit, gloves and leggings, glasses or a welding mask.
Stages of work execution
- Preparation (cutting) of blanks to size
- We make brackets (fillies), elements for securing the tread and risers to the stringer
- Installation and securing of stringers in place
- Welding the stairs, namely connecting the brackets with the stringer
- Welding steps and balustrades (fencing of a staircase structure) to the staircase frame
- We clean the surface of the structure from sharp edges and burrs
- The final stage is priming of metal elements and painting
Preparation of stringers begins with choosing a profile; the most common is a channel or an I-beam, but this is not the entire list of available configurations; the figure below shows various options.
To ensure the safety and strength of the structure, when making a stringer, keep in mind that the shelves of the selected profile (I-beam or channel) remain intact; for example, if the tread protrudes beyond the shelf, then it is necessary to trim the tread, not the shelf.
Having decided on the profile option, we select the material for making the tread. Corrugated sheet steel is considered optimal; it eliminates the possibility of slipping on the steps and falling, but it is better to use it if the staircase structure is located inside the building. We do not recommend using it for street (external) stairs, since fallen snow cakes on the solid tread and the steps become slippery. For external steps, it is better to use grating or corrugated reinforcement; it is welded with a gap of 5–8 mm to each other, which allows snow to fall through.
We proceed to the next step - we make brackets (fillies). They are made from a metal corner or a hollow rectangular profile (it is stronger in bending than a corner). You can also make a tread base from the profile, but in order to save money, it is better to make the base from reinforcement.
Having chosen the metal according to its shape (corner or rectangular profile), we cut the joining angles at 45 degrees and connect the two elements so that we get an L-shaped corner and weld them. Manufacturing calculations include two brackets per step (staircase design on two stringers).
The brackets (fillies) must match each other in size and have a right angle.
We install and weld the stringers to the supports. If the house has a concrete floor, then the lower support can be installed directly into the concrete. We weld the upper part of the stringer to a support beam secured to the ceiling between floors with steel anchors. If the staircase is located along the wall, then we fix the nearest stringer with anchors to the wall to strengthen the staircase structure.
We mark the stringers and weld the brackets. We check the coincidence of the brackets on the horizontal plane with a level. We weld the base for the tread between the stringers. The base is also made of steel angle, rectangular profile or reinforcement.
When installing and securing the brackets for the first step (from below), be careful and take into account the height, taking into account the finished floor, so that the height of the top point of the first tread is 18 cm (optimal size).
The next step is to secure the steps to the brackets and base. The connection is made in two ways: by welding or bolts if the steps are made of metal, and for wooden steps we use screw connections.
We weld the fencing on the sides of the stairs in such a way as not to reduce the width of the flight of stairs.
The final stage of staircase construction is to clean the metal at welding points, from burrs, notches and sharp edges, treat it with a primer, and paint the metal part of the structure. After the paint has dried, we install the wooden steps, and now our DIY metal staircase is ready.
How to make a metal staircase: outdoor design
A metal structure for outdoor use is quite simple to make. You just need to have a welding machine or other special equipment, with the help of which you can bring to life the most daring solutions. Metal structures are in many ways superior to wooden stairs; they are more reliable and durable. The steps of the stairs must be made of reinforcement with a gap.
Snow will not linger on the rods, and ice can be easily removed. It is not recommended to arrange sheets; such stairs will be slippery and dangerous.
The outer structure of a metal staircase is quite easy to make.
Steps and platforms can be made of corrugated steel. For the construction of a staircase structure, a channel must be used. It needs to be placed on its edge. We must also remember about the fence. It can be made of angle steel, 45 mm wide. It is best to connect all the components together using electric arc welding.
The staircase will be:
- Durable;
- Reliable;
- Durable.
If the channel is used as stringers, then it is necessary to weld fillets made of metal to it, which have brackets for fastening the steps.
We calculate the number of steps by dividing the rise of the flight of stairs by the desired rise of the step and taking the whole part. For example, the rise of a flight of stairs is 3.5 m, the desired step rise is 18 cm. 3.5/0.18=19.4444444. This means we will have a march with 19 steps, the rise of each step is 3.5/19 = 0.1842 = 18.42 cm.
DIY metal stairs + drawings, diagrams
DIY metal stairs + drawings, diagrams
When you plan 2-3 floors in a residential building, you need to think through the design that will lead to the upper tiers. A drawing of a metal staircase, which is created based on measurements, helps to simplify the work and make the arrangement process accessible.
The metal staircase design has all the required parameters of durability and safety. It is for this reason that people often place bets on this type of product.
Metal is almost not susceptible to corrosion, helps to emphasize the style of the room and brings rigor and elegance to the design.
What types of metal stairs are there?
The design of staircases in a house can be different, but each of them is worthy and is often chosen by the owners of private country houses. The designs of metal stairs are:
| Screw | Such gangways will help save maximum usable space in the room. The steps will favorably emphasize the sophistication of the design and add a spark to the overall picture of the interior space. The only thing that can stop you is the difficulty of implementing the drawing yourself. Without special skills, a person cannot cope with the measurements required for such a complex structure. And also the direct process of installing stair structures requires some skill and skill. Knowing all the features of a spiral staircase, a person will be able to realize the idea of installing such a structure on a gangway. After the implementation of the plan, the interior will immediately sparkle with new colors. |
| Marching | This option is most often used to implement the idea of installing staircase structures. For such an array it is easy to draw a diagram even for those who have never encountered such a task before. Marching stairs can be straight, leading to the second floor or with turns (this helps to save space). Measuring the parameters required for drawing any of these types of gangways is very simple. It is enough to have the necessary tools and devices at hand. Direct installation of the structure is also elementary. You just need to follow the step-by-step actions that you can read about in any relevant literature. |
| Mounted | There are structures leading to the second floor that are supported on the wall. No supports are installed under such structures. The main load-bearing and load-bearing structure is the wall. Therefore, before proceeding, you should make sure that the walls are strong and ready to withstand such a high load. If yes, then you can safely equip a hanging metal staircase. Such a staircase will help save space and make the style of the room elegant. |
Metal stairs
Looking at the incredible variety of metal stairs on offer, you can understand that even a person who does not have experience in such incarnations can make them with their own hands. The most important thing is to choose a structure that can be drawn, prepared and installed indoors or outdoors.
Advantages
- Metal stairs that lead to the second floor, ways to come up with them in different design solutions.
- They can be painted in different colors, and therefore there is a chance to choose the one that perfectly matches the main interior picture.
- The material is not subject to corrosion if properly processed, which makes it possible to install such structures in different humidity conditions, as well as under any climate conditions.
- The structure of the product is reliable and durable in terms of safety. The use of metal stringers makes the structure much stronger.
- Stairs can be either simple or intricate.
- Installation of the product is very simple, and therefore it can be done even by two people.
Flaws
- The main disadvantage is the bulkiness of the railings and gangway. But thanks to the skills of modern developers, you can easily choose a scheme that will best suit the load for a particular room.
- Certain decorative elements and curves are difficult to implement without special skills.
Details
Staircase structure on stringers
A drawing of a metal staircase is much easier to make if the structure is equipped with stringers. This is due to the fact that it is necessary to calculate the distance for each foot and prepare materials that will be fixed to the base in the future. Stringers represent a base, that is, a foundation in the form of a future staircase. It can be made from different materials and can be attached as required in the room. Naturally, to purchase suitable stringers, measurements are still required. The fact is that the design must correspond to the parameters of the space allocated for the stairs. A metal stringer ladder helps even inexperienced craftsmen complete installation tasks. The main thing is that the staircase drawings are made correctly, marking the place where the gangway will be placed. You also need to have on hand the materials and tools that are important to implement such an idea in your home.
Advantages
Due to the fact that the gangways, which are equipped with the use of stringers, have earned their calling, and the positive qualities of such a solution are obvious:
- This helps make your workflow easier.
- Makes it possible to easily organize an algorithm of actions.
- Such structures are durable and strong.
- Thanks to the stringers, even an inexperienced craftsman or just a home owner will be able to implement the idea and turn everything into reality.
- This element allows you to devote more time to the elements and experiments of designers who decorate staircase designs for the second floor.
These are not all the advantages of stairs that are attached to stringers; every owner of a country house will have all the advantages.
Flaws
On the diagram of a metal staircase, it is necessary to correctly determine the size of the base for the steps so that the structure fits clearly into the interior design. It is not difficult to make such calculations. It is enough to simply measure the height, inclined angle and width of the installation.
How to make a drawing
Making your own drawings for metal staircase structures is very simple. To do this, it is necessary to take measurements of the space where the steps that lead to the second floor will be placed.
Materials for measuring
In order to take space measurements, you need to have the following accessories on hand:
- Construction tape with maximum length.
- Surface level meter.
- A specialized felt-tip pen or chalk that can be used to make the necessary marks on the floor, wall and ceiling.
This is the minimum number of accessories that will help you quickly and efficiently carry out the measurement process.
Materials for drawing
In order for the diagram to be as accurate and correct as possible, it is also necessary to prepare a number of stationery items, or more precisely:
- Compass.
- A4 sheet or Whatman paper.
- Ruler.
- Sharpened pencils or a black marker with a thin tip.
It is necessary to draw the diagram carefully and carefully so that during the immediate installation process you do not make errors that are difficult to correct.
What parameters need to be measured?
In order not to make mistakes and correctly make drawings with your own hands, you need to make the following measurements:
- The height from the floor surface to the beginning of the level on the second floor at a selected inclined angle.
- Distance from the floor to the steps - if you plan to install solid structures, strengthening them on the floor, then such measurements do not need to be carried out.
- Distance from the highest step that is parallel to the ceiling. Such a space should be at least a couple of meters so that a person of any height can climb to the second floor without bending.
- To competently make metal stairs with your own hands, you need to determine the width of future steps. However, they must be at least ¼ meter.
- The height of the membrane that is under the step is also important to calculate. Its ideal size is 0.15 meters.
After taking measurements, you can transfer the recorded characteristics onto a piece of paper, creating a diagram of future gangways.
Nuances that are important to consider in the process
When taking measurements, it is important to pay special attention to the following factors:
- It is necessary to measure the height at a certain angle.
- It is also important to take into account that the height of future gangways should be at the level of the 2nd floor, and not at the level of the ceiling of the 1st apartment tier.
- When installing metal stairs in a house, it is important to take into account that such structures weigh a lot. For this reason, it is necessary to strengthen the walls before starting work or to ensure their strength if the house was recently built.
Let's look at the types of stairs.
What kind of metal stairs can there be?
The design of house staircase structures can be very different from each other, but each of them is worthy and they are often chosen by the owners of country houses. The designs of metal stairs can be different.
Screw
Marching
Mounted
What are the advantages of drawings
When the design for the future staircase is drawn, the person will make the task easier during the installation of the gangway. It helps:
- Make the installation process quick.
- Drawings made with your own hands will save money.
- Include imagination in the process of developing a design plan.
- Make the staircase you dreamed of, and not according to a company template.
- Feel like a real home owner.
- Eliminate banal wall templates at home.
- Make an ideal design that fits into the interior.
For this reason, it is necessary to give due consideration to the issue of independently performing work according to the drawings in planning the future staircase.
Manufacturing of wooden steps, lighting
After completing the welding work, I began finishing work - I putty and painted the frame with primer. I used materials for body work, sanded the putty with an eccentric machine, and manually in hard-to-reach places. The primer was applied with a spray gun.
And for the next couple of years, the frame acquired temporary wooden steps.
Nothing is as permanent as temporary, but now the wall finishing is over, and rasss has returned to the process of upgrading the staircase. Beech steps 1 meter long, 30 cm wide and 4 cm thick had been waiting in the wings for several years, but the required square platforms (1000x1000 mm) could not be found on sale. Therefore, I cut triangular steps from furniture board (1500×700 mm), and glued the platforms from three parts with carpentry PVA and reinforced the connection with metal pins (M6). To drill a hole evenly for the studs, I used a hammer drill.
rasss
I removed the top part from the drill stand, secured it with clamps on the table, installed a hammer drill instead of a drill - the drill did not fit into the drill chuck. The difficulty in the drilling process is that you need to accurately set the drilling height relative to the center of the hole in which the hammer drill is installed. And the side stop along which the step moves must be strictly parallel to the axis of the hammer drill, otherwise the drill will move to the side.
Before processing, I “tried on” all the steps and platforms onto the frame.
I chose a two-component parquet varnish as a decorative and protective coating. The method of application with a roller recommended by the manufacturer was not impressive, but the result of spraying with a spray gun, although not the first time, was satisfactory. As a result, the front part of the steps is covered with several layers (3-4), depending on the presence or absence of defects, and the back part, on average, with two, not counting the primer. Each previous layer was sanded with 120-150 grit sandpaper before applying the next one.
At the same time, rasss made decorative lighting in the steps - using a router, I selected a groove (depth/width 4 mm) in each step, fixed a colored LED strip with double-sided tape, and connected each piece via a micro-connector.
Before assembly, I painted the frame - with a brush, since at that moment the rest of the finishing was already completed, and splashes from the spray gun were not included in the plans.
Wooden stairs are often creaky, so that the steps do not “sing” during operation, Rasss was on the safe side - he glued a thin strip of automobile sound insulation to each bracket. After assembly, the staircase “played” in the literal sense of the word.
The wiring runs from the back of the stringer - it is glued to the wall side with double-sided tape.
The backlight is controlled by a light sensor - it turns on when it gets dark.
To adjust the brightness of the backlight, which caught the eye of many, rasss added a regulator to the system - now you can adjust the glow of any intensity, from minimum to maximum.