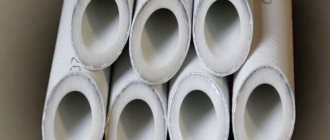
More and more often, metal pipes are being replaced with plastic ones, in particular polypropylene. They have a long service life (up to 50 years), do not rust or rot, weigh little, and you can assemble everything yourself, without involving specialists. Welding polypropylene pipes requires some skill, but it comes quickly. You can first practice on small scraps and inexpensive fittings, and then start creating more serious things.
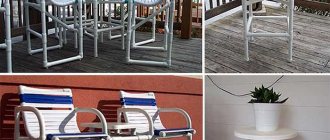
By the way, you can do not only plumbing or heating, but also a lot of necessary and useful things
Types and purpose
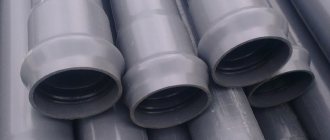
Polypropylene pipes can be of four colors - green, gray, white and black. Only black ones differ in their characteristics - they have increased resistance to ultraviolet radiation and are used when laying an irrigation system on the ground. All others have similar characteristics and are laid indoors or buried in the ground.
According to their intended purpose, polypropylene pipes are of the following types:
- For cold water (temperature up to +45°C). They can be easily distinguished by their longitudinal blue stripe.
- For hot water supply (heating up to +85°C). A distinctive feature is a red stripe.
- Universal (maximum heating up to +65-75°C depending on the manufacturer). Two stripes are applied side by side - blue and red.
Colors do not affect characteristics
There are pipes with different characteristics for both cold and hot water. This is displayed in the markings:
- PN10 are used exclusively in cold water supply systems (up to +45°C) with low pressure (up to 1 MPa). They have small wall thickness. Not suitable for high-rise buildings.
- PN16. They are often labeled as universal, but are more often used for cold water - they can withstand heating of the environment up to +65°C and pressure up to 1.6 MPa.
- PN20. Thick-walled pipes, which can transport media with temperatures up to +80°C, can withstand pressures of up to 2 MPa. Used for distributing hot water and heating systems.
- PN25. These are reinforced polypropylene pipes (with foil or fiberglass). Due to the presence of a reinforcing layer, they often have a smaller wall thickness than PN20. The heating temperature of the medium is up to +95°C, pressure is up to 2.5 MPa. Used for hot water supply and heating.
All of them are produced in different diameters - up to 600 mm, but in apartments and private houses they are used mainly in sizes from 16 mm to 110 mm. Please note that the internal diameter is indicated, as wall thickness may vary.
Connection of aluminum reinforced pipes
It is required to follow the rules when welding polypropylene pipes with reinforcement. The reinforced layer is made of aluminum or fiberglass.
They are used when installing systems that move water at the highest temperature, since under the influence of heated water, linear expansion of the material and bending of the pipeline occurs.
When performing soldering, the duralumin protective material must be removed. In addition, this layer affects the quality of the connection, and the welding time depends on the heating period of the polypropylene parts.
Reinforced pipelines have a larger diameter. Therefore, it will not be possible to use standard nozzles on a heating tool without preparatory preparation of the products.
Produced by stripping parts. It is not carried out for glass fiber reinforced products. They are connected in the same way as unreinforced pipelines.
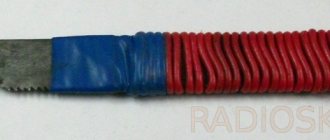
Stripping is done in various ways, since there are many technologies for reinforcing polypropylene products. Processing is most often used when using a shaver. It is an iron device in the form of a sleeve with blades.
Shaver
The tool is put on the end of the tubular product and rotated, which allows you to remove the duralumin layer of protection. The process continues until only one piece of plastic remains.
PP pipes can be designed when the reinforced layer is located in the center of the wall thickness. In this case, a trimmer is used. This instrument is very similar to a shaver. Different placement and arrangement of knives.
The tool allows you to make the ends as even as possible and remove 2 mm of the reinforced layer located in the center of the pipe wall thickness. Thanks to this processing, it will be possible to perform high-quality soldering.
Soldering table for polypropylene pipes
If you do not maintain the heating time, you will not be able to solder the connection perfectly. Underheating prevents the diffusion of the material. Overheating will cause deformation of the products. Therefore, you should always use the values from the table.
Soldering time for polypropylene pipes table
When soldering thin-walled tubular products, the heating time of these parts is reduced by 2 times, but the heating period of the couplings cannot be changed. It must correspond to the recommended values. When working outdoors or in an unheated room where the temperature is less than 5°C, it is necessary to heat the PP product 50% longer.
If the heating time, removal from the soldering iron and joining of parts, their fixation and welding temperature of polypropylene pipes are observed, a neatly shaped bead appears around the circumference inside the joint. Its height is usually 1 mm. It does not interfere with the movement of water. A careful bead is also created on the outside. It does not spoil the appearance of the joint.
Welding equipment
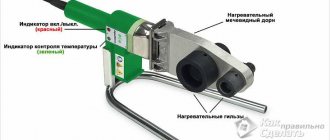
Structurally, all machines for socket welding of polypropylene pipes are similar to electric irons. The devices have heating elements and replaceable nozzles of various diameters. Such a tool is usually called a welding iron.
Soldering iron type “iron”
For end joining, more complex welding machines are used. Direct connection equipment is used in industrial facilities.
Butt welding machine
When working with any type of heating tool, you need to use gloves made of thick material.
What is welding of polypropylene pipes
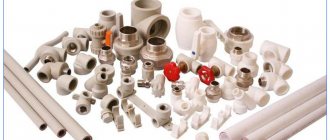
Polypropylene is characterized by increased rigidity, and to create systems of the required configuration, fittings from the same material are used. These are various angles, tees, bypasses, adapters, couplings, etc. They are connected to pipes by soldering. This process is also called welding, but its essence does not change: two elements are heated to the melting point and, when hot, are connected to each other. When done correctly, the connection turns out to be monolithic and serves no less than the pipes themselves.
Fittings for polypropylene pipes allow you to create a system of any configuration
To connect polypropylene with metals, there are combined fittings, in which one part is made of metal and is connected using a threaded connection, and the second - polypropylene - is welded.
What to solder with
Welding of polypropylene pipes occurs using a special device called a soldering iron or welding machine. This is a small metal platform, inside of which there is an electric coil that heats the surface. Because of this design, this unit is also called an iron.
Two device designs for welding PP pipes
To connect two elements, the spliced surfaces are heated to the melting temperature (+260°). To heat the element to the desired depth, two different Teflon-coated metal nozzles are installed on the welding platform:
- a mandrel (smaller diameter) is used to heat the inner surface;
- To heat the outer surface, a sleeve is placed.
Nozzles for soldering polypropylene pipes
The two elements to be connected are simultaneously put on the corresponding attachments, held for a certain period of time (several seconds), then connected. This is how polypropylene pipes are welded.
The process of welding polypropylene pipes
Welding table for polypropylene pipes
- Turn on the welding machine. The power button indicator should light up. The welding machine heats up within 10-30 minutes, depending on the ambient temperature. The operating temperature of the device is 260 degrees. If the device is being used for the first time, after heating it is allowed to stand for 5 minutes, and only then welding begins.
- The pipe and fitting are simultaneously inserted into the welding nozzle along the same axis. Heating occurs in accordance with the table and depending on the diameter of the elements being welded.
- After the heating time has ended, the fitting and pipe are removed from the welding machine and immediately connected, holding them motionless for the specified time.
- A cooled joint indicates that welding is complete and the parts can be used as a single unit.
So, the article on the topic “polypropylene pipes: how to install and how to weld” is over. Now you should not have any problems when installing the pipeline yourself.
How to weld
The designs of soldering irons for polypropylene pipes are slightly different, but the principles of working with them are common. There are two main models - with a flat platform or a cylindrical heater. With normal quality, both work, there is practically no difference. Whoever is more comfortable chooses it.
This is what a well-made connection looks like in cross-section - as a single whole
Preparatory work
Before starting work, you need to warm up the soldering iron, but it’s not that simple. The procedure for its preparation is as follows:
- First, nozzles of suitable diameter are installed on the platform. A pin is threaded into the hole in the platform, a mandrel and sleeve are put on it on both sides, and tightened with nuts on both sides.
- If the heating element is in the form of a tube, the nozzles for it are sold attached to the plate. The plate is placed on the heating element and the fastening bolt is tightened.
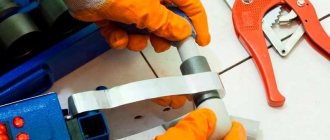
The soldering iron is ready for use. But we still need to prepare the pipes and fittings. The first condition for high-quality welding is an even cut. The cut must be strictly vertical, without burrs or tears. This cut can be obtained using special scissors. They have two wide jaws on the bottom that hold the pipe in place, and the cutting part is on top.
If you cut like this, the cut will be even and smooth.
The second condition for good soldering of PP pipes is clean, dry, grease-free parts. If you want your plumbing or heating to last a long time and not leak, you should not skip this procedure. Clean the pipe section and fitting using alcohol or water and dishwashing detergent. Then they wait until everything is dry, and only after that they begin the soldering process.
How long to heat
When welding, polypropylene must be heated strictly to the required temperature. Overheating and underheating significantly reduce the quality of the seam. An overheated and softened pipe simply will not be inserted into the fitting, and an insufficiently heated material will not fuse.
The heating time depends on the diameter of the pipes, air temperature and is indicated in the table.
| Diameter of polypropylene pipe | Welding depth | Heating time | Welding time | Cooling time |
| 16 | 12-14 mm | 5 s | 6 s | 2 minutes |
| 20 | 14-17 mm | 6 s | 6 s | 2 minutes |
| 25 | 15-19 mm | 7 s | 10 s | 2 minutes |
| 32 | 16-22 mm | 8 s | 10 s | 4 min |
| 40 | 18-24 mm | 12 s | 20 s | 4 min |
| 50 | 20-27 mm | 18 s | 20 s | 4 min |
| 63 | 24-30 mm | 24 s | 30 s | 6 min |
| 75 | 26-32 mm | 30 s | 30 s | 6 min |
In general, you can solder at +5°C, but the data is given for +20°C. In hotter weather, the holding time of the elements on the soldering iron is reduced by 30-60 seconds, in colder weather it is increased.
Pay attention to the welding depth column in the table. This mark is placed on the pipe. Before that, you will need to press it into the fitting. This creates a small bead of molten plastic in front of the edge of the fitting. This will mean that the seam is made correctly.
Mistakes that may occur when welding polypropylene pipes
One more column requires explanation - “welding time”. This is the time for which it is necessary to compress and fix the elements to be welded.
In general, if you try to insert a cold pipe into a fitting, it should go in with great difficulty - the outer diameter of the pipe is slightly larger than the inner diameter of the fitting. This is done intentionally to provide some excess material from which the bead on the seam is formed. To ensure reliable welding of polypropylene pipes, it is better to take all components from the same company. This ensures that the sizes match. Otherwise, you need to try it on so that the fitting does not “slip”, but is difficult to tighten.
Technology
As already mentioned, when welding polypropylene pipes, they and the fittings must be cleaned, degreased and dried. And only after that you can start soldering.
This preparation is suitable for all types of pipes, except those reinforced with foil. In this case, after the required piece has been cut, the cut is cleaned down to the foil with a special device - a shaver. A pipe is inserted into it and turned several times. In this case, the top layer of plastic is removed, after which it can be degreased and soldered.
For foil-reinforced pipes, polypropylene is cut down to the foil
After the surface has dried, a mark is drawn on the pipe, noting the distance to which it must be pressed into the fitting (the easiest way is with a thin marker or a sharpened simple pencil).
Marking the welding depth
Soldering polypropylene step by step
Further, the technology for welding pp pipes is as follows:
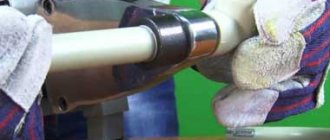
- We put the cut section of the pipe on the mandrel and insert the fitting into the sleeve. This must be done at the same time; in extreme cases, the fitting is put on earlier, since it has a large wall thickness. The delay should be very small.
We put it on the nozzles - We hold the elements for the required amount of time.
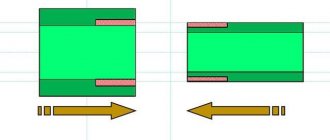
- We remove it from the nozzles and connect it by pressing the pipe into the fitting up to the mark. The connection is exclusively linear; you cannot rotate the elements relative to the horizontal axis (do not twist, although you really want to). You can straighten the horizontal position immediately after connection if a discrepancy is noticed.
We fix it so that the welding of polypropylene pipes is reliable - When connecting, you have to make quite a lot of effort. The same force is maintained for several seconds (in the table in the “welding time” column).
- After the specified time has elapsed, we stop pressing, and the connection cannot be disturbed for several minutes (in the table there is a column “cooling time”). After this, we can assume that the soldering of the polypropylene pipe is completed. You can proceed to the next seam.
One note: immediately after finishing welding, inspect the attachments on the soldering iron. If there are material residues, they are removed with a soft, lint-free, non-fading (white) cloth. You cannot leave plastic on the soldering iron - the next fragment will stick and it will be difficult to remove. Do not clean the attachments using abrasives - they have a Teflon coating and are easily scratched. And even microscopic scratches will lead to the fragment on the soldering iron (iron) sticking.
By the way, it is better to work with cotton gloves - there will be fewer burns.
Before putting the system into operation, it must be checked. This is done using crimping. What it is and how to do it, read here.
The technology of soldering polypropylene pipes we work independently without a team of plumbers
Any home requires a heating system. There are unconventional technologies, such as the Russian stove or the Buleryan heater, but this is the exception rather than the rule.
Traditional steel or cast iron pipes are practically not used. In the first case, corrosion is ubiquitous, and cast iron requires welding.
An alternative material is copper. Pipes made of this metal are practically eternal, are quite easy to process, and have sufficient strength. There is also a drawback - high cost.
The same applies to plumbing. Steel pipes quickly deteriorate and become an incubator for bacteria to multiply. With copper everything is also clear.
Recently, homeowners have been offered a compromise option - polypropylene foam. Pipes made of this material have a long service life, are absolutely indifferent to corrosion and do not attract limescale.
Soldering polypropylene pipes with your own hands - preparation
First, let's look at the technology. The pipe and the connecting element (clamp, tee or angle with an internal diameter corresponding to the outer size of the pipe) fit tightly into each other. The joint must be made airtight. No glue or sealant will work. The connection technology is based on the properties of polypropylene.
Should the softening point (like the dew point) be determined automatically, or “by eye”? There are many questions. So that the soldering of polypropylene pipes does not fall off during the first heating season.
Let's look at the features of the technology
Selecting the right pipe
We are not talking about size, but about classification by temperature and strength.
- The most inexpensive option is PN-10. Thin walls, weak strength. Can be used for underfloor heating systems at coolant temperatures up to 50°C. Also suitable for secondary water supply networks (without high pressure).
- If you are laying a pressure pipe, its class should be PN-16. Can be used in a heating system at a temperature not exceeding 60°C.
- The next class PN-20 is used in any systems except steam heating. This is the most common pipe option, but not the most economical (in terms of cost).
- And finally, the PN-25 pipe is reinforced with aluminum foil. The most durable and heat-resistant design. Withstands high pressure at a temperature of 95°C.
Of course, the application characteristics are somewhat arbitrary. For example, you can use a PN-10 pipe for heating, but its service life will be reduced from the required 50 years to 5-10. Or a PN-16 class pipeline, heated to 90°C, may not withstand the normal pressure for cold water.
Soldering temperature of polypropylene pipes
The actual heating is carried out at 255-265°C, this is the standard for most pipes. If a different value is required, this will be indicated in the documentation for the material. The main condition that must be met is the heating, docking and cooling time. The value depends on the diameter of the pipe.
Heating mode table
Explanations for the table
- The overlap depth is the distance to which one pipe is immersed inside the other
- Warm-up time - the pipe is applied to the soldering iron at the set temperature
- Connection time - how long can the pipes be moved relative to each other when joining
- Cooling time – set joint strength set
- The soldering temperature is set taking into account weather conditions.
Soldering iron selection
There are many manufacturers and designs. The selection criteria are simple – good things don’t come cheap. And vice versa.
Soldering polypropylene pipes - process
- First, we prepare the joints using a special tool. There should be no burrs or shells on the surface. At the end, we check the pipes by joining them without heating. The contact should be tight, without distortions. Before heating, the pipes should be cleaned of dirt and grease stains. The presence of traces of lubricant on polypropylene will reduce adhesion during connection.
- Then we warm up the welding machine (soldering iron) to the required temperature. The device must be placed on a stable base, without the heating element touching walls or furniture.
Layout of polypropylene pipes
Polypropylene pipes are used for installation of cold or hot water combs and heating. The choice of diameter in each case is individual - it depends on the volume of liquid that needs to be pumped per unit of time, the required speed of its movement (formula in the photo).
Formula for calculating the diameter of polypropylene
Calculating the diameters of pipes for heating systems is a separate topic (the diameter must be determined after each branch), for water supply systems everything is simpler. In apartments and houses, pipes with a diameter of 16 mm to 30 mm are used for these purposes, with the most common ones being 20 mm and 25 mm.
Counting fittings
After determining the diameter, the total length of the pipeline is calculated, and fittings are purchased depending on its structure. With the length of pipes, everything is relatively simple - measure the length, add about 20% for errors and possible defects in the work. A piping diagram is required to determine which fittings are needed. Draw it, indicating all the outlets and devices to which you need to connect.
An example of the layout of polypropylene pipes in the bathroom
To connect to many devices, a transition to metal is required. There are also such polypropylene fittings. They have a brass thread on one side and a regular solder fitting on the other. You should immediately look at the diameter of the pipe of the device being connected and the type of thread that should be on the fitting (internal or external). To avoid mistakes, it is better to write everything down on the diagram - above the outlet where this fitting will be installed.
Next, according to the diagram, the number of “T” and “G” shaped connections is calculated. Tees and angles are purchased for them. There are also crosses, but they are rarely used. By the way, there are corners not only at 90°. There are 45°, 120°. Don't forget about couplings - these are fittings for joining two pieces of pipe. Do not forget that polypropylene pipes are not at all elastic and do not bend, so each turn is made using fittings.
When purchasing materials, agree with the seller about the possibility of replacing or returning some of the fittings. Problems usually do not arise, since even professionals cannot always immediately determine exactly the required assortment. In addition, during the installation process, sometimes it is necessary to change the structure of the pipeline, which means the set of fittings changes.
Compensator for hot water supply and heating made of polypropylene pipes
Polypropylene has a fairly significant coefficient of thermal expansion. If a polypropylene hot water supply or heating system is being installed, it is necessary to make a compensator, with the help of which the lengthening or shortening of the pipeline will be leveled. This can be a factory-made compensator loop, or a compensator assembled according to the diagram from fins and pieces of pipes (pictured above).
Laying methods
There are two ways to install polypropylene pipes - open (along the wall) and closed - in grooves in the wall or in a screed. Along the wall or in the groove, polypropylene pipes are attached to clip holders. There are single ones - for laying one pipe, there are double ones - when two branches run parallel. They are attached at a distance of 50-70 cm. The pipe is simply inserted into the clip and held in place thanks to the elastic force.
Fastening polypropylene pipes to walls
When laying in a screed, if it is a warm floor, the pipes are attached to the reinforcing mesh; no other additional fastening is required. If the lines to the radiators will be sealed in, the pipes do not need to be fastened. They are rigid and do not change their position even when filled with coolant.
Option for hidden and external wiring in one pipeline (the wiring behind the bathroom was made open - less work)
Soldering nuances
The process of welding polypropylene pipes itself, as you have seen, does not leave much work, but there are a lot of subtleties. For example, it is not clear how to adjust sections when joining pipes so that the pipes are exactly the length required.
Another aspect of welding polypropylene pipes is soldering in hard-to-reach places. It is not always possible to fit a pipe and fitting onto a soldering iron on both sides. For example, we solder in the corner. The soldering iron has to be shoved into a corner, on one side the nozzle rests directly on the wall, you can’t pull the fitting onto it. In this case, install a second set of nozzles of the same diameter and heat the fitting on it.
How to solder polypropylene pipes in hard-to-reach places
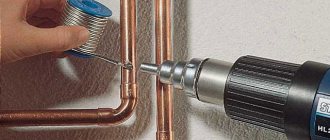
How to switch from iron pipe to polypropylene.
Welding instructions
In domestic conditions, soldering of polypropylene fittings and pipes into a single structure is most often performed using the thermal polyfusion method. After heating with a special device, the pipes are quickly connected. The work, in accordance with the technology, is carried out in stages.
Preparation
At the preparatory stage, design documentation is developed, which must indicate the selected pipeline diagram. The places where the system is fixed to the walls are correctly determined, and if necessary, the required number of mounting holes is punched using a construction tool.
Polypropylene pipes must be marked and then cut into individual elements in strict accordance with a pre-prepared diagram, as well as field measurements. Such a simple event will allow you to verify the accuracy of the markings.
The pipe sections laid out on the most even surface should follow the correct sequence of connections. The foil parts are removed from the ends with a trimmer, after which the depth of insertion into the fitting is marked at the selected ends with a marker.
Heat
The operating temperature of the heater on the soldering device must be selected depending on the technical characteristics of the pipes. The process of soldering pipelines with aluminum reinforcement should be carried out at nozzle temperatures within the range of 260-300°C.
The soldering equipment used in the work must reach the required temperature before welding, so the thermostat is set to the appropriate position, and the plug of the device itself is plugged into the electrical outlet.
The readiness of the welding machine for welding polypropylene is signaled by the switching of a special backlight on the device. The alarm options vary on different equipment models. In order not to make mistakes in the operating rules of the device, you should carefully study the instructions supplied by the manufacturer.
Welding
Correct operation means simultaneous heating of the end of the polypropylene pipe and the fitting by the soldering device. In this case, the fitting used is located on a special mandrel, and the pipe is inserted into the sleeve with little physical effort. The insertion depth must be monitored in accordance with the marker markings applied to the PPR pipe.
| Diameter (mm.) | Welding depth (mm.) |
| 20 | 14,0 |
| 25 | 16,0 |
| 32 | 20,0 |
| 40 | 21,0 |
| 50 | 22,5 |
| 63 | 24,0 |
| 75 | 28,5 |
| 90 | 33,0 |
| 110 | 39,0 |
The standard heating time for all connected elements is selected depending on their diameter. It is necessary to combine polypropylene pipes and fittings quickly enough, thereby preventing temperature losses of the heated material. The joining of elements is carried out through a smooth translational movement without rotation.
The connected structure of the pipeline section should be securely fixed until the joined polymer elements reach maximum strength values. As practice shows, the system sets within 10-20 seconds (depending on the D of the pipe). The ideal option is to maintain the fixed position until the connection area has completely cooled.
| Diameter (mm.) | Cooling time (sec.) |
| 20 | 3 |
| 25 | 3 |
| 32 | 4 |
| 40 | 4 |
| 50 | 5 |
| 63 | 6 |
| 75 | 8 |
| 90 | 10 |
| 110 | 10 |
Stripping
After all welding work is completed and the material in the joints has completely cooled, the joining areas are carefully cleaned of natural plastic deposits. This event allows you to give welded structures a neat and aesthetic appearance.
A sharp knife can be used for this purpose, but stripping must be done very carefully. It should be remembered that an excessive amount of sagging of polymer material may well prevent the pipeline elements from fitting tightly into the fastening clips.
Important Additions
Of course, to weld polypropylene pipes you need to use only special equipment, and in domestic conditions the best option would be simple hand-held equipment with a minimum number of standard attachments.
Some manufacturers install two heaters in one device, which are equipped with separate switches. There is no need to use both heaters at the same time, because the plastic may overheat and the electrical network may be overloaded.
Today, the best, well-proven brands of devices for welding polypropylene pipes (according to experts and users) include: Candan Cm-03, Elitech SPT-1000 and Elitech SPT-800, Wester DWM-1500, Prorab 6405-K, BRIMA TG-171 and Gerat Weld 75-110.
How to solder polypropylene pipes correctly - step by step instructions
Plastic water pipes made of polypropylene are increasingly popular, also because the installation process is very simple and can be done independently.
But for this you need to know how to correctly solder polypropylene pipes, because this is the main operation that determines the durability of the entire system.
Installing plastic internal wiring pipes is a fairly common, but rather labor-intensive process, therefore, first, you need to understand how to correctly solder polypropylene.