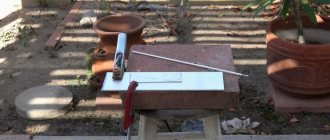
Preparing, purchasing, stocking up
The most important thing is to know that everything will work out perfectly, because inverter welding technology is very easy to learn and use; experience and skill are not particularly needed here.
Safety precautions
Any welding activity, including an inverter, is directly related to electrical current.
This means that without knowing and following safety rules on how to weld with a welding inverter, you should not start; this is not even discussed.
These rules are simple and straightforward:
- It is necessary to check the cables for integrity and serviceability before connecting to the inverter. It is important to remember: the return cable with a clothespin goes to the negative pole. We attach the cable, where there is an electrical holder, to the positive connector.
- After a visual check, set the current control knob to the minimum value. Then we connect the device to the network. We listen to the operation of the fan when it turns on: if the noise is smooth and without crackling, everything is in order.
- Now let's take into account the considerable weight of the metal with which you will have to work.
Workwear
Welding with an inverter.
First of all, you need to take into account the effect of high temperature and have the following items:
- welder's mask with special light filters;
- protective gloves or gaiter;
- suit made of protective fabric;
- shoes with rubber soles;
- if necessary, a respirator if welding takes place in a closed room without ventilation.
Equipment
List of required equipment:
- inverter welding machine;
- hammer;
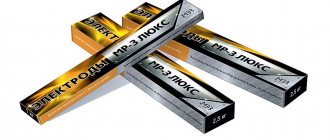
- electrodes selected for the type of work, taking into account the nature and thickness of the metal;
- metal bristle brush
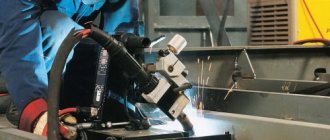
Let's start cooking
First we set the correct current strength on the inverter. We remember that in inverter technologies, alternating current welding is the main type. The strength of the welding current depends on the composition of the electrode and the diameter of its tip, the position of the workpieces during welding and the type of seam in the planned joint.
All these dependencies can be found in the comprehensive instructions for the device itself and in the inserts in packs of electrodes. Theoretically, the welding current can be selected according to the diameter of the electrode rod: for each millimeter of diameter there should be about 30 A.
We find a comfortable and stable position, put on a mask and begin work with the elbow abducted. It is better to wrap the forearm with a cable. If this is not done, your hand may get tired during welding, and the cable will begin to dangle, which will negatively affect the quality of the weld.
Direction of electrode movement for a novice welder.
For debut work, it is better to choose metal blanks that are not the smallest size - more than 20 cm, this will be more convenient. As beginners usually do: put on a mask, ignite an electric arc and immediately, with one breath, pass the workpiece along the entire length of the seam.
If your part is short and you weld it in one breath, you may develop the unnecessary habit of welding the seam in one breath. Therefore, train on long parts with proper breathing.
Now about the arrangement of objects during work. It is better to place the workpieces on a work table - a horizontal surface. The electrode in the holder should be at right angles to the table plane, then the angle of inclination should be approximately 30°.
Now you need to ignite the arc to move along the planned weld.
Welding can be done at a backward angle, in which case a 30° tilt goes in the direction of the seam. If the angle is forward, the electrode tilts in the opposite direction from the seam. The electrode should be held approximately like a pencil - at a height of 2 mm from the surface of the workpiece.
It must be remembered that when burning, the electrode shortens, so the distance above the surface must be constantly monitored.
Working as an inverter
Before turning on the device, it is advisable to familiarize yourself with how to cook using inverter welding. Instructions are included with the purchased equipment. The main stages of the work will be described below.
Ignition of the arc
First of all, you need to ignite the arc. Two methods are used for this:
- Strike - the welder begins to move the electrode along the workpiece being processed, and then rises above it until a spark is formed.
- Tapping is a more popular option for igniting an arc. The welder taps the end of the electrode on the site of future welding until a spark appears.
The method of igniting the arc is selected depending on comfort and convenience.
Electrode movement
To properly weld part to part, you need to know how to move the electrode. Beginners think that it is enough to light an arc and slowly move the electrode over the contact point of the parts to get an even seam. It is important to correctly select the constant angle of movement of the electrode and the speed of movement of the working part of the equipment. Driving the electrode straight at a right angle is acceptable for thin sheet metal.
Electrode welding
Arc gap control
Another important point when welding with an inverter is the distance between the end of the electrode and the metal surface. If the distance is about 2 mm, the welding will be shallow and the seam will not be strong. When the arc is larger than 4mm, it becomes unstable. Metal spatter increases and weld accuracy decreases. It is advisable to place the working part of the inverter apparatus at a distance of 3 mm from the metal surface.
Rules for creating smooth seams
To properly weld metal and make smooth seams, you need to take into account some features:
- Selecting the welding angle. The optimal range of angles is from 30 to 40 degrees.
- Laying the seam requires longitudinal and transverse movements. There are various schemes on the Internet by which you can train the movements of applying a seam.
The speed is selected depending on the chosen method of working with the electrode. If you move the electrode slowly, you can overheat the surface. When done quickly, the seam is not strong.
Now about the arc and electrodes
Quickly igniting and holding the arc correctly is perhaps the most important thing for successful welding with an inverter. The arc should not be interrupted - this is what you need to watch out for when the electrode approaches the workpiece plane.
The electrode is ignited in two ways: by tapping or striking. If the electrode is new, it ignites easily. If it has already burned, it is covered with a film of slag, which prevents the consumable from quickly igniting.
In this case, you should tap the electrodes longer so that the film breaks. The relationship between welding current and electrode diameter can be easily calculated using tables that are available in large numbers on the Internet.
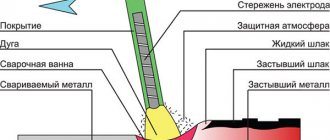
Functional diagram of welding with an inverter.
If you have an advanced inverter model, then it is equipped with additional functions that make life easier for beginners and everyone else.
These advanced features are:
- The Hot Start or HotStart function makes it easier to ignite the electric arc.
- Anti-sticking or arc forcing is activated when the electrode approaches the metal surface too quickly. This function increases the current level.
- Antistick or AntiStick, on the contrary, turns off the current to prevent overheating of the welding machine.
It is better to learn from the simplest form of seam - a thread seam, for which the electrode must be guided evenly without any oscillatory movements.
Once you start to feel comfortable with the thread technology, you can start welding metals with oscillating movements in different configurations - there are several of them.
In such cases, you need to make the first few oscillatory movements to form a weld pool. We tilt the electrode at an angle of 30°, no more and no less. Once the pass is completed, you need to beat off the slag crust with a hammer to clean the new seam using a wire brush.
In order for the seam to come out high-quality and aesthetically pleasing, at the end you should make a couple of oscillatory movements towards the metal surfacing. In this way, crater formation can be avoided.
Rules for the formation of a weld seam and possible defects
To obtain a high-quality welding joint with an inverter, a combination of several factors is necessary.
First of all, you need to correctly select the main parameters of the future welding process, which include voltage polarity, current strength and electrode diameter. In addition, it is necessary to know the rules for using different types of electrodes depending on the type of materials being welded and types of welding. The next important point is the technology of the welding process itself. Learning to weld, even with an inverter, which makes the process much easier, requires lessons on individual welding components, such as starting and maintaining the arc, moving the electrode at different angles, and finishing the weld. The correct execution of the combination of all these components ensures the specified quality of the welded joint. In addition, it is necessary to master the preparation of the welding site, as well as cleaning the resulting seam from slag. Defects that occur during inverter welding are the result of various reasons. First of all, this is poor preparation of the surfaces to be welded, incorrect selection of parameters and errors during the welding process. Lack of penetration of the weld and its saturation with slag can be a consequence of underestimating the welding current, poor cleaning of the joint or high speed of movement of the electrode. And the uneven shape of the seam is most often associated with instability of the weld pool or fluctuations in the trajectory of the electrode. In addition, some defects arise due to the special physical and chemical properties of the material being welded. In order to avoid them, a more careful selection of the operating modes of the inverter and the electrodes used is required.
About welding seams
The seams that are formed using inverter welding are as follows:
- single-pass, in which the thickness of the metal workpiece is replenished in one pass;
- multi-pass, in which one pass of electrodes is not enough. Used when welding thick edges.
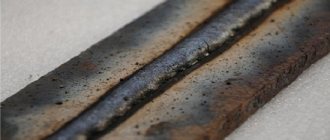
The most famous and simple way to check the quality of a seam after welding is to tap it with a hammer. At the same time, the slag layer bounces off - provided that the seam is even and smooth. Also, the quality of the seam depends on the temperature: it must be correct.
If the seam is overheated, it may break; if the heating is insufficient, a very unpleasant thing will happen - lack of penetration.
Polarity forward and reverse: what is the difference
Polarity in welding on an inverter machine is an extremely important thing that you need to understand.
If the welding current is constant, then the movement of electrons is also constant. And in this situation, there is almost no splashing of drops and pieces of molten metal, as a result of which the seam comes out neat and of high quality.
At its core, polarity is the direction of electron flow, which depends on the order in which the cables are connected to two different connectors on the device. Inverters have the ability to select the type of polarity. The welding current can also be adjusted.
Reverse polarity
Types of polarity for welding.
This is the negative pole on the metal workpiece, and the positive pole on the electrode. The current thus moves from minus to plus, that is, from the metal to the electrode. With this method, the electrode gets quite hot. The method is good when welding thin metals as the risk of burn-through is reduced.
Straight polarity
Here it’s the other way around: the negative pole is on the electrode, and the positive pole is on the metal of the workpiece. The current now flows from the electrode to the part being welded, which in this case heats up more than the electrode. This is how they work with thick metal edges.
It should be noted that the polarity is always indicated in the instructions on the packs of electrodes.
One of the main “inverter” questions from debutants is what is the most optimal polarity when welding with an inverter? The answer depends on many criteria, but from the point of view of cutting metal, the polarity should be straight.
The fact is that with this type of polarity, the molten area turns out to be deep and narrow - just what is needed when cutting.
With reverse polarity, the opposite is true: the melting zone is shallow and quite wide.
Differences between direct and reverse polarity when welding with an inverter
In a welding arc, electric current is a flow of electrons moving in plasma from a negative electrode (cathode) to a positive electrode (anode). In this case, approximately one third of the thermal energy is accumulated at the cathode, and two thirds at the anode. For this reason, when welding with an inverter, the polarity directly affects where the greater heat generation will be: on the part being welded or on the electrode. Direct polarity is considered standard, when the electrode is connected to the negative terminal of the inverter, and the workpiece is connected to the positive terminal (see figure below). With this welding mode, deep penetration of the welded metal occurs with the formation of a stable weld pool and slower consumption of the electrode. Most low- and medium-carbon structural steels, as well as cast iron products, are welded using this method.
When welding with reverse polarity, the electrode holder is connected to the positive contact of the inverter, and the ground terminal is connected to the negative terminal. In this case, electrons are separated from the metal of the workpiece, and their flow is directed towards the electrode. As a result, most of the thermal energy is released on it, which allows welding with an inverter with limited heating of the part being welded. This mode is used when welding parts made of thin metal, stainless steels and metals with low resistance to elevated temperatures. In addition, reverse polarity is used when it is necessary to increase the melting rate of the electrode, as well as when parts are welded with an inverter in a gas environment or using fluxes.
Cook, cut
If you are working with thin sheets of metal, you need to choose the right small diameter electrode and welding current. If, for example, the edge thickness of your part is 0.8 mm, the diameter of the electrodes should be 1.8 mm. Well, the welding current should reach 35 A. You need to cook using intermittent movements.
The question of which electrodes to weld with is decided taking into account the type of welding and the nature of the metal.
Using an inverter, you can cut metals and even make holes in pipe walls. In order to do this competently and quickly, you need to set the correct parameters on the device. An electrode diameter of 2.5 mm and a current of 140 A are just such indicators.
We ignite the electrode and place it exactly at the location of the planned hole. Press for good heating. We rearrange the electrode, press and heat again. And so on until a hole of the desired shape and size is cut.
If you are cutting sheet metal, the sheet must be fixed vertically. In this case, drops of molten metal will flow down, otherwise you risk getting frozen metal icicles at the bottom of the cut.
To be honest, all cutting of metals with a welding machine, even with the most advanced inverter, is not the best idea from a technical point of view. There is always a risk of metal melting at the cut site - the metal can simply melt out. The best way to cut metal is with a grinder.
Inverter welding rules
Welding with an inverter has become a breakthrough in the field of welding machines, since outdated transformers are quite heavy and difficult to use. The advantage is that with inverter welding, spatter occurs less than when welding from a transformer.
An inverter is a welding machine that allows you to connect sheets of metal using an electric discharge. It has a distinctive feature: it has low weight and maximum capabilities , thanks to which it can perform work previously carried out by heavy and complex devices. The weight of the device depends on its power (from 3 to 7 kg).
You can transport it using a handle or strap. Cooling is provided by ventilation holes in the housing. This device consumes electricity, which is directed only to the operation of the arc , and it carries out the welding process itself.
The device is insensitive to voltage changes. If there are constant fluctuations, you should pay attention to the required voltage, which is indicated in the inverter’s passport.
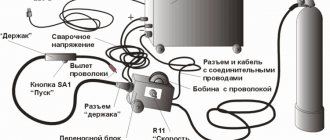
Handles and control indicators are located on the surface of the device :
- turns on and off with a toggle switch;
- the voltage and current values are set using knobs on the front panel;
- the panel has indicators informing about power supply and device overheating;
- The outputs (“+” and “-“) are located on the front of the panel.
Additionally, the set contains 2 cables . One of them ends with a holder for the electrode, and the second has a clip in the form of a clothespin for securing the product. The device is connected via a connector located on the rear panel of the device.
We choose, we buy
Table of characteristics for welding with an inverter.
It would be useful to google and read about domestic and foreign manufacturers whose products are offered on the Russian market. These are mainly European and Asian countries.
Equipment from Asia is usually inexpensive and of very decent quality, with the exception, of course, of handicraft fakes.
European inverters are distinguished by qualities with the obligatory adjective “high” in front: high price, high reliability, high quality. There are few Russian devices on the market.
Understand the brand of welding cable and its cross-sectional area. The right choice will help you avoid difficulties with power surges if they occur during welding.
The second thing to do is figure out the availability of service centers around the country. If you live in a city with a population of one million, a service center for a specific product is unlikely to be a problem for you. But if you live in a remote region, this issue will become one of the most important for you.
To be honest, you won’t be able to buy one device. Be sure to buy a welding helmet with a light filter. You need to protect yourself from splashes of molten metal and combustion products.
But the main thing is protection from ultraviolet radiation from a hot arc. The most primitive option is a mask made of plastic and a light filter, which is selected depending on the current strength, lighting and your vision.
A more expensive and much more comfortable option is a mask with a Chameleon-type light filter, which automatically changes its characteristics and can be adjusted to suit the ambient light and the condition of your eyes.
There are many tables on the Internet with data that will help you choose the right filters. It is better to choose them for a number larger or smaller. The best solution would be to check the lighting in the work area and your vision.
Okay, we agree, you don’t have to buy a whole suit made of special fabric. But a canvas apron with gloves is not a whim, but your protection. It is better to choose mittens from split leather. Pay attention to your shoes: be aware that drops of molten metal may fall on your feet.
How to care for the inverter?
Any equipment loves care and order, your inverter is by no means an exception. The rules on how to properly cook using inverter welding and how to store it correctly are simple.
Selecting an electrode for welding various metals.
Before work you need to do the following:
- carry out a visual inspection of the device and prepare the place where you are going to work;
- install the inverter in a horizontal position with the desired protection from dust, precipitation and other contaminants;
- connect the cable to the connectors in accordance with your plans, usually this is plus to the electrode and minus to the metal;
- connect power supply. The most important nuance: if you use an extension cord, the cross-section of the welding cable must be at least 2.5 mm².
- ignite the arc at separation as a test test;
- make sure the casing is intact, because cooking without it is strictly prohibited;
- adjust the current mode. You can start cooking.
You must store your device according to the following rules:
- Constantly check all components of the device. The frequency of checks depends on the intensity of use of the device and the degree of dust in the work area;
- Clean the device from dust using compressed air and low pressure. Do not clean the electric plateau with a jet of air, but use a soft brush;
- check the strength of power connectors, the integrity of the plug, socket and insulating coating of electrical cables;
- It is better to store the inverter in dry conditions, the air temperature should be within the range from -15°C to +50°C, the optimal air humidity is about 70 - 80%.
- Remember to disconnect the inverter from the network when it is not working.