Drainage and storm sewerage are structures that are engineering structures that collect and discharge wastewater of various natures outside a specific area. Drainage is usually laid to reduce the groundwater level in the area, and storm drains are used to collect rainwater on the roof and then drain it away.
Drainage systems are necessary to remove excess moisture from the soil
Why are drainage and storm sewers needed?
Storm drainage is used to collect precipitation on the roof. Collecting rainwater and melted snow is necessary, since when moisture flows freely from the roof, it damages the foundation of the building, which can lead to the house being tilted. The main task of storm drainage is to collect and drain wastewater outside a specific area.
The sewerage drainage system performs the function of collecting excess water in the soil on the site. Its main task is to drain the area adjacent to the house. Arrangement of drainage is a necessary measure to avoid rising water levels in the soil.
Important! It is worth remembering that it is strictly forbidden to combine these two systems together. This is due to the fact that during heavy rainfall, the drainage system quickly overflows with water from the storm sewer and ceases to function.
The water collected by these systems is transported through pipes to special storage tanks, after which it is discharged outside the site. In some cases, moisture collected in storage containers is used for irrigation. Installation of drainage and storm sewerage is necessary on almost all soils and in all areas. To understand the issue, it is necessary to study the main characteristics, as well as the design features of drainage and storm sewers.
Storm drainage is needed to collect atmospheric moisture from the roof and drain it outside the site
Rules for installing a dual system
You can combine stormwater and drainage in one trench, but at different depths
Before installation, design work is carried out with a topographic survey of the area. The throughput capacity for pipelines is calculated, which should ensure water drainage in overload mode.
When bookmarking, you must follow the following recommendations:
- The installation of drainage requires significant investment. Incorrect calculations will lead to additional costs. It is quite difficult to restore a broken system; it is easier to install a new one.
- Combining stormwater and drainage in one trench is acceptable, but they are located at different depths. The well for collecting water can be shared.
- The depth of the ditch is made taking into account a layer of crushed stone and sand, which should provide better water filtration.
- Perforated drains are laid below the storm pipeline.
- The pipes are located at some distance from each other. This protects the drainage system from overload in the event of damage to the storm drain.
- The maximum installation depth for a collector with a diameter of 700 mm is 120 cm.
Effective operation of the combined scheme will preserve the integrity of the foundation and prevent flooding. The money that would have been spent on installing both drainage systems and waterproofing will be halved.
Types and design of drainage systems
Today, there are several types of drainage systems that differ in their design and installation method. Consider these varieties:
- horizontal drainages;
- vertical drains;
- combined (systems that include both horizontal and vertical sections).
Horizontal drainage structures, in turn, are divided into:
- open;
- closed;
- wall-mounted
To understand the structure of the drainage system, you need to study what elements it consists of. Let's consider the drainage device:
- drains (these are special perforated pipes that are equipped with holes that allow moisture to pass through);
- sand traps (filtration elements);
- pipelines that drain collected water outside the site;
- wells.
Pipes for drainage systems can be made of different materials. The selection of material is carried out depending on the characteristics of the site and other individual characteristics in a particular situation.
Today, pipes made of various polymers are often used for drainage systems and storm drains.
Let's look at the main materials from which drains are made:
- polymer;
- asbestos-cement;
- ceramic;
- non-perforated drains, which are made from modern porous materials (for example, expanded clay glass). A special feature of such pipes is the way water enters them. Water does not enter them through standard perforations, but seeps through the porous wall.
In addition, wells are divided into three main types:
- examination rooms;
- accumulative;
- differential.
Drainage tunnel
A drainage infiltration tunnel of the required length is assembled from short plastic modules.
Sometimes it is advantageous to use a drainage infiltration tunnel instead of drainage pipes.
Compared to pipes, the drainage tunnel has an increased cross-section and a more optimal shape for seepage of wastewater into the ground. The tunnel allows you to receive and transfer into the ground a larger amount of wastewater per unit length.
As a result, the filtration or absorption field can occupy significantly less space on the site.
Section, plastic drainage infiltration tunnel module.
At the top center of the section there is a flange for installing an aeration pipe. The cross-section of the tunnel has the shape of an arch. It is assembled at the construction site from plastic sections - factory-made modules. For example, a tunnel section from one of the manufacturers has a length of 1220 mm and a width of 800 mm. and height 510 mm., weight 11 kg. The section holds a one-time waste volume of 300 liters.
The manufacturer claims that in terms of infiltration capacity, one tunnel section can replace 36 meters of drainage pipes. When choosing the size of the tunnel, the amount of drainage and the absorbency of the soil are taken into account.
A drainage tunnel from plastic modules can be assembled in the shape of a cylinder.
The drainage tunnel should be used on soils with fairly high absorbency. It can serve as a good alternative to drainage pipes, as well as a filter well
.
When installing a drainage tunnel, the following rules are followed:
- A drainage tunnel assembled from modules is installed on a bed of crushed stone or gravel. The thickness of the pillow is selected depending on the absorbency of the soil, but not less than 100 mm.
- A vertical pipe is installed at the extreme section of the tunnel for aeration and control.
- Then the tunnel is sprinkled with a layer of crushed stone or gravel of a fraction of 20-40 mm, the thickness of the layer is equal to the height of the tunnel. The layer of crushed stone from the sides and top is separated from the soil by a geotextile sheet.
- If protection against freezing is necessary, insulation boards - PSB-35 foam or extruded polystyrene foam - are laid on a layer of crushed stone, under geotextiles.
- The trench is covered with soil. If the thickness of the soil above the tunnel is more than 0.5 m, then a parking area for a passenger car can be placed above it.
Open drainage design
Such systems are installed on the surface of the earth, and water is drained into special containers or ditches. Surface drainage design is the most budget option, and its installation takes the least time. To implement such a system, you will need to dig ditches that must correspond to certain dimensions.
An important point when organizing drainage sewerage is the slope. The slope of such a system should go from the residential building to the sewers. Without an appropriate slope, water simply will not move through the trenches. You should also make sure that melt or rain water flowing from the roof falls into pre-organized trenches along the blind area and recesses along the paths.
The underground drainage system will not create inconvenience for residents of the site
The main disadvantage of such drainage is its unpresentable appearance. In addition, open trenches on the site can cause various kinds of inconvenience for the residents of the house. Therefore, experts recommend constructing drainage systems that contain prefabricated trays or constructing the structure underground.
Closed drainage design
Closed sewer drainage consists of ditches with drainage elements located at the bottom. The closed type stipulates that such ditches must be filled with earth.
There are several types of closed drainage structures. Let's look at them:
- simple closed systems;
- systems that contain special water collectors (trays);
- systems equipped with drainage mats.
Note! The first two types of systems are installed in order to remove water linearly or contour. The last option, which uses drainage mats, does not take this into account.
1. Simple closed drains. To lay such communications, it is necessary to dig appropriate trenches around the perimeter of a specific area. Then the ditch is backfilled with waterproof materials. Backfilling is carried out in several layers and mainly sand and crushed stone are used for these purposes. At the end, the trenches are filled with earth and compacted.
To install drains, it is necessary to prepare trenches into which a layer of geotextile is laid and crushed stone is filled
This drainage system has some operational disadvantages. For example, when organizing such a system, the possibility of monitoring the condition of the drains is excluded. Based on this, over time, the effectiveness of drainage will gradually decrease. In order to increase the efficiency of drainage and extend the service life of such a structure, it is recommended to use drains.
2. Closed structures, which include special trays. To organize a closed system with trays, one important point must be taken into account - for the installation of such a system, a scheme must be used that takes into account free passage or passage. To install the tray system, two types of trays are used. Let's look at them:
- perforated (such trays collect water from the adjacent land);
- non-perforated (for water condensation on the surface).
In addition, all trays are equipped with gratings on top. Grilles not only affect the overall aesthetics, but also perform a protective function, preventing various debris (for example, branches) from entering the system. The materials from which such gratings are made can be very different, but cast iron products are usually used.
A little theory: types of drainage structures and rules for their arrangement
Every homeowner must remember that the normal functioning of the treatment system is only possible when the clarified wastewater undergoes final treatment in the filtration field, which, based on specific circumstances, consists of one or more filter trenches in which spray pipes are installed. If filter systems are properly designed and manufactured, problems should not arise during the operation of the local sewer system.
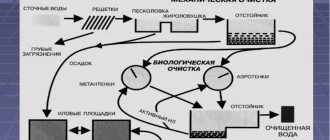
How the filter field works
Wastewater that has undergone sufficiently deep purification in the septic tank used at home enters the cavity of the drainage pipes of the filtration field. The soil microorganisms present here ensure the final oxidation of organic matter, using the oxygen supplied to them by the usually installed ventilation.
The process of arranging a filtration field is clearly determined by the provisions of sanitary standards and documents of local authorities. The requirements appearing in them are based on the fact that treated wastewater should not enter the cavity of water intake systems that supply water to homes.
Drainage of filtration fields must be created if:
- groundwater lies close to the surface (up to 1.5 m or less);
- the filtration field is located in soil with weak filtering abilities.
Types of sewer drainage
Filter well
A filter well resembles a cesspool, which has long been familiar to many Russians. The difference is that it does not have an isolated bottom. This arrangement of drainage is ideal for dachas where daily use of sewerage is not expected. The good thing about a filter well is that it requires a fairly small area to install.
If your site requires a well, then its construction should be carried out taking into account the following points:
- The location of its installation is clearly defined in SanPiN. Any violations are fraught with administrative liability.
- It is better not to build a well in areas where water supply is provided from a well, since according to existing standards, the bottom of the well should be lower than the bottom of the well, which is practically impossible.
- In order to be able to use the sewer system in cold weather, the well container must be equipped with an appropriate layer of thermal insulation.
Filtration field, also called aeration field
If a filtration field or trench is constructed, the quality of wastewater treatment increases significantly, since the liquid coming here from the septic tank is distributed by a system of pipes over its entire area. Suspended particles in a liquid are subjected to aerobic processing by microorganisms, for the normal life and work of which aeration fields are always equipped with simple ventilation.
The filtration field with the trenches forming it should be located as far as possible from the house and no closer than 3 m from the garden.
When arranging aeration fields, you must adhere to the following recommendations:
- The off-season is considered the optimal period for carrying out work on creating such fields.
- When arranging, do not forget that there is always a possibility of damage to the pipes by plant roots and displacement of soil layers.
- Ideal for filtration fields are those types of soil that contain sand.
- The filter layer of the field must be located below the freezing level.
- The slope angle of the drain must be constant throughout the entire length of the pipe.
Drainage tunnels
Ready-made tunnels of varying capacities can be purchased at retail outlets. They are convenient due to the simplicity of their installation, as well as the fact that ventilation is not provided for them. This makes it possible to equip a home parking lot above them or install a gazebo.
So, let's move on to the practice of the issue: we begin the installation of sewerage drainage.
Wall drains
Wall drainage structures are organized near the foundation. The main feature of such communication is that it contains waterproofing materials. A ditch is dug along the entire foundation. The depth of such a ditch should correspond to the depth of laying the foundation or exceed it.
Wall drainage is done in order to remove moisture from the foundation of the building
The necessary waterproofing is installed on the foundation walls, and the pre-dug ditch is filled with drainage materials. In this case, it is allowed to use special drainage mats, the filter of which is made of geotextile. Such mats are usually waterproofed with polyvinyl chloride (PVC).
Note! Pipes can be laid in the trench to drain rainwater collected from the roof. In this case, it is recommended to use plastic pipes without perforation. With the help of such pipes, water is removed from the tray structures into a special well.
Rainwater must not be discharged into the drainage system, as this may lead to overflow of the structure. If the drainage structure overflows, the water will rise into the foundation of the building, which is fraught with unpleasant consequences.
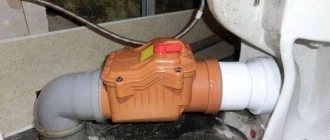
Closed storm drain
It is a point type sewer. Set up as follows:
— trenches are dug in which pipelines for drainage will be laid. The trenches are excavated to a depth below the freezing depth of the soil by 0.4-0.5 meters. Pipes laid above the freezing depth must be carefully insulated.
— stormwater pipes must have a diameter of at least 110 mm, the upper limit of the diameter is not limited. Polyethylene two-layer pipes with a corrugated outer and smooth inner layer are used. To install a point storm drainage system, it is preferable to lay pipes in a straight line; if this is not possible, then the turn is made at an obtuse angle and an inspection well is installed at this point. The same wells are installed in places where the sewer pipe branches. All joints are carefully sealed with adhesives or sealant.
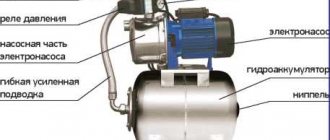
— then all the stormwater pipelines are connected at the lowest point to a pipe with a large diameter, which is the collector. The collector is connected to a reservoir or placed in a pit to collect water for subsequent use of rainwater for watering the garden, washing cars, or for any household purposes other than cooking. If there is a quarry, ponds or ravine nearby, then it is possible to divert the water there.
— before filling the trenches, do a test run of water to check the operation of the installed storm sewer, as well as its tightness.
Vertical type drains
Such structures are represented by a well in which pumping equipment is located (pumps are used to pump out wells). As a rule, such drainages are used in the agricultural industry, and they are also actively used to drain land during the construction of highways.
When laying this system, wells and trays are used, which, as a rule, are located on a waterproof layer. In addition, such a system must be equipped with deep-well pumping elements. This drainage system is considered the most effective. And if the land on the territory of a particular site has a high coefficient of water resistance, then such a structure will not only be effective, but also quite economical.
A vertical drainage system requires a pump to pump water from wells
The depth of laying vertical drains can be different, since everything in this case depends on the level at which the groundwater is located. It can be 20 or 150 meters, depending on the characteristics of the soil on which the site is located.
Helpful information! The vertical design is represented by different types of pipes: conventional and perforated. Regular ones are located at the top of the structure, and perforated ones are located at the bottom. It is also worth noting that the holes of perforated pipes can be of different shapes.
Such borehole drainages can operate in various modes (the choice of mode is carried out based on the time of year). Do not also forget that such systems require periodic preventive inspections and cleaning of the filter, which consists of sand and gravel.
How to arrange a drainage system around the house
Start with deep drainage - ideally at the construction stage. The general rules established by SP 45.13330.2012, SNiP 3.07.03-85 and SNiP 3.05.05-84 for wall drainage of strip foundations are as follows:
- the drainage slope towards the drainage element is 0.02 m per meter of length
- the depth to which the pipes are laid is from 30 to 50 cm below the base of the foundation
- maximum distance from the outer edge of the foundation - 1 m
- the distance between inspection wells (also called control or inspection wells) is 40 m on straight sections . They are also installed on corners
Important: start drainage work after waterproofing the foundation - the drainage system only works in this case.
- Determine the bottom and top points of the system.
- Dig trenches for drains - drainage pipes with holes. Their diameter is 110-200 mm, the diameter of the holes is less than the diameter of the particles of crushed stone or gravel that you will fill the pipes with.
- Pour sand into the bottom of the trench.
- Spread geotextiles on the sand. The width of the web should be such that the pipe, together with a layer of crushed stone or gravel, can be wrapped with an overlap.
- Apply gravel in a 10 cm layer.
- Lay drains, install inspection wells with covers and connect them together. Cut the pipes into the wells at a height of at least 5 mm, so that there is room at the bottom for settling sand.
- Fill the drains with crushed stone or gravel in a layer of 15-20 cm. Wrap the pipes filled with geotextile.
- Fill the trench with sand, compact it in layers of 10 cm. Moisten each layer.
If you are arranging a combination of slab and wall drainage for a slab foundation, then you will need to dig a pit 1 m wider in each direction. You will also need to create a slope from the bottom of the pit to the edges. Line the bottom with geotextile. Pour gravel around the perimeter of the pit and lay pipes. Install inspection wells along the edges. After laying the ring drainage pipes around the perimeter of the slab, level the bottom of the pit with 15-20 cm layers of crushed stone or gravel, sand, and gravel again. The resulting “pie” can be poured with concrete preparation.
To arrange surface drainage, dig trenches 50-60 cm wide along the entire length of the linear drainage system. Dig such a depth that after installation the upper edge of the tray is 3-5 mm below ground level. All trenches must be connected into one, which will ultimately lead the water to the discharge point. Start by installing sand traps at the lowest point of the system, then lay down the trays. Connect the trays using grooves and tongues, which are included in the kit. It is better to seal the seams between the trays. Cover the trays with protective grilles.
Install point drainage around the perimeter of the building. Install sectional rain inlets in those places where water will accumulate the most - under the outlets of drainpipes, in door recesses in front of the gate. The drains you will need to connect to the receivers can be placed in wall drainage trenches. You can choose improved versions of rainwater inlets - those equipped with siphons to neutralize unpleasant odors, or baskets for collecting waste.
It makes sense to think through the drainage system at the very beginning, along with the house design. In order to spend time in a clean and dry area, and not in a smaller copy of a forest swamp, and to protect the house from excess dampness, we recommend that you conduct a study of the soil and groundwater on the site and seek the help of specialists in any unclear situation.
Types of storm sewer system
Storm sewerage, as mentioned above, performs the function of collecting melt and rainwater, as well as draining it outside a specific territory. There are several types of storm sewer systems that you need to pay attention to:
- Spot. This system performs the function of collecting water on the roof and is a structure of rain inlets that are installed under each roof drain. In addition, this system includes pipes that are laid in the soil at a certain slope to effectively drain wastewater. Such pipes are connected to the main collector (a well that drains water outside the site).
- Linear. A structure that collects moisture from roads, as well as concrete and other paths. It is carried out in the form of special channels at a certain slope. Such a system, like a point system, transports water to the main collector.
- Combined. Such a system includes both point and linear storm drainage. The combined system also includes various auxiliary elements (for example, pallets).
Installing any of the above systems is a rather complex process that is best left to specialists with experience in this field. The preliminary design should take into account such items as: site features (topography), the volume of collected water, as well as the place where this water will be discharged.
How does the sewer system work?
The difference between such a sewer system and a drainage system is that it is installed at the stage of laying the roof, and it has a different purpose. The drainage outlet is located under the foundation and differs in its structure. For storm drainage, a system of gutters, drains, and funnels is installed on the roof. Under each pipe there is a rain inlet, which is connected to the rest of the structure, through which liquid is removed from the territory.
Trays are placed near the entrance to the house and garage and covered with gratings. There should be drainage along the paths. Additional structures, such as filters, can be added to the system. They will keep out debris, sand and dirt. The rest of the water will flow through the pipes into the ditch.