Prevention
The problem of sparking grinder brushes can be prevented by taking preventive measures:
- follow the operating rules;
- regularly change the lubricant in the gearbox and bearing sections, reducing mechanical and thermal loads (factory lubricant must be replaced before starting any work);
- promptly replace bearings while maintaining the structural integrity of the armature shaft;
- install a new set of brushes before the old ones start sparking.
If you notice that the brushes spark and burn, you should immediately check the tool or contact a specialist. The lack of timely diagnostics of angle grinders leads to the fact that the sparking brush block ultimately breaks the entire power tool.
You will learn how to replace faulty brushes in an angle grinder in the following video.
It’s hard to imagine a home craftsman’s arsenal without such a popular power tool as an angle grinder or an angle grinder (popular name). The angle grinder gained its popularity due to its versatility, since this tool can be used for cutting, grinding, sawing, polishing, stripping, sharpening and other work. Moreover, absolutely any materials can be processed. During the operation of the tool, various breakdowns occur, and one of the most common is sparking brushes on angle grinders. Not many people know why brushes on an angle grinder spark, so let’s look into this issue, and also find out why they burn out and how to replace them.
How to rewind an angle grinder at home, detailed instructions, video
The following video describes the repair of a Makita model angle grinder with excessive sparking in the brush-collector assembly. To determine the circumstances of the deficiency, a complete diagnosis of the electrical part of the angle grinder was carried out.
READ Makita angle grinder button does not lock
The reason for the excessive spark was a break in one of the armature windings of the angle grinder. The creator eliminates the disadvantage by rewinding the failed winding. After determining the required characteristics of laying the old coils and then removing them, the new winding is wound. It is done using a special device.
After winding is completed, the coils are fixed in the grooves using wedges made of wood or other soft material. The creator connects the winding wires and the terminals of the collector lamellas (“cockerels”) by welding. After this operation, you should definitely check the electrical circuit of the coils with a multimeter and a short circuit indicator.
If no breaks, breakdowns or interturn short circuits are found, the winding is impregnated with epoxy. To create the conditions for high-quality impregnation, the rotor is previously heated. The creator quite carefully outlines the technological methods that promote the best flow of resin inside the coils.
Because the rotor rotates at enormous speeds, it is important to ensure good balancing to reduce the load on the bearing units. The creator of the video only indicates the presence of this technological operation; more detailed information is not provided. After balancing, the commutator is machined in the working position, in other words, based on bearing units. When performing the indicated processing, mechanical particles may enter the winding, therefore the devices should be checked for breaks and short circuits.
The same creator repairs grinders of various models: in the first video, the “SKIL” model is repaired, and in the 2nd video, the “Bosch” model. Therefore, the repair methodology in both cases is similar.
It is fundamentally correct to find the characteristics and winding pattern of failed rotors on both models. Here, in addition to visual inspection, the creator uses a tester to determine the location of a closed electrical circuit for the wire from the core groove with a suitable “cockerel” terminal of the lamella, which indicates low resistance if such a connection is present. The creator advises making a graphic representation of the installation scheme indicating the required characteristics.
Unlike the previous video, in this one the creator directly shows his actions while working on a lathe while removing the old winding, freeing the grooves from the remaining bundles of wires and actions when winding the wire. The creator is a master at repairing power tools, so he has a special winding device in his arsenal.
The grinder sparks and twitches, the brushes are new, the armature and stator are intact. How to fix it? Bosch tool repair
After winding is completed, the ends are secured according to the diagram by bending the bends of the “cockerels” of the lamellas. Additionally, the wire of the frontal part of the armature is banded using natural heat-resistant threads (synthetics are strictly prohibited). Next, the ends of the wires are welded with the bent ends of the lamellas and control is made for the presence of breaks and short circuits with appropriate devices.
After heating the rotor to about 100°C (pyrometer readings), the winding is impregnated with epoxy.
In the following video, winding the armature winding is done without using a device, purely by hand. Manual winding has its own peculiarities related to securing the wire. In the video, it is secured with a loop on the rotor shaft immediately behind the commutator. The creator strengthens the ends of the windings to the lamellas without introducing soldering and welding technologies. The hooks of the lamellas are settled at the junctions of the wires using special extensions using the impact method.
Several videos are devoted to repairing the anchor of the angle grinder model “Metabo”. One of them addresses the issue of refining the rotor surfaces after impregnation. This information complements that previously stated. During this technological operation, resin may get onto some working surfaces. The video shows a method for cleaning them.
Reasons why brushes spark
Very often you can notice how the brushes on an angle grinder sparkle. Signs of sparking are detected through the ventilation holes in the body of the power tool. Craftsmen are interested in why the brushes on an angle grinder spark, even after they have been directly replaced. There are many reasons for this, and to understand this, you need to have an understanding of the structure of a power tool. If you know how the angle grinder works inside, then understanding why the brushes spark strongly will not be difficult.
https://youtube.com/watch?v=W-k9JyxuWik%3F
The reasons for strong sparking of brushes on grinders are the following factors:
- Faulty armature winding. If a violation of the insulation of the armature winding occurs, then this ultimately contributes to the development of an interturn short circuit, as well as a short circuit to the core. In addition, a winding break may occur, which will ultimately cause an increase in load. A characteristic sign of a faulty armature winding is a decrease in speed, an increase in noise and a drop in power
- The brushes do not press well to the commutator. A spring is responsible for pressing the main part, which, over time, loses its original springing properties.
- The rotor winding has broken off from the copper plate of the commutator - this phenomenon is extremely rare, however, if the power tool is overloaded, it may well occur
- The centering of the electric motor armature is disrupted, which ultimately contributes to strong sparking of the brush on the angle grinder
- The shape of the collector is broken. The collector, consisting of copper lamellas, has a cylindrical shape, which can be broken when the rotor is rewinding. At the slightest deformation of the commutator shape, sparking of the brushes will occur
- Violation of insulation between the collector lamellas. Each collector plate is insulated from each other, and if the micanite insulating layer is damaged, sparking occurs. The insulation between the plates may also be compromised due to the settling of the graphite layer in the grooves
- When the armature bearings are worn. If the bearings are faulty, then a beating of the rotating armature occurs, and as a result, signs of sparking appear
- Curvature of the rotor shaft. It is difficult to bend it, but if this happens, the engine begins to work under load. To prevent the tool from malfunctioning, it is recommended to replace the rotor
- If the ends of the armature windings are soldered incorrectly to the copper plates of the collector. Such errors are not allowed at the factory, but they can be made by the wrapper who rewinds the armature of the power tool.
- Inappropriate composition of graphite brushes. The parts in question are made from coal and graphite, adding different types of impurities. This is done for a reason, but in order to use brushes depending on the voltage and shaft rotation speed. Graphite can be soft or hard. The lower the supply voltage, the softer the grade of graphite selected. For high-voltage power tools, it is necessary to take hard brushes that do not contain copper.
- Deformation of the lamellas due to their heating. If the angle grinder experiences excessive loads, deformation of one or more lamellas of the collector may occur. The plates rise relative to the others, resulting in the contact being broken. This malfunction causes strong sparking of the brushes when operating the power tool.
- Poor contact at the brush connection point. If the terminal is loosely connected to the device, the result of this contact failure may manifest itself in the form of excessive sparking
- Presence of carbon deposits on copper plates - periodically or regularly it is recommended to clean the surface of copper lamellas from carbon deposits. Carbon deposits usually appear due to wear of the brushes, so if blackening is detected on the surface of the commutator, it should be wiped with alcohol
Often, after changing the brushes on an angle grinder, craftsmen observe the phenomenon of excessive sparking. Based on the factors described above, you can identify the cause and eliminate it before the tool fails. The elements in question are inexpensive, but due to their incorrect selection and use, the power tool may break. To find out what malfunction is causing strong sparking, you will need to disassemble the power tool and inspect it, as well as ring the rotor winding.
https://youtube.com/watch?v=JhnK8Mi2syY%3F
Why the brushes on the grinder burn?
Why do the BRUSHES on the GRINDER SPARKLE and blaze so quickly? Let’s look at the prerequisites and solutions. Strong sparking often indicates imminent tool failure. It is necessary to understand in time the causes of excessive spark formation and take measures to eliminate it.
Prerequisites for sparking of electric motor brushes. Wear of brushes. If these parts are heavily worn, the electric motor does not develop speed at full power, and may also not turn on (all the time or occasionally). In this case, when the electrical appliance is turned on, you can use a screwdriver with an insulated handle to press the brush against the armature. If an increase in engine speed is observed, then the problem has been correctly identified. Most likely, replacing worn parts with new ones will correct the situation. From time to time it is also necessary to replace the brush holder springs. Interturn closure of the armature winding. A malfunction of devices with electronic engines may be a broken armature. In this case, sparking will be observed in the area of both brushes, and the armature winding will get very hot due to the fact that some contacts receive a larger current than others.
HOMEMADE from GRINDER.
My channel: https://www.YouTube.com/c/DmitriiIzumov VK.com: https://vk.com/id197936402
Play.Lists: ① ⚒ all videos ⚒ https://www.YouTube.com/playlist?list…
Optimization. DO NOT read: grinder repair, stator replacement, grinder repair, bearing replacement, rotor, grinder repair, brush replacement, comfortable grinder , how to choose a comfortable grinder, whole rotor, whole stator, new brushes, why the grinder . commutator, deformation, sparks, intermittent operation, twitches, increased sparking, uneven wear of the commutator, grinder sparks, how to fix, how to check the stator, how to check the armature, diagnostics of power tools, inter-turn short circuit, how to determine whether it is the armature or the stator, what the grinder is out of order, definitions of interturn short circuit, interturn short circuit indicator, why the brushes are on, short circuit indicator, grinder gets very hot, little known breakdown, angle grinder sparks, brush tunnel, grinder broke, grinder , angle grinder, angle grinder , replacement, brushes, why, doesn’t it turn on, heat up, work, how, with your own hands, make, brushes,
“Bulgarian9” itself has nothing to do with it. This phenomenon applies to all commutator-type engines. Motors of the so-called serial type are installed on hand-held power tools. This is when the stator windings are not connected in series. This is because initially the myth was that the type of electric motors was created for direct current. However, the use of a sequential circuit allows it to be connected to an alternating current circuit. The speed of such a motor is not limited by the frequency of the current, as is the case in brushless electric machines. Due to the increased speed, a number of requirements are imposed on the commutator assembly, which are aimed at reducing sparking under the brushes, without thereby reducing engine heating. And so, the spark is increased if:
Something like this. Choose from this list that doesn't just suit your situation.
Why in Bulgarian
Do the brushes burn out quickly (I installed new ones and they burned out in three minutes)?
Let me argue a little with the previous answers. That's it, under no circumstances should you install copper-graphite brushes. They are denser and do not cause mechanical damage to the anchor. Which then leads to a possible short circuit of its winding, and this turns the contact surface into something similar to sandpaper, this again gives rapid wear for simple graphite brushes.
Copper-graphite brushes are mounted only when the contact surface of the armature has a special coating or is made of a special alloy.
READ How to ring the stator of an angle grinder with a multimeter
There is another option for the reason for rapid wear of brushes - armature beating. Edelweiss is a matter of wear on the bearings of the electric motor bushings, depending on what is installed. However, this is a rarer case.
And as another possibility, it is worth mentioning the possible presence of a micro breakdown in the winding. Heating occurs in the electric motor just at the right time, this heating does not manifest itself as a micro breakdown, something like this happens. only very weak, the brushes begin to burn out quickly.
The best option would be to take the grinder to a workshop. There they would check it - if desired, they would grind the contact surface, ring the winding, replace the bearings or bushings. If you can’t do this, then you can at least try to grind the anchor yourself. Disassemble the engine, clamp the armature into a drill at maximum speed and polish it. You just need to use sandpaper of the smallest grit, micron. Not here, practically do not put any effort on it, but only lightly touch it. And then carry out the second stage - initially rubbing the sandpaper against each other, thereby erasing the surface layer and such a situation will already be like polishing. And the final step is to polish it with a piece of cloth, also called felt, moistened with machine oil. Don’t forget that the layer to be removed must be minimal - a micron or two, based on the existing damage.
Here you need to make a precise determination - are your brushes burnt out or worn out?
If they burnt out, then I have never seen anything like this before; when the motor shorts out, the brushes themselves do not burn, since they are made of a material that, by and large, has no right to burn out, unless it is subjected to a large current, alas, then it will be a bunch of sparks no short circuit at the bottom. Which, as far as I understand, did not happen for you.
Therefore, I assume that rapid wear has occurred. Then, of course, we’re not talking about brush wear, but wear on the motor commutator. I've encountered this many times. When, due to commutator wear, the brushes are not worn out first.
What's happening is that the collector itself is divided into parts, look at
To determine the wear of the collector, you will have to get to it without checking the coating.
So I’ll answer it myself, since I figured out what the reason , it turns out I added problems to myself! Like an office worker, when the brushes on the angle grinder wore out and the machine started to work jerkily, it was necessary to stop immediately. alas, for the reason that I had nothing to finish cutting with, I still cut it further. The worn-out brushes hung on the limiters and did not create a huge arc in a circle, alas, the machine continued to spin the disk, it was not I who sawed, the arc ate out a groove on the armature commutator like electric welding, and when I installed new brushes they did not have a plane of pressure against the armature commutator, they did not burn out, they just idled very quickly work. Having disassembled the grinder, I saw a gloomy situation, an attempt to polish the armature commutator at the turner did not end in success, I had to buy a new anchor, since it was impossible to replace only the commutator, and besides, honestly no one even wanted to take on this. The result was that the finished 40X40 profile resulted in the purchase of a new anchor, but that’s not the whole reason for this action.
What spare parts for angle grinders can be changed independently, and how to properly maintain power tools
A grinder at home is like a telephone connection. When the oil is in good working order, no one remembers about it. Once a breakdown occurs, it immediately becomes obvious that you can’t do without it for a day. Repairing this useful electrical appliance on your own is possible even for a novice craftsman.
First of all, let's look at the structure of the grinder.
An internal moving component of an engine. Usually it is integral with the working shaft, through which rotational energy is transmitted to the gearbox.
Armature switching board. The operating voltage from the brushes is supplied through its contacts.
Contact elements pressed against the commutator plates.
The outer winding of the motor, inside which the armature is required to rotate. Located along the inner contour of the instrument body.
A mechanical component that reduces the speed on the working shaft while simultaneously increasing it.
Why do the brushes burn in an angle grinder?
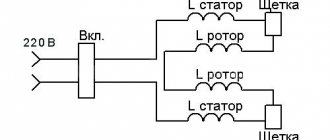
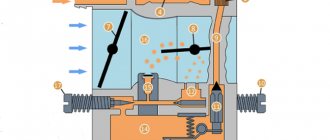
The attached figure clearly shows the electrical circuit and arrangement of the electric motor components.
Tool motor picture
The angle grinder engine operates in extreme conditions. Despite the protection, dust gets inside, most often in the form of small metal filings. Metal is known to be a conductor. When it gets into the contact zone between the brushes and the commutator, microcircuits occur and the copper plates become very hot. Melting and mechanical connection of the collector contacts may occur.
Type of electric motor commutator to be repaired
In this case, the brushes overheat and the working surface burns out intensely. Hence sparks and increased wear. Another reason why brushes spark is when fine sand and wood dust get inside. When the commutator is contaminated with sawdust, the contact between the brushes and the commutator is broken, and sparking occurs under intense load, with all the ensuing consequences. Therefore, for prevention, it is necessary to periodically disassemble the body of the angle grinder and clean the dust from the collector.
It is necessary to periodically blow out the engine of the angle grinder
This simple procedure will extend the life of both the brushes and the armature commutator. It is advisable to at least vacuum the angle grinder after each dusty job, especially in the area of the ventilation holes.
Types of devices for collecting current
Underestimating the importance of the good condition of this part leads to serious consequences. Timely measures to prevent them will extend the service life of the tool.
First you need to understand the types of current collectors:
- The production of graphite brushes for an angle grinder occurs by mixing the base substance with a binder composition. As a result of pressing carbon materials under pressure and further firing, a product with additional strength and wear resistance is obtained. Then the graphitization process begins, which consists of heating to a temperature of 2500-2600 degrees in special furnaces. This is the most common type of such products, although it is quite expensive, but its service life partly compensates for it.
- To produce carbon brushes for grinders, the same graphite or carbon black is used, only additional hardening is excluded from the cycle. This significantly reduces both the cost of the product and its durability.
- The raw materials for the manufacture of metal-graphite brushes, as the name suggests, include metal in addition to the main element. Usually this is copper powder, but the addition of tin, lead or silver is not excluded. metal component can reach up to 80 percent. Applications for such parts are primarily in industrial generators and electric motors. For household needs, these products are too expensive.
READ Husqvarna Chainsaw Starts and Stalls Cause
Before purchasing a replacement set of brushes, you need to find out their type and dimensions in the technical data sheet of the tool.
Why do brushes burn out quickly?
What are the reasons for the rapid burning of brushes on a tool?
How to understand that you need to change the brushes
Many people change brushes only after they notice strong sparking from the tool, as well as the appearance of a burning smell. Many craftsmen are not stopped even by these signs, and they continue to use the tool until it stops turning on. When is it necessary to change carbon brushes so as not to damage the structure of the power tool? There are the following signs for this:
- Strong sparking - if signs of strong sparking appear, then it is necessary to disassemble the tool and inspect the consumables. Sparking is the first sign that consumables need to be replaced.
- The appearance of a burning smell - if the smell of soot is heard when using the tool, it is recommended to disassemble the grinder and replace the graphite brushes
- When the wear of the main part is over 30% -40%. However, it is almost impossible to determine their initial length, unless you measure it before installing the elements
- When signs such as jerking or “growling” of the power tool appear
Devices are also subject to replacement if they have uneven wear and do not correspond to quality.
https://youtube.com/watch?v=Wt0n_ECSwvE%3F
Care and proper operation of the grinder
To make the grinder work for a long time, follow the rules:
- Monitor the integrity of the insulation of the wire and plug. Don't remove your protection.
Lubricate and clean the entire tool.
After turning off the grinder, wait until the circle stops rotating, then place it on the ground. When the engine stops, the tool, through the ventilation holes, sucks in, along with the air flow, particles of earth and other hard fractions that hit the motor windings. As a result, a break or short circuit occurs.
Try not to use an angle grinder outside in the winter. While you are running, the engine gets hot. The air is icy. As a result, condensation forms. Moisture is harmful to the engine. Always use the circles recommended by the tool manufacturer. If the angle grinder is 180 mm, do not put more than 200 mm there. The larger the circle, the lower the revolutions should be. You will have to remove the protection, and the speed will be exceeded. Vibrations and vibrations will increase. As a result, the circle will break into pieces. This is not only fraught with serious injuries. The gearbox bearing breaks and the gears wear out.
Post Views: 10
Sparking degree
The quality of switching, according to GOST 183-74 (Table 1), is assessed by the degree of sparking (switching class) under the running edge of the brush, that is, under the edge from which the commutator plates emerge during their rotation. The degree of sparking is 1, 1¼ and 1½ and are allowed under any operating conditions.
Table 1
Degree of sparking (switching class) of electrical machines
| Sparking degree (switching class) | Characteristics of the degree of sparking | Commutator and brush condition |
| 1 1¼ | No sparking (dark switching) Weak spot sparking under a small part of the brush | – No blackening on the commutator or carbon deposits on the brushes |
| 1½ | Weak sparking under most of the brush | The appearance of traces of blackening on the commutator, which can be easily removed by wiping the surface of the commutator with gasoline, as well as traces of carbon deposits on the brushes |
| 2 | Sparking under the entire edge of the brush. Allowed only for short-term load shocks and overloads | The appearance of traces of blackening on the commutator, which cannot be eliminated by wiping the commutator with gasoline, as well as traces of carbon deposits on the brushes |
| 3 | Significant sparking under the entire edge of the brush with large and flying sparks. Allowed only for moments of direct (without rheostat stages) switching on or reversing machines, if the commutator and brushes remain in a condition suitable for further operation | Significant blackening on the commutator, which cannot be eliminated by wiping the surface of the commutator with gasoline, as well as scorch and destruction of the brushes |
Potential sparking
Under certain conditions, spark discharges occur between individual collector plates on the free surface of the collector not occupied by brushes. Such sparking is called potential . It is caused either by the accumulation of coal dust and dirt in the grooves between adjacent commutator plates, or by the development of excessive stresses between adjacent plates. Such sparking is dangerous because it can develop into a short circuit between the plates and into a so-called circular fire.
How to understand that you need to change the brushes
Many people change brushes only after they notice strong sparking from the tool, as well as the appearance of a burning smell. Many craftsmen are not stopped even by these signs, and they continue to use the tool until it stops turning on. When is it necessary to change carbon brushes so as not to damage the structure of the power tool? There are the following signs for this:
- Strong sparking - if signs of strong sparking appear, then it is necessary to disassemble the tool and inspect the consumables. Sparking is the first sign that consumables need to be replaced.
- The appearance of a burning smell - if the smell of soot is heard when using the tool, it is recommended to disassemble the grinder and replace the graphite brushes
- When the wear of the main part is over 30% -40%. However, it is almost impossible to determine their initial length, unless you measure it before installing the elements
- When signs such as jerking or “growling” of the power tool appear
Devices are also subject to replacement if they have uneven wear and do not correspond to quality.
This is interesting!
It is not recommended to buy copper-plated brushes for a home grinder, as they will quickly damage the armature commutator due to the high copper content in the composition.
Copper-plated elements can be used on grinders that have a special coating on the collector plates. https://youtube.com/watch?v=Wt0n_ECSwvE%3F
brushes sparkle
Of course, by measuring inductance, there are also devices for determining short-circuit turns. In a very clinical case - visually and/or by resistance. According to the scorch of the armature commutator lamellas - if the scorch is uneven, then most likely there is a failure with the armature; if it is uniform, it is possible the stator. Of course, check the armature for interwinding/breakage with an ohmmeter: the resistance between adjacent lamellas and between diametrically reverse ones is measured alternately - in any case, there are no sharp differences, less
5% (due to slightly different wire lengths in different slots). For an angle grinder with a power of about 600-700W, the resistance of the stator windings is approximately 4-6 Ohms (same for both), the armatures - between adjacent lamellas is about 1-1.5 Ohms, diametrically - I don’t remember :(
Thank you very much! I will find short circuit. However, our client still shows, judging by the uneven burning of the lamellas, a short circuit in the rotor.
Please! And sell, anchors fly more often. Also, perhaps not a short circuit, but a break in the armature winding - from time to time the outer turns are interrupted by a foreign object, usually under the impeller. Sometimes such a break can be restored by soldering and filling with varnish/epoxy resin.
Source
Prevention of collector devices
In order to extend the life of the armature, and, accordingly, the electric tool itself, it is necessary to follow a few simple rules. These measures are as follows:
- Do not allow the device to operate for a long time at low speeds under a significant load, and especially not to allow the cutting part to bite. When an electric motor jams, a short blocking time is enough for it to burn out.
- If the device is jammed, it must be carefully released and allowed to idle for two minutes. During this time, due to natural cooling, the heated parts will cool down a little.
- Observe the timing of adding or replacing lubricants.
- If vibration or noise occurs, it is necessary to carry out a preventive inspection by disassembling the housing and cleaning both the collector and the entire space inside from dirt.
It is recommended not to carry out any independent work on repairing power tools, not only angle grinders, until the end of the warranty period. Manufacturers do not welcome unauthorized intervention into the equipment. This does not apply only to replacing brushes without opening the case, but in other cases it is better to seek help from an authorized service center.
An angle grinder is a high-speed electric tool equipped with a commutator electric motor. In this motor, current is supplied to the armature - the internal rotating part. This feeding is carried out using a sliding method, and the only way to make contact between the power source and the moving part is through graphite “brushes”. They are “fuses” against voltage overload and are the first to fail.
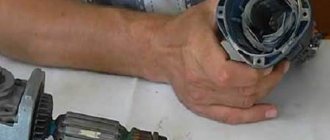
Do-it-yourself check and repair of an angle grinder's anchor
As Shakespeare said: “Nothing lasts forever under the moon.” Home appliances, as annoying as it may sound, are no exception. It happens that even the most reliable mechanism fails. And you need to be ready to face this fact without panic, with firm confidence that there are no hopeless situations. How does an angle grinder , what malfunctions can occur, how to check the armature of an electric motor, find the cause of the breakdown and fix the problems? Knowledge of the structure of the main components of a power tool will allow the master to diagnose and repair an angle grinder with his own hands.
Checking contacts with a light bulb
If you don’t have a tester, you can get out of the situation using a simple 12-volt light bulb. The power can be any, optimally 30–40 W. The voltage from the 12 volt battery must be applied to the plug of the angle grinder by inserting a light bulb into the gap in one wire. If the armature is working properly, if you rotate the spindle by hand, the light should light without changing brightness. If the heat changes, this is a sure sign of an interturn short circuit.
If the light does not light, this may indicate the following:
- The brushes may become stuck in the non-working position. The retaining spring has worked.
- There has been a break in the supply circuit.
- There is a short circuit or break in the stator winding.
READ Which Side to Place the Cutting Wheel on the Grinder
There are other diagnostic methods, but they require more sophisticated equipment, which is not usually used at home. An experienced technician will determine the breakdown with a high degree of accuracy using a “punch” or a simple transformer with a cut toroidal core and one primary winding.
How to rewind an anchor - step-by-step instructions
If the balancing of the armature is not disturbed, and the problem is only in damaged windings, then such an armature can be restored independently by rewinding the coils. Rewinding a rotor at home requires a lot of patience and accuracy.
The technician must have skills in working with a soldering iron and instruments for diagnosing electrical circuits. If you are unsure of your abilities, it is better to take the engine to a workshop for repairs or replace the entire armature .
To rewind the anchor yourself you will need:
- wire for a new winding. A copper core with a diameter exactly matching the old conductor is used;
- dielectric paper for insulating the winding from the core;
- varnish for filling coils;
- soldering iron with tin-lead solder and rosin.
Before rewinding, it is important to count the number of turns of wire in the winding and wind the same amount of new conductor onto the coils.
The rewinding process consists of the following steps:
- Dismantling old windings. They must be carefully removed without damaging the metal body of the armature. If any burrs or damage are found on the body, they must be smoothed out with a file or sanded with emery. Sometimes, to completely clean the body of slag, craftsmen prefer to burn it with a torch.
- Preparing the collector for connecting a new wire. There is no need to remove the manifold. You should inspect the lamellas and measure the resistance of the contacts in relation to the housing with a megger or multimeter. It should be no more than 0.25 MOhm.
- Removing old wiring on the manifold. Carefully remove the remaining wires and cut grooves in the contacts. In the future, the ends of the coil wires will be inserted into the grooves.
- Installation of sleeves for anchors. The sleeves are made of dielectric material 0.3 mm thick, for example, electrical cardboard. Cut a certain number of sleeves and insert them into the grooves of the cleaned anchor.
- Rewinding reels. The end of the new conductor is soldered to the end of the lamella and wound in successive circular movements, counterclockwise. This laying is called “laying to the right.” Winding Repeat for all coils. Near the collector, tie the wires together with a thick thread of cotton fabric (it is prohibited to use nylon, as it melts when heated).
- Checking the winding quality. After laying all the windings, check with a multimeter for the absence of interturn short circuits and possible breaks.
- Finishing processing. Treat the finished coil with varnish or epoxy resin to secure the winding. In factory conditions, the impregnation is dried in special ovens. You can do this at home in the oven. As an option, use quick-drying varnishes for impregnation, applying the coating in several layers.
Why do motor brushes spark?
Commutator electric motors differ from other types of motors by the presence of a commutator-brush assembly. The unit provides an electrical connection between the rotor circuit and circuits located in the stationary part of the motor, and includes a commutator (a set of contacts located directly on the rotor) and brushes (sliding contacts located outside the rotor and pressed against the commutator).
When operating a commutator motor in a power tool, you can sometimes observe sparking of the brushes. In some cases, this symptom leads to rapid breakdown of the power tool, and in others it does not bode well. One way or another, it is useful in each case to understand the cause of the sparking, so that, if necessary, the correct measures can be taken in a timely manner. In this article we will look at the causes of sparking brushes, as well as measures to combat the problems that cause this phenomenon.
Root cause
It is obvious that intermittent mechanical contact of the brushes with the commutator cannot but lead to sparking, because in fact, the electrical circuit of the rotor is broken and closed again many times per second.
The rotor contains a winding, which is a predominantly inductive load. The rupture of such a circuit is inevitably accompanied by a transient process, which is associated with the appearance of small arcs from the self-induction of the rotor winding or the rotor and stator windings. Of course, brushes wear out over time, as do commutator plates, but sometimes problems arise even before they wear out.
In fairness, we note that for the reason mentioned above, even a serviceable commutator engine cannot operate without sparks at all; there is always a small spark on the commutator. A fully functional device normally reaches full power, develops operating speeds and still sparks a little. It’s another matter if the sparking is strong - there is a reasonable concern here.
Sparking brushes as a sign of wear
If the brushes are already badly worn, simply due to the age of the engine, then the engine will not be able to reach full speed and reach full power. In this case, the sparking will be very strong, and the engine will not start the first time.
How to check that this is exactly the case? If the worn brushes are pressed against the commutator with a screwdriver, the contact will become tight and the engine will start working. But as soon as the clamp is loosened, sparks will appear again - the distance between the plates and brushes will become filled with small arcs. The brushes are clearly worn out and should be replaced with new ones. Sometimes replacement is only possible together - with brush holders and springs.
There may be a short circuit in the rotor winding
The armature (rotor) winding of a commutator motor traditionally contains several sections. If at least one is damaged, if there is an interturn short circuit, then more current will be supplied to one section than to the others. This will lead to overheating of the winding in one place, and to uneven sparking on the collector - sparks will be stronger at certain transitions on the plates than at others. This requires rewinding the anchor or a completely new anchor.
Is the stator winding OK?
A similar malfunction is possible inside the stator when part of the winding overheats and strong sparking is observed near one of the brushes. Check the resistance of both halves of the stator winding, they should be the same. If one part of the stator winding has a resistance much lower than the other, then rewinding or replacement of the stator is required.
A dirty collector causes an unnecessary short circuit on it, resulting in unnecessary sparks
Dust on the commutator is formed as a result of gradual wear of the brushes - this is graphite dust. It accumulates between the plates (lamellas) of the collector and creates “unauthorized” short circuits. Sparks appear due to short circuits. Simply clean the collector with sandpaper, removing dirt between the lamellas.
Be sure to check how the brushes are located, whether one of them is displaced relative to its normal position, and adjust the brushes if necessary. When the brushes are positioned crookedly, graphite dust is formed in disproportionately large quantities than when the brushes are positioned correctly.
Another cause of contamination is carbon deposits on the manifold due to overheating. When all other causes of sparking have been eliminated, it is necessary to clean the contacts from carbon deposits to improve the contact of the brushes with them.
If the contact is good, the resistance does not increase beyond the nominal value, and unnecessary sparks do not occur. You can clean off carbon deposits like graphite dust - with sandpaper, only by rotating the rotor with the commutator clamped in special pads.
Andrey Povny (Google+, VKontakte)
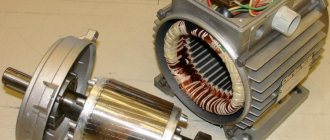
Electric motor design and operating principle
The operating principle of an electric motor is based on the interaction of a conductor with a current located in a magnetic field.
The magnetic field is created by the stator.
The main element of its design for a DC motor is a permanent magnet, for alternating current it is an excitation winding. The rotor (armature) has its own winding, to which voltage is supplied using a brush-commutator unit. The interaction of magnetic fields causes the rotor to rotate.
The collector consists of a set of contacts, which are copper plates located directly on the rotor. Micanite or mica cuffs act as insulators for each individual contact. Graphite brushes are sliding contacts pressed against the commutator.
Heavy sparking on USM brushes
I mentioned Robert Ivanovich Bosch), I had a high-power machine, which is hard to hold on the palms during normal starting
No need to waste more than 1.5 kW of soft start. If it's closed, change it. I tried Bulgarian Interskol. terrible, out of control. Just look at it head-on using dialing. Severe curvature on the brushes Ear. Good evening everyone. In order not to create an additional topic, you decided to ask here. The situation is this: we have a pole-to-pole 230 mm at 2300 W. Smoothly running something brain powder sometimes works exactly right, and sometimes this picture doesn't. you press the button, at first there is a sharp jerk, and then it starts, as if with a soft start. Guys, can this be cured? And if so, how. Basically, don't say that hell is some kind of problem because of this, but, you know, the situation is not very good. Postscript Bulgar worked for about three years in professional conditions: for a long time, a lot, and sometimes with heavy (but not prohibitive) workloads.
This message was edited by Devil666: July 12, 2014. 22:13
Strong sparking on the UWB brushes guys question Bulgarian Ummsh 125 Arsenal threw out the speed controller, now how to connect the stator
Attached images
Devil666, Conder is experiencing it, very similar. capacitor needs to be replaced
Heavy sparking on USM brushes
In my experience. After replacing the brush and running for a minute after LATR with increasing voltage (minimum to 150 volts), everything seemed normal. After a minute (I think the brushes were at least a little, but frayed) they began to increase the voltage higher. After 170-180 volts, a circular fire began. And with a little tension (slow rotation) the rotation was smooth. Something doesn't fit. When the brush springs were released a little, the fire disappeared.
Strong sparking on angle grinder brushes
Having mentioned Robert Ivanovich Bosch), I had a high-power machine for a reason, which is difficult to hold in the palm of my hand during normal starting
It doesn’t make sense to throw away anything other than a 1.5 kW soft start. If it is covered, then change it. Interskol. creepy, it breaks out of your hands. Just look at him, he'll hit him in the forehead with a disk. Strong sparking
on angle grinder brushes Have a good evening everyone. In order not to create an unnecessary topic, I decided to ask for advice here. The situation is this: we have an interskol of 230 mm at 2300 W. A smooth launch is kind of mind-blowing when it works completely correctly, but this is the picture. You press the button, at the first moment there is a sharp jerk, and then it starts as if with a soft start. Men, of course this can be cured? if you sell, then how. By and large, keep silent about the fact that there are some hellish obstacles due to this, but, you yourself realize, the situation is bad. PS The grinder is about 3 years old, it was used in professional conditions: for a long time, for a long time and sometimes with heavy (but not prohibitive) loads.
Post edited by Devil666: 12 July 2014. 22:13
Strong sparking on the brushes of angle grinders, guys, angle grinder
umsh 125 arsenal threw out the speed controller, now how to connect the stator
Attached images
Devil666, Conder is outliving his professionalism, very similar. capacitor needs to be replaced
Strong sparking on angle grinder brushes
From my experience. After replacing the brushes, and running for a minute after the LATR with increasing voltage (from minimum to approximately 150 volts), everything seemed to be normal. After a minute (I think that the brushes have gotten used to it at least a little, unfortunately) I began to increase the voltage higher. After 170-180 volts, radial fire began. And with a little tension (with a leisurely rotation), the rotation was smooth and uniform. Something doesn't fit. When I slightly loosened the springs of the brushes, the fire disappeared.
Action and characteristics
These elements are needed for the normal operation of not only the angle grinder, but also many other power tools. Graphite brushes for an angle grinder are needed to relieve voltage from the stator, while passing electricity and driving the moving mechanism. Their wear occurs due to friction against the armature commutator, which rotates during operation.
Timely replacement of brushes is very important, otherwise the power tool may break down. When the brushes are in normal condition, the rotating parts move without difficulty or special effort. In order not to miss the moment of brush wear, you need to periodically check their performance. If the graphite rod is worn down and the edge is close to the wear limiters, it must be replaced.
Thanks to these parts, tool wear is also reduced, since these elements are very easy to change. The main parameter is that the brushes must withstand the mechanical load that is provided when the rotor rotates.
Materials for production
Different materials are used to make brushes, but the most commonly used are carbon or graphite. Less common are carbon-graphite, copper-carbon, and copper-plated.
Graphite brushes are perfect for grinders because they have a high current conductivity coefficient and, as a rule, have good switching properties. Some types of such spare parts can automatically move away from the rotor in case of overload without being damaged, which is achieved thanks to the ceramic spring tip, which is built into the spring body of the part.
The ceramic tip does not conduct current and when the brush wears out, it is released, causing the spring to push out the connector. Carbon brushes for grinders are more wear-resistant. Even in tools with reverse, such as drills and screwdrivers, they last a long time and retain power in reverse mode
Particular attention should be paid to details with additional contact. The manufacturer of such a tool guarantees uninterrupted operation only when replacing the brushes with original ones.
The drill sparks on the brushes - what to do
So, your drill sparks on the brushes and you don’t know what to do in this situation. This article will tell you why this happens, whether it needs to be fixed, and if so, how.
It is immediately worth noting that the presence of the specified sparking during operation is a completely acceptable phenomenon. This is true only if the sparks are small and there are not so many of them. If they just fall out, this may indicate a malfunction.
Note that on a new, working power tool, the brushes may also spark strongly at first, since they need to first get used to. Grinding in usually takes 10-15 minutes of work. If after this everything remains as it was, then it is better to take the instrument back to the store with a claim.
If your drill is no longer under warranty, you can try to fix it yourself.
But first we will describe the reasons for this phenomenon.
Why do brushes spark in an electric motor?
Sparks, including on a working engine, appear due to mechanical action between the brushes and the commutator. The brush, moving along the commutator from one of its contacts to another, alternately forms and breaks a connection with each of them. Now remember what happens if you unplug any working electrical appliance from the socket - usually at such a moment a spark jumps between the plug and the socket. In the case of a brushed motor, this is the same phenomenon.
Therefore, a small spark even on a working electric motor is acceptable, since connections and ruptures constantly occur here.
Causes of severe sparking and how to eliminate them
Now let's move on to strong sparking. It occurs mainly for the following reasons:
- contamination of collector contacts with carbon deposits
- graphite dust getting between the collector contacts
- interturn short circuit in the armature winding
Let's go through each point separately.
1) Soot contamination occurs as a result of engine overheating. The presence of carbon deposits leads to even more friction, which leads to even faster overheating and even more carbon deposits. Which very quickly leads to breakdown.
Excessive sparking here results from the fact that carbon deposits form additional resistance, which causes the spark to break when it breaks, becoming larger and more powerful.
In general, carbon deposits should be removed immediately.
This is done with zero grade sandpaper. That is, you need to remove the collector along with the armature and carefully clean it. Ideally, it is advisable to carry out the grinding on a lathe so as not to disturb the correctness of the circle. But, as a rule, this is not possible, so you can get by with manual stripping. The main thing is not to overdo it.
2) When using a drill, the brushes wear out, which causes the formation of graphite dust. It can easily accumulate between the collector contacts and lead to short circuits between them, since it is a conductor of electricity and has its own resistance. Because of this, the current is distributed unevenly, which leads to large sparks in some places.
In a working drill, wear occurs quite slowly, so graphite dust hardly accumulates. Accordingly, its accumulation signals that the brushes are in the wrong position during operation. This usually happens when they do not stand tightly in their groove, but, on the contrary, have some play.
This often happens when replacing brushes, when they are selected to be not quite suitable in size.
Therefore, when replacing this point, you should pay close attention.
Repair of such a malfunction is carried out by removing dust with some pointed tool and replacing the brushes with more suitable ones.
3) In the event of an interturn short circuit in the armature, the current flows in a larger value to some contacts and a smaller value to others. Because of this, more current flows in some places than necessary, resulting in large sparks.
Identifying such a short circuit should be done when the two previous points did not give much effect. It is produced using a special device that creates an alternating magnetic field. When an armature is placed in this field, it begins to rattle, as induced currents appear in it.
Some people make such a device themselves from a power transformer, in the core of which a cutout is made where the armature is placed.
If the reason turns out to be an interturn short circuit, then you need to rewind the winding or completely replace the armature.
These are the causes of excessive sparking on the drill brushes. Remember, if you don't do anything about it, the engine will most likely break down soon. Therefore, do not be lazy and follow the recommendations indicated in the article.
Basic malfunctions of an angle grinder
An angle grinder, or in common parlance “grinder”, is an indispensable assistant for home craftsmen. There is always a use for it on the farm, and the more often you use a tool, the greater the likelihood of it failing. Since all angle grinders are designed approximately the same, the diagnosis of main faults for different models will be similar.
First, let's look at the main components of the grinder. All models of grinders, regardless of model, are characterized by the presence of:
- The armature is the rotating part of the electric motor.
- The collector is the part of the armature to which all the windings are routed. It consists of a series of copper plates isolated from each other, the so-called lamellas.
- The stator is the stationary part of the electric motor.
- Brushes - carbon or graphite, supplying current to the commutator lamellas.
- Gearbox - a mechanical device for transmitting rotation from an armature to a cutting or grinding wheel.
Electrical faults
The most common and easily fixed problem is brush wear.
Fig.1 Brushes
During normal operation of the angle grinder, a small, even spark should be observed inside the body. If the sparking is strong, or is not observed at all, then this often indicates that it is time to replace the brushes.
In some models, to replace the brushes, it is enough to unscrew two covers on the body, but more often there are models in which the body has to be disassembled to replace the brushes. If you could not find original brushes for your model, then you can take similar ones from another model - the main thing is that they are the same size or a little larger. Using a file, they can be easily adjusted to the desired size.
Another common problem is a simple break in the power cable at the input. This fault can be easily found using a multimeter. If you don’t have a multimeter at hand, you can use an indicator screwdriver.
Also, due to overheating or dust getting inside the housing, problems often arise with the electric motor of the angle grinder itself, most often this is a break or short-circuited turns in the armature or stator windings, as well as burnout of the lamellas on the commutator.
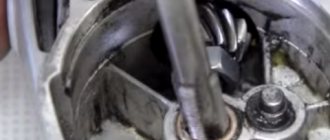
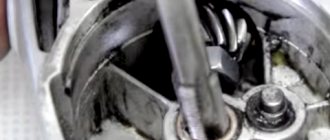
Fig.2 Grinder anchor
The main symptoms of the malfunction are a characteristic burning smell, heating of the housing, and strong sparking on the collector. Often, an external inspection is sufficient; the presence of darkening on the windings, burnout or peeling of the plates on the commutator clearly indicates that the stator or armature is faulty. If an external examination reveals nothing, you will have to use a multimeter.
Switch the multimeter to 200 Ohm resistance mode, check the resistance of two adjacent lamellas, and then check all the lamellas in a circle. The resistance on all lamellas should be approximately the same.
Fig.3 Checking the anchor
We also check the resistance between the lamellas and the armature body. The device should show infinite resistance.
Checking the stator windings is carried out in a similar way, only in this case we check all the terminals of the stator windings among themselves, as well as between the terminals of the windings and the stator housing.
It is not possible to determine the interturn short circuit of the armature or stator with a multimeter; in this case, a special device is required.
Another problem related to the electrical part is the malfunction of the start button. Due to the ingress and accumulation of dust, the contacts located inside the button simply burn out. The button can be checked using a multimeter. I don’t recommend trying to repair it; it’s better to buy a new one right away.
Fig.4 Start button
And finally, the most rare problems are the failure of the speed controller (not available in all models) and the noise suppression capacitor. This problem can also be solved by replacing faulty parts.
Fig.5 Capacitor
Grooving with sandpaper
The armature shaft is fixed in the chuck of some torque mechanism (lathe, drill). The rotation starts and the abrasive is applied to the commutator. Avoid forceful pressure and the use of coarse sandpaper. The minimum grain size is 1000 P.
Using a multimeter, detect the presence of a breakdown in the armature winding. Set resistance test mode. Place one probe on the lamella and the other on the contact of the corresponding winding route. The absence of an open circuit will be indicated by an audible signal. If there is no signal, this route is broken. You will need to replace the armature or rewind its winding.
Determine whether there is any runout in the bearings. If it is found, replace the bearings and measure with a micrometer the diameter of the edges of the armature shaft in the places where it adjoins the assemblies.
How to remove
For high-quality diagnostics and possible repairs, the anchor should be completely removed from the angle grinder. If necessary, to carry out work, you can use the information on the link “How to remove an anchor from an angle grinder.”
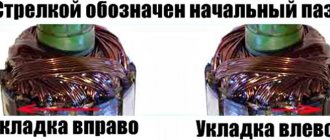
12 grooves and 24 slats
Rotor for Interskol angle grinder-2300M, HAMMER. Photo 220Volt
The rotor winding with such design parameters is carried out in the following way.
- The winding direction is set (usually clockwise when viewed from the commutator side).
- Insulation made of electrical cardboard and other similar material is installed in the cleaned grooves. The winding wire is soldered to the lamella in accordance with the old installation scheme.
- The wire is placed in the groove opposite the lamella indicated by the first number and, according to the winding pitch, is directed into the groove, turning back. The number of such layings corresponds to the size of the winding turns.
- A circuit with 12 grooves and 24 lamellas is built after soldering the middle of the winding to the lamella and continuing to wind the winding wire into the same groove. The required number of turns is maintained and soldering is done to the lamella. This is how the first complete coil comes out.
- Then the winding is done in the grooves and soldering the middle of the winding to the lamella and the end of the winding to the lamella
- Using the method listed above, wind the coils, the last of which ends on the lamellas. all 12 grooves and 24 lamellas will be used in the laying pattern.
Replacing angle grinder brushes
In most models of grinders, electric brushes are located inside the handle (see photo). This arrangement is due to savings in the production of the body, as well as more comfortable operation of the tool due to its compactness. On some other models, for the convenience of quickly replacing brushes, the screws are located directly on the body. In any case, it is more advisable when replacing brushes to also clean and lubricate the entire tool, and for this it must be disassembled.
Regardless of the location of the electric brush, first you need to disconnect it from the electric circuit of the angle grinder. The tips are removed, a visual inspection of the holder structure is made, and the brushes are pulled out, as shown in the photo. If chips, abrasions or other signs of wear are found, they are replaced with new ones.
Usually, a spare belt is given along with the grinder upon purchase. a set that includes brushes. They can also be purchased at any specialty store. It can be difficult to find suitable ones for some models of grinders, so brushes are purchased a little larger than the required size and carefully filed. If the tips are different, the leash from the old brush is attached to the new one.
For Interskol angle grinder models, in order to remove the brushes, you need to remove the back cover of the stator housing. Then the screws from the holder are unscrewed.
Wear of elements is determined by their residual length. The length of working carbon brushes cannot be less than 5 mm. For a more detailed study of the technology of changing brushes, you can watch the video.
Access to the electric brushes on Bosch angle grinders is achieved by opening the handle of the stator housing, which is held on by a screw. The length of working carbon-type electric brushes must be at least 8 mm. By the way, carbon electric brushes for Bosch are distinguished by the presence of a device that stops the operation of the tool when the brushes reach their minimum operating length.
In the Makita angle grinder, the screw is unscrewed and the back cover of the case is removed. The Makita 9565 model uses carbon brushes with auto-off.
Selection of electric brushes
Brushes differ in size, shape, and material of manufacture. Previously, they were produced in the form of a structure consisting of copper wire and a conductive brush. But due to very rapid wear and tear, it was decided to modernize this design. Currently, electric brushes are produced by pressing carbon material at high temperatures.
These replaceable elements of the mechanism should not be underestimated, because the service life of the engine depends on the correct operation of the brushes, because by replacing the brushes in time, you can protect the angle grinder from destruction of the armature commutator plate.
- Graphite brushes. During production, graphite is bonded to a special composition, to which carbon black can be added. Next, molding occurs under pressure, and then firing. The difference in the production of such brushes is due to the fact that the material is given additional strength and wear resistance. They are made from carbon materials (graphite, carbon black) and binders. After the standard molding procedure, graphitization follows, which involves firing at a temperature of 2500-2600°C in specialized furnaces. Such electric brushes are the most common for using grinders. Despite the relatively increased price category, the advantages of the properties outweigh the high cost;
- Carbon brushes. The main material for the production of these brushes does not differ from graphite. The difference between the production technology is the absence of heat treatment, which reduces production costs. Hence the low price tag in stores. But the wear resistance of such brushes is insignificant.
- Metal-graphite brushes. The composition of raw materials for making brushes includes not only graphite powder, but also metal. Mostly copper powder is added, but lead, tin or silver may also be added. At the same time, the metal base of the powder contains about 80%. Such brushes are used in generators and electric motors, because They are characterized by high wear resistance and reliability. But they are very rarely used in household electrical appliances. The price category is high.
Before buying electric brushes, it is better to look in the instructions or technical notes. in the grinder's passport, which brushes the manufacturer recommends. You can also consult service centers about choosing the right brushes.
Rewinding an electric motor armature - diagnostics, repair, service
Features of the asynchronous motor of the angle grinder
In fact, all electrical appliances used in everyday life use an asynchronous electric motor. The fundamental advantage of this type of motor is that when the load on it changes, the speed does not change. This means that if, for example, you cut stone for a long time without stopping with a household grinder, there will be no noticeable signs of motor overload. The disk rotation speed will be constant, the sound will be monophonic. Only the temperature will change, but this may not be visible if your hands are wearing gloves.
The asynchronous motor commutator is sensitive to overheating
If you are not careful, an advantage can turn into a disadvantage. Asynchronous motors are very sensitive to overheating; a significant increase in operating temperature entails melting of the insulation on the rotor windings. At first, the motor will work intermittently, and later - when an inter-turn short circuit occurs - the engine will stop completely. If you overheat the grinder’s engine a couple of times, it’s more likely that the anchor will melt. In addition, the high temperature causes the contacts connecting the wires of the primary winding to the collector to become unsoldered, which leads to an interruption in the supply of electric current.
READ How to Cut Brick with a Grinder Without Dust
Collector repair
The disadvantage that is eliminated in the following video, namely the separation of the commutator lamellas, is not so common with entire rotor windings. But the creator brilliantly makes it at home. Instead of missing lamellas, new ones are made from copper wire using the cold forging method.
After soldering and gluing the lamellas, all sagging is removed using the metalwork method, and the final finishing of the collector surface is done in an unusual way, proposed by the creator. It is not always possible to find a lathe at home, so the armature is assembled at the place of its intended purpose (in a grinder), where instead of brushes, a tool for processing the commutator lamellas is installed.
It consists of wood blocks adjusted to size, onto which sanding paper is attached. The processing force is created by tightening the plug that presses the bar to a certain amount. The rotor is driven through the spindle by another grinder. In this way, by changing the sanding paper a couple of times, they achieve a completely smooth and polished surface of the collector after replacing the lamellas.
How to fix the problem?
Remove the old brushes and replace them with identical ones. New kits are available at most hardware stores or electrical outlets. When choosing a replacement, you should take into account the density of the graphite substance and the design features of a particular grinder. The composition and density of the brushes differ depending on the technical characteristics of the angle grinder. If these parameters do not match, the new brushes will also spark and burn.
Examine the collector for mechanical damage. If dust, dirt, or sand gets on it during operation, scratches, dents, and chips may form. Assess their extent, if any.
Causes
There may be several reasons why the brushes on an angle grinder spark and wear out a lot:
- malfunction or increased wear of the brushes themselves;
- violation of the contact density between them and the collector plates;
- deterioration of the pressing action of the brush spring;
- breakdown between the collector lamellas;
- axial runout of the armature due to bearing wear;
- short circuit in the armature winding;
- introducing structural damage to the mechanism during repairs.
The reasons listed above are a consequence of improper operation of the angle grinder or poor assembly of its components.
In order to avoid the appearance of sparks in the area of the brushes, you should follow the rules for the safe use of angle grinders.
- Do not turn on if there is high humidity, significant voltage drops in the network, dirt gets into the brush block, or contamination of the air grilles in the housing.
- Avoid overheating the engine or the load that slows down the rotation of the mechanism during operation.
- Do not use a low-power grinder for sawing “heavy” materials.
Conclusion
Structurally, grinders differ from each other, so the method of replacing brushes may differ slightly from the basic methods described above. But common features are still visible:
- The brushes are located near the rear handle or the area of the body that is designed to hold the tool.
- The most common designs of graphite brushes: with and without a spring.
The first type of design involves a simplified replacement method, because it has a wire, a contact plate, and a pressure spring.
Springless brushes require a slightly more labor-intensive replacement process, because the retaining spring is attached to the body and is more rigid, and the wire is attached in a separate place using a plug.