Welcome to the kuzov.info blog!
In this article we will look at how tinning and soldering of a car body is carried out.
Tinning and car body brazing have been used in automobile manufacturing and repair since the mid-1930s. Lead solder was used in the mass production of automobiles to be applied to the lap weld joints of roofs and rear fenders. Applying solder to the body for many years, before the advent of automotive putty, remained a traditional method of repairing a damaged car body (see article on the history of the invention and development of putty).
Content:
- Advantages of tinning and soldering the body
- Types of solders for body repair
- What is flux? What flux should I use for tinning the body?
- What tools and materials are needed for tinning and soldering the body?
- Tinning and soldering of car body
- Sealing holes
The process involves applying special solder to body panels to fill in imperfections, seal and mask weld joints, and solder holes. While putty is most often used in modern auto body repairs, solder is still used in classic car restorations. In fact, both tinning and putty have their advantages and disadvantages. The main disadvantages of using solder for body repair are the difficulty of its application and heating of the body. There is nothing too complicated in this process, but you need to follow some rules and acquire skills. When the burner is used correctly, the heating is quite gentle. Even the paint on the back side may remain intact. Putty wins in this sense, since it is applied to the surface easier than solder. In terms of characteristics, solder is much superior to putty. We will look at its benefits in this article below.
The solder is softened by heat and applied to the surface prepared by tinning. After cooling, a strong bond between the solder and the metal surface is formed.
Soldering the body may be necessary where other repair methods are difficult or impossible. Solder is convenient to use when the metal is too thick to straighten and there is no access from the back of the panel. Solder can be used in areas where there may be slight metal movement during vehicle operation and the putty may crack (welding joint). Solder seals the weld seam well and guarantees its corrosion resistance. Also, when using body solder, the thickness of the layer is not as critical as when using putty. Solder is well suited for areas of the body where you need to form an edge.
Methods for tinning a car body
Repair work that involves straightening the car body is rarely done without special operations related to tinning metal parts.
Soldering a body with tin is a common procedure that requires skillful use of the technique of working with a soldering tool. During this process, molten solder is first applied to the parts to be joined and then, due to diffusion, fused with the metal of the workpiece. After hardening, reliable contact between the sheet body elements is established. One of the specific features of tinning operations is that the melting temperature of the solder is noticeably lower than the same indicator for the metals being joined.
The relevance of tinning a car body.
When cars stopped looking like horse-drawn carriages, body repair became a serious technical problem. While the safety of people inside and outside cars has been taken seriously only since the 1950s, the appearance of the car has been taken care of from the very beginning. The most difficult thing was after the collision, bringing the car body into perfect condition. After heavy hammering of the bent piece of sheet metal, tin was used to achieve a perfectly smooth surface. Today, tinning is rarely used in handicrafts. To level surfaces after processing sheet metal, you can use one of three methods: applying putty, filling uneven areas with tin and new ones, filling with chemically curing materials, or the so-called “cold tinning”. The oldest method, used since the beginning of mass production of steel bodies, fills irregularities with tin. It was necessary to solve the problem of achieving aesthetic alignment of connections between parts or metal on one element, especially with complex folds or rounded corners in vehicles.
General information about the technology
To obtain a high-quality connection of body parts, you must perform the following steps:
- first, all body parts are carefully prepared for repair;
- then the surfaces intended for soldering are treated with flux;
- after this, you should tin them well (for this purpose, a special paste for tinning the body is used);
- These works are completed by soldering automotive parts.
To reliably connect metal workpieces by soldering, solder is used, which in addition to the main component must contain lead.
The use of pure tin alone is unacceptable, since it does not provide the required melt fluidity, and, therefore, does not allow obtaining a high-quality joint. Let's add to this that when tinning a car body without a special admixture, after the metal cools, the solder becomes brittle.
To avoid this, a lot of lead is added to it even before soldering begins. In proportion it looks like this: 33 percent tin, and the rest is lead.
This type of solder is not intended for soldering car parts made of aluminum and its alloys. To work with these metals, special lead-tin rods must be used, as well as special tinning powder. The melting point of such tin solders does not exceed 230-250 degrees.
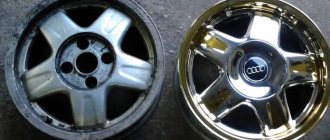
Models of cars with galvanized body
Now consider specific brands and models of cars with galvanized bodies. The list will be quite extensive, so we also classify the machines according to the method of applying the anti-corrosion material.
Hot galvanizing method
This method was first used in the distant past by Volkswagen, and they still use it to this day. In addition to VW, Audi, Porsche, Volvo, and a host of other automakers also treat their bodies this way. Considering the cost of processing a car using this method, it must be recalled that quite expensive premium and business class models are subjected to it. List of car brands whose model range includes models with a fully galvanized body using the hot method:
- Porsche (the first of the models with such a body is the famous Porsche 911).
- Audi.
- Volvo.
- Ford.
- Chevrolet (Lacetti).
- Opel (Astra and Vectra).
The first production car with a fully galvanized body was the famous Audi 80. After it, most of the cars of this company came with a mandatory anti-corrosion coating. Depending on the brand, the coating could have a thickness from 2 to 10 microns.
Galvanic processing method
Galvanic treatment of the body with zinc differs from the previous method in that it costs less. This method is more often found in American and Japanese cars, a little less often in European ones. By reducing the cost of processing, the reliability of such processing has also decreased significantly. The coating did not provide a 100% guarantee of protection. European manufacturers decided to go their own way, using the developed new technology. List of technological operations carried out by the BMW and Mercedes concerns:
Removing paint
Preparatory work before tinning is carried out in order to clean the surface of metal workpieces from traces left after painting body elements. To do this, you can use a drill equipped with a cleaning attachment in the form of a “brush” with metal bristles.
For small amounts of work, it is more convenient to use large sandpaper. Upon completion of paint removal, you need to wipe off any remaining dust and microparticles from the surface with a clean flannel soaked in solvent.
Final cleanup
Before soldering, unpainted body elements (including its bottom) should be cleaned of oil stains, dirt and foreign deposits. To do this, it is most convenient to use a metal brush, first removing the rust with a file.
Sometimes a special glass sandpaper is used to remove paint, which should be handled very carefully, avoiding the formation of sediment. To remove stains and traces of greasy stains found on parts, you can use the same soft flannel soaked in solvent.
If you use sandblasting, the body will be ideally prepared for tinning, but this procedure requires special equipment.
Galvanized models
This method is a little cheaper, but in terms of quality it is almost as good as hot-dip galvanizing. It was adopted by both European automakers and Japanese brands.
Yes, cars from the Middle Kingdom and South Korea are distinguished by an impressive set of electronics, a comfortable interior and an attractive exterior, but the low cost has affected the quality of the bodywork. The latter begins to rot relatively quickly, while ordinary cars from venerable European concerns feel great on any road surface, even without a bunch of electric drives.
Flux treatment
The need for pre-treatment with a flux composition is explained by the desire to prevent oxidation of surfaces before and during the work. Zinc chloride, as well as its derivatives with the addition of rosin and stearin, can be used as a flux.
In the process of coating sheet blanks, it is necessary to carefully ensure that there are no “gaps” or places not covered by the flux composition. Otherwise, it will be very difficult to tin and solder them.
Since zinc chloride is a chemically active product, only glass containers should be used for its storage. After finishing the body treatment, the surface must be thoroughly wiped to remove any remaining reagent and eliminate the possibility of metal oxidation.
Using a special paste for tinning, which contains flux and solder, will speed up the work. After applying it, the surface of the body just needs to be heated with a gas burner, and it will be ready for soldering.
Preparing metal parts
The first stage of work in soldering parts is their preparation. The metal surface must be thoroughly cleaned of residual compounds and generally all foreign matter. To remove paint or its remnants from the body, you need to treat the surface of the car parts with a mop, having first cleaned the metal with a file with your own hands. Such work is often carried out with glass sandpaper and therefore care should be taken, and if it is new, take into account that because of this the powder may not completely settle. To remove residual greasy compounds, parts must be washed with trichlorethylene or gasoline.
Tinning with a soldering iron
Tinning the body or any other part of the car (car radiator, for example) allows you to prepare them for subsequent soldering and greatly facilitates it. These jobs are relatively easy to perform and can be done independently.
To carry them out you will need the following consumables and tools:
- source of open fire (blowtorch, burner);
- special soldering device (hammer soldering iron);
- solder, flux and rosin.
Below we describe the general procedure for carrying out work, when tinning is supposed to be done using a soldering iron heated over an open fire.
First, a piece of solder is brought to the hot tip and held until it begins to flow into the work area. In this case, the surface being treated is wetted, to facilitate which the soldering iron gradually moves along the sheet. As a result of this operation, a thin layer of lead-tin composition is formed on the part.
During tinning with an open fire, the solder bar is periodically moistened with flux or special tinning powder.
Simultaneously with the application of the latter, the well-heated surface is thoroughly wiped with a rag, which ensures better distribution of the flux composition. Upon contact with it, the solder melts, uniformly wetting the metal structure.
Automotive galvanizing methods
For a polished but untreated steel structure, one rain is enough to start the oxidation process of the metal. The presence of several layers of paint and varnish will protect the surface from moisture, but who will protect the paintwork itself? With the lack of free space in modern cities, finding a car with an unscratched body is not an easy task. But even a small but deep scratch is enough for rust to appear in this place, spreading to nearby areas.
Therefore, metal surfaces exposed to active environmental influences are in dire need of additional processing. There are many methods for creating such a protective layer, but galvanizing is considered one of the most effective and affordable. It is the zinc-containing coating that provides the car body with optimal protective properties in most respects. Proof that cars with galvanized bodies suffer much less from metal oxidation is an increased warranty, the period of which for such cars can range from 6 to 25-30 years.
There are 6-7 methods of applying zinc coating to a steel surface, but only three of them are used in the automotive industry:
Note that the latter method is used mainly in artisanal conditions. Automotive manufacturers prefer galvanization and hot-dip galvanizing, while the thermal method is considered more preferable in terms of reliability, quality and durability of the coating for the following reasons:
This means that a galvanized body is characterized by lower corrosion resistance. But if we talk about cold galvanizing, then this method is even less reliable and in most cases its indication in the technical characteristics of the car is purely for marketing purposes. It is believed that the zinc contained in the primer layer weakly protects the metal from oxidation in case of deep damage to the paint.
Soldering order
Upon completion of the tinning procedure, you can move on to the next stage of work - soldering the car body, which can be organized in two ways: using an open flame torch or using a powerful electric soldering iron.
Before starting the soldering procedures, the body elements are generously moistened with flux and then overlapped slightly over each other (butt soldering in this case is unacceptable). After this, the sheets are fixed with special clamps that do not disturb the temperature regime in the soldering zone, and are heated with a well-hot hammer-type soldering iron.
Then a bar of solder is brought to the joining seam, which, in molten form, evenly fills the voids between the sheet blanks, and after cooling, securely fixes them.
The procedure for working with a powerful electric soldering iron is similar to that described above (except that instead of an open flame, an electrical network is used).
Soldering
After tinning, the car parts are soldered (it is advisable to first watch a video with recommendations on how to do it correctly). Before starting this stage of work, the body elements are coated with flux, they are finally placed as necessary, but always with overlap. It is not advisable to install them end-to-end, since such soldering is unreliable due to the low mechanical strength of the solder.
The parts are connected with clamps or other devices that do not disturb their heating. The soldering iron raises the temperature on the surface, as a result the solder melts (if there is a need, you can add the required volume from the common plate).
Solder is applied to sheet parts in two ways: using an open flame or a soldering iron.
An open flame heats the sheet and when wiping the working surface of the body, a layer of paste-like consistency remains after the bar of solder. Then wipe the surface with a rag containing flux, smoothing the heated composition.
Using a soldering iron, a piece of wire or a bar of solder is melted, then pressed onto the part. It is necessary to ensure that the composition does not overheat and flow along the inclined parts.
voice
Article rating
Expert recommendations
Before starting work on tinning and soldering the body, it is advisable to familiarize yourself with the following recommendations from professionals:
- When soldering a car body, the soldering iron should not be heated to high heat, as this may cause some of the tin to evaporate. As a result of overheating, the copper contained in the workpieces oxidizes, and the quality of soldering decreases;
- To heat the soldering tool, it is most convenient to use a gas burner;
- during the heating process, the soldering iron tip must be continuously wetted in the solder;
- Before you start soldering, you need to tin all the prepared parts of the car, regardless of the form in which they are presented (as sheet blanks or individual structural elements).
In conclusion, we note that during repair work, the components necessary for tinning and soldering should always be at hand (this applies to both solder and flux, and other consumables).
Source
Types of galvanization
Manufacturers are using different galvanizing options. The final quality of the coating depends on the type chosen.
Moreover, the body treatment can be either partial or complete. Some manufacturers galvanize only the node connections for the sake of saving money. All specifics regarding body coating are indicated in the documentation accompanying the vehicle: type, layer thickness, area of application, etc.
Some dishonest Asian manufacturers are guilty of false data. For example, the passport indicates a galvanic processing method, while upon examination it turns out that ordinary cold galvanizing was carried out. Moreover, such testing costs a lot of money, so the truth is revealed after months of active use of the car.
General information about the technology
To obtain a high-quality connection of body parts, you must perform the following steps:
- first, all body parts are carefully prepared for repair;
- then the surfaces intended for soldering are treated with flux;
- after this, you should tin them well (for this purpose, a special paste for tinning the body is used);
- These works are completed by soldering automotive parts.
To reliably connect metal workpieces by soldering, solder is used, which in addition to the main component must contain lead.
The use of pure tin alone is unacceptable, since it does not provide the required melt fluidity, and, therefore, does not allow obtaining a high-quality joint. Let's add to this that when tinning a car body without a special admixture, after the metal cools, the solder becomes brittle.
To avoid this, a lot of lead is added to it even before soldering begins. In proportion it looks like this: 33 percent tin, and the rest is lead.
This type of solder is not intended for soldering car parts made of aluminum and its alloys. To work with these metals, special lead-tin rods must be used, as well as special tinning powder. The melting point of such tin solders does not exceed 230-250 degrees.
Welding technology
In order for the quality to be the best, it is best to stitch the seam with stitches of two to three centimeters every five. If you use this method instead of the usual point one, you can get a better quality connection with increased rigidity and a limit to deformation during operation.
It is also worth noting that welding the body at the front is not relevant, since the car body experiences minimal load there, but welding the bottom is required on both sides. Also, the seams must be treated with a special primer to maintain durability, since even the strongest seam joint does not “live” using welding for more than 7 years.
Safety
When working with welding, there are specific safety measures that are considered mandatory:
- use of a shield and protective gloves;
- dielectric layer on the floor;
- all cables must be sealed;
- Argon is not used in confined spaces without exhaust or ventilation.
These tips will help any car enthusiast with basic welding skills to independently carry out body repairs on his four-wheeled, or maybe more, friend.
Forget about fines from cameras! An absolutely legal new product - Traffic Police Camera Jammer, hides your license plates from the cameras that are installed in all cities. More details at the link.
- Absolutely legal (Article 12.2);
- Hides from photo and video recording;
- Suitable for all cars;
- Works through the cigarette lighter connector;
- Does not cause interference to radios and cell phones.
car body tinning
I was looking for some way to prepare my homemade PCBs. One of the solutions that came to my mind was reflow with solder paste. Another really cool use for solder paste is in repairing brass parts - like pipes, trombones and tubas - because all you have to do is heat the joint with the paste and at the right temperature it will bond. If you've looked for solder paste on the Internet, you know that it costs a lot.
During body repair, one of the ways to connect metal or metallized parts is soldering. This technological process is carried out using molten solder.
Advantages of tinning and soldering the body
- Solder sticks to the surface better than putty. The tensile strength (the force required to separate the solder from the metal it is applied to) is 423 bar. This is a very high figure.
- Even a thick layer of solder does not shrink, unlike putty.
- Solder has better elasticity and strength than automotive putty. Lead bends well together with the metal on which it is applied, so it does not crack.
- The solder will not crack or peel off on impact, as happens with putty.
- Solder is waterproof. Putty cannot be called completely waterproof.
- Solder can withstand high temperatures, so it can be used for repairs and subsequent powder coating.
- Another big advantage of solder over putty is that you don't have to worry about the hardening time. You can add additional solder directly onto the already applied layer. You just need to heat the surface and new solder and add it. There is no need to completely melt the already applied layer.
Final cleanup
Before soldering, unpainted body elements (including its bottom) should be cleaned of oil stains, dirt and foreign deposits. To do this, it is most convenient to use a metal brush, first removing the rust with a file.
Sometimes a special glass sandpaper is used to remove paint, which should be handled very carefully, avoiding the formation of sediment. To remove stains and traces of greasy stains found on parts, you can use the same soft flannel soaked in solvent.
If you use sandblasting, the body will be ideally prepared for tinning, but this procedure requires special equipment.
Flux treatment
The need for pre-treatment with a flux composition is explained by the desire to prevent oxidation of surfaces before and during the work. Zinc chloride, as well as its derivatives with the addition of rosin and stearin, can be used as a flux.
In the process of coating sheet blanks, it is necessary to carefully ensure that there are no “gaps” or places not covered by the flux composition. Otherwise, it will be very difficult to tin and solder them.
Since zinc chloride is a chemically active product, only glass containers should be used for its storage. After finishing the body treatment, the surface must be thoroughly wiped to remove any remaining reagent and eliminate the possibility of metal oxidation.
Using a special paste for tinning, which contains flux and solder, will speed up the work. After applying it, the surface of the body just needs to be heated with a gas burner, and it will be ready for soldering.
Metal tinning technology
The tinning process is divided into two stages:
- Preliminary surface preparation.
- Product processing.
The technology for performing work is such that the slightest negligence at any stage will have a strong impact on the result. Poor preparation of products affects the adhesion of the tin layer covering the metal: it will last much less than expected. If there are errors in the metal processing process, the half-layer layer will not have the specified thickness and will not be able to cope with the assigned tasks. There are nuances at all stages of the work.
Preparation of products
Sandblasting and other abrasive cleaning methods are allowed.
For finishing, fine-grained abrasive cloths are used to obtain the smoothest possible surface.
Tinning with a soldering iron
Tinning the body or any other part of the car (car radiator, for example) allows you to prepare them for subsequent soldering and greatly facilitates it. These jobs are relatively easy to perform and can be done independently.
To carry them out you will need the following consumables and tools:
- source of open fire (blowtorch, burner);
- special soldering device (hammer soldering iron);
- solder, flux and rosin.
Below we describe the general procedure for carrying out work, when tinning is supposed to be done using a soldering iron heated over an open fire.
First, a piece of solder is brought to the hot tip and held until it begins to flow into the work area. In this case, the surface being treated is wetted, to facilitate which the soldering iron gradually moves along the sheet. As a result of this operation, a thin layer of lead-tin composition is formed on the part.
During tinning with an open fire, the solder bar is periodically moistened with flux or special tinning powder.
Simultaneously with the application of the latter, the well-heated surface is thoroughly wiped with a rag, which ensures better distribution of the flux composition. Upon contact with it, the solder melts, uniformly wetting the metal structure.
What tools and materials are needed for tinning and soldering the body?
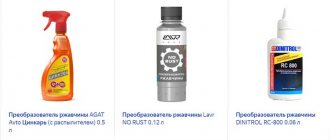
- There are special kits that include the solder itself, flux paste, tools for leveling the applied solder and instructions. Also, all accessories can be purchased separately.
Set for tinning and soldering the body.
- Requires solder and tinning paste with a brush for easier application.
- You also need a clean rag (cotton is best) to wipe off any remaining paste after heating.
- For heating, you need a welding gas torch, propane (butane) torch or hair dryer with adjustable temperature and air flow. When using a gas welding torch, the flame must be set to the minimum temperature at which the flux will melt and the body metal will heat up.
- The solder is leveled using special hardwood blocks. A special lubricant (solid animal fat), a thin layer of oil or beeswax is applied to the paddle or block so that it does not stick to the solder. So the solder, smoothed out in blocks, turns out more even. You can make a block of the desired shape yourself.
- You must use a HEPA (high efficiency particulate air) respirator with a high efficiency particulate air filter, also known as an N100 filter. You can also install a fan nearby, which will blow harmful fumes away from the master. Then the harm of fumes is reduced and you can do without a respirator. Gloves must be used when using lead solder. Avoid contact of solder and flux with skin.
- To handle hardened solder, you will need a body file or a sanding block with coarse sandpaper.
- It is necessary that all materials and tools are within reach so as not to waste time during tinning.
DIY patch on a car body (fiberglass, soldering, welding)
It's good if you have the opportunity to change cars like gloves. What if this is not possible? Apparently they have to be “darned”! As well as for those who do not have the opportunity to change these same gloves. In general, we do not want to draw analogies about the material well-being of car enthusiasts, much less touch on their personal “I” in material matters; this is an everyday matter and is not subject to discussion.
But regarding practical information assistance in matters of car repair, we can quite help with this. So, today's topic is about patches on the car. Such patches are needed when the body has rust through it and there is nothing more left to do than patch it. In fact, there are several ways to fix a hole in the body. It is these methods that we will talk about.
DIY patch on a fiberglass car body
The first option we proposed is the use of fiberglass. Indeed, this material is already often and successfully used by car enthusiasts. There are many advantages to this, including the versatility of making molds, corrosion resistance, ease of operation, and relative cheapness. Epoxy resin is used to fix the fiberglass and form the molds. And now about the same thing, but with a particular example. The installation site for the future patch is cleaned of rust and dirt.
Next, we apply a layer of epoxy resin and apply fiberglass impregnated with it.
As a result, after drying, we apply several more layers of fiberglass impregnated with epoxy. As we said, this method is quite accessible to car enthusiasts, but it is not without its drawbacks. Firstly, this is not high enough adhesion, which means that your patch is more likely to come off.
Secondly, there are excessively different temperature expansions of metal and fiberglass, which again affects the strength of the connection of these materials to each other. This method is more suitable for plastic parts and the like. In any case, if you do not have any special alternatives, this option is quite acceptable.
Unless epoxy and fiberglass, after hardening, are best impregnated with bitumen or something similar, that is, painted.
DIY patch on a car body soldered using solder and a soldering iron
The second option for installing a patch can be dated back to the era of Soviet car enthusiasts, when tinning of teapots and similar procedures that seemed quite mundane at first glance were in use.
How to repair through holes on a car body using putty without welding
Before repairing a hole in the car body, you should prepare:
- fiberglass and automotive putty;
- aluminum mesh;
- putty knife;
- sandpaper (if possible, it’s also worth looking for a sanding machine);
- primer, paint, varnish.
Fixing holes in a car body itself is distinguished by its simplicity. First of all, you should remove the rust using an angle grinder or any other suitable equipment. Next, we cut out the patch from aluminum, and then attach it to the body using masking tape
We apply a thin layer of fiberglass putty (here it is important not to touch the tape, because then you will have to remove it). When the putty sticks, peel off the tape and putty the remaining places
When everything is dry, sand everything using coarse sandpaper or a sander.
Having achieved a flat and smooth surface, apply a second ball of putty - automotive putty. We wait until it dries and level it again. Then the surface is primed (do not forget to cover the areas that do not require painting with film). When the primer is finished, you can paint the body.
It is worth noting that the patch will be more stable if you apply a couple of layers of putty on the back side. In addition, it is also possible to seal holes in the car body without welding using putty and without using a patch. In this case, it is necessary to apply a lining on the back side so that the composition is well fixed. On the other hand, this solution is only suitable for very small through holes.
Let's watch a detailed video on how to seal holes without welding:
Soldering order
Upon completion of the tinning procedure, you can move on to the next stage of work - soldering the car body, which can be organized in two ways: using an open flame torch or using a powerful electric soldering iron.
Before starting the soldering procedures, the body elements are generously moistened with flux and then overlapped slightly over each other (butt soldering in this case is unacceptable). After this, the sheets are fixed with special clamps that do not disturb the temperature regime in the soldering zone, and are heated with a well-hot hammer-type soldering iron.
Then a bar of solder is brought to the joining seam, which, in molten form, evenly fills the voids between the sheet blanks, and after cooling, securely fixes them.
The procedure for working with a powerful electric soldering iron is similar to that described above (except that instead of an open flame, an electrical network is used).
Car plastic repair by welding or soldering. Step-by-step instructions +
In this article we will try to figure out point by point how to repair the plastic of a car. This will be a kind of instruction, which, quite possibly, will be useful to many car enthusiasts. Let's take the Renault door panel as an example. Today this part is quite difficult to find, so it has to be repaired rather than replaced.
What damage will we have to repair today?
The photo shows how it was boiled from the inside. In this case it was carried out the day before. But the bulk of the work is still ahead.
- The material that will have to be repaired is ABS. This material is often used in domestic cars.
Our goal is to seal the damage with a car sill trim; this could be, for example, a Ford car sill trim.
Part preparation
To work, we need a plastic part, as in the photo. We cut out the part we need from it and sand it.
You need to sand with P60 or even P40 paper. You need to go through sandpaper in order to peel off the old paint from the part being used.
Next, you should take scissors and cut out the strips that will be needed in further work.
We perform welding
If you weld with a rod of the same width as in the photo below, you can get an uneven surface on the back side. Therefore, we will need to carry out repairs in a different way. Then it is necessary to carry out welding not overlapping, but to weld the edges of the crack.
Based on this, the strip that we have needs to be unraveled a little more than the width of the seam.
We should end up with a strip that is ideal for the crack in the plastic.
First you need to turn on the soldering iron, you can set it to 450 degrees. Thus, it will be possible to obtain a tip output of approximately 340 degrees.
Initially, you will need to make a groove or, as it may also be called, an O-shaped seam.
If you solder “evenly”, it will not be reliable and will not last long.
Now we make a groove.
It is important not to forget to degrease this area. A regular solvent will do for this.
As for the “46” solvent, it melts the plastic.
Let's move on to degreasing.
Next, take a hairdryer and set it to 360 degrees.
We begin the process of welding the crack. To work, we will need a previously cut strip of plastic. We need to achieve welding of two plastics.
Since we need to achieve welding of two plastics - a strip of plastic (also called an electrode) cut out earlier and a plastic part of the machine - it is not the electrode itself that needs to be heated, but the space (joint) between it and the crack. This is very similar to electric welding.
We begin welding our crack.
First you need to warm up the lower part of the rod.
After this, we begin to weld it into the joint to the crack. There is no need to press hard, the work should be done slowly and carefully. The result should be something like this.
What to do next. In the place shown in the photo, we make an overlap for fastening.
In the next one - so as not to leave holes in the seam.
We use the rod and carry out the assigned task further.
Later it will be necessary to sand the repair area well.
We move on to the next damage and carry out welding using the proven method.
You need to heat it so that the crack and the edge of the rod are simultaneously affected. So, gradually, we must weld all the cracks. The thickness of the rod should be the same as the width of the overlay. This is necessary to ensure even heating. We gradually weld all the cracks, slowly, carefully, carefully. This type of work requires extreme caution and attention.
As a result, we get sealed cracks. The repair, as you can see, is not complicated, but quite effective. Next we need to treat these places well.
Let's start processing the sealed cracks. First you need to turn off the hairdryer. The processing will be carried out with a drill, because if you use a grinder, you can erase important areas that are not recommended to be washed.
To work, we will need a so-called cone-shaped cutter for plastic.
There are different cutters: Thin, thick, choose them according to the type of work. But only if a drill is used. This is convenient because you have to sharpen in places like those shown in the photo, but it is not possible to get there with a grinding machine.
The most ordinary drill will do the job.
We load our cutter into it and start turning.
After processing with a drill, you should get neat strips.
As for the inside, it’s better not to touch anything here, for the sake of strength.
If these strips were in a visible place, they could be processed, but since they are inside the part, it is not worth spending time on sanding them. Using this principle, you can repair the bumper. This type of repair is a good way to add strength to the piece since the panel will still be covered in leather or fabric. Therefore, the main thing is that it holds securely.
Another example of repairing a crack in plastic
As another example, we have another panel. There are more breakdowns here.
First you need to weld the seams so that the entire structure does not fall apart.
And then you can start working on the holes in the panel. The pieces that need to be inserted here can be made from the same material, that is, ABS, but it is very difficult to find, so, in our case, we will use a plastic box from Ford, from which we cut our strips for welding cracks.
Tinning of car body parts
Tinning the body is used mainly for restoration work. However, in certain cases IT will help SAVE on body repairs.
Tinning is the application of molten tin alloy to the surface of a metal. In the past, this was the only way to properly seal welds on a car body. But with the development of bodybuilding technologies and the advent of modern materials, primarily putties, tinning has become a specific repair service.
Unlike the restoration of rare cars, when it is necessary to preserve original body parts, on ordinary cars repair comes down to replacing damaged parts or digesting their parts. And if there is access to the welds on both sides, the putty seals them as well as tin. However, with a very thick (more than 1 mm) layer, the risk of cracking of the putty increases, be it in the area of a weld or a straightened dent. After all, the body “plays”, and no one is immune from the next external mechanical impact. In addition, any putty shrinks.
Tin is free from these disadvantages. It is much stronger, but at the same time plastic, therefore it provides a higher mechanical connection with the surface of the part. In addition to leveling, tin strengthens metal that has been weakened by removing rust or repairing serious dents. But in most cases, the advantages of tinning are canceled out by the high price tag for the work and the inexpediency of ensuring such a high quality of repair. However, there are exceptions.
Tinning is an excellent alternative to costly replacement of glass frames affected by serious rust. The metal layer is built up with tin, thereby maintaining the necessary rigidity. Tinning will also save money if serious rust has spread to the pillars.
Another option is to save the rear wing. Often, replacing it or digesting the damaged part results in a significant amount of money (expensive spare parts and high cost of work). One of the typical cases is the appearance of through holes on the wing after working with a snotter when correcting serious dents. It is better to seal them with tin, and they also need to level the surface as much as possible in order to use a thinner finishing layer of putty.
Due to the high cost of work, tinning is in little demand for ordinary body repairs. It usually costs two to three times more than puttying. The reasons are obvious: the high cost of materials, the increased labor intensity of the process, and the qualifications of the craftsman. However, this method is worth remembering. Sometimes he turns out to be a real salvation. Tinning will be a good alternative when quality and a long warranty for repair work are at the forefront. In other words, when you need to do it once and really for a long time.
Tinning technology
The repaired area is cleaned down to metal, and then the paste is applied with a brush. It consists of tin, acid and flux. The main task of the paste is to create an adhesive layer on which the molten tin alloy will fit well. Acid removes an oxide film from the metal surface that cannot be removed during mechanical processing, and flux prevents its reappearance when heated during further work.
The paste is burned with a burner (using an autogen or a gas cylinder with a nozzle) and its excess is removed. It is important to avoid overheating, otherwise the blackened paste will have to be completely removed and a new layer applied.
Then the surface is wiped with acid to remove any remaining flux that has come to the surface.
The master heats the tin rod and the surface of the wing for fusing. Two types of tin alloys are used: with and without lead. Tin-lead rods are easier to work with due to their wide melting temperature range. With lead-free tin it is much narrower - at the slightest overheat the metal begins to flow. Lead-free alloys are used for environmental reasons: when grinding the deposited layer, harmful lead dust is released.
The deposited pieces of tin are reheated and the coating is leveled with a wooden or metal spatula.
This is what the intermediate stage of work looks like. No matter how competently the master acts, the layer of deposited tin turns out to be uneven and requires mechanical processing.
During the initial rough processing with a grinding machine, coarse-grained wheels are used.
Subsequently, the repair site is treated with a body file. The better the workman does, the less finishing leveling of the surface will fall on the painter’s shoulders. And this is not only the time spent on work, but also the thickness of the putty layer. At the finish, the surface is wiped with acid to remove the flux contained in the tin rod. Otherwise, corrosion cannot be avoided!
Condition of the repaired wing after tinning. Next, the part will be painted. You can clearly see how much smoother the surface has become. The zones of native metal (dark) and tin-coated (light) are clearly visible. Turnkey work with tinning cost 40 thousand rubles. With puttying alone, the price would drop to 25 thousand. However, the result would be too thick a layer of putty, which would soon crack - and everything would have to be redone. It will do for sale, but for yourself it makes sense to overpay for tinning and ultimately save.
Expert recommendations
Before starting work on tinning and soldering the body, it is advisable to familiarize yourself with the following recommendations from professionals:
- When soldering a car body, the soldering iron should not be heated to high heat, as this may cause some of the tin to evaporate. As a result of overheating, the copper contained in the workpieces oxidizes, and the quality of soldering decreases;
- To heat the soldering tool, it is most convenient to use a gas burner;
- during the heating process, the soldering iron tip must be continuously wetted in the solder;
- Before you start soldering, you need to tin all the prepared parts of the car, regardless of the form in which they are presented (as sheet blanks or individual structural elements).
In conclusion, we note that during repair work, the components necessary for tinning and soldering should always be at hand (this applies to both solder and flux, and other consumables).
Types of solders for body repair
- There are different types of solders. For body repairs, soft (low-melting) solders are often used. They are sold in the form of rods, 45 cm long, of different thicknesses. In general, they are classified as lead free or lead free solders. The first type of solder was used for many years due to its ease of use. However, it has been banned in some countries for use in mass production due to health and environmental concerns. However, lead solder is still used by individuals and can be found commercially. Many craftsmen prefer to use lead solder.
- The ratio of its components (tin, lead) is indicated on the solder. Traditional body solder is 30% tin and 70% lead. May contain an additional component, for example, 74% lead, 25% tin and 1% antimony. Lead is hazardous to health. To use it, protective equipment is required and safety precautions must be taken into account. However, it is easier to use. It remains soft longer after heating (in the range of 180 to 260 degrees Celsius). This makes it easier to apply and level. This solder is easily applied to vertical and horizontal surfaces. Once lead solder has hardened, it is not recommended to process it with a grinder, as very toxic dust is generated. So, it is usually processed with a special body file, and at the final stage with a block of coarse sanding paper by hand. If you still use a grinding machine, then you need to use only coarse abrasive so that there is no suspension of fine dust. Lead residues after grinding must be disposed of immediately.
Solder containing lead (Pb 74%), tin (Sn 25%) and antimony (1%).
- Solder can have different lead to tin ratios (70/30, 60/40 or 50/50). Solder with lower lead content is also used in auto body repairs, but has a low ductility range (183ºC to 188ºC) so it is more difficult to use. Solders with this ratio are usually used on horizontal surfaces, since they quickly become liquid and can flow. The adhesion of all lead solders is approximately the same and depends on proper surface preparation.
- As an alternative to lead solder, safer lead-free solder has been developed. In all lead-free solders, tin is the main component. The other component may be silver, copper, indium or bismuth. Most lead-free solders have either a higher or lower melting point than lead solder. For body repairs, the most common lead-free solder is a mixture of tin and silver (94% tin and 6% silver or 96% tin and 4% silver). It has a higher cost. Lead-free solder is approximately equal in performance to traditional lead solder with a 50/50 (lead/tin) ratio. This solder has a higher melting point (221°C). Once heated, it remains soft for less time than lead solder, making it more difficult to align. When hardened, it becomes harder and more brittle. It is more difficult to process with a file. The advantage is that it can be sanded as it does not produce toxic dust. Although, do not forget about the respirator. An additional benefit of lead-free solder is higher tensile strength.
- Solder used in electronics typically consists of 60% tin and 40% lead. It may contain flux in the center. Rosin flux, often used with this solder, does not promote adhesion to steel, but acid flux may work well. This solder is best used only for soldering small holes, since its ductility range is very small.
- To work with aluminum bodies, a different type of solder (containing tin and zinc) is used.
We do car body repairs without welding. How to do everything yourself.
Welding is undeniably the best solution for body repair, but what to do if the budget for such work is very limited, or you want to try to do the work yourself and have no experience in welding. There are also many cases when the car is a “workhorse” and it is not economically feasible to invest in it, but it is still necessary to close the through holes in the body. In this case, various methods of repairing a car body without welding come to the rescue.
It is worth noting right away that all these solutions are not professional, and there are some doubts about their reliability, but still they are often used in their practice by many car enthusiasts.
At its core, non-welding methods for car body repair are a collection of experiments by folk craftsmen who, using certain characteristics of materials, solve the problem of restoring holes and large cracks on various body parts.
The general concept is as follows. The damaged area of the body is trimmed using a grinder, then cleaned of dirt and dust. Next, the surface is degreased, treated with anti-corrosion impregnations, and then the hole is sealed. Putty is applied, sanded, primed, painted and varnished.
Let's take a closer look at the various repair technologies.
Fiberglass putty
The first and most unreliable method of repairing a car body without welding is to fill the through hole with putty with the addition of fiberglass. There are different versions of this material, which are classified depending on the size of the fiberglass fraction: small, medium and large. To seal body holes, mainly large fiberglass fractions are used.
This method of solving the problem is applicable to minor damage, and in no case can be used on load-bearing structures. Because there it will simply not be effective. When filling a hole with putty, a lining is used, and the layers themselves are applied in several stages with a drying period for the material.
Related article: Dent removal technology - PDR. Practical advice on carrying out work.
The work methodology is as follows. First, the body metal is cleaned, then primed. The first layers are applied from the inside of the part, after they dry, the front side is also filled. Next they sand, apply universal putty and sand again. Next comes the painting work.
To repair major damage to the body, in combination with a fiberglass primer, an aluminum mesh is used, which is used to cover the through hole and secure it with tape; after the putty has been applied, the tape is removed.
We use fiberglass and glue
This is the second option for how to repair through body corrosion without welding, using inexpensive materials and hand tools. The through hole is filled by applying an adhesive composition based on epoxy or polyester resin, and fiberglass is used as a reinforcing element.
The restoration process begins with the same cleaning of the damaged area of the car body, then it is degreased and treated with anticorrosive.
The required number of patches are cut from fiberglass. The size of each patch compared to the previous patch is made larger around the perimeter by 2 cm, so that each subsequent layer forges the previous one. Next, by gluing patches to the damaged area of the fiberglass body, the hole is gradually filled. For large holes, use a lining on the inside of the body. Next comes putty, and the painting work begins. This repair method is suitable for minor damage.
Body soldering
The method of soldering a patch to a car body is positioned as something between welding and the use of fiberglass adhesive. Its essence is as follows: first, the junction of the patch with the stripped body near the through hole is tinned; in other words, it is processed using solder with flux, which ensures a more reliable fastening. After this, the cut-out metal plate is applied to the damaged area of the body and soldering is carried out using a powerful electric soldering iron, connecting the sheets together. The choice of solder and flux is based on the type of metal that needs to be soldered. If after the work the soldered plate protrudes slightly beyond the surface of the body, it is recessed using a sheet.
There are also minor disadvantages to this approach. Firstly, this is the high cost of consumables, such as solder. Secondly, this is still a lower quality of seams compared to welding. You must also be able to work with a pin to carry out the work yourself.
Related article: Protecting the body of your car from corrosion. Description of methods and practical advice.
DIY car body repair
Let's talk about problems with the car body that arise due to corrosion.
Everyone understands that if you do not fight it, the process of destruction will begin in the places where the outbreaks form. There are various ways to deal with it, such as anti-corrosion treatment, but if the body is already de facto rusted, rotten and is already threatening to fall apart, only a major overhaul will help, or a partial one - replacing leaky parts. Repairs can be done yourself in the garage if you have the necessary equipment.
Beginners in car body restoration believe that such repairs can be performed by manual arc welding. That is, you take a piece electrode with coating and cook it. This is far from true. The stick electrode is ineffective when welding thin-walled steel sheets. The thickness of the body ranges from 0.8 ... 1 mm. It is clear that it is difficult to obtain a high-quality weld without slag inclusions and burn-throughs at such thicknesses. Moreover, it is often necessary to weld such sheet material end-to-end.
Body repair equipment
It turns out that the highest quality and most efficient welding is available only with a carbon dioxide semi-automatic machine - this is what service stations most often use for body repairs. Set the current - the machine optimizes the wire feed speed. Set the speed and the current will be adjusted to the optimal value. Or simply select the sheet thickness. The likelihood of through burns and metal melting is minimized. Take the torch with both hands and you get a high-quality and durable seam. The carbon dioxide semi-automatic machine is suitable only for ferrous metals; welding of stainless steel and non-ferrous metals and alloys is carried out in an argon environment.
It should be noted that recently resistance spot welding has been used for repair and restoration work on car bodies. Some devices are specially “tailored” for such repairs - they have a user-friendly interface and a list of settings for effective work with the body. Plus, combined with special devices, such a device results in quick and high-quality repairs, which are in no way inferior to semi-automatic repairs. If the body at the factory was initially assembled by resistance spot welding, then it is recommended to use it during body restoration work.
Semi-automatic welding
An introductory briefing for beginners who want to customize their car, but don’t know where to start.
So, in detail about the minimum tool that you will need to get started:
- Welder
- Bulgarian
- Drill
- Wire
- Carbon dioxide cylinder
- Hose connecting the cylinder
- Reducer (will regulate the supply of acid).
Purchase a millimeter sheet of steel measuring 2x1.2 m to organize patches. You can cut a piece from it and weld it into the “rotten” place (after first removing it). But before you start repairing the car body, practice. Cut out 2 samples measuring 100x100mm in a steel sheet. Make 10-15 holes in one of them, at least Ø5 mm, with a drill or hole punch. Add it with the second sample and start cooking. Select the wire feed and voltage level at which you will get a seam. At a low current you will under-melt the metal, at a strong current you will melt it through. Normal welding is when the semi-automatic wire melts and completely fills the hole.
Setting up a semi-automatic machine
Place the torch against the metal to which the ground terminal is attached, and adjust the wire feed on the control panel of the device by setting the speed to minimum. Press the torch trigger: if the wire feed is slow - you will understand this - it will begin to “shoot”. Increase the feed speed until the inverter starts cooking normally. If the speed is too high, the wire will “throw” the burner back due to the fact that it does not have time to melt. It is enough to select the feed speed once and do not change it during further work.
The current strength is selected depending on the thickness of the metal. Set the minimum current, if you need to add it, you will feel it intuitively by the nature of the formation of the weld pool. Excess cooled metal is cleaned off with a grinder.
After you hone your skills on samples, move on to welding the car. Start cooking on flat surfaces. Take horizontal seams when the electrode is on top (lower position). You will master the ceiling and side seams, when metal flows out of the bathtub under the force of gravity. Here you need to take gravity into account and a certain skill is required.
If, for example, your doorstep is rusty, cut it out with a grinder. Next, prepare the patch with a margin, since welding is performed with an overlap of a centimeter on each side. It is also possible to do it butt welding, but this is done in exceptional cases, since butt welding gives less strength. It is clear that the metal plate must follow the curves of the defective area.
Welding is carried out by surfacing with points, but do not place them one after the other along the perimeter of the patch, but place them in diametrically opposite places. Dots are placed alternately from one edge (top), then from the opposite (bottom), the middle of the left edge and then the right are grabbed. After tacking, welding is completed with spots in a checkerboard pattern. Places where you need to press the lining more tightly can be screwed on with self-tapping screws. It is also possible to initially attach the patch with self-tapping screws, which allows it to be correctly aligned before welding. It is enough to secure a part measuring 100x100 mm with 8 such screws.
The metal should fit snugly to the body. If there is a gap somewhere, use the wooden handle of the hammer as a clamp. The shape is given to the metal better when you heat it up: you’ve boiled a point, and immediately you need to tap with a hammer where the fit is not quite precise.
Start repairing with easy places, the rest can be mastered when you understand how to bend metal and “feel” your semi-automatic machine. It is better not to touch the repair parts of the wings, arches, engine shield, power parts of the car until you gain sufficient experience, since the consequences of inept intervention can be the most unexpected, even creating an emergency situation on the road.
Do-it-yourself threshold repair technology
The threshold is located in the most aggressive environment, and therefore is a place highly susceptible to corrosion.
If your threshold is rusty, it requires immediate repair. which is quite possible to do on your own. So, the general sequence of work to restore the threshold is as follows:
- Cleaning the problem area with a grinder and a metal brush (“hairy” circle)
Be very careful while working, use safety glasses, but preferably a mask. Anyway,
It is imperative to use protective equipment, because the elements of the brush fly out of it and can injure your face and body.
If you have earplugs, it is better to use them, the instrument produces a very strong sound. Stripping produces a lot of dust, so wear a respirator to protect your lungs.