OUR ADVANTAGES
1. Qualified service.
2. Own lock store.
3. Real time of arrival of a specialist at the address.
4. Quality certificates for all types of locks.
5. Warranty on locks and labor from 1 to 3 years.
6. Receipt of strict reporting on the results of work performed.
7. A large selection of locks from a specialist for any budget.
8. Specialists have all the necessary permits and licenses.
9. We have been working since 2005 in St. Petersburg and Moscow
10. Discounts on work for Pensioners, WWII Veterans, Students, New residents
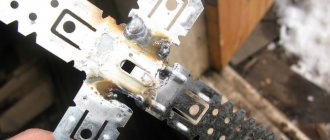
Door repair requires an integrated approach to solving the problem and is not always limited to just replacing the finish, lock or fittings; in some cases, professional help will be needed. As you know, all methods are good for the stable functioning of a door structure. For example, over time the doors begin to sag, in which case the master must weld the hinges. Moreover, the possibility of their wear cannot be ruled out, so repairing door hinges will not be possible without welding.
Other features of welding fittings
There are a few more nuances that those who are planning to weld hinges need to know about.
The bottom of the hardware should always be welded first. Hinges must be welded to round posts with an offset of 5 millimeters towards the opening. This offset allows the gate to open as wide as possible without any obstacles. However, for rectangular or triangular supports, no such manipulations need to be done.
Welds must be smooth, strong and deep. The presence of gaps in such seams is unacceptable.
When vertical welding, it is very important to choose the correct electrode guiding speed. Experts advise home craftsmen to resort in this case to smooth circular movements, which will, as it were, lift the flowing metal upward.
Welding work requires the performer to strictly adhere to safety precautions. You should start welding the fittings only when you have put on the protective equipment and removed all flammable objects nearby.
Welding
Next, you need to prepare the hinges - clean them of rust and fatty deposits, lubricate them with grease or other similar compound. This will prevent so-called hinge sintering when you start welding.
Now you need to use the welding machine: first, the fittings are welded to the gate leaf, and only then to the support pillars. In this case, it is necessary to constantly monitor the quality of the resulting seams.
When all welding work is completed, it is advisable to process the new seams with a grinder.
You can weld hinges on a gate, garage door and on a metal door according to the same scheme as described above.
However, it should be noted that the craftsman usually has the opportunity to weld the fittings onto the door at the moment when it is in a horizontal position on a flat area, which greatly facilitates the process.
This does not work out with gates: the support pillars, as a rule, are installed much earlier than the actual installation of the curtains begins.
Welding without plates
If the weight of the gate is light, you can do without plates. The welding technology will be slightly changed:
- The support and frame of the gate are laid horizontally so that their surfaces are in the same plane. A gap of 3-5 mm is left between them.
- 20 cm is measured from the top edge of the frame and a loop is placed in the gap. To raise it a little, you can use two matches, placing them perpendicular to the gap and installing a hinge on them.
- The hinge is fixed by spot welding: the lower element with the pin is welded to the support, the upper element with the groove is welded to the frame.
- To check how well the hinges work, it is not at all necessary to lift the sash: it is much easier to turn the support. If everything is normal, final welding is performed along the entire length of the fastener<./li>
These methods are suitable for installing new gates, doors or gates. If it is necessary, for example, to replace old hinges on an already installed gate, experienced craftsmen suggest proceeding as follows:
- Secure the plaits to the loop.
- Laying the sash horizontally, weld the top part of the hinge.
- Place the sash in the opening and secure it.
- Insert the bottom of the loop into the top. Mark on the support the place where the bottom plate should be.
- Weld the lower part to the support.
After welding the door hinges, the seams are cleaned, primed and painted. Further care of the hinges comes down to regular lubrication, which will prevent rust and reduce friction.
Lubrication should be carried out only in the warm season, otherwise the hinges may freeze. Before applying lubricant, it is recommended to remove the door from the hinge, remove the remains of the previous composition, dirt, rust from the pin, and clean the groove.
Installation of welded hinges
Let's look at how to properly weld hinges. To do this, you need to go through three main stages:
- preparation of equipment and materials required for work;
- preparing a metal surface for welding;
- welding hinges on the door.
Tools and materials
Before properly welding hinges on a metal door, gate or gate, you need to prepare the materials necessary for the work:
- loops selected according to all the rules indicated above;
- metal plates (if welding of hinges is carried out with reinforcement of the structure with plates). The dimensions of the plates are selected based on the weight of the door leaf. The greater the mass of the door, the larger the plates required. For example, garage hinges for gates of standard sizes (approximately 2.5 * 2.5 m) are welded onto metal plates measuring 80 * 80 mm;
- electric welding machine;
- dry electrodes. To carry out the work, it is enough to have electrodes with a diameter of 3-4 mm;
- a brush with metal bristles for preliminary cleaning of the work surface;
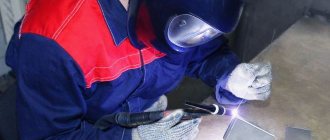
- personal protective equipment for the master.
Special protective clothing and mask for welding work
Preparation
When answering the question of how to properly weld hinges on gates and other metal doors, it should be mentioned that the preparatory stage is in practice the most important.
At the preparatory stage it is required:
- mark areas for installing hinges. If two round hinges are installed, they should be located at a distance of 15-20 cm from the top and bottom of the door leaf. Additional hinges are located evenly along the entire height of the door;
- all areas in which hinges are supposed to be welded must be cleaned of dust, rust, and so on. To carry out cleaning, use a brush with metal bristles, dry rags and, if necessary, treat the surface with some kind of solvent;
Cleaning the metal surface before welding
- process the loops. The surface on which the weld will be located also needs to be cleaned. In addition, the inside of the hinge, where the ball bearing is located, must be thoroughly lubricated. For lubrication, you can use litol, solid oil, and so on;
Loop welding technology
Before we talk about how to weld hinges on gates, it is worth taking a closer look at the conditions necessary for their normal operation.
Even if the load is calculated correctly, the hinges may not be able to cope with it if their position deviates even slightly from the vertical. They will quickly fail. And the second point: there should be a small gap of 1-2 mm between the hinge body and the support post so that the metal parts of the post and the mating part of the canopy do not touch or rub against each other. The same gap should be left on the side of the sash.
After a thorough check of the location of the gates and the pre-measured and marked fields for the plates has been made, welding work can begin with the lower hinges on the posts. Vertical welds are the most difficult job for a welder. But thanks to the plates, even an inexperienced welder can handle them. Once one bayonet part of the hinge on the sash is welded, you can use a laser level to verify the correct location of its axis and to determine the exact location of the second bayonet hinge.
Correctly welding the hinges with your own hands
To ensure that the structure does not sag under its own weight and opens conveniently, properly welded hinges on the gate must meet the following requirements:
- welds are made continuous;
- if possible, the loops are welded around the entire perimeter;
- so that the canopies are not subjected to additional loads, they are installed as level as possible;
- When hanging heavy sashes, install additional hinges.
We weld the ears
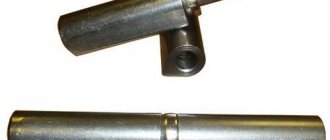
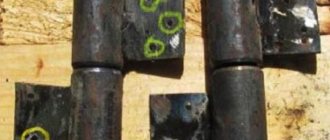
An inexperienced craftsman may not have the ability to reliably weld hinges with a cylindrical body to a flat surface. In this case, metal plates called plates or ears are used. They are welded to the hinges in the following order:
- Two plates are placed parallel to a flat surface with a gap between them of 2 - 3 mm;
- A loop is placed in the gap;
- The plates are welded with a continuous seam to the cylindrical body. One to the top of the loop and the other to the bottom.
Features of welding hinges to round, square and stone pillars
In order for the gate to function without jamming, you need to weld the hinges to the round posts through metal substrates 2 - 3 mm thick. The installation location of the canopies on the rack needs to be moved 5 - 6 mm outward. This will ensure maximum opening of the valves.
The hinges are installed flush with the outside of the square supports. At first they are only grabbed. Then, using a wooden block or corner, vertical alignment is carried out, controlling it with a plumb line. If, after preliminary hanging of the gate, nothing interferes with its opening, final welding is performed.
A metal pipe is placed inside the stone pillars intended for hanging gates. Mortgages are welded to it for installing hinges. If the concrete or stone pillar is without mortgages, the canopies are secured using rods driven or screwed into the holes. For massive gates on brick and stone fences, channels installed on columnar foundations are used as supports.
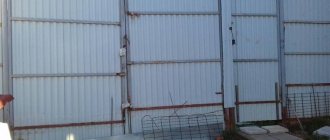
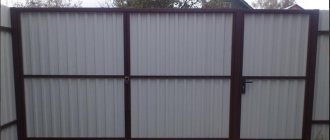
To weld hinges on the fence and gates, a pair of jumpers is prepared from a profile sheet. They are installed parallel to the long sides. The distance between them is chosen so that three jumpers fit. After fastening, the hinges are welded at the bottom and top. To avoid damage by welding, the corrugated sheet is screwed over the installed canopies. For reliability, it is recommended to weld garage hinges that can withstand significant loads.
Method of fastening to the gate
The hinges are welded onto the finished sash. They must be fixed to a support frame; installation on metal sheathing sheets is prohibited. The optimal assembly option is with installed support pillars. It may be difficult to lock the gate in the working position. To do this, you can use additional substructures.
Recommendations for installing a loop group:
- the gap between the support post and the sash frame is up to 5 mm; Markings are made in advance, taking into account that the loops must be on the same axis; part of the loop group with the pin is located below, its direction is at the top; first, test welding is done at a maximum of three points, it is recommended to start from the bottom loop; after this, the correct operation of the gate is checked - it should open and close freely, the gap is controlled, there is no spontaneous movement of the leaf, regardless of its position; final welding of the plates around the perimeter, after cooling - removal of scale and cleaning of the surface.
Has the hinge on a metal door fallen off?
What such repairs will be depends on the extent of the problem. It may be enough to lubricate the door hinge, even without removing it, but this is more likely to be preventative work or to correctly adjust the hinges already on it. It is more difficult to weld hinges on a metal entrance door, but a master will do this work.
You should be especially careful when repairing hidden door hinges - here, without options, you cannot do without the help of a specialist. In general, you should not “by eye” determine the degree of damage if you do not have sufficient knowledge and experience. For example, electric arc welding work is unacceptable for an amateur. There are still a number of hinge problems that do not mean the entire door needs to be replaced. But know exactly what to repair. Only a master can make such an accuracy, such a diagnosis of faulty door hinges.
He will be able to correctly and reliably adjust the hinges of the front door, which is very often the cause of creaking or tight entry of the door leaf into the vestibule. At first glance, the problem seems trivial. But it seriously interferes with the operation of the metal entrance door. And if the front door constantly sticks and jams, then postponing its repair or adjustment is simply unacceptable: one day the door simply will not open or close. And just when you need to go to work and school.
How to evenly and correctly weld hinges on a door, gate, etc.
Friends, I welcome you again to our channel. If you decide to learn manual arc welding on your own, then here are hundreds of articles that will help you in this difficult, but very interesting and necessary task!
Today we will discuss a topic that everyone who has picked up a welding holder cannot do without, because sooner or later they will still have to deal with it - how to weld the hinges evenly and correctly.
I will demonstrate this technology using the example of setting and welding hinges for a metal door.
I always start welding hinges this way: first of all, I disassemble the hinges into 2 parts, and with a marker I make a note on the part of the hinge, which in everyday speech is called mom.
Types of loops
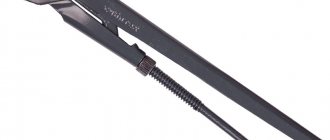
It is important to choose the right fasteners, taking into account the weight of the door and its dimensions. For heavy metal doors, modern industry produces the following types of hinges:
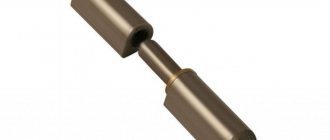
- Cylindrical. The most popular because they make it possible to open the gate to the maximum angle. Disadvantages include difficulty in attaching to a flat surface.
- Teardrop-shaped. They are a type of cylindrical hinges.
- Hexagonal.
- Square. Used extremely rarely.
In this article you will learn how to properly weld hinges
Regardless of the cross-sectional shape, a door hinge is a part consisting of at least two elements. In the simplest hinges, the connection of these elements is made by a pin and a counter groove. Their main advantage is their low cost and ease of further maintenance (lubrication). At the same time, simple hinges fail faster.
In more complex designs, at the end of the pin there is a movably fixed ball (ball loops), the function of which is to replace sliding friction with rolling friction, which, as is known, is much less. This makes it easier to open and close the doors, and the hinges themselves will last longer.
There are also hinges equipped with ball bearings, but it is not recommended to use them for heavy doors, since the complex mechanism quickly becomes unusable. For massive gates and gate leaves, hinges are produced that are additionally reinforced with plates. Due to the plates, the weight of the door is more evenly distributed on them, which allows you to increase its service life.
Reinforced ball ones are considered the best option for heavy metal doors, garage doors and gates. They compare favorably with their cheaper counterparts in their long service life, ability to withstand significant weight loads and ease of installation.
In this video you will learn how to properly weld hinges:
For heavy metal doors, the welded method is recognized as the best. It allows you to fix the hinges as securely as possible, eliminating play and gradual loosening of connections.
Loop selection
The correct choice of hinges for metal gates, gates and doors should be based on several factors:
- determining and selecting the type of loop;
- determining the number and overall dimensions of the loop.
Types of loops
First of all, welded hinges differ in shape. They can be:
- cylindrical. A variation of this group is the welded drop-shaped loop;
- square. They are used extremely rarely. Currently practically not produced;
- hexagonal.
The main types of welded loops, differing in shape
Experts recommend choosing cylindrical or teardrop-shaped hinges, since this type is the easiest to install.
All welded hinges can be additionally equipped with a ball that acts as a bearing. The ball makes it easier to open the door and reduces friction, which negatively affects the life of the fittings.
Welded hinge equipped with a ball bearing
Also on sale you can find reinforced welded hinges, which are used for installation on a metal door of large size or weight. Additional plates allow you to evenly distribute the load on the hinge, which increases the service life of the product.
Welded loop complemented by metal strips
The most optimal option for a welded loop is a cylindrical ball loop, supplemented with strips. It is this kind of fittings that will serve for a long time without unnecessary problems.
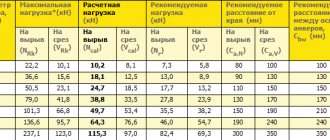
How many hinges do you need to install?
The number and overall dimensions of hinges are selected depending on the weight of the door leaf. The greater the weight of the door, the larger the hinges required, and the number of hinges increases.
Table for choosing the sizes and number of door hinges
Welding metal door hinges
Despite the high strength of metal products, they are also susceptible to breakage under certain conditions. As a result, there is a need to order welding of door hinges in order to restore its performance and strength characteristics. The most common problem we encounter is damage to door hinges. Shed restoration operations must be carried out with extreme precision by qualified craftsmen. Only in this case is the continued proper operation of the structure guaranteed.
Welding rules
In order to prevent the gate from sagging and to avoid problems with its operation in the future, all work must be carried out taking into account certain features. Therefore, first of all, special attention should be paid to:
- The integrity of the weld, which must be continuous, that is, without gaps.
- Welding depth - the loop must be welded along the entire plane adjacent to the support.
- Axial location - all hinges on the sash must be in one straight line so that the load on the seams is distributed evenly.
- When determining the number of hinges, if the gate is massive, it is recommended to supplement the design with another pair.
- Dimensions - all measurements are made using tools designed for this purpose, and not “by eye”.
A couple more useful tips
Recommendations from experts will help you weld canopies efficiently:
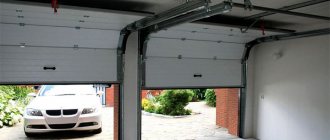
- It is better to install hinges on garage doors by placing them on the ground;
- vertical seams are made from the bottom up, preventing molten metal from draining;
- For convenient closing of the valves, a backing is placed under the bottom hinge before welding.
The process of welding hinges is simple, but you should not rely on the accuracy of your eye. It’s better to double-check with measuring instruments seven times so that you don’t have to redo everything. Haste when testing the gate, without waiting for the welds to cool completely, will also lead to the work being repeated.
Installation recommendations
The reliability of the gate directly depends on compliance with the rules of their installation technology. First, the support pillars are attached. If the canvas is made independently, the dimensions of the frame will be determined only after the first stage. It is important to remember the technological gap.
In the lower part, the distance to the ground surface must be at least 100 mm. This is necessary to compensate for possible subsidence of the structure. Corrugated sheeting can be used as a cladding material. To securely fix the corrugated sheet, additional stiffeners are welded. Additionally, you can provide a small gate. An alternative is to make it separately, if the width of the installation opening allows.
After welding the hinges, the surface is cleaned of rust, a layer of primer and paint is applied. To avoid extraneous sounds when opening, the hinges are lubricated with grease.
Step-by-step welding algorithm
After everything is folded and prepared, you can begin to weld the hinges to the gate. Step by step it looks like this:
- First, the loops are welded to the plates using a uniform continuous seam. This is the name of a plate made of durable iron, which serves as a kind of load distributor. The thickness and width are selected based on the weight and size of the gate structure.
- After preparing the hinges, it is necessary to install the gate correctly. They must stand in the opening perfectly accurately in all planes. A long building level will serve as an indispensable assistant when adjusting the position of the sashes.
- When the required position of the structure has been selected, you should first lubricate the hinges with thick automotive lubricant, for example, grease or its equivalent. This is done to make the hinges move lightly and smoothly after installation.
- Next, you need to mark the location of the hinges. This is done with a construction pencil or chalk. The hinges should be located at a distance of 30 centimeters from the upper and, accordingly, lower edges of the sash structure.
- Loops are welded onto the marked areas with a few drops of metal. This is done to fix the gate structure. After this, you need to try opening and closing the gate several times. If a skew or unevenness is detected somewhere, a hammer, which is used to beat off the loops, will help correct the situation. Then they are welded again, taking into account the identified deviations.
- When the gate opens and closes as expected, the hinges should be completely welded along their entire length. It is necessary to achieve smooth, uninterrupted seams. It is necessary to start welding work from the lower hinge.
Choosing loops
The choice is made taking into account the size and weight of the valves. For example, a metal garage door will require stronger hinges with a support bearing than a gate. The stores offer a variety of types:
- Drop-shaped ones with support bearings are designed for weights up to 400 kg.
- Cylindrical, thanks to the amplifier, which works as a load distributor, and the support bearing, ensure ease of opening with a load of up to 600 kg.
- Through ones are chosen if it is impossible to weld the hinges or secure them with bolts. Fixation is carried out using a through hole in the rack. They are attached to the sash with nuts. Maximum load up to 200 kg.
- 3-section doors are difficult to break into and are used for hanging heavy sashes.
- Forged ones are functional and are used as decoration for wooden gates.
- Steel boom hinges are often installed on garage doors made of thick metal.
- Height-adjustable hinges are useful if the position of the support posts may change.
Hinge with support bearing ensures easy opening with loads up to 600 kg