We will send the material by email
Something as seemingly simple as welding hinges on a gate often turns into a complex problem. For many people, it is much easier to weld a geometrically correct frame for gates and gates than to install the finished structure in place and ensure that it works properly. In fact, this work is really not difficult, but it requires extreme precision and accuracy, as well as knowledge of some nuances.
Selection of loops and their quantity
If you decide to use welded hinges to install the gate, you can choose from several types:
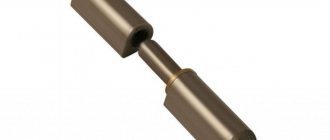
- the simplest and most inexpensive option is a split cylinder with a rotating axis in one part and a cavity-cap in the other. Such hinges require periodic lubrication, without which they quickly begin to creak;
- The most popular are hinges of the same design, but improved with a ball or bearing on which the axis rests. They can be either two- or three-section;
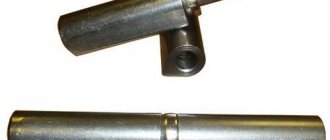
- Another option is the same hinges with metal plates welded to each part.
For reference! Welded hinges most often have a round cross-section and, when assembled, resemble a cylinder. But their cross-section can also be teardrop-shaped, with a sharp point along the walls. The shape does not affect the performance characteristics of the products in any way; it is selected solely on the basis of ease of installation: for some it is easier to weld some, for others it is easier to weld others.
However, it is not enough to know how to weld hinges to the gate - first you need to calculate the load on them and decide on the quantity. This is not difficult to do if you know the weight of the sashes.
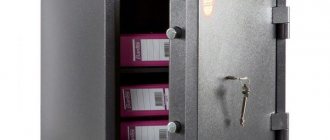
Hinges without plates can withstand a maximum of 400 kg depending on their diameter and the length and thickness of the metal. And hinges with plates that take on part of the load are designed for a more impressive weight - they can withstand up to 600 kg.
Knowing the design load on the hinges and the weight of the structure, you can determine the required number of hinges. Of course, there will not be less than two of them per sash. And in the case of heavy gates, the number of canopies is increased to 3 or 4. An additional hinge is installed just below the top one, which bears the main load.
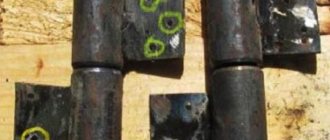
By the way, you can strengthen ordinary hinges yourself by welding to them plates cut from thick metal of a suitable size. The weld must be continuous.
On our website you can get acquainted with the most popular projects of houses with a garage - from construction companies presented at the exhibition of houses "Low-Rise Country".
How to properly weld droplet loops. Welding hinges with your own hands
How to weld hinges: technology of work
Installation of metal doors, as well as gate doors and gates, requires welding of hinges to the door leaf and frame. How to choose hinges for installation, how to weld hinges on your own, and what equipment you will need for the job - answers to all questions can be found in this article.
Installation of hinges by welding
Loop selection
The correct choice of hinges for metal gates, gates and doors should be based on several factors:
- determining and selecting the type of loop;
- determining the number and overall dimensions of the loop.
Types of loops
First of all, welded hinges differ in shape. They can be:
- cylindrical. A variation of this group is the welded drop-shaped loop;
- square. They are used extremely rarely. Currently practically not produced;
- hexagonal.
The main types of welded loops, differing in shape
All welded hinges can be additionally equipped with a ball that acts as a bearing. The ball makes it easier to open the door and reduces friction, which negatively affects the life of the fittings.
Welded hinge equipped with a ball bearing
Also on sale you can find reinforced welded hinges, which are used for installation on a metal door of large size or weight. Additional plates allow you to evenly distribute the load on the hinge, which increases the service life of the product.
Welded loop complemented by metal strips
How many hinges do you need to install?
The number and overall dimensions of hinges are selected depending on the weight of the door leaf. The greater the weight of the door, the larger the hinges required, and the number of hinges increases.
Table for choosing the sizes and number of door hinges
Installation of welded hinges
Let's look at how to properly weld hinges. To do this, you need to go through three main stages:
- preparation of equipment and materials required for work;
- preparing a metal surface for welding;
- welding hinges on the door.
Tools and materials
Before properly welding hinges on a metal door, gate or gate, you need to prepare the materials necessary for the work:
- loops selected according to all the rules indicated above;
- metal plates (if welding of hinges is carried out with reinforcement of the structure with plates). The dimensions of the plates are selected based on the weight of the door leaf. The greater the mass of the door, the larger the plates required. For example, garage hinges for gates of standard sizes (approximately 2.5 * 2.5 m) are welded onto metal plates measuring 80 * 80 mm;
- electric welding machine;
- dry electrodes. To carry out the work, it is enough to have electrodes with a diameter of 3-4 mm;
- a brush with metal bristles for preliminary cleaning of the work surface;
- personal protective equipment for the master.
Special protective clothing and mask for welding work
Preparation
When answering the question of how to properly weld hinges on gates and other metal doors, it should be mentioned that the preparatory stage is in practice the most important.
At the preparatory stage it is required:
- mark areas for installing hinges. If two round hinges are installed, they should be located at a distance of 15-20 cm from the top and bottom of the door leaf. Additional hinges are located evenly along the entire height of the door;
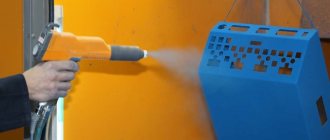
- all areas in which hinges are supposed to be welded must be cleaned of dust, rust, and so on. To carry out cleaning, use a brush with metal bristles, dry rags and, if necessary, treat the surface with some kind of solvent;
Cleaning the metal surface before welding
- process the loops. The surface on which the weld will be located also needs to be cleaned. In addition, the inside of the hinge, where the ball bearing is located, must be thoroughly lubricated. For lubrication, you can use litol, solid oil, and so on;
Preparing the loop for installation
- if the hinges are installed using metal plates, then at the preparatory stage it is necessary to weld the inserts to the hinges. Welding of hinges and plates is carried out with an even seam;
Reinforcing hinges with metal plates before installation
- connecting the welding machine. When working with equipment, it is imperative to connect grounding;
Equipment elements and device regulation
- The device is adjusted using regulators located on the equipment body and by testing the production of a weld.
Achieving a high-quality weld by testing and adjusting the apparatus
Welding
It is recommended to weld the hinges in a horizontal position of the door and door frame. If you install the box first, you will have to perform a vertical weld, which causes difficulties even for an experienced craftsman.
Loop welding technology
Before we talk about how to weld hinges on gates, it is worth taking a closer look at the conditions necessary for their normal operation.
Even if the load is calculated correctly, the hinges may not be able to cope with it if their position deviates even slightly from the vertical. They will quickly fail. And the second point: there should be a small gap of 1-2 mm between the hinge body and the support post so that the metal parts of the post and the mating part of the canopy do not touch or rub against each other. The same gap should be left on the side of the sash.
Loop selection criteria
The fittings for fastening swing gates are selected taking into account:
- sash manufacturing material;
- weight and dimensions of the entrance structure;
- expected loads.
Gate hinges must have the following characteristics:
- silent or low noise level;
- ease of turns;
- large plowing width;
- resistance to loads.
Awnings also vary in size. The greater the weight of the wicket or swing gate, the larger and more powerful the mechanisms required for their installation. The use of weak fasteners can lead to them becoming deformed or completely destroyed under the weight of the canvases. Particular attention should be paid to the wear resistance of gate hinges, since this element of the entrance structure is used more often than gates.
Video description
To understand what we are talking about, watch the video
The nuances of installation on supports of different sections
The supporting posts on which the sashes are hung can be round, square or, less commonly, rectangular in cross-section. There is a difference between how to properly weld gate hinges to round posts or supports made of profile pipes.
- If the profile pipe has smooth edges without bends or distortions, then it will be easy to cope with the task of how to properly weld gate hinges to square posts. They are installed on the outer plane of the support.
Welding technology
It will be much easier to weld the hinges correctly if you follow the rules of the sequence of the technological process. The sequence of work is as follows:
- installation of plates;
- gate installation;
- welding of hinges.
Now we will analyze each of the stages separately, using the example of circular loops (turned). Video: How to properly weld the loops, with your own hands.
Installation of plates
Platik is a metal mounting plate that serves both to distribute the load evenly and to simplify welding work. The size of the plate and its shape depend on the weight and dimensions of the doors. It turns out that in order to correctly install the hinge, such a plate needs to be welded to it. This is done with a continuous seam, without gaps. Experienced welders can weld without plates, which is quite acceptable, but the fastening will not be as reliable.
- A wire with a thickness of 1.5-2.5 mm is wrapped around the loops from below and above, and then twisted to create a gap between the welding plane and it. You can also put matches or other objects of suitable thickness, but they will fall out, break or move, which is extremely inconvenient.
- It is necessary to place the places for attaching the canopies on the supports and apply a long, even block or profile pipe to them. Secure it level, ensuring a vertical position.
How to properly weld hinges on a gate + video Such a simple matter, how to properly weld hinges on a gate, almost always turns into complications and problems. For most people, it is much easier to weld the frame of the correct geometric shape of a wicket and gate than to install ready-made structures in place and ensure that it functions normally. In fact, the work is not so difficult, but it will require extreme accuracy and precision, as well as knowledge of certain nuances .
Video description
See how it looks in this video:
- loops with twisted wire are pressed against the block and the post and are also fixed in a vertical position;
Important point! The ground cable of the welding machine is attached to the part of the canopy that will be welded. If you install it on a support, then as a result of resistance welding, the halves of the loop can adhere to each other.
- the loops are welded to the supports at 2-3 points;
- in the same way, they grab the second (upper) part of the hinges to the frame or leaf of the doors;
- when the tacks have hardened, the gate is checked for opening - it should swing open 180 degrees without jamming or warping;
- if everything is in order, the sashes are closed again, fixed and the hinges are welded onto the finishing surface with a continuous seam from the bottom up;
- the cooled seams are cleaned of scale with a hammer and sanded with a grinder to give a more aesthetic appearance. But this work must be done carefully so as not to damage the joint.
Loop welding technology
Before you talk about exactly how to weld gate hinges, you should consider in detail all the conditions that are necessary for their normal operation. If the load is calculated correctly, the hinges may not be able to cope with it if their position deviates even slightly from the vertical. They will quickly fail. And now about the second point - between the hinge body and the support post there should be a small gap of 0.1-0.2 cm so that the metal pillar parts and the mating part of the canopy do not touch or rub against each other. The same gap must be left on the sash side. To understand all the nuances, you need to watch the video.
Features of installation on supports with different sections
The supporting type pillars on which the sashes will be hung can be square, round or even rectangular in cross-section. There is a difference between how gate hinges should be welded to round type posts or to profile support pipes.
- If the profile pipe has smooth edges without bends or distortions, then it will be quite simple to cope with the task of welding gate hinges to square-type posts. They are installed on the outer supporting plane.
- If we are talking about a round support, you must first decide in which direction the doors will open. Next, find the most protruding line (the middle of the pillar relative to the opening) and step back a couple of mm outward about it - towards the opening. Even 0.5 cm is enough for the gate leaf or gate to “walk” smoothly, without jerking, around the hinged axis. Since attaching hinges to gates on round posts is much more difficult than on square ones, you need to be especially careful and attentive, maintaining the same indentation size for all hinges.
Now let's talk about installation.
Installation and welding work
Experienced craftsmen recommend first welding the canopies to the sashes and laying them on a flat, horizontal surface. Weld a half to them in the form of a hollow cylinder, and to the supports in the future - a counterpart with a pin (and the pin should be directed upward).
You need to retreat approximately 0.15 meters from the lower and upper edges. Next, install the sash with welded canopies in the opening on supports that will provide the required distance from the ground, and firmly fix it with pliers, clamps and other mechanisms. This is done so that it stands exactly vertically, and there is a gap of 0.5 cm between it and the support. To do this, use a laser level or plumb line, and spacers of the required thickness must be inserted between the elements. Other craftsmen prefer to first set up a gate, and then weld hinges to it, and also to the post. There are no big differences, and everyone does what is most convenient for them. Helpful advice! Installing the gate so that the doors are perfectly level is quite difficult. To prevent them from moving during the work process, they can be temporarily connected to each other by grabbing them through a jumper by welding. Now let's talk about how to weld canopies on gates. The working sequence is as follows:
- A wire with a thickness of 1.5-2.5 mm is wrapped around the loops from below and above, and then twisted to create a gap between the welding plane and it. You can also put matches or other objects of suitable thickness, but they will fall out, break or move, which is extremely inconvenient.
- It is necessary to place the places for attaching the canopies on the supports and apply a long, even block or profile pipe to them. Secure it level, ensuring a vertical position.
What it really looks like
..., look at the video: Loops with twisted wire are pressed to the bar and post and also fixed in a vertical position.
Please note that the ground cable of the welding machine is attached to the place of the canopy that will be welded. If you install it on a support, then eventually the loop halves can interlock with each other due to contact welding.
- The hinges need to be secured by welding to the supports at a couple of points.
- In the same way, grab the second (namely on the top) part of the hinges to the frame or sash leaf.
- When the tacks have hardened, the gate should be checked for opening - it should swing open 180 degrees without jamming or warping.
- If everything is fine, the sashes need to be closed again, fixed and the hinges welded onto the finishing seam with a continuous type, from bottom to top.
- Clean the cooled seams from scale with a hammer and sand them with a grinder to give a more beautiful appearance. But such work must be done carefully so as not to damage the joints.
There is no need to open the gate until the weld seams have completely cooled down and gained strength.
- The ends of pipes prepared for the outer frame are cut at an angle of 45⁰. The welding areas are cleaned down to metal.
- The pipes are folded into a rectangle on a flat surface where the gate will be welded. The correctness of external and internal corners is checked with a square and by measuring the diagonals. The permissible discrepancy is no more than 2 mm. The horizontal position is checked with a level. For reliability, the structure is fastened with corner clamps before welding.
- They grab the corners, re-check their correctness, and weld with continuous seams.
- A horizontal cross member is welded into the middle of the frame. Diagonal spacers are inserted into the resulting two parts. With this design, high strength is achieved with minimal material consumption, which is important if the gate is welded using your own hands.
- The slag is knocked off the seams and cleaned with a grinder. Welded joints must be checked for leaks, since water that gets inside will accelerate the corrosion process, and in winter, if it freezes, it can rupture the pipes.
When the owner of an estate has a car, he cannot do without a gate. If you decide to make them yourself, it is better to choose welded swing gates. They are easy to make from available materials if you have the ability to weld metal at an amateur level. Therefore, welding a gate onto a fence from a profile pipe with your own hands will cost much less than buying or ordering one.
The procedure for properly welding hinges on garage doors
In welding-related work, it is extremely important to follow safety precautions. This is precisely why you should prepare gloves and a protective mask for yourself in advance.
It is better to start the welding process when the gate is still on a flat plane of the ground. The hinges must be coated with grease in advance.
Stages of welding hinges for a garage:
Further differences follow, as mentioned earlier - it all depends on what shape the pillar has.
The loops need to be let out five millimeters.
Why are mounting plates needed?
In most cases, in order to facilitate welding work and also distribute the load evenly, specialized metal plates need to be welded to the hinges in advance.
The size and shape of the plates will depend on the thickness and weight of the metal gate leaf. Plus, the plates serve as decoration.
It is necessary to weld hidden hinges (they are located inside) onto the gate
If, for example, you need to weld hidden hinges (internal) to a gate, then a great option is to ask a specialist, because this is a rather complex technology that requires the hands of a skilled welder and you cannot do it with your own hands.
Choosing loops
The choice is made taking into account the size and weight of the valves. For example, a metal garage door will require stronger hinges with a support bearing than a gate. The stores offer a variety of types:
- Drop-shaped ones with support bearings are designed for weights up to 400 kg.
- Cylindrical, thanks to the amplifier, which works as a load distributor, and the support bearing, ensure ease of opening with a load of up to 600 kg.
- Through ones are chosen if it is impossible to weld the hinges or secure them with bolts. Fixation is carried out using a through hole in the rack. They are attached to the sash with nuts. Maximum load up to 200 kg.
- 3-section doors are difficult to break into and are used for hanging heavy sashes.
- Forged ones are functional and are used as decoration for wooden gates.
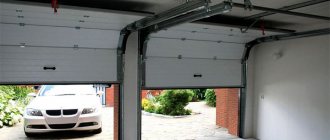
- Steel boom hinges are often installed on garage doors made of thick metal.
- Height-adjustable hinges are useful if the position of the support posts may change.
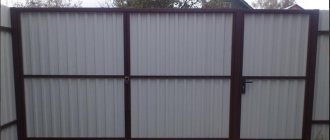
How to weld hinges on gates made of profiled decking?
The diagram, thanks to which the sash frame is assembled from a profile pipe.
The procedure looks like this:
You need to make 2 jumpers, they should be parallel to the bottom and top of the long side of the sash and attach them using squares; The distance between the jumpers should be such that the sash can be divided into 3 equal parts;
We weld gate hinges to these jumpers;
The profiled sheet needs to be screwed on top of the hinges that are welded. Hinges for a garage that are at least a meter long are much better suited; the thicker the material, the better. We do not recommend using material thinner than three millimeters.
After reading our material, you will know for sure that everyone can definitely handle welding.
There is only one thing that you may not be able to achieve in the first place - an even, perfect seam, but it is only beautiful, and over a period of time, you will be able to become a professional!
Household repair No. 1
Choose reliable craftsmen without intermediaries and save up to 40%!
- Fill out the application
- Receive offers with prices from masters
- Select performers by price and reviews
Post a task and find out prices
- Minor household repairs
- Renovation of apartments
- Articles
- Renovation of apartments
Gates are an integral part of any personal plot and private house. They protect the home from unauthorized entry. You need to understand that the correct opening and closing of doors is the most important characteristic, which entirely depends on the quality of the hinges. The correct installation of these elements to the round posts is also very important.
To properly weld hinges, you must first understand how they work together. Both loops should be located on a straight line of the axis. In other words, when installation is completed, the lower loop should be under the upper one. Only in this case will a uniform load distribution be achieved.
How to weld hinges on gates correctly?
Even a professional welder may not know how to properly weld hinges to round posts. The task is complicated by the fact that the loops are cylindrical in shape. First, this element is welded to special plates, but this must be done on a horizontal flat surface. In addition, the plates must be welded with a continuous, even seam, and nothing else.
To select plates by size, you need to consider:
- characteristics of the material used in the manufacture of gates;
- gate length;
- their weight.
An experienced welder, even without additional equipment, will determine how long the weld should be so that it can support the weight of the door.
To ensure that the hinges are welded correctly, you will need high-quality consumables and equipment. You can't do without:
- records;
- plumber's hammer;
- Bulgarians;
- electrodes;
- welding machine;
- workwear;
- metal door hinges.
It must be remembered that welding of the hinges must take place directly at the location of the gate. To install the canvas in a vertical position, you can use a plumb bob. That is, the gate doors must be installed exactly as they will be after welding. Measurements must be taken carefully to avoid defects. The training video shows how to do it correctly.
Stages of welding loops
The most difficult part is the vertical seams. Without records it will be almost impossible to make them. We must not forget that welding work should begin from the lower hinges, and not from the upper ones. The bayonet part is welded first. This is done by smooth movements of the electrode from top to bottom.
After the first stage, you need to check whether the gate opens correctly. A regular laser level will help here, which shows the location of the axis of the welded loop. If there are no distortions and everything is done correctly, work can continue.
So, welding work consists of several stages. For everything to be done correctly, you need:
- raise the gate so that it stands vertically;
- check their correct location (a plumb line is used for this);
- attach the hinges at the places where they are attached (you need to make sure that they are parallel to the line of the edges of the sash);
- weld to the posts and to the structure fabric;
- thoroughly clean the seams (it is best to use a grinder).
Recently, gates made of corrugated sheets have increasingly begun to be produced. In this case it is necessary:
- build jumpers that will run parallel to the bottom and top;
- fix the jumpers (it is best to use squares);
- arrange them in such a way that they divide the canvas into three equal parts;
- weld the hinges to the jumpers;
- After finishing the work, cover the corrugated sheet on the hinges.
To ensure everything is done correctly, it is advisable to watch the training video.
General recommendations
It must be remembered that if the metal hinges are welded incorrectly, the doors will close with great difficulty. To avoid this, you need to follow the advice of experts:
- straight hinges need to be welded only after laying the gate on the ground;
- before welding, it is advisable to make a footrest by placing its lower loop;
- in the event that the loop is fixed on a round stand, approximately 5 millimeters must be released outward;
- You can use a rectangular piece of wood before finally securing the hinges. This will help you install them correctly.
- you need to cook from bottom to top using small potholders and observe the order of work;
- The gate should be opened only after the hinges have cooled.
Gate hinges are quite easy to install yourself, but not everyone can do it. If you do not have the opportunity or the necessary skills to install hinges, you can use the services of professionals.
The most convenient way to search for performers is on the Yudu website. This service has registered experienced craftsmen who will weld hinges on gates professionally and at very low cost. Thanks to a convenient search system, you can find a specialist very quickly.