Set of socks, Omsa socks
349 ₽ More details
Set of socks, Omsa socks
349 ₽ More details
Electronic bidet
To properly install a gate structure, first of all, you need to know how to weld hinges onto a gate. Properly welded canopies are the most important factor when installing gates and guarantee the reliability of the mechanism for many years. An essential aspect of high-quality installation is the availability of appropriate components.
You can weld such hinges yourself
Selection of loops and their quantity
If you decide to use welded hinges to install the gate, you can choose from several types:
- the simplest and most inexpensive option is a split cylinder with a rotating axis in one part and a cavity-cap in the other. Such hinges require periodic lubrication, without which they quickly begin to creak;
- The most popular are hinges of the same design, but improved with a ball or bearing on which the axis rests. They can be either two- or three-section;
Welded hinges with a ball Source dekoriko.ru
- Another option is the same hinges with metal plates welded to each part.
For reference! Welded hinges most often have a round cross-section and, when assembled, resemble a cylinder. But their cross-section can also be teardrop-shaped, with a sharp point along the walls. The shape does not affect the performance characteristics of the products in any way; it is selected solely on the basis of ease of installation: for some it is easier to weld some, for others it is easier to weld others.
However, it is not enough to know how to weld hinges to the gate - first you need to calculate the load on them and decide on the quantity. This is not difficult to do if you know the weight of the sashes.
Hinges without plates can withstand a maximum of 400 kg depending on their diameter and the length and thickness of the metal. And hinges with plates that take on part of the load are designed for a more impressive weight - they can withstand up to 600 kg.
Knowing the design load on the hinges and the weight of the structure, you can determine the required number of hinges. Of course, there will not be less than two of them per sash. And in the case of heavy gates, the number of canopies is increased to 3 or 4. An additional hinge is installed just below the top one, which bears the main load.
3 hinges are often installed on massive insulated garage doors Source dekoriko.ru
By the way, you can strengthen ordinary hinges yourself by welding to them plates cut from thick metal of a suitable size. The weld must be continuous.
See also: Catalog of projects of houses with a garage
Beginning of work
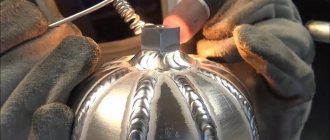
The cylindrical shape of the hinges often makes inexperienced welders wonder: “Does this even weld?” It's cooking. Loops made from a hexagon or tetrahedron are actually more difficult to weld. Using the correct technology, the loops are first welded to special plates. It is advisable to do this on a flat horizontal surface, for example, on an anvil (at the same time, you can attach the “minus” of the welding machine to it). An essential requirement: the plates must be welded to the hinges with a continuous seam.
It is not difficult to choose a suitable size dress. We take into account the weight of the gate and the strength of the material from which they are made and determine by eye what length of welding seam can withstand the weight and not allow the door structure to deform. The plates provide a convenient working “platform” for welding work, and they also serve as distribution plates for the door leaf, which prevents the latter from “breaking” even with the overall heavy weight of the door structure.
Gate installation
Welding of hinges with already welded plates must be done permanently, having previously placed the gate in the “native window”. That is, the gate will have to be fixed “idle” and reach its required position even before the start of welding work. The position of the doors must be checked and double-checked as many times as the average first-grader knows the numbers - at least ten.
Welding work
After a thorough check of the location of the gates and the pre-measured and marked fields for the plates has been made, welding work can begin with the lower hinges on the posts. Vertical welds are the most difficult job for a welder. But thanks to the plates, even an inexperienced welder can handle them. Once one bayonet part of the hinge on the sash is welded, you can use a laser level to verify the correct location of its axis and to determine the exact location of the second bayonet hinge.
Completion
After carefully welding the bayonet parts of the loops on the pole, you will need to attach the inserted upper parts of the loops to them immediately with the balls. Then press the baited part against the door leaf as tightly as possible and continue welding work.
At the end of the welding work, the seams can be processed with a grinder.
This technology has been successfully used by all door installation services for a long time. It will not be difficult to do this yourself if you have welding skills and the necessary equipment with consumables:
- Metal door hinges;
- Plates/plates;
- Welding machine;
- Electrodes;
- Bench hammer;
- Welding mask, gloves and overalls;
- Bulgarian.
Please note that the gates must open outward, because if the gate opens inward during heavy snowfall in winter, this can become a big problem!
Video - creating swing gates
Video - installing garage doors
Loop welding technology
Before we talk about how to weld hinges on gates, it is worth taking a closer look at the conditions necessary for their normal operation.
Even if the load is calculated correctly, the hinges may not be able to cope with it if their position deviates even slightly from the vertical. They will quickly fail. And the second point: there should be a small gap of 1-2 mm between the hinge body and the support post so that the metal parts of the post and the mating part of the canopy do not touch or rub against each other. The same gap should be left on the side of the sash.
How to properly weld hinges on gates - procedure
Garage doors are an indispensable element of any garage, which performs both a protective and decorative function. When installing gates for a garage or other purposes (for example, for a yard), the question almost always arises of how to weld the hinges onto the gate so that it serves you as long as possible.
Correct welding is of decisive importance, because incorrect formation of the weld and various other defects can significantly reduce the strength and reliability of the entire structure, and also affect the reduction in the service life of the gate. How to ensure the security of property in your garage (you can install a lock for this) and ensure the correct installation of door hinges? This detailed guide to action will definitely help you.
Video description
To understand what we are talking about, watch the video
The nuances of installation on supports of different sections
The supporting posts on which the sashes are hung can be round, square or, less commonly, rectangular in cross-section. There is a difference between how to properly weld gate hinges to round posts or supports made of profile pipes.
- If the profile pipe has smooth edges without bends or distortions, then it will be easy to cope with the task of how to properly weld gate hinges to square posts. They are installed on the outer plane of the support.
Canopy with plates on a square pole Source distroy.ru
- In the case of a round support, you must first decide in which direction the doors will open. Then they find the most protruding line (the middle of the pillar relative to the opening) and step back from it a few millimeters outward - in the direction of plowing. 5-6 mm is enough for the wicket or gate leaf to move smoothly and without jerking around the axis of the canopy. Since it is more difficult to weld hinges on gates to round posts than to square ones, here you need to be especially careful and attentive, maintaining the same indentation size for all hinges.
Installation and welding work
Experienced welders recommend first welding the canopies to the sashes, laying them on a flat horizontal surface. A half in the form of a hollow cylinder is welded to them, and a mating part with a pin (pin up) is subsequently welded to the supports. They retreat approximately 15 cm from the top and bottom edges.
Wicket frame with welded hinges Source www.chipmaker.ru
See also: Catalog of companies that specialize in the construction of fences, gates and enclosures
Then the sash with welded canopies is installed in the opening on stands that provide the required distance to the ground, and is rigidly fixed with clamps, pliers and other devices. They do this so that it stands strictly vertically, and there is a gap of 5 mm or so between it and the support. To do this, use a laser level or a plumb line, and spacers of the required thickness are inserted between the elements.
Other craftsmen prefer to first install the gate, and then weld the hinges to both it and the post. There is no big difference, everyone does what is convenient for them.
Advice! It is quite difficult to install the gate so that the doors are exactly level. To prevent them from moving during operation, they can be temporarily tied to each other by welding through a jumper.
Another option is to make the upper and lower ribs of the frame solid when making the gates and cut them after hanging them on the hinges Source sqezo.ru
Now about how to properly weld canopies on gates. The sequence of work looks like this:
- 1.5-2.5 mm thick wire is wrapped and twisted around the loops at the top and bottom to form a gap between it and the welding plane. You can place matches or other objects of suitable thickness, but they fall out, move or break, which is very inconvenient;
- The places where the canopies are attached are marked on the supports and an even long block or profile pipe is applied to them. Fix it level, ensuring a vertical position.
Basic truths
The process of installing hinges can be considered using the example of a metal gate. In order for it to properly perform its main functions, a number of conditions must be met when welding hinges:
- Provide a gap between the support post and the gate frame, which should be 3-5 mm.
- Provide a gap of several millimeters between the hinge and the gate frame by welding plates - metal plates of the required thickness - to the hinge. In total, for each loop you need two strips, the length of each of them is 2 mm less than the length of half.
- The optimal distance from the edge of the gate to the loop is 15-20 cm. If you need a middle loop, then it is located exactly in the middle between the outer loops.
First, the lower part of the fastener (with the pin) is welded to the post, then the upper part (with the groove) is welded to the sash.
A properly assembled structure should have the following parts:
- a loop;
- plate; wicket frame;
- support pillar;
- lower part (with pin);
- upper part (with groove).
All loops must be coaxial, that is, their centers must be on the same straight line. The alignment requirement is extremely important. It is on its compliance that it depends on how evenly the weight of the gate will be distributed on the fastenings and, accordingly, how long they will last.
To work, the master will need:
- welding machine;
- metal plate for making plates;
- Bulgarian;
- hammer;
- plumb line;
- oil for lubricating hinges;
- protective equipment - mask, gloves, overalls.
At the preparatory stage, you should mark the gate frame and sash, determining the places where the hinges will be welded. Clean them from dust, dirt, and rust. To do this, you can use a wire brush and solvents. Next, a similar treatment is performed on the surface of the hinges, and lubricant is applied to their inner part.
The traditional welding method involves the installation of plates at this stage, for which it is recommended:
- Take 2 identical plates of the required thickness and length. Place them so that there is a gap of 2-3 mm between them.
- Place the bottom part of the loop on them.
- Weld the loop to one of the plates (in this case, to the right one).
- Do the same for the top of the hinge and weld it to the left plate.
- Then you need to install the shutters in the working position and fix them.
- The plates with the lower part of each hinge are spot welded to the post, then the upper hinge elements are inserted into the lower parts and spot welded to the sash. After checking the alignment of the hinges and the operation of the gate, final welding is carried out along the contour of the plates.
Video description
See how it looks in this video:
- loops with twisted wire are pressed against the block and the post and are also fixed in a vertical position;
Important point! The ground cable of the welding machine is attached to the part of the canopy that will be welded. If you install it on a support, then as a result of resistance welding, the halves of the loop can adhere to each other.
- the loops are welded to the supports at 2-3 points;
- in the same way, they grab the second (upper) part of the hinges to the frame or leaf of the doors;
- when the tacks have hardened, the gate is checked for opening - it should swing open 180 degrees without jamming or warping;
- if everything is in order, the sashes are closed again, fixed and the hinges are welded onto the finishing surface with a continuous seam from the bottom up;
- the cooled seams are cleaned of scale with a hammer and sanded with a grinder to give a more aesthetic appearance. But this work must be done carefully so as not to damage the joint.
After painting, the ground joints will become almost invisible Source i.ytimg.com
Do not open the gate until the welds have completely cooled and gained strength.
Preparatory work
They start by welding the plates to the hinges. This step can be skipped if you are using ready-made canopies with mounting plates or when mounting them on round poles of small cross-section. The plates are cut from sheet steel using a grinder, choosing sheets with a thickness of at least 5 mm.
Before assembling the hinge, its internal part (the place where the bearing is located) is carefully treated with lubricant, and the area allocated for welding is cleaned of dust and rust. Cook on a horizontal surface. Two plates are laid side by side along the long side with a gap of 2–3 mm. Half of the canopy is placed on top, welded to one of the plates with a continuous seam. A similar operation is performed with the second half. The resulting seams are carefully cleaned.
Important: according to fire safety rules, welding work is carried out either on unpainted or fully painted, dry parts. Paint that is not completely dry can ignite from a spark.
Classification according to GOST
Today on the market you can find a huge number of all kinds of hinges from different manufacturers, shapes, types of fastening, and external design. High-quality hinges for country gates and gates are divided into certain groups according to current GOSTs so that the average person does not get confused when choosing them. This makes it much easier for customers to select the necessary components and navigate their types and prices. Knowing the features of each type, the client can easily choose the right part for fastening the doors.
The main types of hinges for modern gates are the following:
- cylindrical type with support bearing;
- secret type for hidden installation;
- through-type curtains;
- models with a reinforced structure for mounting on gates;
- three-section type for installation in industrial facilities.
Now, let's take a closer look at each of these types in order to evaluate the features of each of them.
Cylindrical with support bearing
This type is made in a standard form and is not particularly different. Outwardly, they look like a cylinder of two halves. In the first part, which is the top, there is a pin, and in the second, which is the bottom, there is a hole into which the first part is inserted. Some models have a ball-type bearing inside to facilitate movement.
Such curtains are used in structures whose weight does not exceed 400 kilograms. For heavier systems, reinforced special cylindrical hinges are used. The connectors are fastened by welding. The ball bearing is installed in the hole in the lower curtain. Often, on the back side of the bearing there is a hole with a plug that makes it easy to lubricate and clean it. This small revision will improve the performance.
Up to four cylindrical hinges are installed in such structures to ensure the best movement and reduce the load on each. In some models, the bearing is not installed in the lower part, but between two moving elements. This modification greatly simplifies the opening and closing process. However, such a mechanism is difficult to lubricate, since to do this you need to lift one of the flaps.
Secret hinges
The main advantage of this type is hidden installation, because the design reliably hides them inside when the system is closed. A special feature of the design is that the hinge itself is hidden in the sash frame and attached to the side of the support. The advantage of such a fastening system is that it reduces the chances of hacking, because the loop is difficult to find and almost impossible to dismantle without the necessary tools.
Through-type hinges
The design feature of this type is that the two curtains are connected by a rod that enters the upper part and protrudes slightly from the lower part. The simplest design consists of two halves and a pin. This type is widespread on the market and is used mainly for office doors; the design can withstand a weight of up to 200 kilograms.
Assembling elements is somewhat reminiscent of a construction set, because each element has several ears
It is important to note that there can be several such elements on the door, which significantly increases reliability. Sometimes, bearings are installed between the hinge elements, allowing movement to occur more smoothly, with less effort.
If the plug is not provided for by the design, then a special limiter is installed on the top part, which does not allow the pin to be removed. This prevents hacking without special tools.
Reinforced gate models
Special reinforced models of cylindrical hinges allow them to withstand greater loads than conventional ones. They are made of metal of greater strength, as a result of which the walls and rods are thicker. This allows you to increase the load-bearing capacity of each loop.
This type has modifications in which bearings are added. They have special markings that indicate increased wear resistance and maximum pressure on them. This makes it easy to open and close heavy gates.
Three-section industrial
This type is in great demand in structures with significant weight of the connected web. Structurally, they are similar to through models, however, they are more reminiscent of cylindrical ones. Their design consists of two oppositely directed pins onto which cylinders are placed and welded to the posts.
What not to do during welding
In order for welding work to proceed without incident, it is necessary to adhere to certain rules:
- Be sure to use protective equipment to avoid harm to your health. This kit includes a protective mask, gloves for welding, a thick jacket or shirt, and pants.
- Never touch a hot welding seam with oil-soaked rags, as they may catch fire.
- It is strictly forbidden to carry out work by eye, even if you are confident in your eye and skill, double-check everything with special tools, then the result is guaranteed to be of high quality and durable.
Now you know how to weld hinges yourself and you can share this information with your neighbors or friends who are still wondering how to weld hinges on their gates without any problems.
Watch the video: Tips and tricks
Why do you need a roller bearing?
A ball bearing is used between the running joint parts. Such a mechanism is always metal and is of high quality, since it bears the main weight. In addition, thanks to the stop, the friction force of the running parts is reduced. Bearings are used in ball or washer form. They are treated with oil lubricant for better performance. Usually they are lubricated when the doors are hung, but after some time, the lubricant dries out and is periodically renewed.
Drop-shaped garage hinges
Design requirements
Before starting work, please consider the following:
- The dimensions are calculated in such a way that the drawing corresponds to the size of a car that could freely drive in and out of the building.
- The minimum space from the swing doors to the side surface of the machine must be at least 30 cm on each side. Even if you have a small car, try to leave the maximum possible distance to the door. After all, it is likely that a more spacious vehicle will be purchased later.
- In a garage for passenger cars, the height of the opening is chosen to be at least 2 meters.
- The dimensions of the opening are selected taking into account the size of the garage. Here everything is calculated individually.
- The main purpose is protection against unauthorized entry. It is advisable to sheathe the surfaces of the valves with galvanized metal with a minimum thickness of 3–5 mm. To strengthen the structure, strong constipations are made. Also, armored linings will not be superfluous.
- An important factor is protecting the interior of the room from atmospheric influences. To ensure a good fit of the canvas to the iron frame, it is better to install vertical locks, which effectively prevent distortion of the structure. It wouldn't hurt to install a seal on the sashes. It will significantly improve the fit between the frame and the gate leaves. Taking this into account, the gate is also made.
Structure frame for a garage made of corrugated pipe
Features of the teardrop model
Drop-shaped hinges are a combination of the classic convenience of fittings and their practicality in installation. This version of awnings is considered modern and practical. The invention itself has the shape of a cylinder, but for ease of use during production it is given a drop-shaped shape.
They are made of metal, and their special shape allows for convenient installation using a welding machine. The seam is as smooth and durable as possible. Thanks to this, the canvas holds securely, even if the load on its frame is high. The presence of a ball bearing, which is located between the welded hinges, ensures smooth and soft movement of the valves.
Installation recommendations
The reliability of the gate directly depends on compliance with the rules of their installation technology. First, the support pillars are attached. If the canvas is made independently, the dimensions of the frame will be determined only after the first stage. It is important to remember the technological gap.
In the lower part, the distance to the ground surface must be at least 100 mm. This is necessary to compensate for possible subsidence of the structure. Corrugated sheeting can be used as a cladding material. To securely fix the corrugated sheet, additional stiffeners are welded. Additionally, you can provide a small gate. An alternative is to make it separately, if the width of the installation opening allows.
After welding the hinges, the surface is cleaned of rust, a layer of primer and paint is applied. To avoid extraneous sounds when opening, the hinges are lubricated with grease.
As an example, it is recommended to watch a video about professional welding of hinges on gates:
Builder 4th category
To properly install a gate structure, first of all, you need to know how to weld hinges onto a gate. Properly welded canopies are the most important factor when installing gates and guarantee the reliability of the mechanism for many years. An essential aspect of high-quality installation is the availability of appropriate components.
You can weld such hinges yourself
We weld the hinges with our own hands
As you know, there are different types of gates and hinges should also be welded to them in different ways. Next, you will learn how to secure hinges on a round and square post. We will also tell you how hidden internal hinges are installed on gates or wickets and how to weld hinges on gates made of profile sheets.
Installing awnings on a round pole
In order for the awning to function normally on a round post, it needs to be slightly moved away from it. To do this, it is best to place a small metal plate under it, about two to three millimeters thick.
When welding canopies to a round post, push them outward by 5 mm on it and on the gate. This will eliminate the gap between them when closing.
Also, from the middle of the post, the loop should extend to the outside by five to six millimeters. Then the gate will be installed exactly in the middle, and the loop will be able to move along its axis without jamming and very smoothly.
We weld the curtains on a square support
Here it is already necessary to install the hinge flush. It is not necessary to make a lining, but it is better to play it safe and do it. First, apply a loop and grab it with several points so that it holds on its own.
You need to cook from bottom to top using small oven mitts and follow the order of work.
After this, take a flat wooden block or a metal corner and align the loop with it so that it stands level, simultaneously checking everything with a plumb line.
To eliminate possible welding deformations, the canopies must be welded to the canvas and the frame “crosswise”.
After both hinges are secured, you should put the gate on and check its movement, if everything is in order, continue welding. At the end, clean the seams with a grinder and you can paint them.
Installing hidden internal hinges
If you want to keep the hinges out of sight, making your gate more attractive, then you should use special hidden hinges for internal installation. But it is quite difficult to install such hinges and you need to have skill and dexterity in welding; if you are an unprofessional welder with experience, then you will not be able to master such work.
It is best to entrust the process to a professional, then the installation will be done efficiently and the gate will be installed reliably and for a long time. Of course, you will need to pay money for such work, but the quality is worth it.
Installed on a fence made of profile sheet
The process of installing hinges on such a fence is somewhat different from the standard one, although there is also nothing super complicated or time-consuming in it, you just need to have the desire and strive to get the highest quality result from the work done.
Metal hinges for gates made of corrugated sheets
So, the entire installation process consists of the following stages:
- Two small jumpers are made, align them parallel to the long side and secure them at the top and bottom, respectively.
- The distance between these jumpers will make it possible to install three such elements.
- We weld our hinges to the installed jumpers.
- The profile sheet must be screwed on top of the installed hinges, since during welding work it can simply burn and lose its attractive appearance. Garage door hinges are best suited for such purposes.
Why are mounting plates used?
Such plates help simplify work and lighten the load on the curtains. They are welded in advance before the installation of the hinges themselves begins.
The dimensions, shape and thickness of such plates will depend on the parameters of the gate that will be installed. In addition to lightening the load and installation, such elements can perform decorative functions.
How much does it cost to weld a garage door?
| Approximate price | |
| Metal thickness | Cost of 1 cm weld |
| 1–3 mm | 15 rub. |
| 4–6 mm | 20 rub. |
| 7–10 mm | 25 rub. |
| 10–14 mm | 35 rub. |
| Installation of locks | |
| Lock mortise | from 1500 rub. |
| Installation of a deadbolt | 1000–1500 rub. |
| Installation of armor plates | 1500–3500 rub. |
Near a private house
You must follow all the rules exactly. Then welding garage doors yourself will not only save a lot of money, but will also give you the opportunity to make a beautiful and durable structure that protects your car with your own hands.
( 1 rating, average 4 out of 5 )
Aesthetic characteristics of the model
When attaching teardrop-shaped fittings, the weld seam is neat. This improves the overall aesthetic appearance of the mechanism. The added bonus to this is strength and durability. It is worth saying that this kind of hinged structure has a smoothly polished surface. This means that the powder paint will adhere to the door and onto it firmly. The paint will protect the surface of the door mechanism from chips and unwanted physical impacts during operation, and the externally painted hinge element to match the door looks beautiful and organic.
Lifetime
The teardrop canopy distributes the weight of the door equally across the entire ball bearing surface. Unlike the commonly used ball to set the door in motion, a washer bearing allows the door hinge mechanism to last longer.
Thanks to experiments conducted on the strength of a modern drop-shaped canopy, it was concluded that the minimum service life is 53 years.
Model size and characteristics