I’m glad to see you all in a new review of various DIY crafts. Today I will introduce you to one very educational homemade product that may definitely interest you.
In our reviews, we try to objectively evaluate the author’s idea, how correctly the design solution was chosen, how the author worked on the appearance of the invention, and whether analogues exist.
- So what awaits us today? - You ask!
hand-made firewood cleaver
.
Honestly, I have already found a use for it and mentally imagine it at my dacha
!
(I’ll show you how it works at the very end)
- Maybe I was too hasty? - Let's figure it out!
Tools used
Wood processing can be easily done on a carpenter's workbench or on a workbench that replaces it. The list of the most necessary tools is as follows:
- Wood hacksaw;
- Carpenter's axe;
- Plane;
- Hammer;
- Chisel;
- Knife;
- Roulette;
- Sandpaper.
Using a power tool (grinder, circular saw or electric plane) will make the process of making a cleaver handle much easier, but you can do without them.
Wood for an ax
The type of wood and the drying of the workpiece determine the durability of the ax for the cleaver. Freshly cut lumps are not suitable for handles: when the wood dries out, it becomes much thinner, cracks and warps. At home, a natural drying method is used, which allows you to prepare the workpiece in a dry shed for two years and in one year if you keep the wood in a heated room. The harvested wood is sawed off 15–20 cm longer than the future ax for the cleaver, in order to subsequently remove the ends covered with cracks.
Among the available tree species, ash has the best properties: its handle is strong, elastic and does not dry out much over time. It is easier to find a suitable birch log, but it takes longer to dry, and it rots faster. A maple ax handle is less loose, and is slightly inferior to a birch one in terms of impact strength, but is more durable and easy to process.
Making your own handle
First, a block of dried lump is made from a thickness of 3–5 mm greater than the width of the mounting hole. The reserve will allow you to later adjust the workpiece in case of mistaken removal of excess wood somewhere. If it is necessary to remove a thick layer, use an ax or a circular saw, then plan the surfaces with a plane, simultaneously leveling the planes.
On the resulting workpiece, mark the outline of the ax handle with the same margin of a few millimeters.
For convenience, the piece of wood is clamped and transverse cuts are made with a hacksaw in increments of 35–40 mm, not reaching the marking line by 2–4 mm.
Next, use an ax or chisel to knock down pieces of wood in small pieces, following the direction of the chip and not allowing it to go deeper than the drawn contour.
The shank is filed perpendicular to the axis of the ax handle to reduce the likelihood of chipping the wooden product.
Having completed the rough processing, mark the dimensions of the mounting hole.
Why find the center at the end of the workpiece and align the tip along it.
The final shapes are given to the workpiece by planing the convex surfaces with a plane, and the sunken parts are selected with a sharp knife.
Working carefully, remove thin shavings and periodically turn the part over to change the direction of the cut. As a result, you get an almost finished ax handle.
Now the upper end of the handle is chamfered for approach.
They try to lightly insert the handle into the eye, after which marks will remain on the wood, showing how much material needs to be removed.
Focusing on these marks, they continue to adjust the axe. Then another test attachment is made to identify areas of chipping.
Subsequent fine-tuning of the handle is carried out with sandpaper, smoothing out all irregularities and bringing the surfaces to a smooth state.
The tip is finally placed on the finished ax handle, ensuring an even fit. The protruding end of the piece of wood is cut off with a saw.
Place the cleaver vertically and hammer in a wedge, the length of which should not exceed the size of the butt to avoid cracking. If the wedge is not completely buried in the wood, the excess is cut off with a hacksaw.
The handle of a firewood cleaver is impregnated with a protective and decorative compound, leaving the surface rough. Do not use varnishes or oil paints that form a glossy finish.
Types of designs
A cleaver is a modification of an ax with an extended handle (up to 1 meter) and a changed blade angle - about 35°. This tool is designed for cutting along the grain of wood. It will be ineffective to cut logs with it. The total weight of the product varies between 2-3 kg.
The cleaver is designed for chopping wood along the grain
Mechanical analogues, in turn, have some of the same characteristics as manual ones. Today, private farms use both manual and automated models. They are mainly divided into 3 types:
- hydraulic;
- spring (manual);
- electric (screw and rack).
Based on the characteristics of each model, it is necessary to decide which one to make, based on the required volume of firewood and the price of components.
Spring cleaver review:
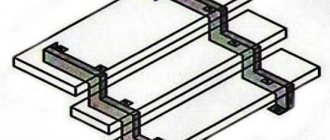
Spring models with lever
This model of mechanical wood splitter works by increasing the impact of a manually stretched spring. A stand is pre-installed under the blade of the structure, on which the material for cutting is laid out. It is not difficult to work with such a tool. It is enough to place the log under the blade with one hand and split it with the other.
The design includes the following elements:
- a frame made of a profile or round pipe with a mandatory horizontal extended support;
- a lever connecting the support and the cutting element;
- on the side of the support (frame of the structure) a spring is attached to the lever, which will intensify the impact during operation;
- On the back side of the lever there is a weight attached (also to enhance the blow), a cutting element and a handle for convenient cutting.
Mechanical spring cleaver: In this case, the design can have not only such components and shape. The main thing is that during operation the firewood is held firmly on the stand and does not tip over. For example, you can do without a support and attach the lever to adjacent structures or a wall.
The diagram of a spring cleaver will help you understand in detail the system of operation of the device
A homemade cleaver for chopping wood has a number of significant advantages:
- easy production;
- low cost of materials and components;
- the product can be used without electricity;
- Frequent vibrations of the structure thanks to the spring mechanism make it easy to chop wood into any pieces.
The main disadvantage of the design can be considered the low level of safety. During operation, you can automatically place your fingers under the cutting element. Also, although using such a product makes the work process easier, you still have to work hard: you need to swing the lever and quickly add firewood.
Cutting logs with knots and so-called “slingshots” is much more difficult. To do this you need to go to one place several times. But even this does not always help, so you have to turn the log over to the other side and strike several more times.
Electrically driven products
Mechanical models of wood splitters with an electric motor, compared to manual ones, significantly facilitate the worker’s work. But the cost of such products is much higher. You will have to spend a significant amount on an electric drive and all the necessary components.
Do-it-yourself conical threaded wood splitter: Such products have two varieties - screw and rack. They consist of the following elements:
- Screw models. The cutting element is a metal cone with a thread. It is cut in the opposite direction relative to the rotation of the shaft. During operation, the cone, thanks to the screw, goes deep and splits the log into two parts.
- You can make a firewood splitter with a rack and pinion transmission. The operating principle is complex, as is the design itself. The blade is installed in a horizontal position on the table top. A log is applied to it, and on the reverse side it is pressed with a toothed rack. Due to the rotation of the gear, the rack presses the deck against the blade and splits it.
When using mechanical wood splitters, remember safety precautions
The rack model has only one element of the classical design - the cleaver blade. As an alternative to an electric motor, you can use a conventional single-cylinder gasoline engine. It can be removed from an old motorcycle. You can also install a power take-off shaft from an agricultural walk-behind tractor.
When making a mechanical cleaver with your own hands, you will have to spend money on the production of a cone and a guide rail. All other elements, such as an electric or gasoline motor, a tabletop, can be found on the farm, removed from old equipment, and the like. But you won’t be able to make the cone and guide rail yourself without special skills; you’ll have to order such work from a turner or mechanic.
Making a cleaver is a labor-intensive and costly process, but its benefits will pay for it in full
If we talk about safety during operation, then the rack and pinion version is more preferable in this regard. The log is always under the frame, and you just need to take care of your hand. The cone version is much more problematic.
The deck can vibrate and spin randomly, while a person will not be able to hold it, since the motor remains on. There are times when clothes get twisted onto the log. The consequences can be severe. Therefore, special care is required during operation.
Making slip protection
To protect the ax from accidental slips, a plate is made from a steel plate 2–3 mm thick. The metal is bent with a hammer, holding the part in a vice along with a suitable iron blank.
The overlay is “finished” directly on the tool handle with light pointed blows of a hammer.
The protection is fixed to the handle with screws through pre-drilled holes.
A well-repaired cleaver with your own hands will be a good helper when preparing firewood.
The condition of the wooden handle should be checked before each splitting of logs. You should not risk your health by working with a tool with an ax that is shriveled and dangling in its socket.
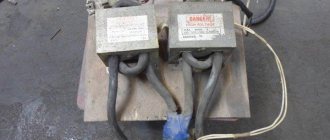
Hydraulic wood splitter
This unit differs from the previous one in the design of the drive and the working part that splits wood. The frame has a different shape, although it is welded from the same materials - angles, sheet metal and pipes. The electric press cleaver is powered by a hydraulic cylinder, the pressure in which is provided by an oil pump. It is installed on the same shaft with the electric motor, and this unit can be located separately from the frame and connected to the cylinder with hoses.
Having found or purchased all the necessary parts, you need to take care of making the shape of the cleaver. The easiest way is to weld it from metal, using a cross-shaped shape as a basis. Its dimensions are selected individually; there are no clear limits. The main thing is that the power of the cylinder is enough to split the logs when the dimensions of the mold are too large.
The mold is mounted on the frame so that its transverse axis coincides with the shaft of the hydraulic cylinder. The latter is installed along the frame and connected by pipes to the pump. If desired, a mechanical firewood splitter can be made mobile by attaching wheels to the frame.