What to do if the toilet tank is leaking? A device malfunction may be caused by damage to one of the design components. In most cases, operation is disrupted due to a malfunction of the siphon, fasteners, locking mechanism, rubber bulb or gasket.
Sometimes a toilet leaks due to physical damage to the tank or bowl of the plumbing fixture.
Such malfunctions can bring a lot of trouble to apartment residents, so it is recommended not to delay repairs.
You can carry out the repair procedure yourself. In this article we will analyze in detail the reasons causing this malfunction and methods for eliminating them.
Why the tank leaks - the main reasons
If you are wondering why the toilet tank is leaking, then the problem has already occurred. Now it remains to find out the reason why this may happen. The most common is ordinary overflow, in which excess liquid is washed away. There are several main factors that in most cases lead to disruption:
- deterioration of the elastic properties of the rubber gasket. Over time, this material wears out, as a result of which the water flow cannot be tightly blocked and the plumbing leaks. The deformed part allows water to pass through perfectly;
- The rubber gasket has not lost its elasticity or deformed, but it does not fit very tightly into the outlet hole located next to the valve mechanism. Due to loose pressing of the part, the toilet cistern leaks;
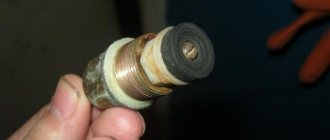
- The valve train pin has suffered corrosive deformation or physical damage. This part keeps the float in the required position, but during prolonged use the element wears out;
- the valve body was damaged - another cause of leakage. However, the cracks that cause the toilet cistern to leak occur only on plastic products. If parts made of brass are installed, such problems will not arise, because... brass components are known for increased strength.
Other common reasons for a leaking toilet tank include:
- damage to bolts and other fasteners connecting the flush tank and toilet. After a long period of use, metal elements often corrode, and plastic elements often break;
- if there is a leak from under the toilet tank when flushing, then the problem may be in the bulb, which has lost its elasticity over time. After prolonged use, this part loses its original properties, as a result of which the ability to acquire the required shape is lost.;
- displacement of the lever fixing the position of the float. This can occur due to prolonged use as a result of which the float loses its tightness. Therefore, liquid may enter the float. Sometimes low quality components also cause a similar malfunction and plumbing leaks;
- breakdown of the siphon or tank hoses;
- Water may leak between the tank and the toilet due to a leak in the connection. As a rule, this occurs when the shape of a seal made of rubber changes;
- the shut-off valve mechanism is damaged;
- cracks appeared.
The main signs that the toilet tank is leaking include:
- frequent or constant sound of pouring liquid;
- the appearance of traces of limestone in places where liquid exits;
- the surface of the bowl, which is located closer to the tank, is constantly wet from the inside, even if the plumbing has not been used for a long time;
- When draining, water flows slowly;
- water consumption increases;
- Condensation occurs on the pipeline and drain tank.
The appearance of even one of the above problems indicates that the toilet tank is leaking. In this case, repair work is required. We invite you to familiarize yourself with the structure of the toilet cistern, common faults and their repair.
The first signs of water leakage
The flush function involves the long-term or short-term flow of water into the toilet bowl in order to cleanse it of waste products. The process begins by pressing the button built into the tank and ends arbitrarily or by pressing it a second time.
Instead of a button, there may be a lever or a handle on a chain, like retro models, but such options are extremely rare.
By pressing the button we control the drain valve. It is connected to a locking mechanism, which, upon completion of the drainage, opens the way for a new portion of water to enter from the cold water system. Thus, flushing occurs only at the request of the user.
If water flows into the toilet after flushing or, even worse, constantly flows in a thin stream, it’s time to check the tank’s fittings - one of the parts has failed.
There are two ways to solve the problem: on your own, by trying to understand the structure of the trigger mechanism, or with the help of qualified specialists - plumbers
But first you need to determine that there is indeed a leak.
Signs of improper drain operation include the following factors:
- constant or periodically appearing characteristic sound of rushing water;
- rusty and limestone stains at the water outlet;
- a constantly wet inner wall of the toilet, close to the cistern, even if the toilet has not been used for a long time;
- an unusually long and weak flushing process - a salvo discharge is considered the norm;
- the appearance of condensate on the pipes and tank, which never existed.
The last symptom is associated with the constant movement of cold water through the pipe, whereas under normal conditions the water is used periodically and has time to warm up to room temperature before it is drained.
If you notice a rusty track or yellowish stains that are difficult to wash off in the water drainage area, you should not stop at just cleaning - you must definitely inspect the tank
Sometimes the cause of leaks lies in the dirt that has accumulated at the bottom of the water tank. In this case, it is enough to thoroughly clean the internal surfaces of the tank. To do this, drain and turn off the water, carefully remove the fittings and, using a brush and cleaning agents, remove the sediment accumulated on the bottom and walls.
If operational cleaning does not help, you will have to become familiar with the design of the drain mechanism.
Required tools and materials
If your plumbing is leaking, you must turn off the water before making any repairs. Due to the fact that the liquid is supplied to the system under pressure, in the process of troubleshooting we can flood the premises. For repairs you will need the following tools:
- sealant suitable for plumbing fixtures;
- sandpaper;
- screwdriver;
- burlap, twine or tow;
- hammer;
- knife;
- pliers;
- If it is necessary to replace a component, a working part of a certain type will be required.
When the necessary tools have been collected, you can begin to carry out repair work.
Conclusions and useful video on the topic
The best plumbing repair advisors are experienced home professionals. The results of their work can be seen in the following videos.
Instructions for replacing fittings:
How to avoid buying a new set of fittings:
Replacing an old float with a new model:
All work related to cleaning or replacing drain fittings can be done independently. If you cannot find a breakdown, but you urgently need to fix the leak, you can simply install new fittings - the cost is low. It is advisable to contact plumbers in one case: if you tried to correct the situation on your own, but failed for some reason.
The problem of constant leakage in the toilet is not so original. Almost all people encounter it sooner or later. Despite the fact that some individuals do not see anything serious in it, it still needs to be eliminated. We will tell you why and how to do this in this article.
How to fix a toilet cistern leak
Once the reason why the toilet is leaking has been found, repair and restoration work can begin. It should be noted that fixing the problem is slightly different in individual cases; the procedure largely depends on the shape of the model.
All of the action algorithms listed below are given for the case if a classically shaped tank is leaking.
Occurs due to overflow
What to do if water flows in the toilet due to overflow? First of all, you need to check which element malfunction caused the system to malfunction. You can determine this yourself by performing a simple test:
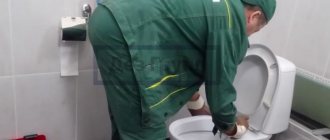
- Remove the toilet lid.
- Raise the float a little and hold it.
- If the tank does not leak when raised a few centimeters, then the float lever is faulty. Its placement does not help block the water. To fix the problem, you need to bend the lever a little and fix it in a position that can stop the flow of water and stop the leak.
- If the toilet still leaks even after raising the float, the valve should be thoroughly inspected. The pin intended for fixing the part must not be deformed, there must be no traces of corrosion or other damage on it, it is also recommended to check that the pin has not moved. Normally, a pin is placed inside the valve and stops the float arm. If this is the problem, it is often replaced with large diameter copper wire.
- If there is no damage to the stud, it is advisable to check the hole where this element goes. Sometimes water leaks from the tank into the toilet when the hole is deformed. In this case, a new valve mechanism is installed.
- Check the gasket. To do this, it should be gently but firmly pressed against the valve. If the toilet no longer leaks, it is necessary to adjust its pressure. If this is not possible, it will need to be replaced.
The above steps in 80% of cases will help determine the cause of the malfunction and eliminate it. However, if they did not help, then you will need to look for damage in other system components.
Leaks at the junction of the tank and toilet
The reason that water is leaking from under the toilet may be damage to the bolts that secure the tank to the toilet. A similar malfunction can occur with fasteners made of any material: both plastic and metal. What to do if the toilet tank is leaking due to bolted connections?
It is necessary to carry out a careful visual inspection of all components, which will require a complete disassembly of the drain tank (since in some cases the breakdown is not visible until the tank is assembled).
There is a possibility that only one part is damaged, so only that one will need to be replaced. However, in most cases, several elements will need to be replaced; it is advisable to purchase a full set of plumbing spare parts.
Parsing steps:
- Make sure that the water riser is closed.
- Drain all liquid from the tank.
- Remove the flexible wiring through which water enters the tank.
- Unscrew the fasteners. Sometimes, after prolonged use, the surface of the bolts rusts; this corrosive layer can be removed using a hacksaw.
- Move the tank aside.
- The shelf located on the cuff is removed.
- It is necessary to drain the remaining liquid.
- Any traces of corrosion found must be removed.
Assembly is carried out in reverse order. Rubber gaskets are changed, new fasteners are installed. It is important to avoid distortions during the fastening of bolts. You also need to remember that when tightening it is necessary to apply little force, because... too much pressure can damage the earthenware.
Leak due to defective hoses
The pipe that connects the water supply and the tank is quite durable. The weak point is the area where the flexible hose connects to the float system. A clear sign of a breakdown is that the plumbing is leaking at the place where the hose is attached.
Quite often, the cause of such a malfunction is a weak connection of fasteners. This is not difficult to fix: you just need to securely fasten the nuts and tighten the fasteners. In some cases, it is also necessary to replace the gasket if it has lost its elasticity and ceased to perform its functions.
However, it should be noted that if there are components made of plastic, tightening the fasteners must be done with the utmost care. Inaccurate movement or too much force will cause damage. Also in this case it is better not to use metal tools, because... this may contribute to thread failure.
If the toilet bowl leaks, it will need to be replaced. A corrugated pipe is inexpensive, so if a resident of the house discovers that it is leaking, it needs to be replaced as quickly as possible.
Leaks due to rubber bulb
Deformation of the bulb is a fairly common reason for water leaking from the tank into the toilet. This happens especially often after many years of use, during which the rubber has lost its elasticity.
The solution to this problem is quite simple; it is considered the least resource-intensive of all recovery methods.
What to do if the toilet tank is leaking due to a broken bulb? Repairing an old broken part is not recommended. It is best to buy a new one from a plumbing supply store.
When purchasing, it is recommended to choose the softest and most elastic pear, then this element will be able to function without problems for a long period.
The component is attached using threads. To remove the element from the tank, you need to turn it clockwise. During installation, the bulb is secured when turned in the other direction.
If for some reason it is not possible to purchase a new spare part, it can be temporarily replaced with a small weight (you can use a heavy nut) that hangs on the rod.
Plumbing leaks due to misaligned float
A misalignment of the float lever can cause a malfunction. This can happen due to external influences or prolonged use of plumbing fixtures. What to do if the toilet is leaking due to misalignment?
The first thing you should check is the float. If there is no visible damage, it will need to be replaced. It is recommended to save on this part and purchase a higher quality one, this will avoid the occurrence of leaks in the future.
If a visual inspection reveals a small hole in a component, it can be eliminated in the following ways:
- seal with polyethylene;
- use a lighter to heat a small piece of plastic and seal the hole tightly with the molten material.
However, it should be noted that such methods are only a temporary solution to the problem. Ultimately, you will still need to purchase a new component.
Leaking due to siphon
The siphon membrane prevents water from leaking even when there is no drain. Over time, this component of the system wears out and must be replaced.
To do this, it is recommended to buy a new part that ideally matches the size and shape of the plumbing model. If you select it incorrectly, the deficiency will not be eliminated.
Algorithm for eliminating the problem:
- Instead of a tank lid, a crossbar connected to a float is installed.
- The water is washed off.
- The nut is unscrewed, through which the pipe is connected to the tank.
- The siphon nut is slightly unscrewed.
- The siphon is removed.
- Then the non-functioning membrane is removed and a new one is installed.
- Install the system in the reverse order.
Violations of the tightness of joints
If the seal breaks, the result is depressurization of the connections. What to do if the toilet is leaking for this reason? You will need to place a new gasket between the toilet bowl and the tank. Let's look at the steps:
- Remove any remaining liquid using a soft sponge.
- The drain nut located under the valve is slightly unscrewed.
- All fastening elements of the tank are removed and it is dismantled.
- The locknut holding the drain is removed, then it is removed.
- A new rubber gasket is installed. This element prevents plumbing from leaking, so it must be selected carefully. When selecting, it is recommended to know the appropriate dimensions and shape. If you select the wrong part (too large or small), the plumbing fixture will continue to leak.
- The drain is secured with locknuts.
- The tank is returned to its place and secured with screws.
Shut-off valve problem
If water is constantly flowing in the toilet, there is a high probability of failure of the valve mechanism. There is no need to waste effort on disassembling and repairing it, because... in most cases these actions do not bring the expected results. The best solution would be to replace the drain assembly or the entire tank.
Instructions:
- Wash off all liquid.
- Remove the top cover and remove any remaining moisture.
- Remove the mounting screws.
- Remove the tank.
- Remove the seal.
- Unscrew the locknuts securing the drain assembly.
- Remove the previous mechanism.
- Install a new valve.
- Fix the drain in reverse order, install the gasket and install the toilet tank.
It is advisable to buy a mechanism of the same brand as the drain tank. It is best if it is exactly the same model as the one that was in the plumbing before it started leaking. It is worth noting that when installing a new system, it is necessary to use new nuts and install a seal.
Leaking due to cracks
Sometimes plumbing fixtures may develop cracks and other physical damage. You can fix this problem yourself at home. The procedure requires only standard tools and sealant intended for plumbing.
Instructions:
- Drain all liquid.
- Carefully remove the tank.
- Dry it from the inside, removing residual moisture.
- Cover all cracks with sealant.
- Place the tank in place.
If the toilet is leaking from below and a crack is found in the bowl itself, it can also be sealed with plumbing sealants. However, such a solution to the problem cannot be long-term; it will certainly be necessary to replace the damaged structural element.
The first signs of a toilet breakdown
Before performing an inspection, you must completely empty the cistern and turn off the water supply.
You can repair the toilet yourself only after correctly determining the cause of its failure.
It is necessary to pay attention to the first signs of breakdown in a timely manner, which will prevent the occurrence of emergency situations.
Some of the most common toilet problems include:
- cracks and chips of the bowl;
- the appearance of loud noise during operation of the device;
- supply hose ruptures;
- release button failure;
- leakage of the tank through the fixing elements;
- continuous drainage of water.
Tank drain device
The main task of the flush cistern is the correct operation of the water supply system
. Before talking about repairing the toilet, it is necessary to consider the diagram of its internal structure. The design of the toilet cistern is represented by two main components in the form of a mechanism for supplying water, as well as a standard flushing device.
The product can be of two types: top or side. The first option is more common today, extremely convenient to use and easy to carry out independent repairs.
A few words about the design of the tank fittings
Before I tell you why a toilet tank may leak, I will introduce you to the design of the fittings so that you understand the principle of its operation.
Of course, there are currently a great many options for mechanisms.
However, the principle of operation of the tank always remains the same, since any fittings include three main elements:
- shut-off mechanism - is a tap that automatically shuts off the water as it enters the tank. The float is responsible for the water level at which the shut-off valve is activated;
Tank fitting options
- discharge system - is a valve that closes the drain hole. The valve is controlled by a button or lever;
- overflow system - prevents flooding of the apartment in case of failure of the locking mechanism. If the water in the tank rises above a certain level, the overflow system ensures that it is drained into the toilet.
Necessary tools for toilet repair
To repair the flush device, a standard set of working tools is suitable.
To repair the toilet flush device with your own hands, you need to purchase new parts that will be installed to replace the failed elements.
For plumbing work you should also prepare:
- hacksaw for metal;
- sharp knife;
- pliers;
- adjustable wrenches and wrenches;
- strong and flexible wire;
- Screwdriver Set;
- film;
- building level.
If the toilet tank with the button starts to leak
In such a case, you should first check the status of the switch. If a malfunction occurs in the return spring mechanism, the drain button may remain in the tank, which will lead to a permanent open position of the lid.
How to fix a leaking toilet tank with a button:
- Remove the top panel.
- Remove the switch that is stuck.
- Replace the return spring.
- Center the seating point, which is located directly under the hole in the cover.
- Reassemble the system in reverse order.
Poor flow of water into the tank
Why doesn't water fill the toilet tank? The cause of this breakdown is most often mechanical particles that come from the cold water system. Larger particles become clogged at the entrance to the flexible hose, through which the toilet tank is connected to the water supply.
Smaller ones stop in the filter, which is installed at the inlet of the filling fittings, or in the filling fittings valve itself. Do not rule out the possibility that the pipeline itself supplying water to the toilet may be clogged.
Turn off the water supply to the toilet and unscrew the flexible connection (don't forget to drain the water if you have a bottom connection to the flush tank). You will notice large mechanical particles with the naked eye. Clean the liner from foreign objects (if there are any). Make sure to remove the “plug” by blowing into the tube.
If everything is fine with the flexible liner, we move on. Inspect the pipe directly at the entrance to the tank. Almost all modern models have a filter. Take it out by simply pulling the special tab. Clean the filter from accumulated dirt.
If your model of filling valve does not have a filter (or you simply forgot to install it), you need to directly inspect the valve of the valve, which is located in the tank itself.
Remove the toilet cistern lid. Unscrew the valve. In cases with a side connection, it is possible to disassemble the valve without completely removing the filling fittings. Rinse and blow out the membrane. Reassemble the valve.
The filling valve is a very delicate mechanism; there are often cases when, after cleaning, it lets water through, but stops shutting it off after filling. In such a situation, it is necessary to replace the filling fittings.
To prevent breakdowns of this kind, a 600 micron coarse filter (mud filter) must be installed on the pipeline supplying water to the apartment. For finer cleaning from mechanical impurities, you can additionally install a filter up to 100-150 microns.
Preventive measures
To prevent a situation where a toilet tank leaks with or without a button, you should regularly carry out certain preventive procedures, as well as follow the operating rules.
Prevention may include the following:
- minimize the likelihood of mechanical deformation of the toilet;
- minimize sudden temperature changes;
- clean the toilet bowl and cistern every six months;
- regularly check the condition of plumbing components, fittings and other parts so that they cannot leak;
- avoid condensation.
Thus, if the plumbing is leaking, you can simply carry out the repair yourself, without turning to a master plumber. First of all, you need to determine what is the reason that the tank is leaking.
It is important to remember that timely preventive procedures will increase the service life of plumbing and sewerage systems in general. If a malfunction is detected, it is recommended to fix minor problems first and then proceed to major damage.
Flush tank device
Most often, the cause of water leaking from the toilet lies on the surface, and fixing it does not require special skills. Before you take up the tool, it is important to understand the structure of the toilet and identify its most problematic parts.
The main component of the toilet is a bowl made of metal, acrylic or sanitary ceramics. It is a non-wearing part and may be damaged if subjected to heavy impact loads. In most cases, the cause of water leakage is a malfunction of the tank or a leak in the joint between the bowl and the sewer.
Main parts of the cistern:
- frame,
- rubber bulb (drain valve),
- float that regulates the water level,
- water supply valve,
- traction system,
- overflow protection.
If you turn on the drain (turn the lever or press the button), the bulb will rise and water will flow into the hole. As the tank empties, the float will lower, the water supply valve will open and the tank will begin filling. Having risen, the float will activate the valve, which will shut off the flow.
Interesting! The design of the toilet has not undergone significant changes over the past decades, only the materials used and design have changed. Having understood the principle of operation of a simple tank, it is easy to repair a device of any level of complexity from standard “compact” systems to designer installations.
Seal damage
Another reason why water runs in the toilet is a faulty or worn seal. Typically such parts are made of rubber or polymers. These materials wear out the fastest, so this element is considered the least reliable part of the drain mechanism.
The O-ring is usually located right at the water exit point. In addition to its direct sealing function, this ring also works as a filter that filters out various impurities contained in the water. Of course, the smallest particles in this case act as an abrasive, gradually wearing out the material of the part. As a result, you have to figure out how to fix the leak in the toilet tank.
A contaminated part can simply be cleaned using the following algorithm:
- First you need to remove the drain mechanism;
- Then the cleaning solution is prepared;
- The valve elements are cleaned with a solution;
- The parts are installed in their places.
If the part was damaged, which was discovered during inspection or during the cleaning process, then the easiest way would be to replace it. Replacement should be made regardless of the nature of the damage to the seal, be it deformation, ruptures or cracks. And, of course, you cannot return the damaged part to its place - after this, water leaks from the tank into the toilet with the same intensity in the very near future.
Repairing leaks
Depending on the identified cause of the toilet leak after flushing, they begin to eliminate the problem in an appropriate way.
Troubleshooting pear and petal problems
Most often, after lifting the lid, a weak fit of the pear is discovered due to the loss of elasticity of its walls. The problem is eliminated by replacing the deformed pear with a new one.
Seat corrosion causes partial seating. In this case, the part is removed, all the screws and fastening elements of the lever are tightened, the corrosion is removed with sandpaper, and it is installed in place.
It is recommended to inspect the petal as well. Plaque appears on it from prolonged use. The petal and seat are cleaned.
Adjusting the float position
An incorrect position of the float will be noticed immediately after removing the reservoir cap. If, regardless of the water level in the container, the position of the float does not change, then its position must be adjusted. The rubber seals are immediately inspected. If you correctly set the float to the required height, leakage problems will be eliminated.
Adjusting the ball valve (liquid flows through the overflow)
When liquid is poured out through the overflow, the conclusion suggests itself after inspecting the container of the tank that the correct operation of the ball valve is impaired. Its operation is adjusted by bending the float lever. Any liquid that has got inside the float must be poured out and the part must be put back in its place. The deformed part must be replaced.
The design of the ball valve has a rubber gasket, which can also cause failure. It wouldn't be a bad idea to check it out.
If the reason is in the ball valve itself, then no matter what model it is, it is recommended to make the float position lower. Adjustment is made with a plastic pin. Sometimes cleaning the faucet helps fix the problem. Or the last option: the part is replaced with a new one.
Problem between the cistern and the toilet platform
Where the tank is installed, water leaks onto the toilet platform in 2 cases:
- if the connection bolts have become loose or the gasket under the nut has become unusable. Water is drained from the tank. The water supply is cut off. Bolts and nuts are inspected for integrity and absence of rust. The degree of wear of the gasket is assessed. You may need a new set of fasteners to install it. Rubber gaskets are lubricated with sealant to enhance the tightness of the connections;
- when the gasket, which is responsible for sealing the joint between the tank and the toilet platform, has worn out, and the protection of earthenware parts from abrasion has decreased. The liquid flows into the gap that appears, which was formed when one of the contact parts shifted or as a result of abrasion of the gasket. The entire gasket is lubricated with sealant to enhance the adhesion of the tank to the toilet shelf. The connecting bolts should not be tightened too much. This leads to deformation of the elastic band. Its service life is reduced.
Leaks at the connection between the hose and the ball valve
Fixing the problem is very simple. The first step is to tighten the nut on the hose. The second step is to check the gasket. You need to disconnect the hose and the gasket will be in front of your eyes. A gasket that has lost its strength will cause a leak. The situation can only be changed by replacing it with a new rubber band. The hose is installed in its place.
Whatever actions are performed, there is no need to apply force. The toilet structure is fragile. At the joints, the gaskets are lubricated with sealants.
Fixing a leak after draining is not difficult if you know the cause of the breakdown.
The toilet bowl is leaking - what to do?
A few words about what to do if the toilet bowl . Often the problem is that there is no rubber O-ring in the pipe.
Once it is installed, the leak stops.
If everything is in order with the seal, the cause of the leakage is in the corrugation itself.
It needs to be replaced with a new one.
Important! There is one more secret. The corrugation is designed for use with plastic pipes. Cast iron can cause problems.
To install a toilet in a cast iron pipe without leaking, you need to purchase an additional adapter sleeve. When installing, use silicone sealant. Then there will be no permanent puddles on the bathroom floor.
Condensation on the drain tank
If none of the above problems apply to you, then perhaps it is not the plumbing that is leaking, but condensation that has formed on it. This often happens - droplets of moisture can often be found on the toilet, especially in the summer. Of course, condensation on the toilet will not flood your neighbors, but their ceiling will most likely become damp.
You may be interested in information on how to repair a toilet cistern
Condensation can form because the water and air in the room have different temperatures or because the drain tank has failed.
Sometimes condensation appears immediately after installing the toilet and this is eloquent evidence of the low quality of the product. So let's look at a few examples that can help you understand the cause of the problem.
- It happens that the water does not drain from the tank for two to three hours, which is why it heats up to the air temperature. In this case, the condensation disappears, but provided that the tank is working normally.
- Sometimes the hood is to blame, but then there must be condensation on the pipeline. Examine it.
If there is condensation on the pipes, then the problem is most likely in the hood
The condensation problem can be solved in one of the following ways:
- reduce the frequency of draining the tank;
- reduce humidity in the house;
- raise the temperature of the water entering the cistern.
- change the tank itself, but only if you are firmly convinced that it is faulty.
What to do if the pipe behind the toilet is leaking
The last reason why toilet problems occur is due to the drain pipe. How to seal a drain pipe in a toilet if it is an old cast iron outlet and ordinary corrugations do not fit it?
The sewer pipe in the toilet often leaks when the toilet is installed on cement mortar. This installation method is especially common in old apartments without renovation. The method is quite simple and reliable, but over time the pipe in the toilet leaks. Gradually, the putty cracks and crumbles, resulting in leaks. The remaining solution is washed down the drain, and the leak gradually intensifies.
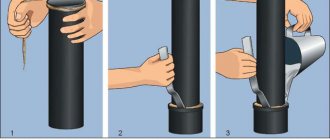
If the sewer pipe in the toilet is leaking, how to cover it up and how to do it correctly in our instructions:
- take a narrow chisel or flat screwdriver, as well as a small hammer;
- break up the remaining putty;
- do not hit too hard so as not to split the toilet outlet;
- clean out dirt, dust, debris;
- fill the void.
To seal the toilet, you can use a 1:1 solution of sand and cement diluted with water, but this is not very convenient. It is better to use silicone sealant, which is sold in every hardware store.
Consultants in the store can tell you which sealant is best to use to seal the toilet if the toilet is leaking from below. Experienced plumbers recommend using a special sanitary sealant - it has good adhesion to sanitary ware.
Video: IS THE TOILET LEAKING? SOLUTION IN 2 MINUTES!
Preparation for repair
Before you can repair the toilet cistern, you need to open it. It is only accessible from the top if you remove the cover. In many modifications it is attached using a ring around the button. This ring must be pressed and turned counterclockwise. After prolonged use, the ring may not turn. Then a few drops of oil are applied to the attachment point. After the ring has turned, unscrew it, and then release the button from the plastic clothespins and remove the cover.
USEFUL INFORMATION: Hood for toilet and bathroom: design and installation
Models are equipped with one or two buttons. In the second case, one of them is intended for a small flush, and the other for a large one. To dismantle the cover, press one button and remove both of them one by one through the technological groove. Then unscrew the fastening screw and remove the cover.
Float mechanism failure
Problems with the float can even be noticed visually - just look under the cover. Most often, the problem manifests itself in the fact that the float does not reach its original level, but is always at the same height. As a result, the following situation arises - the float simply does not respond to changes in the volume of water in the tank, which is why the overflow system is triggered, and excess water flows from the tank into the toilet. The root of this malfunction is usually the loss of tightness of the float.
Another common reason that the toilet is leaking from below is a broken float mechanism. The solution to this problem is to replace the float. To do this, you need to remove the old part, come to the store and choose a model with similar characteristics. Usually, after replacing the float, the leak stops, but it is still worth carefully observing the operation of the system for at least a couple of days.
Preventing toilet leaks
In order not to encounter problems when using the toilet, it is worth taking a number of preventive measures:
- The most important operation is cleaning the inner surface of the tank and all its elements. Without this, the tank will become dirty very quickly due to sediments and tiny particles in the water. It is not surprising that the toilet tank leaks after flushing if there is no maintenance.
- To minimize the amount of dirt entering the drainage system, it is worth equipping the water supply with filters. They are installed directly at the cold water supply at the outlet of the main line.
- It is advisable to periodically check the condition of all structural elements of the tank - seals, fasteners, functional parts, etc. The presence of moisture at the contact points of the parts indicates a lack of tightness, and in this case it is recommended to slightly tighten the fastening nuts or change the seal.
Performing these simple operations will allow you not to wonder why water is constantly running in the toilet - the system will work correctly and flawlessly.