How to install a toilet with your own hands? How much installation space is required? How to connect a toilet to the sewer without the help of a plumber? Read on for more information on this and other issues.
- Installing a toilet: features and nuances
- Design options for modern models
- Norms
- Distance between toilet and sink
- At what distance from the water supply should it be installed?
- Minimum distance to wall
- The closer to the wall, the better?
- Distance from the riser: how far can you place it?
- How to install a toilet: general rules and recommendations
- What you need: tools and materials
- Assembling a new toilet with your own hands
- Sequence of assembly of the structure
- Sewerage
- Water pipes
- How much space do you need?
- Minimum dimensions
- Toilet height from floor
- Average sizes of models
- Compact
- Standard
- Non-standard models
- How to connect to the sewer
- Connection diagram
- With straight release instead of oblique
- Using an adapter
- With oblique release
- Types of connection
- Fan pipe or plastic pipe
- Eccentric
- Corrugation
- How to connect to a water supply
- Flexible and rigid water connection
- Bottom and side water supply
- Installation
- Floor mounting options
- Wall mounting options
- Features of installation work
- How to connect to a plastic pipe
- In the old drain in the apartment
- Installation technology for compact models
- How to properly install a toilet with a hidden cistern
- How to install a toilet with a high cistern
- How to connect a wall-hung toilet
- Without corrugation
- Installation of a monoblock toilet
- Useful video
Design options for modern models
Depending on the type of construction, toilets differ in the shape of the bowl, which can be:
- visor (a drain shifted forward from the tank and a flat or concave rear wall);
- disc-shaped (a drain shifted forward and a rear wall made in the form of a horizontal protrusion);
- funnel-shaped (the drain hole is located in the middle of the bowl).
In terms of functionality, the last option is the most effective, since during use, unpleasant odors disappear quickly, and the surface of the toilet bowl is practically not dirty. But this type of design also has a disadvantage - due to the strong splashing of water, the level of convenience and practicality is reduced to a minimum.
Also, the design features of toilets include the type of flush. This parameter determines how effectively sanitary fixtures will be cleaned during flushing without physical intervention from the user. Flushes are classified into:
- horizontal (cascade);
- circular straight lines;
- circular twisted.
Of the listed options, direct is the most suitable for cleaning morocco ceramics or stone.
Norms
In accordance with the ergonomic features of toilets, a set of rules is provided on the basis of which installation is carried out. Quite often, installation is carried out not in a separate room reserved for a bathroom, but in a shared bathroom with a shower and sink. If you do not take into account the installation rules, you may encounter plumbing problems.
Distance between toilet and sink
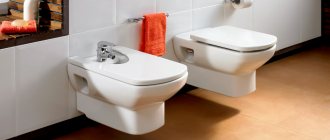
The toilet should be located at a distance of 20 centimeters from the sink and further. When installing complex plumbing fixtures, it is necessary to take into account that the shower stall and bathtub are located at a similar distance. If paired sinks are installed, there should be at least 40 centimeters between them. The bidet, on the contrary, is located next to the toilet - the optimal distance is up to 30 centimeters.
At what distance from the water supply should it be installed?
This parameter is determined depending on the type of toilet supply. With the standard installation method, it should be located at a distance of 18 centimeters from the water supply. This parameter takes into account the distance from the pipe axis to the finished floor level.
Minimum distance to wall
In accordance with current SNiP standards, depending on the position of the toilet, the distance to the walls is determined:
- from 53 to 76 centimeters - to the frontal, located in front;
- at least 40-45 centimeters - to the sides.
The specified standards are relevant for a separate room. It is recommended to install it near a wall, both in a separate room and in a shared bathroom.
The closer to the wall, the better?
Some users are of the opinion that the closer the toilet is placed to the wall, the more convenience and comfort it will provide. But professional plumbers do not recommend using this method, as it will complicate access to communications in the future. For convenience and practicality in servicing the toilet, it is recommended to install it so that the flush tank is located at a distance of 5-10 centimeters from the wall.
Assemble the tank fittings
YouTube channel “The Good-Natured Plumber”
Unpack the toilet and carefully read the instructions. Lay out all the parts on cardboard from the box to avoid scratching the tiles on the floor. Place conical gaskets onto the threads of the drain and fill valves with the narrow part towards the holes.
YouTube channel Cersanit
Place the valves in place and tighten the plastic nuts by hand, and then another quarter turn using a wrench. Make sure that the drain valve does not touch the walls of the tank (otherwise the float will become stuck and will not shut off the water when filling). To do this, check its movement by hand or turn the tank over.
How to install a toilet: general rules and recommendations
Before installation work begins, the old toilet is dismantled. Depending on the fastening method, the screws are unscrewed or the cement is broken. Some devices are additionally equipped with a wooden backing, which must also be removed. Only after preparing the place for the new toilet can you proceed directly to installation work.
What you need: tools and materials
Installation of a new toilet is carried out using:
- hammer drill or impact drill;
- adjustable wrench;
- metal drills 8 or 10 millimeters depending on the type of fastening;
- hammer;
- drill for tiles (if they cover the floor in the toilet);
- wrenches;
- silicate sealant;
- minium;
- resin strand.
Additionally you will need:
- marker or pencil;
- masking tape;
- rubber cuff measuring 123x100 millimeters (if installed on a cast iron socket);
- flexible water supply (if the old one is in a worn-out condition);
- cuff (straight, flexible or eccentric type).
Assembling a new toilet with your own hands
Installation is recommended only if you have experience in plumbing or construction. When installing a toilet yourself, you must consider the following recommendations:
- eccentric cuff (corrugation for a bathroom and a flexible hose) – a mandatory element for changing the height of the floor during the installation process;
- the problem of uneven coating can be eliminated if you install the plumbing fixture on sealant (when using wooden or plastic wedges, it is poured under them);
- a rectangular elbow or flexible corrugated cuff will simplify the connection if the hole for the sewer drain is located in the floor and not the wall.
When arranging a toilet in non-standard conditions (uneven floors, leaking pipes, cracks in the walls), you cannot do without the help of a specialist.
Sequence of assembly of the structure
The new toilet is assembled and installed according to the following scheme:
- the water supply is shut off and the flexible connection is disconnected;
- An eccentric cuff is temporarily placed at the toilet installation site;
- using a marker or pencil, markings are made for fastening;
- dowels are inserted into the drilled holes;
- in accordance with the instructions, which are necessarily included with the purchase, the fittings of the drain tank are installed (it should not come into contact with its walls);
- the gasket is secured with sealant so that it does not move during installation;
- A lid is installed on the tank, after which the liner is attached to the toilet and a test flush is carried out.
Sewerage
To connect the toilet to the sewer, plastic pipes or drain pipes are used. First you need to make sure the toilet bowl outlet and the socket have the same diameter. If this is not the case, an eccentric collar is used. A corrugated pipe is the optimal way to connect a toilet to a sewer system. The release is treated with red lead and resin strands, after which a sealant is applied to the edges. Before it dries, a pipe is attached to it. After 20 minutes, the sealant will harden, and for a complete connection all that remains is to tighten the fasteners.
Water pipes
The procedure is carried out by attaching a flexible hose to the drain tank.
After this, water is supplied through the shut-off valve, and the connection point is inspected for leaks. If it is missing, all connection areas are treated with sealant. With its help, the attachment of the toilet base to the floor is further strengthened. If a plumbing fixture moves, a leak may form.
Remove the old toilet
If you are installing a new toilet and not replacing it, move on to the next point.
YouTube channel “On Da4e”
Turn off the tap at the entrance to the tank or (if there is none) the tap at the entrance to the apartment. Remove the flexible line and then press the drain button. Fill a bucket of water and quickly pour it into the toilet to flush any remaining waste inside the siphon down the drain. Use a sponge to remove water from the bowl.
YouTube channel Nytro Piter
Unscrew the toilet mounting screws that secure it to the floor. Using a sharp knife, trim the caulk around the base of the bowl. Remove the corrugation from the siphon outlet and move the toilet. Cover the sewer pipe with a bag or rag so that the smell does not penetrate the room.
YouTube channel “Good-natured Plumber”
If the plumbing is very old, the dismantling process will be more difficult. First, unscrew the mounting bolts, spraying them with WD‑40 if necessary. Then, using a screwdriver, crumble the cement caulking around the perimeter of the cast-iron sewer pipe, having previously heated it with a torch or a hair dryer, and remove the toilet.
Sometimes it's easier to split ancient plumbing fixtures with a hammer or hammer drill, and then remove the fragments from the sewer pipe. If you decide to take drastic measures, do not forget to wear safety glasses.
Use a hammer to knock out the wooden stand and remove all debris. Using repair compound or tile adhesive, fill the resulting depression and wait 6-12 hours until it hardens completely.
How much space do you need?
There are no recommended minimum and maximum standards for arranging a bathroom. The optimal area of the room depends on the size of the toilet. Considering that it is almost impossible to change the dimensions of the bathroom, not every model of plumbing fixture is suitable for installation in a toilet.
Minimum dimensions
When choosing a toilet for your bathroom, you need to consider the following recommendations:
- the distance from the plumbing fixture to the walls should not be less than 35 centimeters in each direction;
- any object located in the toilet should be at a distance of 30-35 centimeters from the toilet;
- If there is a shower or bathtub, additional free space for movement must be provided.
Toilet height from floor
The toilet should be positioned at such a height that your feet rest on the floor at a normal angle during use.
A wooden backing is used for adjustment. In accordance with the purpose and design features, the standard height of the toilet from the floor is:
- with a solid cast shelf - 34 centimeters;
- without a solid cast shelf - 36 centimeters;
- for children – 21-29 centimeters.
Connection diagram
The connection type is classified by design and can be:
- vertical;
- horizontal;
- oblique
With straight release instead of oblique
Vertical (direct) outlet is typical for toilets made in Europe or America, so models with a similar design are rare on the domestic market. Plumbing fixtures with this type of outlet are used when arranging bathrooms in new buildings. The sewer pipeline is located directly under the toilet, which ensures maximum space savings.
Using an adapter
The adapter is used if the toilet outlet and sewer pipe have different diameters. Since it is impossible to connect them directly, an adapter is used, presented in the form of a flexible segment, which is attached to the edges of the elements using sealant. This method is relevant for private or old houses that are not equipped with standard plumbing.
With oblique release
Slanting release is less common among toilets.
Its advantage is to minimize the risk of pipeline clogging.
An oblique release involves the use of additional elbows that can be directed and attached to the pipeline at the required angle.
Types of connection
Connecting the toilet to the sewer can be direct or using connecting parts if the use of pipes is difficult. Fastening is done using:
- corrugated cuffs;
- eccentric elements;
- plastic corners and bends;
- fan pipes.
The connection type is selected depending on the conditions.
Fan pipe or plastic pipe
The drain pipe is used to neutralize the risk of water seal failure. It is installed if the riser has weak throughput functions.
Eccentric
Eccentric elements have bends with different diameters and directions.
These parts are not flexible, but are used to connect pipes whose direction does not coincide. To select an eccentric, measurements are taken first, after which a suitable model is purchased. The maximum length of the device is 10-12 centimeters, so it is not suitable for connecting pipes over a long distance.
Corrugation
Corrugation, like an eccentric, is used if the direction of the pipes does not coincide. It is presented in the form of a flexible plastic element that can be bent at any angle. The main disadvantage of corrugation is its limited length (10-15 cm), due to which it is impossible to install it with a small distance between the outlet and the sewer pipe.
We attach the tank to the toilet
Next, our assembled structure needs to be secured to the toilet. This is not difficult to do. But again there are nuances. We have a large connecting gasket between the tank and the bottom of the toilet, it is attached here.
One side has double tape, the other is regular. So, the adhesive side is attached to the bottom of the tank. And the usual one should be turned towards the tank.
I also recommend using sealant again before fastening. To begin with, coat the bottom part on the sides and glue the gasket.
Next, you need to apply a little sealant to the top and after that attach the tank. This is done in order to 100% avoid leaks in this place. From experience I will say that half of all toilets leak in this place, so the tightness here must be high!
After this, we place the tank on this gasket; the fastening bolts located on the sides should fall into the mounting points. Like this.
After this, we screw the tank to the bottom of the toilet with special plastic nuts. Here we twist - as long as the hand can twist, there is no need for more. The entire tank and lower part are secured.
How to connect to a water supply
Connecting a toilet to a water supply system is classified according to the type of water connection and the design of the supply line.
Flexible and rigid water connection
Flexible hoses are used when connecting tanks installed on the toilet. Due to this, it is possible to provide water intake from almost any angle. Rigid liners are used when installing hanging drain tanks.
Bottom and side water supply
The lower connection ensures silent operation of the water supply system. Since the pipe passes from the bottom of the tank, it is necessary to ensure that the connection is tight due to the increased load. The side connection is simpler and more reliable, but does not eliminate noise during the water intake process. If the inlet hose is lengthened, this problem will be reduced.
Basic moments
As a rule, the toilet is installed on a solid concrete or tile base. Fasten using dowels, special screws, bolts or glue. Often, a rubber or silicone gasket is placed between the base and the compact itself. More precise fastening methods and a diagram for assembling the toilet are described in the manufacturer's instructions, which come with the compact.
You must strictly follow these recommendations and remember that the product warranty will be void in the following cases:
Instructions for connecting the tank to the toilet.
- if you cause damage when assembling plumbing, improper installation, design changes and other alterations;
- in case of other mechanical damage during transportation or operation;
- due to improper care, when using dirty water with mechanical impurities;
- when using aggressive chemicals to clean the compact.
Necessary materials:
- Toilet with a set of fasteners, gaskets and fittings.
- FUM tape.
- Braided hose for cold water.
- Rigid sewer outlet with a diameter of 100 mm.
- Tap.
- Coarse filter if necessary.
- Tile adhesive.
- If necessary, sealant or silicone.
Required tool:
- Pipe wrench.
- Set of wrenches.
- Hammer.
- Drill.
- Screwdriver.
- Putty knife.
Installation
Installation of a new toilet is carried out after:
- preparing the necessary tools and materials;
- dismantling old plumbing fixtures;
- choosing a model and type of fastening.
To do this, a plan of proposed actions in the bathroom area is drawn up in advance.
Floor mounting options
The toilet is attached to the floor using:
- pedestal (tile) mounted on 2-4 dowels;
- anchors inserted into the floor during screeding and pouring;
- wooden base;
- special corners in the floor;
- glue.
In the latter case, an epoxy composition having a thickness of at least 4 millimeters is required.
Wall mounting options
Fastening to the wall is carried out only if the surface is load-bearing. A special metal frame is used for this. Anchors are first inserted into the wall and filled with cement. After they harden, you can hang the cistern.
Features of installation work
Installation work is carried out only after preparing the necessary equipment, but involves several stages.
How to connect to a plastic pipe
When connecting a toilet bowl to a plastic pipe, it is recommended to use a corrugated cuff. It will reduce the load on structural elements, since it can be bent at any angle. In the absence of corrugation, the use of plastic elbows of a suitable type is allowed. Using a sealant will prevent leaks.
In the old drain in the apartment
The old drain is pre-cleaned, after which special pipes are connected to it. Direct connection is only possible if the pipe diameter matches the toilet outlet. But even in this case, it is difficult to ensure tightness without a fixed plastic outlet.
Installation technology for compact models
Compact models are faster to install because they do not require separate installation of the drain tank on the wall. It is initially built into the toilet or screwed with fasteners that come with the kit. After this, the structure is installed on the floor, connected to the sewerage system, water supply system and started up.
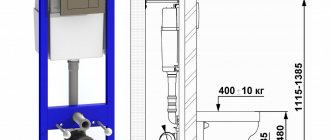
How to properly install a toilet with a hidden cistern
This type of toilet is equipped with a non-standard flat cistern designed specifically for wall mounting.
For this, a niche with a depth of 10 centimeters is prepared in advance. A drain tank is placed in it and secured with dowels or screws. A water supply hose and a drain pipe are connected to it. Then a box-shaped extension is installed for the button on the latches, pressing which will provide flushing. The structure is walled up and connected to the toilet bowl using sealant.
How to install a toilet with a high cistern
Before installing the flush cistern, the toilet is mounted separately, after which markings are made on the wall. The container is placed at a height at which the drain hose will not bend much. The tank is hung on dowels secured to the wall using a hammer drill. A special adapter coupling is used to install the hose. The system is connected to the water supply and started.
How to connect a wall-hung toilet
A wall-hung toilet is mounted into the wall and does not require the installation of additional fastenings in the floor.
Models of this type are most often installed with an installation that involves hiding the cistern and components. Initially, markings are made on the wall, after which sewerage and water supply are supplied. The bowl is fixed at a height of 40-50 centimeters from the floor. The toilet is hung on strong dowels, embedded in the wall and capable of withstanding increased load. After this, communications are connected and the system starts. Typically, installing a wall-hung toilet requires the additional installation of a false wall, since it is almost impossible to hide all communications in any other way.
Without corrugation
A drain pipe is the best substitute for corrugation when connecting a toilet to a sewer. It is used if the pipes are not brought close to the system. Preliminary measurements are taken, after which a fan pipe with suitable dimensions and diameter is purchased. It is recommended to buy devices a few millimeters larger than required to ensure a margin.
Installation of a monoblock toilet
Monoblock - a toilet combined into a one-piece structure with a flush cistern.
The advantage of such models is their simple installation method and easy maintenance. Monoblock toilets are sold with fasteners. Before installation, the floor is poured with cement, since the device is heavy. Markings are made on the hardened concrete, after which holes are drilled. Then the drain fittings are installed and the drain button is secured. The system is connected to the sewer and started. If there is no leak, final fastening is performed. Installing any toilet is a complex procedure that requires careful measurements and sequence of actions. Unreliable fastenings and errors in connecting drains, sewerage and water supply will lead to negative consequences, due to which the work will have to be done again. To avoid problems, you should carefully study all the nuances in advance or seek help from professional plumbers.
Installation of a monoblock toilet
Models in the “monoblock” category are supplied to the market assembled. They do not require adjustment of the drain mechanism, since all fittings are already adjusted at the factory.
Otherwise, the installation technology for monoblock models does not differ from the installation of compact toilets. Connecting to communications and fixing the device itself is carried out in an identical way.
Important point! If the holes in the toilet bowl are made at an angle relative to the floor surface, then they must also be drilled at an angle. We also recommend reading the article on choosing monoblock toilets.