Today there are a huge number of different ovens. Some furnaces are used to heat your premises, others are used to prepare delicious food, and there are also furnaces in which they melt various metals, alloys, and also store already melted material. They are also called melting crucible furnaces. These furnaces are especially popular among large enterprises, factories, and laboratories. But you and I understand the size of melting they do there, and this does not mean that if you need to melt several kilograms of aluminum at home, you will be forced to buy expensive imported equipment. You can absolutely easily make a crucible furnace with your own hands. To do this you need three important things:
First, minimal technical skills and knowledge, although I think that if you took up this business, you have an idea of what you will have to do. Second, a certain set of materials, which I will give a little later. And third, hard work and the desire to do something with your own hands. (See also: How to make your own heat gun)
Types of crucibles
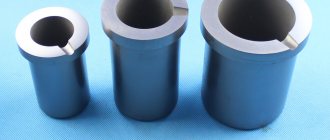
What are crucibles? Crucibles are containers made of refractory material in which metals are melted by heating to a certain temperature. The following materials are commonly used for the manufacture of crucibles: cast iron, ceramics and graphite.
Ceramic crucibles are considered the best option for the production of various alloys, especially those based on palladium, since when using these materials no changes occur in the composition of the substance itself. Only in ceramic crucibles can you confidently melt a variety of base metals and alloys based on cobalt, chromium and molybdenum.
Graphite crucibles, in turn, have higher oxidation resistance and a longer service life. This type of crucible is universal for melting any metals, but they are especially good for zinc alloys and brass, and also directly for use in induction furnaces. Graphite crucibles flawlessly cope with the melting and thermal holding of aluminum in electric furnaces at temperatures up to 800°C.
Graphite crucibles are most often used for casting gold and other precious metals.
Cast iron crucibles are not used so often in production; they have a fairly narrow specialty and have a number of disadvantages: insufficiently high melting temperature, high reactivity, ability to oxidize and interact with other elements, short service life. But on the other hand, cast iron has one significant advantage: it is cheap and accessible. That is why when installing our homemade crucible furnace we will use this particular material.
Types of equipment
Only two types of furnaces are widely used: crucible and channel. They have similar advantages and disadvantages, the differences lie only in the method of operation used:
- In a crucible type furnace it is necessary to load each portion of the charge separately. The principle of operation of the device is as follows: the metal is loaded inside the inductor, after melting it is drained and a new portion is loaded. As a rule, such a model is purchased for small workshops when work is carried out with a small amount of raw materials.
- Channel ones differ in that they allow metal melting to be carried out continuously. The design allows loading of a new portion of metal and draining of already molten metal during operation. The only disadvantage is that difficulties arise at the time of draining, since the drain channel must be filled.
The most popular type of induction furnace is the crucible type. This is due to their high performance and ease of operation. In addition, if necessary, such a design can be made independently.
Homemade versions are quite common . To create them you need:
- Generator.
- Crucible.
- Inductor.
An experienced electrician, if necessary, can make an inductor with his own hands. This structural element is represented by a winding of copper wire. The crucible can be purchased at the store, but a lamp circuit, a self-assembled battery of transistors, or a welding inverter are used as a generator.
Using a welding inverter
An induction furnace for melting metal with your own hands can be created by using a welding inverter as a generator. This option has become the most widespread, since the efforts made relate only to the manufacture of the inductor:
- Thin-walled copper tube is used as the main material. The recommended diameter is 8-10 cm.
- The tube is bent according to the desired pattern, which depends on the characteristics of the housing used.
- There should be a distance of no more than 8 mm between the turns.
- The inductor is placed in a textolite or graphite housing.
After creating the inductor and placing it in the housing, all that remains is to install the purchased crucible in its place.
Application of transistors
Such a circuit is quite complex to implement and involves the use of resistors, several diodes, transistors of various capacities, a film capacitor, copper wire with two different diameters and inductor rings. Assembly recommendations are as follows:
- When using the scheme in question, the structure will become very hot. This is why efficient cooling should be used.
- The purchased capacitors are assembled into one circuit to form a battery.
- Throttle rings are used as the basis for the inductor. A previously purchased copper tube with a diameter of about 1 mm is wound onto them. The number of turns determines how powerful the homemade stove will be. The recommended range is from 7 to 15 turns.
- A second copper tube is wound around a cylindrical object, the diameter of which should be about 2 mm. It is worth considering that the ends of this tube should be left large, since they will be used to connect to the power source.
- A 12 V battery can be used as a power source.
The created circuit is placed in a textolite or graphite case, which are dielectrics. A circuit involving the use of transistors is quite complex to implement. Therefore, you should undertake the manufacture of such a stove only if you have certain work skills.
Lamp stove
Lately, lamp-based stoves have been created less and less frequently, as they require careful handling. The circuit used is simpler compared to the case of using transistors. Assembly can be carried out in several stages:
- 4 beam lamps are used as a current generator, which are connected in parallel.
- The copper wire used must be connected in a spiral. The coils created must have a diameter of 8 to 16 cm, with a distance of at least 5 millimeters between them. It is worth considering that you will need a fairly large amount of wire, since the crucible must fit inside the turns.
- The created spiral is placed in a housing made of a material that does not conduct electric current.
- The efficiency of the circuit can be increased by additionally connecting a trimmer capacitor.
The llamas used must be protected from mechanical impact.
Crucible furnace material
Now let's start searching for materials, yes, yes, just searching, since you can find everything you need at your dacha, in the garage or barn, what yesterday was garbage and littered your yard, or some other places, now will become elements of your future homemade crucible furnace.
In order to install a crucible furnace with your own hands, you will need the following materials:
- a piece of cast iron pipe (you determine its dimensions yourself), the main thing is that the wall thickness is 4-5 mm,
- small sheet of metal (for the spout),
- piece of reinforcement
- 1 nut,
- 1 screw
If you have found or purchased all the necessary materials, we can begin installing the crucible furnace with your own hands. Usually the crucible is made in the shape of a cone or cylinder.
Making a crucible with your own hands
Making a crucible is not a labor-intensive task. To make it yourself using martel you will need:
- crushed graphite;
- whole graphite;
- graphite tube;
- fireclay martel;
- magnesite;
- felt.
https://youtube.com/watch?v=IQuBnPbZTKI
Technological sequence:
- Take thick paper. Roll it into two cylinders of different diameters. The outer cylinder is hollow and larger in diameter, while the inner cylinder is closed on both sides and smaller in size.
- Mix the martel and other ingredients in a separate container. Next, mix with liquid glass until a homogeneous mass is obtained, the consistency of which is comparable to shortbread dough.
- Part of the resulting mass is distributed on a flat and smooth surface. Then place paper cylinders on it one inside the other to obtain the shape of a crucible. The distance between the paper cylinders is the thickness of the crucible walls.
- The remaining mass is filled into the prepared form.
- After formation, the paper elements of the mold are removed and the workpiece must be dried a little at room temperature.
- The crucible is then placed in an induction furnace to remove any remaining moisture from the mixture. It should be heated at low temperatures so that the mold does not burst. The process takes considerable time.
- After drying, the crucible is fired at a temperature of no more than 600 °C.
- The quality of the crucible is checked by tapping it, like a crystal glass.
Making a crucible furnace
The easiest way to make a crucible is to simply weld it from a piece of pipe of the most suitable diameter. When choosing the trim itself, you need to consider several important factors.
First, the width of the walls should be at least half a centimeter. Second, your scrap must be made of a metal that melts at a higher temperature than the alloys you plan to melt. Cast iron is ideal for this. After this, the pipe must be cleaned, or all excess can be simply burned in the oven. Now your homemade crucible furnace is in no way inferior to any other.
To safely remove molten metal from the crucible, attach a small spout to it. To do this, grind the top a little with a grinder and go through it with a file. To make it, use a piece of metal cut at an angle.
You can also attach a handle to your homemade crucible furnace; use a nut and screw the handle into it, which will help you immerse and remove the crucible from the furnace more safely. All you need is a couple of turns of the handle, and your crucible will be held in a death grip, thus preventing accidental tipping or spilling of molten aluminum on yourself or people who may be nearby at that moment. All the safety measures mentioned above will come in very handy when melting non-ferrous metals at home. As you can now see, installing a crucible furnace with your own hands is a fairly simple task. I hope you will now never ask yourself again: how to make a crucible furnace?
How to make a crucible for melting lead with your own hands?
As children, many of us were engaged in stripping lead from old batteries in order to further melt it into rings or pendants. At that time, no one was interested in the rules of melting, and therefore tin cans, held by a “hoop” of freshly picked twigs, served as a vessel for this action.
Nowadays, many people who want to melt down any material take this more seriously. And they often have a question: how to do this so as not to spoil anything around and not leave yourself a couple of memorable burns?
From this material you will learn how to make a crucible for melting lead with your own hands. And drawings of an approximate result can be seen above.
But first, a definition.
Induction crucible furnace: advantages and disadvantages
A crucible induction furnace is a special installation for melting metals and alloys by high-frequency electromagnetic influence on them.
The most important working part of an induction-type crucible furnace is the inductor - in other words, a conductor wound without a core - inside which a melting crucible, usually shaped like a cylinder, is placed. As a rule, it is made of fire-resistant material.
If we compare crucible induction furnaces with other types of similar equipment, they have the following advantages:
- the effect on the processed material occurs directly, without any intermediate heating elements, which makes it possible to avoid unnecessary energy losses
- the ability to create atmospheres of a given type in the crucible at the required value of the pressure itself
- uniform heating of the entire volume of material, as well as high intensity of melt circulation
- the possibility of completely draining the melt, which is necessary during periodic work, thus making it easy to switch from working with one alloy to another
- ecological smelting process due to the absence of emissions of harmful combustion products into the atmosphere
- the operating features of the installation lead to the possibility of complete automation of the entire smelting process;
- ease of process management, simplicity and ease of maintenance;
The disadvantages of induction crucible furnaces include:
The slag in induction crucible furnaces is heated directly from the metal, which is why its temperature will always be lower.
Compared to others, the durability of the lining is low at very high melt temperatures, as well as the presence of sharp fluctuations in the temperature of the lining when the metal is completely drained.
But still, the advantages of induction crucible furnaces over other melting units are much higher, thanks to which they have managed to find quite wide application in a wide variety of industries.
Working principle of induction furnace
Heating of the metal placed inside the device occurs by converting electromagnetic pulses into heat energy. Electromagnetic pulses are generated by a coil of copper wire or pipe.
Diagram of an induction furnace and heating circuits
When the device is connected, an electric current begins to flow through the coil, and an electric field appears around it, changing its direction over time. The functionality of such an installation was first described by James Maxwell.
The object to be heated must be placed inside or close to the coil. The target object will be penetrated by a flow of magnetic induction, and a vortex-type magnetic field will appear inside. Thus, inductive energy will turn into thermal energy.
Classification of crucible furnaces
Depending on where the smelting process takes place, furnaces are distinguished:
- open (work outdoors)
- vacuum (work in vacuum)
- compressor (operation under excess pressure).
On organizing the time process:
- periodic action
- half continuous
- continuous action
Furnaces are also distinguished depending on the design of the melting crucible:
- with ceramic crucible
- with conductive metal crucible
- with conductive graphite crucible
- with a water-cooled metal crucible.
