Using a meat grinder, you can quickly and easily get minced meat.
Only a meat grinder can chop meat into minced meat. And although technology is now taking its toll, putting electronic appliances on the shelves of our kitchens, the good old manual meat grinder is still used to this day. Unlike an electric meat grinder, a mechanical one is driven by manual effort. I'll tell you how to assemble it correctly.
Types of meat grinders
There are two types of meat grinders - mechanical and electric.
The latest varieties provide varying degrees of grinding of meat and other products. Manual types of meat grinders in the traditional version have several attachments, which also allow you to vary the size of the resulting minced meat. Upon detailed study of the design features, it becomes clear that in principle they are similar. Having mastered the algorithm for assembling a conventional meat grinder, you can quickly understand how to install its electric counterpart.
Main details of the device
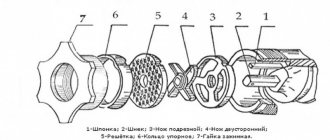
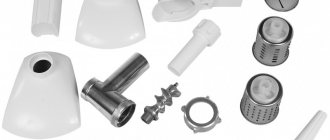
The manual version of the meat grinder has the following structural elements:
- body equipped with a clamp;
- a helical auger that helps move the product to the knives;
- tightening ring;
- pen;
- knife;
- lattice.
The body is most often made of steel, although cast iron can be found. The knife is made on one side with a convex surface. The second side is flat and has cutting edges. To ensure a secure fit, the central hole is shaped like the tip of an auger onto which the knife fits. Usually this is a square. The grille easily takes the desired position, thanks to the side slot that fits into a similar-shaped protrusion on the inside of the case.
See also: Sharpening a ceramic knife at home: myth or reality?
Correct assembly
To assemble the meat grinder, you first need to insert the auger inside the body, orienting it so that the threaded end comes out of the rear, narrower hole. A handle is put on it, which is fixed to the meat grinder with a special screw. On the other hand, a knife is installed in it. It is directed with the flat side outward, and its convex surface, accordingly, will look inside the body. The grille does not have a clearly defined orientation, so it can be placed on either side, always aligning the side cut with the protrusion.
A tightening ring is screwed on top. There is no need to apply excessive force to it and twist it very tightly. This can complicate the work process, and then it will be difficult to disassemble the meat grinder to wash it. All that remains is to securely fix the meat grinder to the edge of the table using the clamp screw.
Important point! Do not mix up the sides of the knife as this will result in the meat not being cut. Due to the rotation of the screw, it will be squeezed out through the holes of the grate for some time, and then the mechanism will simply stop, as it will be completely clogged.
Parts and their purpose
To understand how to assemble a manual meat grinder, let's figure out what parts it consists of. This is important so as not to be confused later.
So, the whole device is a metal frame (pipe, casing) and a whole set of parts of different sizes.
At the top there is a receiving tray, into which we load all the products for processing. From the tray, our semi-finished product enters a pipe where there is an auger on a shaft (for convenience, we will simply call it an auger), it delivers the meat to the knives, and it is they who grind it into minced meat. Then, through the small holes in the grid (it is held in place by a disk), the chopped minced meat falls into the bowl.
For the process to proceed, you need to manually turn the auger. We do this using a handle located at the back.
Now let's figure out how to assemble a manual meat grinder. The photo will help you with the assembly step by step. It's not difficult at all.
Nuances of assembling an electric meat grinder
Analyzing the assembly process of an electric meat grinder, it should be noted that there is no clamp on the body, which is equipped with a motor. The kit includes a funnel with a safety pusher that guides the meat into the receiving hole. The screw is fixed directly in the housing with a special nut.
The assembly of a complicated electrical model can be performed according to the following algorithm:
- an auger is placed in the housing;
- a ring with three or four slots is put on the auger;
- a double-sided knife is placed;
- a grille with medium-diameter holes is attached from the kit;
- a second knife is installed;
- then comes the grid, in which there are the smallest holes;
- the clamping ring is fixed.
The accepted orientation of the knives is maintained - their flat side is directed towards the grate.
Some assembly features after repair
If, to repair an electric meat grinder during operation, it is necessary to remove the reduction gears located in the transmission unit, then you need to know that one of them is fitted with an interference fit and will require a vice or heating of the parts to work with it. The second method is used less frequently, since there is a risk of damage to the motor rotor winding.
There can be two or more gears and each of them is mounted on its own shaft. The gearbox parts are cleaned of dirt from old grease using a rag, the gear seating areas are lubricated with Litol, and a special silicone compound is used. After this, they are installed (the power must be turned off) and rotated manually to control the functioning of the mechanism.
If the commutator motor was removed, then after the repair it is necessary to make sure that the brushes have been removed. The collector is cleaned with alcohol, the shaft bearings are lubricated with Litol.
The shaft is installed first, and then the brushes, after which the motor can be fixed to the housing.
Rules for caring for an electric meat grinder
Main parts of electric meat grinders:
- frame;
- button on the body to separate the loading part;
- loading tray;
- cutting unit, consisting of a socket for receiving products and a part where they are processed;
- auger - a screw mechanism that delivers products to the outlet;
- a pusher, which pushes the products in the socket towards the auger;
- a plastic bushing for the auger, which helps connect it to the electric motor block;
- a fixing ring in the form of a large nut that secures various attachments;
- knife;
- perforated disks - grids with holes of different sizes;
- additional nozzles.
These parts are found in all meat grinders. They are made from different materials. For example, the tray and pusher are either metal or plastic. A compartment for storing small parts can be located in the housing or a collapsible pusher.
How to assemble a meat grinder
Assemble and disassemble the meat grinder, disconnected from the power supply. Make sure the plug is removed from the socket.
Procedure:
- Place the bushing on the auger.
- Insert the auger into the housing, completely recessing the sleeve into the hole provided for this purpose.
- Insert knife. The cutting edge should face outward. Otherwise, he will not chop the meat.
- Install a grill with the desired hole size. There is a groove on it that should align with the protrusion on the body.
- Screw on the retaining ring (do not tighten it tightly). This assembled part is called the boot.
- Insert it into the meat grinder a little sideways. Press and hold the locking button on the meat grinder body. Push the assembled part towards the motor and turn it counterclockwise. Once you hear a click, release the lock button.
- Screw the locking ring all the way.
- Install the loading tray.
- Insert the plug into the socket and turn on the unit.
Do not push food with your hands or foreign objects. Use only the pusher included in the kit.
How to disassemble a meat grinder
Disassemble the electric meat grinder in the reverse order:
- Turn off the device.
- Unplug.
- Remove the loading tray.
- Press and hold the locking button, turn the loading part clockwise until it stops, and remove it. Release the button.
- Unscrew the locking ring.
- Remove the grate.
- Remove the knife.
- Remove the auger (it is not necessary to remove the bushing from it).
How to wash a meat grinder
The body is wiped with a damp cloth.
Important! Make sure that water does not get inside the mechanism.
The anti-corrosion protection of metal parts deteriorates over time, which means they will rust from excess moisture. Therefore, once you have washed them, pat them dry with a paper towel or napkin. Leave for some time until completely dry. And only then put it back in place.
Additionally, the grate and knife are lubricated with a thin layer of vegetable oil. This will protect them from oxidation.
If you need to install a nozzle
To make homemade sausage, you will need an attachment. Installing it is a little different than assembling a meat grinder with knives. Next, we’ll look at how to assemble a manual meat grinder with an attachment.
To do this, having inserted the auger into the casing, we will immediately install a special grill (it is in our photo). We won't insert knives. Then we will add a special nozzle (there may be several of them in the kit). Don't forget that there may also be a chamfer (protrusion) to hold the attachment in place. Then we screw the disk.
That's it, our meat grinder for preparing sausage is ready.
Let us add that you can make homemade sausage only if you have a specially prepared intestine (it is put on a nozzle and held with your hand).
How to assemble a manual meat grinder
A manual meat grinder is assembled similarly to an electric one, but it has additional parts - a handle and a screw for fastening it.
Procedure:
- Insert the auger into the housing.
- Put down the knife.
- Install the grille, aligning the groove with the protrusion.
- Screw in the locking ring until it stops.
- Put on the handle.
- Secure it with a screw.
- Screw the meat grinder to a table or other flat surface.
Disassembly is carried out in reverse order.
Important! Place the knife in the meat grinder with the cutting edges facing out.
Caring for a manual meat grinder is the same as for an electric one: after washing, dry until completely dry and lubricate the grid with the knife.
Checking correct assembly and installation
To check the correct assembly, you first need to install our mechanism on the tabletop. To do this, there is a special device at the bottom: a square metal plate or special legs for support and a screw at the bottom.
When installing, the plate should be positioned above the tabletop, and the screw will press it firmly to the plane under the tabletop. Knowing how to assemble a manual meat grinder and having assembled it, you need to check the correct assembly. To do this, let's take some meat and process it. If the work goes quickly, everything is installed correctly.
Additional details
Additional details make the device more versatile and allow you to prepare a variety of dishes. If you want to use any attachment, but you don’t have one included, you can purchase it separately. Basically, all attachments are standard and are suitable for both electric and manual meat grinders.
Grater attachment
It is a grater with holes of different sizes, twisted into a cylinder. This attachment quickly chops vegetables/fruits. The set includes a drum with which you can crush ice.
The kit includes at least two grater attachments - large and small.
Installation:
- Take a vegetable cutter housing.
- Insert a grater into it.
- Place the vegetable cutter into the meat grinder body.
- Press and hold the lock button and turn the vegetable slicer counterclockwise until it clicks. Release the button.
- Turn on the meat grinder.
To serve fruits/vegetables, use the special pusher included with the vegetable cutter.
The structure is disassembled in the reverse order.
Shredder attachment
Similar to a vegetable slicer, but cuts food into slices. There are different shredders to produce thick or thin slices. The shredders are installed in the same way as the grater attachment.
Cookie cutter
Used for molding cookies. It is a tip made of metal and a movable plate with holes of different shapes (usually 3-4). The dough passes through them and the cookies are formed. The knife and grid are not used.
Assembly order:
- Insert the auger into the housing.
- Align the hole of the desired shape with the plate. Install into the housing, aligning the groove and protrusion.
- Secure with a nut.
Form cookies by cutting pieces of dough to the desired length.
Sausage attachments
Typically, the kit includes two attachments - for thick and thin sausages. They use pre-cooked minced meat, so the knife and grill are not installed.
Assembly order:
- Install the auger into the housing.
- Place the sausage attachment on it, aligning the groove with the protrusion.
- Loosely tighten the locking ring.
- Install the structure into the meat grinder.
- Screw the ring all the way in.
- Pull the softened sausage casing over the nozzle and tie the end.
Now you can stuff the sausages.
Kebbe attachment
Designed for preparing a national Middle Eastern dish - sausages stuffed with various fillings.
Assembly order:
- Install the auger into the housing.
- Place the kebbe attachment pieces on it - first with the pin, then with the cone.
- Secure with a ring.
- Secure the loading part in the usual way.
- Install the tray.
Juicer attachment
Designed for preparing juices or purees from berries/fruits/vegetables. They come in different configurations and are divided into auger ones, for citrus fruits and tomatoes. There are differences in their designs, but the assembly principle is the same.
How to install:
- Install the screw for the juicer and the desired filter mesh into the base.
- Install the assembled structure into a meat grinder.
Tips for care and disassembly for cleaning
It is important to keep a meat grinder, like other equipment, clean. This will extend the service life and make further operation much easier. After using the device, you should follow these tips:
- Carefully disassemble the structure in reverse order.
- Remove any remaining food from the housing and remove it from moving parts.
- Rinse dirty parts thoroughly with warm water using cleaning products. If some metal elements are difficult to clean from adhering minced meat, you can use a scraper.
- The washed parts should be laid out on a towel and allowed to dry. Do not put them in a box if they are wet.
To avoid cutting yourself, it is better to wash the blade with a thick sponge and dry it with a thick towel.
These simple tips will help you maintain your meat grinder and protect it from rapid wear.