Installing a plow on a walk-behind tractor via a hitch
Before installing the unit, we install a beam under the left wheel of the walk-behind tractor to recreate the plowing process. Structurally, plows differ from each other, so you need to know the plowing depth in advance. Usually the recommended depth is indicated in the instructions for the device. In summer cottages and garden plots, the plowing depth is set from 10 to 20 cm.
The unit is hung on a single-point mount and secured with two bolts. If the walk-behind tractor is not equipped with a single-point system, then a hitch is attached to it, on which the plow is hung. When installing the device through the hitch, the main thing is that there is a slight play in the horizontal plane, no more than 5 degrees, because if you tighten the bolts as much as possible, you will have to make efforts to till the soil.
After preparing the machine for plowing and attaching the plow, you can begin setting up the device.
Advantages of homemade plows
Making a homemade plow with your own hands has a number of advantages over using purchased ones. Its design better meets the requirements corresponding to the cultivated soil: the angle of the oval, the depth of the plowed layer, the width of the plowed area in one pass, as well as the loosening effect.
A plow made by yourself, taking into account engine power, will not create additional load on the walk-behind tractor, will eliminate wheel slipping and will provide optimal plowing effect. The use of high-quality material and adherence to technology will significantly increase the service life. When making a plow, it is possible to provide for the possibility of attaching additional equipment for tillage.
Common problems and their solutions
Remember that plows are structurally different from each other. The general adjustment process is similar, but the elements by which the adjustment occurs may differ. Before starting connection and setup, read the instructions that came with the device.
The same applies to the walk-behind tractor. Check the instructions to determine whether the wheels need to be replaced with lugs, and what diameter they should be. It is recommended to install weights on light and medium-class walk-behind tractors so that the unit sinks under the weight of the machine. If the plow is configured correctly, but the machine still slips, then the unit is too large for the walk-behind tractor of your power. This problem can be solved by installing weights.
When choosing a device, focus on the power of the walk-behind tractor. The heavier the machine, the larger the diameter of the plow you can install . Heavy diesel walk-behind tractors are equipped with two-body devices that increase the productivity of site processing.
The design of the plow is simple and understandable - the main thing is to pay attention to the unit itself and think sensibly when connecting it. Remember that the unit must be looked after in the same way as a walk-behind tractor. Clean your unit after plowing, try not to plow rocky soils and perform timely maintenance on your assistant.
Typical components
The industry produces conventional and complex equipment for walk-behind tractors. Common components include simple hanging elements that are supplied with the unit at the sales stage. Or they can be purchased at the time of purchase of the equipment for an additional fee. Let's look at some of them.
- An indispensable addition to the walk-behind tractor are lugs. These are special steel wheels with studded elements that provide stability to the equipment during field work. With the help of lugs, the walk-behind tractor simply moves over any kind of soil, even difficult ones. In addition, they make their own contribution to better soil treatment.
- An all-season attachment for a walk-behind tractor will ensure its operation on caterpillar tracks. Thanks to increased traction, it improves maneuverability on difficult soils and snow cover.
- Common components include a lifting mechanism for the hitch. It is horizontal to the surface in any position of lifting the load. The effort on the hitch pedals does not exceed 10 kg per 100 kg of load.
- Flat cutters-rippers are installed on a walk-behind tractor to grind weeds in the ground. Over time, cut weeds are converted into humus (organic fertilizer).
A three-point hitch is installed on the walk-behind tractor, but it is important to know the type of structure ( plow , harrow, etc.). Hedgehogs are discs with spikes of various sizes; they are used for hilling and weeding potatoes. Walk-behind tractors equipped with brushes are used to clean sidewalks and roads from falling leaves and snow drifts.
Plow device
Depending on the device model, its design varies. Main structural elements of the unit:
- Frame. The housing and the adjustment wheel are attached to it. There are two lanyards installed on the frame, which change the position of the body in horizontal and vertical positions.
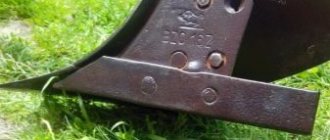
- Frame. This is the main working element of the plow. The following are attached to it: a ploughshare (knife), a blade and a field board. The body is height adjustable by moving the stand. The ploughshare is responsible for cutting the soil layer, and the blade is responsible for turning the soil. The field board is a service element on which adjustments are made.
- Support wheel. Depending on the set height of the support wheel, the plowing depth also depends.
In addition to the main working and service parts, plows are equipped with other parts. It depends on the type of device and its purpose.
Adjustment on heavy walk-behind tractors
Setting up a plow on heavy diesel walk-behind tractors is no different from setting up on light-duty machines. The only thing is that heavy machines do not have lugs installed, because the weight of such equipment exceeds 200 kg. The main thing is to follow safety precautions when connecting the unit and plowing. After all, the more powerful the equipment, the more careful you need to be when working.
Single-body mounted plow SCOUT PL-130
The SCOUT PL-130 single-body plow is connected to a single-point attachment to mini-tractors and walk-behind tractors with a power of 10 hp or more. With.
The unit is equipped with an enlarged steel ploughshare, and the design itself is made reliably - you can forget about sharpening the ploughshare. To regulate the plowing depth on uneven terrain, a limit wheel is installed. The plow is designed for processing heavy, loamy soils and virgin soil.
When working with the floating mode of the hydraulic distributor, the device must be weighted.
Types of plows for walk-behind tractors
Plows used for plowing are divided into several types. These include:
- single-body designs - these products are the easiest to use. They have minimal weight and consist of a small number of parts;
- reversible or rotary plows - the upper part of such structures is equipped with a curved feather, designed to turn the soil directly during the process of plowing it. A reversible plow is most effective when processing heavy soil;
- rotary plows - attachments of this type have the most complex design. On sale you can find a double-body plow, consisting of two, and a three-body plow, consisting of three shares;
- disc plows - designs of this type are used primarily for plowing wet soil. The depth of soil cultivation with such plows is slightly less than with previous types of attachments.
Each of the listed types of plows has found application when plowing one or another type of soil. However, the double-sided reversible plow is considered to be the most universal - it shows high efficiency in cultivating any type of soil.
Adjusting the plow on a walk-behind tractor
To work on different types of soil, the unit must be configured differently. But the main adjustment occurs according to several criteria:
- plowing depth adjustment;
- angle of attack adjustment;
- cutting the first furrow.
Plowing depth. The further process of growing crops depends on the setting of plowing depth. If you set the depth to be insufficient, the roots of harmful plants will remain under the soil, and if the depth is too great, the fertile soil will be mixed and the plants will not receive the necessary nutrients.
Attack angle. Adjustment occurs using a field board. The performance of the unit depends on the angle of attack: if the angle of attack is greater than necessary, the device will get stuck in the ground and the walk-behind tractor will stall; and if the angle of attack is insufficient, the plow will not remove the required layer of soil.
First furrow. After all the settings have been made, you need to plow the first furrow. At this stage, it becomes clear whether the plow is configured correctly. During the next plowing, the machine is lowered with one wheel into the rut, and further adjustment takes place in the furrow.
How to make a horse plow yourself
Of course, you can buy a ready-made homemade plow on the Internet or on specialized sites, but it’s not always possible to choose the right one that would meet all your needs and criteria. Therefore, armed with suitable drawings, you can make it yourself at minimal cost.
Important! Before making a plow, decide on the type of soil that will need to be plowed, as well as what agricultural crop this land will be used for next.
Table 2. Step-by-step instructions for making a horse-drawn plow
How to install and plow a mounted plow
The main working parts of the tool are a metal ploughshare and a blade. The ploughshare carries out plowing: it cuts the upper layers of soil and directs them to the dump. And the blade wraps the earth raised by the ploughshare, crumbles it and throws it into the furrow. Thanks to this process, deep loosening of the soil occurs, during which it is saturated with oxygen and gets rid of weeds.
The picture (diagram) shows what a plowshare plow looks like, designed for plowing with a cultivator or walk-behind tractor in the garden. Different models of plowing devices may have some differences among themselves, but mostly they are all designed this way.
Before you start plowing the ground with a cultivator or walk-behind tractor, assemble a removable plow. To do this, take two bolts and use them to attach the hitch to the rack of the mounted implement. The assembled unit must be attached to the cultivator bracket, lightly fixing it, and then adjusted according to the parameters:
To adjust to the required plowing depth, the motor-cultivator is rolled out onto stands 12-20 cm high and placed as level as possible: the field board should be in full contact with the ground surface, and the stand should be perpendicular to it. The mounted plow is adjusted to the required position at which it will plow, and then secured with an adjuster screw and a lock nut.
To adjust the angle of the blade, tilt the cultivator to the side. To do this, remove the stand from under the right wheel (or lug), leaving only under the left one. The nuts securing the hitch to the hitch are slightly loosened, the plow is slowly turned, giving it the optimal position for plowing.
Changing the angle of the heel (field board) is carried out by rotating the adjusting screw of the cultivator hitch. If it is necessary to increase the height of the heel lift relative to the plowshare, turn the screw clockwise and vice versa. When adjusting, be sure to ensure that the distance does not exceed 3 cm, otherwise the nose of the plow, when plowing in the garden, will begin to burrow deep into the ground and worsen the traction force of the cultivator, as well as a walk-behind tractor or a walk-behind tractor. After completing the adjustment, tighten all nuts well with a wrench. You can take a more detailed look at the process of setting up a plow for plowing with Salyut, Neva and other motor cultivators in the video.
READ How to Make a Shovel for a Walk-behind tractor with your own hands
After making the above settings, the plow is completely ready for use - you can try plowing in the garden. But before you start plowing thoroughly, especially virgin soil, you perform control plowing and evaluate whether the plow is adjusted correctly, what the depth of the furrow is and the quality of the soil dump. How to properly plow with a cultivator is well shown in the video using the Neva walk-behind tractor as an example. You can also watch a video about how the heavy walk-behind tractor when plowing virgin soil. Pay attention to how the plow goes deep.
When the plow is adjusted correctly, the power unit moves evenly during plowing, without jerking, without burying the “nose” of the ploughshare deep into the surface. The furrows from under the moldboard turn out to be even and do not “overlap” each other during plowing. If the site has hard soil, then plowing is carried out in two passes. During the first plowing, the specified shallower depth is set, and during the second, a greater depth. In the same way you need to plow virgin soil. To cultivate small areas, they mainly use a cultivator and a plowing cutter. Medium-sized plots are also cultivated with a cultivator, but with the use of a huller or a light plow, and heavy and virgin lands are cultivated with the help of a powerful motor-cultivator, for example Neva, and a mounted plow. You can develop your own plow setting method that is suitable for your walk-behind tractor. Attaching a plow to a walk-behind tractor is not difficult.
Reversible plow for walk-behind tractor - manufacturing procedure
As in the first case, in order to make a rotary plow, you need to study the design diagram. Otherwise, even the slightest inaccuracy will lead to low efficiency of the finished attachment.
To make a Zykov plow, proceed in this order:
- To make the ploughshare, use sheet steel about 5 mm thick. Cut a blank from it, heat it with a gas burner and bend it as shown in the figure. The ploughshare must be removable. The cutting part of the part is beaten on an anvil and sharpened on a special machine;
- Next, make a blade. It can be made from a pipe with a wall thickness of 5 mm and a diameter of 50 cm. Using a template, cut out the dump blank using a gas torch, then sand the product with a grinder;
- After this, make a plow body from sheet steel, 3 mm thick, and assemble the structure using welding;
- Clean the weld seams with a file and sandpaper.
As a result of the work, you get a universal plow on a walk-behind tractor, with which you can cultivate not only dry, but also wet soil.
What attachments does the walk-behind tractor work with?
Any experienced farmer knows that with the help of a walk-behind tractor, cultivator or other motorized equipment, almost all agricultural work can be mechanized: starting with cultivating the land to prepare it for sowing and ending with transporting the harvested crop. Motor units have become universal due to the possibility of using a variety of attachments. In addition to moldboard and other plows, the following equipment has been created for processing plowed land and cultivating virgin lands:
Harrows are used to plow virgin soil, as well as for pre-sowing (spring) or post-harvest loosening (autumn) of arable soil to a depth of 7-14 cm. Using harrowing with a walk-behind tractor or cultivator, the surface is leveled, moisture is covered, and weeds are destroyed. The working parts of such agricultural implements are metal teeth or spherical disks. In this video you can clearly see how to properly plow with a walk-behind tractor and a homemade harrow. And also from there you can learn improvements for the harrow.
The hiller is used to hill up potatoes, cut furrows for sowing seeds, backfill planting material, and also sprinkle weeds directly in the row area. Hilling devices come in single-row and double-row, with fixed and adjustable working widths, distinguishable both by their design and their efficiency. Here is a video of how the Neva MB2 motor cultivator performs processing with a mounted two-row weeder-hiller.
With a rotary cutter you can plow virgin soil, carry out pre-sowing and basic cultivation of plowed land. This agricultural implement allows you to mill, cultivate the land and qualitatively prepare it for sowing. It is capable of not only plowing the soil, but also mixing it with fertilizer, crumbling large layers, crushing stubble particles, and leveling the sown area. Rotators for cultivation come in different types, depending on the number of cutting elements. This video shows how to actually plow a walk-behind tractor with a cutter installed on it, as well as cultivation.
A flat weeding cutter helps to trim weeds, split and cut grooves without turning the formation, plow and crush the soil. Flat cutters come in all possible working widths and processing depths, which allows you to choose them for specific processing conditions of agricultural plots and crops. This video demonstrates well how to carry out processing with a mounted flat cutter in practice (using the example of a Dnepr walk-behind tractor).
In addition to the listed removable tools designed to plow virgin soil and cultivate arable land, rakes, wood splitters, seeders, shredders, cultivators, rotary and segment mowers, shovels, sprayers, sweeping brushes, snow blowers, etc. are used with the motorized unit. Having a basic set of mounted agricultural implements, you can use a walk-behind tractor or a powerful cultivator to perform all kinds of economic tasks, in particular, pre-sowing plowing, sowing and planting crops, applying fertilizers, inter-row cultivation of crops, harvesting root crops, and seasonal harvesting of green fodder.
Choosing a walk-behind tractor for plowing
When purchasing a walk-behind tractor for plowing land, you need to remember about other jobs that it can perform. The mechanism with a motor not only plows, cultivates and hills, but also transports loads, removes garbage and snow from the territory, and mows the grass. Watering the beds and harvesting the crops in the fall are operations that are also subject to the walk-behind tractor. Some specimens have a shaft to which various equipment is attached, capable of sawing and chopping wood, pumping water, and providing electricity. This is the difference between walk-behind tractors and cultivators.
Units for plowing land are available in 3 varieties: light, medium and heavy. Products of medium and light classes are intended for everyday use. Their weight ranges from 50-100 kg. They are equipped with engines with a capacity of 4-8 liters. With. Most units have several forward and reverse gears. Heavy-duty walk-behind tractors work on farm lands. They weigh more than 100 kg and are equipped with an engine with a power of over 8 hp. With.
The choice of a mechanical assistant for tillage is related to the number of functions it performs, the area of the site and the type of soil. The denser the soil, the heavier and more powerful the unit will be needed to plow the land. Its weight must be selected from 95 kg. The best products are equipped with diesel engines. They have a high traction force, a long service life, and diesel consumes less fuel. But when the ambient temperature drops to 2˚C or lower, the engine is more difficult to start.
For a cultivated area of up to 15 acres, a walk-behind tractor is needed with a processing width of 70-80 cm and an engine with a power of 3-4 liters. With. For 15-40 acres, a unit with a processing width of up to 90 cm and a power of 7 liters is suitable. With. If the land area is more than 40 acres and up to 1 hectare, it can be plowed with a unit with an engine of over 9 liters. With. and a working width of 1 m.
You can purchase a large set of equipment along with the main walk-behind tractor. But it is best to choose the necessary devices: lawn mower, motor pump, snow blower, potato digger. For snow removal, a product with a gasoline engine is purchased. To transport goods, you need wheels with a diameter of 45 cm. It is good if there are height-adjustable handles.
The most expensive part of a walk-behind tractor is the engine. Domestic units are equipped with imported motors. Saving on the engine leads to frequent repairs, which are more expensive than the cost of the engine. High-quality engines are produced by:
- GreenField (Greenfield);
- Subaru (Subaru);
- Honda (Honda);
- Forza (Forza);
- BRIGGS STRATTON.
All manufactured engines are two-stroke and four-stroke. The latter have proven themselves to be reliable and economical. When choosing an engine, preference should be given to engines with a disc clutch and a serviceable gearbox. These products are the most functional and reliable. It is better to choose gear reducers. Worm drive systems often overheat during operation and require the unit to be stopped every 20 minutes.
- Salyut (Russia) with Japanese engine;
- walk-behind tractor Neva MB-3S (Russia) with a Subaru engine.
These machines are suitable for cultivating land on farms and small plots of land.
- Caiman (France) with a 6 hp Robin-Subaru engine. With. Has gears: forward - 2, backward - 1. Plowing depth - 32 cm, width - 90 cm.
- Neva and Cascade are produced by domestic manufacturers and are equipped with an American Briggs Stratton engine.
- Centaur (China) with a 7 hp gasoline engine. With. Plows to a depth of 30 cm, the width of the passage is 100 cm.
- Scout;
- Belarus;
- Bison
These units are equipped with high-quality American or Japanese-made diesel engines, equipped with a gear reducer and disc clutch. 4 forward and 2 reverse gears allow you to work with various attachments and transport loads.
How much does it cost to plow a field?
Manual cultivation of plots of land is a rather difficult task, and if it is also virgin soil, then it is almost impossible to dig up the soil. Therefore, farmers and summer residents, in order not to plow by hand, try to acquire special agricultural equipment: cultivators, motor-cultivators, walk-behind tractors, mini-tractors and various accessories for them. The equipment will allow high-quality plowing of virgin soil and quickly cultivating plowed lands.
But not every owner of a farm or dacha land has the opportunity to purchase a whole arsenal of motorized equipment. Often the power of a purchased cultivator is simply not enough to cultivate virgin soil or plow an abandoned garden. In this case, you have to turn to the owners of more “serious” agricultural equipment for help - powerful mini-tractors and tractors. These high-performance machines become especially popular during the pre-planting and post-harvest seasons. They quickly and efficiently process the field, cultivate, cultivate overgrown turf and virgin soil.
Of course, agricultural machinery services are not cheap. The cost of mechanized work performed by a tractor depends on various factors:
- prices for fuel and lubricants;
- dimensions of the treated area;
- the degree of neglect of the site, the presence of vegetation on it;
- relief and condition of the soil that will be processed;
- distances from the place where the equipment is parked to the place where it will work;
- the type of excavation work and the agricultural implements used to carry it out.
How much it costs to hire a tractor for plowing virgin soil or cultivating plowed land can be found out on thematic forums, where experienced farmers and beginners exchange relevant information with each other and give practical advice. Typically, tractor owners calculate the cost of plowing as follows: all processing costs are 45-50% (virgin soil, naturally, is more expensive). But it’s difficult to say exactly the final amount, since prices can vary greatly in different regions of the country.
The most expensive work is considered to be tractor work for plowing virgin and arable land using a disc harrow, a tillage cutter and a three-furrow or double-furrow plow (25,000 rubles/1-5 ha). It will cost a little less to disk the earth and mow the grass if you work with a mini tractor using a mounted rotary mower and a tooth harrow (20,000 rubles/1-5 ha). But even at relatively high prices, the services of tractors and mini-tractors are used by many farmers, including owners of garden and country plots. Whatever one may say, plowing and cultivating without equipment is difficult and time-consuming. In addition, this is a very responsible process that cannot be done without time and financial investments. To plow a plot, you can either hire a tractor or dig it yourself.
READ What kind of oil to pour into a walk-behind tractor engine
Setting up the plow
How to setup?
Lungs
A similar mini-equipment is often called a motor cultivator. Its power does not exceed 4 and a half horsepower, which is why it costs less than medium and large units. The advantages include the light weight of the monoblock and the ease of processing awkward areas due to the small grip of the cutter.
The downside is the rapid overheating of the low-power motor, which means that you will have to work with such equipment for a short time. In addition, the depth of the excavated soil is less than that of a heavy walk-behind tractor. In addition, light equipment does not have mounts for additional equipment.
How to install a plow on a walk-behind tractor
Preparation for plowing
Before plowing, you need to perform a test plowing and find out the quality of the plow adjustment.
- find out the features of the blade and the depth of the furrow;
- control the movement of the plow in the furrow;
- monitor the regular movement of the unit and the load on the plowman’s hands;
- set the load of the unit.
Setting up the plow
If you are satisfied with all the points listed above, you can start plowing the site. If not, you need to adjust the plow again.
Test plowing of the site is performed as follows.
- We place the unit on the edge of the cultivated plot of land.
- Set the first speed and carefully press the clutch handle. It is extremely important that the steering wheel of the unit is parallel to the plane of the ground, so that the unit does not dig into the ground, but also does not rise above the arable land being cut. When plowing, the worker does not need to press the steering wheel or push the motorcycle too diligently, since this agricultural machine itself will perfectly cope with its responsibilities without auxiliary efforts.
- After obtaining a test furrow, it is imperative to measure the plowing depth. To do this, you need to use a tape measure or an ordinary ruler. If the dimensions match those initially established, then you can begin the main work.
Attack angle
For someone who already has the practical skill of plowing soil with motorized equipment, there is no need to explain what and how to do at this stage. The following information is provided for informational purposes to those who are encountering this matter for the first time. The slope of the angle of attack, or, as it is also called, the slope of the angle of the field board, is a slope that shows the height of the plowing plane in relation to a flat plane. Adjustment is carried out using a screw knob.
- place the unit with the plow on the supports mentioned earlier;
- turn the adjustment knob to the limit so that the field board rests completely on the ground, without gaps;
- start turning the handle in the opposite direction until the back of the board rises 2-3 cm above the ground.
If you make a miscalculation, the following unpleasant consequences will appear:
- with a large angle of the field board, the plow will become an anchor - the unit will begin to regularly slip and move forward with effort;
- at a small angle, the required layer of soil will not be removed.
- You can check whether everything is correct only at the plowing stage - the unit should not resist or move excessively freely.
How to plow with a walk-behind tractor correctly
The engine is started, you can start plowing. To begin work, the walk-behind tractor is brought to the site. The boundaries of the first furrow are marked with a taut twine. The control knobs should be turned to the left to operate the unit from unplowed ground. The first furrow is made at low speed. This must be done carefully, without losing the orientation cord. Having reached the end of the site, check the plowing depth. It should be within 15-20 cm.
After this, the right wheel is placed in the furrow, engaged in first gear and continues to plow. The equipment is easy to use and the skill appears quickly. If the plowing depth is not satisfactory, you need to adjust the plow. When plowing, you need to constantly monitor the wheel in the furrow; it should not go beyond its limits. The ridge of the earth should be at a distance of 8-10 cm from the previous one. well-adjusted walk-behind tractor moves smoothly, without jerking. You can't push him. With the development of skills, the plowing speed can be increased.
Sometimes the motor overheats. In this case, it needs to be turned off and cooled. When the soil is plowed, it is filled with oxygen. This affects the future harvest. Autumn plowing is useful. Plow with a walk-behind tractor before winter. In the spring, it remains to dig up some areas in the corners of the garden. For plowing, it is better to use medium and heavy class products.
Preparing to use the walk-behind tractor
Plowing the soil begins with preparing the walk-behind tractor. Let's find out how to do this.
- Before plowing, the motorized equipment must be disassembled. The walk-behind tractor must be transported to the workplace without trolleys and other attachments. As a rule, the unit is transported to its destination by means of vehicles. If the land that you intend to cultivate is located near your home, the walk-behind tractor must be mounted on a flat surface in any suitable place.
- Removing transport wheels. After the walk-behind tractor has been delivered to the area that needs to be plowed, it is necessary to dismantle the transport wheels in order to replace them with specialized lugs (iron wheels). To facilitate this work, trestles can be placed under the hitch located on the rear of the unit. Lugs are necessary for more thorough adhesion to the soil. They are indispensable equipment for plowing, planting beets, carrots, and potatoes.
- Hub rotation. At the next stage of preparing the unit, before plowing, it is necessary to change the hubs on which the transport wheels stood for longer ones. This is necessary to increase the distance between the lugs. Such a solution will significantly improve the stability of the unit during operation.
- Installation of lugs. Let's move on to mounting the iron wheels. It is important that these elements are installed correctly. Correct installation is determined by the direction of the tread pattern. The tapering of the pattern shows the direction of forward movement.
Step-by-step instruction. Adjusting the plow for a walk-behind tractor
Plowing a plot of land is one of the most important types of work in the autumn and spring seasons. This work must be done to prepare the soil for planting or sowing a variety of crops. Plowing is performed by a plow for a walk-behind tractor, which is very important to adjust.
How to properly adjust the plow so that plowing the land is correct, even, neat and fast. You will find the answer to this question in our article.
Preparing the walk-behind tractor for installing the plow
Plowing the soil begins with preparing the walk-behind tractor. Let's take a closer look at how to do this.
Step one. Removing the transport wheels
So, you have delivered your walk-behind tractor to the area you are going to plow. The first step is to remove the transport wheels to replace them with special lugs. To simplify this part of the work, you can install a stand under the hitch located behind the walk-behind tractor. Grousers are needed for more thorough adhesion to the ground. They are simply necessary equipment for plowing, planting potatoes, carrots, and beets.
At the second stage of preparing the walk-behind tractor before plowing, you need to replace the hubs on which the transport wheels were installed with elongated ones. This is necessary so that the distance between the lugs increases slightly. This solution will significantly increase the stability of the walk-behind tractor during operation.
Have you installed extended hubs yet? Now is the time to move on to installing the lugs. It is very important that these items are installed correctly. This factor is checked by the direction of the tread pattern. Tapering the tread means moving forward.
Now you can remove the stand and start adjusting the plow. Assembling the plow involves installing a coupling device (the so-called hitch) on it. This hitch and plow need to be assembled in order to later be installed on a walk-behind tractor.
At this stage, you must prepare all the equipment necessary for the work, namely: a plow, a hitch and wrenches.
To adjust the required depth of plowing the soil, you need to match the hole in the hitch hub with the middle hole in the plow stand. After this, these elements are connected using a fastening bolt.
The fastening bolt is installed in the upper hole of the plow stand and securely fixed with a nut. At the same time, it is extremely important not to tighten all the nuts in the places where the plow and hitch are attached too much, since then they will still have to be loosened at the stage of adjusting the plow. Now that you have installed the hitch on the plow, you can move on to the next step.
Step four. Installing a plow on a walk-behind tractor
After completing all the previous steps, you can attach the plow to the walk-behind tractor. This is done like this: a plow is mounted on one or two pins (this depends on the walk-behind tractor model), after which the pins are securely fixed with cotter pins.
To make it much more convenient for you to adjust the plow, it is recommended to install the walk-behind tractor on stands. These can be two bars 150 by 150 millimeters in cross section. It is this size that will help you adjust the optimal plowing depth, which should be in the range from 15 to 18 centimeters.
READ How to start a gasoline walk-behind tractor in cold weather
For greater ease of adjustment, the plow should also be placed on a small elevation, for example, on plywood or a board. This solution will allow you to much more accurately determine the inclination from the heel of the plow to its nose. The angle of this inclination is adjusted using a special bolt on the hitch, which is very convenient. And it happens this way:
Tricks for setting up a walk-behind plow
1) By turning the adjusting bolt clockwise, you need to raise the heel of the plow, thereby increasing the plowing depth.
2) Turn the adjustment bolt counterclockwise, slightly lower the plow heel and thereby reduce the plowing depth.
The distance between the soil and the plow must be from three to five centimeters. Otherwise, the plow will simply bury itself in the soil. If the angle of inclination of the plow is incorrectly set, then the quality of plowing will leave much to be desired. This will significantly increase the load on the motor and the operator’s hands. After adjustment, tighten the fastening of the plow and hitch.
To measure the distance between the gearbox and the reference surface (that is, plywood or board), you need to use a tape measure (or other measuring device). Normally, the gap is from 15 to 20 centimeters. It is important to comply with this condition.
Before plowing, it is necessary to carry out test plowing and check the quality of the plow adjustment. To do this you need:
Check the depth of the furrow and the quality of the blade.
Check the smooth running of the walk-behind tractor and the load on the operator’s hands.
If all of the above points satisfy you, you can begin plowing the site. If something is wrong, you need to readjust the plow.
Control plowing of the site occurs as follows.
We install the walk-behind tractor at the edge of the cultivated plot of land.
Tricks for setting up a walk-behind plow
Engage first gear and gently press the clutch lever. It is extremely important that the steering wheel of the walk-behind tractor is parallel to the surface of the plot, so that the walk-behind tractor does not bury itself in the soil, but also does not rise above the cultivated land. When plowing, the operator does not need to put pressure on the steering wheel or push the walk-behind tractor , because this agricultural machine itself will do its job perfectly without additional effort.
After the first furrow, be sure to check the plowing depth. For this purpose, you should use a tape measure or a regular ruler. If the indicators coincide with the initially specified ones, this means that full-fledged work can begin.
Correct plow adjustment is the key to quality plowing. After work, be sure to clean the plow from dust and dirt, remove it from the walk-behind tractor and put it aside until the next use.
Important! If you work during the hottest part of the day, be sure to pause while working to allow the engine to cool down.
Now you know how to install and adjust the plow on a walk-behind tractor.
Every owner of a vegetable garden, a garden plot, or a small farm understands what it is like to manually plow the beds and pull out weeds. To make plowing easier, a plow is used. However, using a tractor or animal traction for a small plot of land is an expensive and stupid task. For such tasks, motor vehicles MB 90, Oka, Brado Garden, and Neva are used. In other words, it is a motor on wheels on which a variety of attachments are mounted: from trailers to plows. Our article is devoted to the features of adjusting a plow on a walk-behind tractor.
Plowing the site
Setting up a plow on a walk-behind tractor is very important, so before work it is necessary to carry out control plowing, which will make it possible to evaluate the regulation. This process includes the following steps:
Assessment of furrow depth and quality of the dump; Evaluation of the plow stroke in the furrow; Assessment of walk-behind tractor load; Hand load assessment.
Only after a complete check can the main work begin. If at least one factor does not meet the requirements, then re-adjustment of the mechanism will be required. The plowing process itself consists of the following processes:
For final plowing, place the mini tractor at the edge of the field where you plan to make a furrow.
Place the steering wheel parallel to the ground. You shouldn’t put too much pressure on the steering wheel or push the walk-behind tractor while working, it will do everything itself. The main thing is not to stop holding the steering wheel parallel to the ground so that the mechanism does not sink into the soil or rise up;
Once you have finished making the initial furrow, check its depth from the bottom of the furrow to the ridge. If the plowing depth is between 15 and 18 cm, then the main process can begin.
How to make adjustments
Precise adjustment of the plow for a walk-behind tractor is based on three parameters:
- width;
- depth of entry;
- angle of inclination.
To independently adjust the plow, the width is set at its edges. For better crushing and easy cutting of the soil, its edge should be attached at the same height as the soil hook, focusing on the inner side.
Read here what is better to use a walk-behind tractor or a cultivator at the dacha.
The depth is built up after the walk-behind tractor is placed on the stands. Installed stably, without displacement towards the plow.
The height of the stands should be adjusted depending on the depth to which you plan to plow the soil. If this is plowing before the winter season, then the depth is chosen to be approximately 25 cm. In spring, the depth is up to 20 cm.
After installation and selection of depth, the plow mount is adjusted. The ideal option is when it is adjacent to the soil.
If this is your first experience in plowing the ground with a walk-behind tractor, then use the tension rope as a guide, since the first row should be straight in order to further build on it.
You can also use a support wheel, it is located to the left of the plow, and runs on uncultivated ground, thereby preventing too deep penetration and adjusting the depth.
After installation, the walk-behind tractor is adjusted with special bolts so that the rear part of the plow is parallel to the soil.
The last step in the adjustment is to remove the walk-behind tractor from the stand and adjust the steering wheel to the height of your lower back. This is done to reduce stress on the hands during prolonged work.
How to adjust
In order to start plowing, you need to attach the plow to the walk-behind tractor, because all these parts are disassembled. To connect it all, you will need 22x24, 17x19, 17x14 or 22x19 wrenches. When all the parts are ready, you will need to first install the adjusting screw. To do this, remove it from the hitch. It is this detail that allows you to configure the plow as conveniently as possible and adjust it depending on what manipulations you are going to perform. After you have removed the adjusting screw from the hitch, adjusting the plow continues by connecting it to the hitch. You will see that there are several holes on the hitch that are also present on the plow.
In order for the plow adjustment to be high-quality, you will need to connect the holes in the hitch with the hole in the plow and, as a result, secure it with an adjusting screw.
Source
Installation of plowing attachment
There is nothing difficult to install. To do this you will need:
- secure the plow to the coupling device without overtightening the nuts. This is done so that in the future it would be possible to adjust the parameters of the plow;
- the hitch should be secured together with the plow to the shackle with two fastening pins.
This completes the installation and you should move on to the next stage - adjustment.
Adjustment is a very important stage, since the quality of plowing and the amount of effort expended depends on it. If the adjustment is incorrect, the walk-behind tractor will not be able to do its job efficiently and a lot of time will be wasted on simple tasks.
Characteristics
A mounted plow for a walk-behind tractor is a universal farming tool, without which high-quality cultivation of the land is simply impossible.
Since its invention, it has been used by man to prepare the ground for further work. The process of working with a plow is called plowing. During plowing, the top layer of soil turns, it becomes softer, weeds go into the lower layer of soil, and the top layer becomes prepared for sowing crops.
Standard plow with hitch
The Kaluga manufacturer of motor vehicles, JSC Kadvi, offers manufacturers not only walk-behind tractors and cultivators, but also attachments for them. For example, for the popular Oka walk-behind tractor and its modifications, the manufacturer recommends using a plow with a hitch.
| General characteristics | |
| Weight: | 7.8 kg. |
| Dimensions: | 535 mm/310 mm/410 mm. |
| Working width: | 190 mm. |
It is recommended to use a plow for the Oka walk-behind tractor for plowing or fertilizing the soil. The device is designed to work on soils whose area does not exceed 0.4 hectares.
Recommendations for high-quality plowing of land
- To prevent soil movement, change the direction of plowing each time.
- To simplify the work, turn the steering wheel of the walk-behind tractor to the left, then you will walk on unplowed soil.
- If the soil is hardened, you should work the ground twice: the first time with a small gripping depth, the second time with the depth you need.
For high-quality operation of the walk-behind tractor, it is important to correctly install the plow and adjust it. The following tips will help you with this. Also follow all recommendations for plowing the land.
From this video you can visually familiarize yourself with adjusting the plow on a walk-behind tractor:
Sources:
https://garden-shop.ru/vspashka-celiny-motoblokom.html https://fishing-caravan.ru/sad-i-ogorod/kak-ustanovit-plug-na-motoblok.html https://6sotok- dom.com/instrumenty/regulirovka-pluga-na-motobloke.html
Regulation
This process also consists of several stages:
Adjusting the plow on a walk-behind tractor The farmer begins by installing the walk-behind tractor on a stand, for which you can place a couple of small blocks with a cross-section of 150 x 150 mm under the lugs. This height is quite enough to easily adjust the apparatus to a plowing depth of 15 to 18 cm;
For the convenience of carrying out work, you should lay a plank or plywood, which will allow you to more accurately adjust the angle of inclination of the plow from heel to nose. To adjust the angle of inclination of the mechanism, you must first rotate the adjustment bolt clockwise, which will raise the heel up, increasing the plowing depth, and then rotate counterclockwise, which will lower the heel of the plow, reducing the plowing depth, as shown in the photo;
The distance between the soil surface and the heel of the plow should be maintained no more than 5 cm, otherwise the device will simply “burrow” into the soil. If the angle of inclination of the unit is incorrectly adjusted, the quality of plowing will significantly decrease, but the load on the driver’s hands and the engine of the mechanism will increase. Having completed the adjustment, you need to tighten the fasteners and couplings with a wrench; Using a tape measure, you need to check the gap between the surface and the gearbox of the mechanism. The gap should not be more than 20 cm.