In home brewing and winemaking, there is such an important point as determining the strength of the finished drink or the resulting distillate. This is necessary to understand whether it is time to complete the manufacturing process and whether you managed to get exactly the result you expected. For the measurement procedure, special instruments are used: alcohol meters (or ariometers). They clearly show how many percent of alcohol is contained in an alcoholic drink.
Alcohol meters
The devices can be purchased freely. Household options are inexpensive and affordable for anyone. But after purchase, the owner often faces a problem: how to use the alcohol meter. Because often the accompanying instructions do not describe the process very clearly, which is why the measurements end up giving fantastic results.
But the point, most likely, is ignorance of the nuances. There are enough of them to confuse not only a beginner, but also a completely savvy moonshiner.
Does temperature affect measurement accuracy?
Temperature affects the accuracy of the results, since the warmer it is, the lower the density of the distillate, so the measuring device demonstrates greater strength.
The difference between the actual percentage of alcohol and the percentage of alcohol shown on the alcohol meter scale can reach 5 degrees. If the ambient temperature is 40 degrees, then instead of 90 the hydrometer will show 95 degrees. The ideal ambient temperature for taking measurements is 20 degrees. But in reality it is difficult to achieve such indicators, so you can make an adjustment for temperature using a special table or an online calculator.
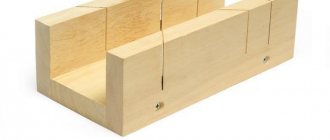
We determine the strength depending on the temperature in the cube
Most industrial stills are equipped with a thermometer, which is used to monitor the heating temperature of the mash. If you know something about temperature indicators, you can determine when the first drops will begin to drip, when you can finish selecting the “heads” and to what level the “body” should be driven.
- At 88 - 89°C, the alcohol begins to evaporate, that is, a trickle of alcohol is about to flow. As soon as you notice the first drops in the tube attached to the coil (transparent silicone tubes are most often used now), turn down the heat or switch the stove to a lower mode; you should not sharply heat the mash any further, otherwise foam may erupt.
- Select the tails (this is approximately 10% of the expected amount of moonshine) and begin to distill the main part (the body). When you see that the thermometer needle has reached the number 95, it means that the strength of the outgoing liquid is now around 40°.
- The needle moves further, and somewhere at 97°C you need to remove the jar with the main distillate and either take away the tails until the temperature rises to 98°C, or stop distilling.
Having analyzed the coincidence of the temperature in the cube and the strength of the distillate several times, you will know exactly how many degrees the liquid has that is currently flowing into the jar you placed.
What to consider when handling the device
It is necessary to understand that an alcohol meter is a rather fragile thing, so you should not leave it anywhere. It can easily be broken or crushed. It is best to store the device in the packaging in which it was supplied. If cracks and chips suddenly appear on the glass, then such a device can no longer be used.
Alcohol meters can measure the strength of only water-alcohol solutions that do not contain sugar, juice, or foreign substances that appear when infused with wood chips. All additional inclusions change the density of the drink, which ultimately makes measurements inaccurate.
General instructions on how to use an alcohol meter
By default, household hydrometers are configured to work with liquids with a temperature of 20 degrees. Therefore, before starting measurements, you should use a water thermometer. If the temperature is higher or lower, the accuracy of the measurements will decrease and you will have to calculate the amount of alcohol manually using the tables supplied with the device.
Before immersing the device in liquid, you need to wipe it and make sure that the flask is free of grease and dirt, as well as wet spots
When lowering the alcohol meter into alcohol, you need to make sure that it does not come into contact with the walls of a large container, which is also important for the accuracy of measurements.
How to use a household alcohol meter
How to use an alcohol meter with a 0-96 scale
This device is suitable for determining the strength of homemade moonshine and vodka. It is intended exclusively for use in water-alcohol, “pure” mixtures. Measurement algorithm:
The resulting moonshine should be diluted with water and left for 4-8 minutes to stabilize. Wipe the device with a dry and clean cloth. You should first use a water thermometer to make sure that the temperature of the liquid is 20 degrees. But even if it is more or less, it’s not so scary. The device usually comes with tables for correcting values; you can use them.
Pour the moonshine into a tall narrow vessel, or into a regular glass. We immerse the wide part of the device in the liquid so that it does not touch the walls. You can’t let go of it - it could be damaged if it hits the bottom sharply
We carefully unclench our fingers and monitor the behavior of the “float” - the liquid should reach a certain mark on the scale. This will be the alcohol indicator
At the end, we take out the device, be sure to wipe it dry and put it in the packaging for storage.
You can watch the video on how to use an alcohol meter:
How to use the ASP 3 alcohol meter
This device has the same principle of operation as a household one, but shows greater measurement accuracy. It is manufactured according to GOST, which already indicates the proper level of quality. This option is the most popular among those who have been making home brews for a long time. It is not much more difficult to use than a household one.
- To increase the accuracy of the readings taken, it is recommended not to measure the strength of moonshine immediately after it has been diluted with water. It is better to wait about a day - during this time all chemical reactions in the drink will complete, releasing heat, and the temperature will be as close as possible to the required value - 20 degrees.
- We carefully wipe the device dry, making sure that there are no greasy stains on the surface.
- We measure the temperature of the liquid.
- We lower the device exactly in the middle of the vessel with moonshine, making sure that it does not touch the walls and bottom.
- We wait until the alcohol meter stabilizes, he should not drown. If this happens, then you need a model with a different range.
- We look at what level the liquid is at and note the resulting value.
- After work, we wipe the device again and carefully put it in the box.
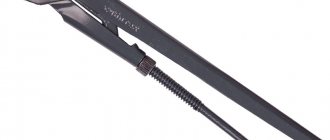
How to use a wine alcohol meter
It is not possible to measure the strength of homemade wine, beer, liqueur, or mash with a conventional hydrometer. It's not designed for that. You need another device - a vinometer, which simultaneously determines the amount of alcohol and sugar in the drink. This is an indispensable thing for artisanal winemakers, which must be in the home arsenal.
Measurement process steps:
We fill a separate container with the finished product - you can use a measuring cup or a regular one, the main thing is that it is high enough, otherwise the liquid will overflow. Place the container on the table so that it stands level. Place the device in the drink - it should not come into contact with the walls. Carefully remove your hand - the “float” should hover in the liquid. Look at the scale - to what value the liquid has reached, this is the strength indicator
Initial conditions for measurements
1. The alcohol meter should be stored in its original packaging, without subjecting it to shaking or other mechanical influences that could affect its integrity and accuracy. Glass models are very fragile and break easily. If cracks, scratches or other defects appear, the device is damaged and requires replacement.
2. Most alcohol meters are calibrated to operate in a solution whose temperature is 20°C (deviation of no more than 0.5 degrees is allowed). At higher temperatures, the hydrometer overestimates the strength, at low temperatures it underestimates. Failure to comply with the temperature conditions causes a measurement error of up to 7%. The density of the liquid also depends on atmospheric pressure, the recommended value is 760 mm Hg. Art.
3. All alcohol meters (except optical, electronic and wine meters) are designed to work with liquids containing only ethyl alcohol and water. Any other impurities (sugar, juice, tannins after infusion in a barrel, heavy metal salts in water and even fusel oils of poorly purified moonshine) change the density of the solution, leading to inaccurate measurements.
Source: alcofan.com
An alcohol meter is used to determine the concentration of alcohol in an aqueous solution. To measure the strength of vodka, a household alcohol meter is used, and when the mixture of alcohol and water is brought to the required proportion, it is worth buying a laboratory alcohol meter to check. Please note that you can buy a household wine meter for liqueur, wine or mash.
The most common alcoholometers are glass ones, the operating principle of which is based on the dependence of liquid density on mass and volume. They are cheap and easy to use, do not require serious maintenance, and are produced for household and research purposes. Their only drawback is the fragility of the case, so they are often supplied in cardboard or plastic cases or tubes.
Design of a glass alcoholometer
The most popular type of alcohol meter is a sealed glass float of precisely defined mass. Based on how deeply the device is immersed in the liquid being tested (how much liquid will be displaced), the density is determined.
A glass alcoholometer is a sealed narrow glass tube. In the wide part there is a load of shot filled with resin. Sometimes mercury is used as a cargo. A paper scale with divisions is inserted into the narrow part that floats above the surface of the liquid. The scale can be calibrated in mass fractions of alcohol, in density values or in degrees of strength of the drink. Sometimes there is a thermometer in the wide part of the alcohol meter.
There are alcohol meters of other designs, for example, in the form of a funnel with a capillary into which the liquid being tested is poured.
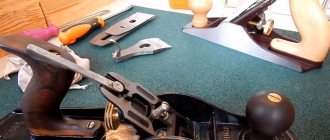
How to use a glass alcoholometer
a household alcohol meter is used, and when the mixture of alcohol and water is brought to the required proportion, it is worth buying a laboratory alcohol meter to check.
Please note that you can buy a household wine meter for liqueur, wine or mash. The most common alcoholometers are glass ones, the operating principle of which is based on the dependence of liquid density on mass and volume. They are cheap and easy to use, do not require serious maintenance, and are produced for household and research purposes. Their only drawback is the fragility of the case, so they are often supplied in cardboard or plastic cases or tubes.
Design of a glass alcoholometer
The most popular type of alcohol meter is a sealed glass float of precisely defined mass. Based on how deeply the device is immersed in the liquid being tested (how much liquid will be displaced), the density is determined.
A glass alcoholometer is a sealed narrow glass tube. In the wide part there is a load of shot filled with resin. Sometimes mercury is used as a cargo. A paper scale with divisions is inserted into the narrow part that floats above the surface of the liquid. The scale can be calibrated in mass fractions of alcohol, in density values or in degrees of strength of the drink. Sometimes there is a thermometer in the wide part of the alcohol meter.
There are alcohol meters of other designs, for example, in the form of a funnel with a capillary into which the liquid being tested is poured.
How to use a glass alcoholometer
The alcohol meter is very easy to use. It is enough to carefully lower it into the liquid so that it floats up. The alcohol meter should not touch the walls of the vessel. Since alcohol meters are most often long, the liquid should first be poured into a tall narrow vessel. The liquid temperature should be +20 °C, since alcohol meters are usually calibrated at the factory at this temperature. Readings should be taken along the lower edge of the meniscus.
What types of glass alcoholometers are there?
Glass alcohol meters can be divided into household and professional, or laboratory thermometers. Household ones, in turn, are divided into: universal;
- vinometers-sugar meters;
- glass alcohol meters.
Professional alcohol meters are designed to measure the concentration of alcohol in a water-alcohol solution. They are produced in different accuracies, with a scale calibrated from a range of 5% mass fraction of alcohol to a scale of several tens of percent, for example ASP-3 0 ... 40.
A household universal alcohol meter (hydrometer) and a glass alcohol meter, which you can buy in our store, measure the amount of alcohol in degrees of strength from 0 to 96. Suitable for moonshine, solutions of alcohol in water, vodka, raw alcohol. A shot glass alcohol meter differs only in size. Its length is only 8 cm and it allows you to measure the strength of the drink directly in the glass.
Vinomer-sugar meter is designed to measure the amount of alcohol and
sugar in sugar-containing weak solutions. These can be liqueurs, store-bought or homemade wines, homemade beer or mash. With its help, you can control the fermentation processes by the amount of sugar remaining in the wort. Measuring range of the device: 0 ... 25% sugar, 0 ... 18% alcohol by volume.
Where to buy an alcohol meter in an online store?
In the Prime Chemicals Group store. Our warehouse is in Mytishchi, but we have delivery, so you can buy a laboratory alcohol meter in Moscow, buy a household alcohol meter, and also buy a professional alcohol meter at affordable prices . Experienced managers will help you make the right choice.
Source: pcgroup.ru
Types of alcohol meters
Based on the measurement principle and technical characteristics, alcohol meters can be divided into glass, digital and optical. Glass drinks are classified according to the maximum strength of the drink, which can be measured with one or another device. There are also special types of alcohol meters that are suitable for measuring liquids with impurities; however, they cannot quite be classified as the classic type of precision alcohol meters. This refers to an alcoholometer for wine - a vinometer. However, experts usually distinguish the following types of alcohol meters:
- domestic;
- professional or laboratory;
- glass;
- optic;
- digital;
- wine meters and sugar meters.
Let's look at each type in more detail.
Analogues of this product
The group (Teplopribory, Prompribor, Teplokontrol, etc.) is instruments and automation for measuring, monitoring and regulating the parameters of technological processes (flow metering, heat control, heat metering, control of pressure, level, properties and concentration, etc.).
https://www.youtube.com/watch?v=ytpressen-GB
Geography of Teplopribor Group of Companies: Moscow, Ryazan, Chelyabinsk, Kazan, Yekaterinburg, St. Petersburg, Novosibirsk, Nizhny Novgorod, Samara, Rostov-on-Don, Ufa, Krasnoyarsk, Perm, Voronezh, Belgorod, Volgograd, Krasnodar, Saratov, Tyumen , Tomsk, Omsk, Irkutsk, Ulan-Ude, Saransk, Cheboksary, Yaroslavl and other cities of the Russian Federation, we also work with Belarus, Ukraine and Kazakhstan.
Fine. But can I at least find out the strength of the moonshine?
People involved in the production of alcoholic beverages are well aware of the importance of using an alcohol meter correctly. It is this device that allows you to determine the amount of pure alcohol in a liquid and with its help you can create drinks with different strengths
But to obtain correct results, it is necessary to purchase a suitable device and use it correctly in the future.
The density of the finished product is calculated based on the ingredients included in its composition. For example, you prepared galangal butter using a liter of 70-degree alcohol. Let's say that the dried root of the degree was almost not stolen. Then we diluted the tincture with half a liter of water - the strength was about 46-47 degrees. And then they sweetened it with a syrup made from 100 ml of water and 100 ml of sugar - from the water the strength dropped by another three degrees, the sugar “ate” about the same amount - after all, the volume of the drink increased.
Yes, in this case good alcohol meters work quite accurately. Despite the fact that moonshine is still not a rectified product, and it still contains additional substances - for example, the same essential or fusel oils, which are heavier than ethylene, or vice versa, lighter alcohols - acetone, isopropyl and others like them, in In general, the error here is not particularly large.
Methods for determining the strength of alcohol
Experienced distillers have their own methods that help them, without instruments, so to speak, “by eye,” determine the quality of the drink.
It is quite difficult to check their accuracy, since the methods do not provide accurate information, but only indirectly indicate the number of degrees contained in alcohol. But nevertheless, such methods are considered relatively accurate and, in the absence of the necessary equipment, they can be used. How to find out about alcohol strength:
Pervach, or pervak, which is distinguished by high strength levels, will give itself away with a specific smell. In addition, drops of such moonshine will roll along the bottom of a glass jar - this means that the strength of the drink reaches 80 degrees. Quality is determined in a simpler way - the moonshine is simply set on fire. You can blot the distillate with a napkin and then simply set it on fire. If the napkin burns and the fire does not go out, the flame is even and burns blue, in this case the strength of the drink in degrees is not lower than 40. If you soak the napkin with moonshine, set it on fire and the fire burns unevenly, goes out or “blinks,” then the strength of the drink is below 40 degrees, but not less than 20. If the test is carried out during fractional distillation, then the drop in degree is perceived as a sign that it is necessary to begin selecting the “tails”. The “tails” are taken away until the napkin somehow burns. You can simply pour moonshine into a spoon and set it on fire
This method is used instead of checking with a napkin, paying attention only to the fire.
Not only fire, but also a visual assessment will help you recognize strong alcohol.
You can focus on color and smell:
- If a drink has a pronounced aroma, a sharp, specific smell, then its strength is quite high or it is of low quality. If the aroma is not so pronounced, then we can say that the strength of the drink is falling. A faint smell indicates that the strength of the moonshine has dropped.
- The process of determining the quality characteristics of a distillate produced at home has one more component - a visual assessment of the transparency of the drink. If the moonshine is not cloudy, then its strength is very high. If the alcohol is cloudy and does not have a pungent odor, then its quality is questionable.
- During the measurement process, you can resort to one more trick - tasting the drink. This will help you form a definite opinion about the degrees without using any instruments.
There is an opinion that the purest alcohol “like a baby’s tear”, which is also the strongest, is perceived by distillers as an indicator of the quality of the distillate. In reality this is a little different. Diluted moonshine can also be pure, but a cloudy drink can have incredible quality indicators.
Now about our favorite “degrees”.
In our time, this is a non-systematic, non-standard (not GOST), outdated unit and in our time it no longer means anything or means what any “clever” homemade moonshiner-Kulibin from the 19th – early 20th centuries can attribute to it.
In the 19th century, during the time of Dmitry Ivanovich, at the beginning of the 20th century, this unit corresponded to certain values. And not only massive, but also voluminous!! There were different calculation systems, if you are interested in details, look at the article from the journal “Issues of the history of natural science and technology” No. 2, 1999 “FROM THE HISTORY OF RUSSIAN SPIROMETRY”, L.B. Bondarenko.
You see, I didn’t even feel like drinking! - Well, where is it - without degrees? It's better to drink milk! Firstly, you have been confused by numerous calculations floating around the Internet: A liter of vodka with a strength of 40° contains 572 g of water and 381 g of grain ethyl alcohol. If the label of a bottle of vodka says 40% vol. (forty percent of the volume), then in a liter of such vodka (according to Father Dmitry Ivanovich Mendeleev) there are 635 g of water and only 318 g of grain ethyl alcohol, which is approximately 35°.
For 572 g of water - 381 g of alcohol - there is more alcohol here. – 40° For 635 g of water – 318 g of alcohol – this is less strong! – 40% or
35° In the first case, the vodka was 40 degrees, in the second - 40 percent. The first vodka is stronger and 40 degrees is not equivalent to 40 percent.
It makes you want to convert percentages into degrees, right? Don't count! In this passage there should be MASS fractions instead of degrees. Yes, there are volume percentages and there are mass percentages. Naturally, different results are obtained. But in the alcoholic beverage industry, mass fractions (when calculating alcohol content!) are not used. Volume percentage only! Secondly, William Pokhlebkin brought great confusion into our minds with his book about vodka (Pokhlebkin V.V. “The History of Vodka”).
Personally, I respect this man very much, but, unfortunately, he was not friendly with the exact sciences and wrote a lot of unnecessary (or rather incorrect) things, both about vodka and about Dmitry Ivanovich (see below). It is from him that this confusion with degrees, mass percentages still comes... Here you can write a lot about his mistakes, but it’s better to conclude:
We must remember: from the 70s of the 20th century to this day, designations on labels are indicated only in volume percentages, for example: 40% vol. Also, since that time, degrees have been mentioned out of inertia, but these degrees are equal to volume percentages, not mass percentages. Moreover, they often wrote back then: “forty proof vodka – 40°, that is, 40% vol.” That is, they said that it was the same thing.
Therefore, if some smart guy comes up to you and asks:
- How can we convert percentages into degrees? answer: “You are confusing, young man, degrees and mass fractions!” There are no degrees in official standards now. Everything is measured (in the liquor industry, written on labels) in percentages by volume. If you so want, you can convert the mass fractions into volume fractions, but this is only for personal self-affirmation and has nothing to do with the contents of the bottle. If you notice a designation in degrees on some bottles, then be sure that this is either left-handed/scorched vodka or illiterate (super illiterate) manufacturers who did not care about the standards. (Unfortunately, we have to admit that our time is the time of the illiterate, to say the least. This is where most of our troubles come from.)
Well, now for lovers of everything about Dmitry Ivanovich Mendeleev.
Here is what Pokhlebkin wrote:
While studying alcohol-water solutions, Mendeleev “noticed” their features and drew attention to their connection with the appearance of different qualities in different water-alcohol mixtures. It turned out that the physical, biochemical and physiological qualities of these mixtures are also very different, which prompted D.I.
Mendeleev to look for the ideal ratio of volume and weight of the parts of alcohol and water in vodka. While various volumes of water and alcohol were previously mixed, D.I. Mendeleev mixed various weight samples of water and alcohol, which was much more difficult and gave more accurate results. It turned out that the ideal alcohol content in water should be 40°, which was never obtained by mixing water and alcohol by volume, but could only be obtained by mixing exact weight ratios of alcohol and water.
That last sentence is absolute nonsense from a scientific point of view.
And, besides this, when mixing alcohol and water, everything goes smoothly on the full “section of the curve” and 40 percent or degrees do not stand out in any way on the graphs. Mendeleev in his works nowhere states that vodka should be exactly 40 degrees - no one has conducted “physical, biochemical and physiological” studies, so there is no ideal ratio!
Interpretation of measurements
The first readings taken before fermentation begins will tell you whether there is enough sugar to produce the required amount of alcohol. For a wine to be stable, it must have an alcohol content of at least 10%, which means that the initial specific gravity must be at least 1.080 (Brix must be at least 20). If the sugar level is too low, it needs to be adjusted and then another measurement taken. The new indicator will become a “first”.
Any data obtained after the start of fermentation can be compared with previous ones and the overall progress of fermentation can be tracked. A decrease in density indicates a decrease in sugar levels and an increase in alcohol content. If the vinometer reading remains stable between two measurements, then this is one of the signs that fermentation is complete.
If the density of the wine increases and it is not due to added sugar or another element, carbon dioxide is likely the culprit, especially if bubbles are visible. If this occurs towards the end of the fermentation period, you can get rid of the gas by vigorously stirring the wine after decanting it.
If the reading remains stable with a specific gravity above 0.996 (or Brix of zero or less) and the desired amount of alcohol is present, fermentation is complete with residual sugar present. But if the readings remain unchanged at a gravity that is well above 0.996 (or Brix above zero) and the alcohol level is well below the recommended minimum, then fermentation has likely stopped and should be restarted.
Once the specific gravity drops to about 0.996 or below (a little below zero Brix), the wine has fermented to dryness.
To calculate the actual amount of alcohol or sugar, the current reading must be compared with the first one, which was taken before fermentation began. In this case, the percentage of alcohol content is found by multiplying the difference between the initial and final specific gravity by 132.
How to choose an alcohol meter for your own needs
Later, with experience and the creation of more and more elite alcohol, as a rule, they switch to ASP-3. However, you should be somewhat skeptical about Chinese-made devices. Among them there are some that are not entirely accurate. Besides, they are too fragile. Sometimes they break when they are simply pulled out of the cardboard tube.
Electronic (digital) is just a moonshiner’s dream. And not only because of the accuracy of the readings, but also because of the ease of use. Thin long probe, digital display. There is no need to recalculate anything; the alcohol meter does this on its own, taking into account the temperature of the drink. And it shows alcohol content with minimal error.
I’ll say right away: if you only have a glass alcohol meter, throw it away and get at least a decent household one, otherwise there will be no question of any measurement accuracy! But even household ones are most often not distinguished by high reliability, because they are made in a clumsy way - that’s why they cost pennies. In my personal opinion (and in this matter it completely coincides with the opinion of the majority of experienced moonshiners), you should purchase ASP-3 alcohol meters - their set includes three devices with ranges of 0-40°, 40-70° and 70-100°, the division price is one degree.
In addition to conventional alcohol meters, there are also more advanced models, for example, optical ones (refractometers - editor's note), which I have already mentioned - expensive and requiring tricky calibration, but capable of measuring the strength of even wine or liquor. As far as I know, electronic hydrometers capable of showing the degree in a finished product are not produced - they measure the strength only in the tank or in the cooler of a working apparatus, based on a complex algorithm, and are used mainly not for distillation, but for vacuum rectification. An example is the ETS-223 alcohol meter/thermometer.
Those who are starting or are already professionally engaged in the production of homemade alcoholic beverages try to acquire high-quality and practical equipment or accessories that allow them to successfully control the process. If a home winemaker has all the necessary devices and tools at hand, then most likely the production of alcoholic beverages, even using the most complex technologies, will be effective, and the result is the appearance of a tasty and pleasant alcoholic drink on the table.
Digital and optical alcohol meters and vinometer
Less common devices are an electronic or digital alcohol meter, which is characterized by instant action and accurate results. Additionally equipped with a thermometer. The disadvantage of such a device for private use is its high price.
An optical alcoholometer or refractometer is, for the most part, a professional device that is more suitable for winemakers.
Using an expensive electronic alcohol meter or a complex optical one at home does not make sense. After all, cheap glass instruments, the use of which does not require much effort, do an excellent job of determining the alcohol content in water.
For some reason, wine meters are classified as a type of alcoholometer, although they are, rather, a separate type of hydrometer that allows you to determine the alcohol and sugar content in grape must.
Types of hydrometers
These devices have another name - an alcohol hydrometer.
There are several different varieties on sale today. Each specific type has its own nuances in operation, which must be taken into account when purchasing. Moreover, all types can be used both at home and directly in production.
What different types of alcohol meters consist of and how to check alcohol strength with their help, we will consider further.
Laboratory
This type of alcohol meter is considered the most accurate; the data obtained with its help is 99.9% accurate. It is used when carrying out special laboratory studies of various types.
Each scale of its division is equal to one degree.
The great advantage of this device is its ease of use, as well as the possibility of using it at home. Professional moonshiners in most cases prefer it.
Domestic
It has been specially designed for home use.
The scale of its divisions is also equal to one degree. There are universal household hydrometers, which are suitable for determining the strength of any drink, and individual ones, with the help of which you can determine the percentage of alcohol in only one drink.
Digital or electronic
A digital device for measuring degrees is characterized by high accuracy in measuring the alcohol content in liquid vapor.
- The results obtained during the measurement are displayed on a special mini-monitor.
- With its help you can determine not only the alcohol concentration, but also the temperature of the liquid.
Such devices are considered the most accurate, modern and easy to use. At the same time, they are also the most expensive.
Optic
Using this device you can determine the strength of alcoholic beverages up to 40 degrees.
The great advantage of this device is that it can be used to determine the strength of a variety of multi-component alcohol, such as liqueurs, wines, liqueurs and vermouths.
Simple and reliable to use.
Ryumochny
This device is specifically designed to measure the strength of alcohol already poured into a glass. It is compact in size, easy and quick to use. It is distinguished by high accuracy of the obtained measurement result.
Wine meter
As is already clear from the name of this device, it was specially created to determine the strength of various wines.
Its use allows you to determine not only the strength of these alcoholic drinks within 20 degrees, but also allows you to find out the exact concentration of sugar in them.
All these types of devices are further divided into two large groups, depending on the material they are made of:
- glass devices are light in weight and inexpensive, but require particularly careful use;
- metal alcohol meters are reliable, durable and have a higher price.
People who use hydrometers of various types say that when used correctly, there is no significant difference between these two types.
How to determine the strength of alcoholic drinks?
An alcohol meter, despite its ease of use and rather simple design, is actually a rather complex device.
When using it, you need to observe some subtleties that will help you get a reliable result:
you cannot simply throw the hydrometer into a container with liquid, it must be slowly dipped into it, before taking final readings you must wait until the alcohol meter freezes, during measurements the device should in no case touch the walls or bottom of the vessel, it is important to select an alcohol meter, which is designed to determine the strength of a suitable liquid, the alcohol meter should not be immersed in extremely hot or cold liquid. This will lead to incorrect measurement results. Most often, these devices are used to find out exactly how many degrees of alcohol are contained in drinks such as wine, moonshine or beer
Most often, these devices are used to find out exactly how many degrees of alcohol are contained in drinks such as wine, moonshine or beer.
In each specific case, the procedure will be slightly different from each other.
Moonshine
Instructions for measuring distillate strength:
- The device must be wiped with a dry cloth to remove moisture, dust and any other contaminants.
- You should make sure that the moonshine has a room temperature of no lower than 18 and no higher than 25 degrees.
- Pour an alcoholic drink into a glass.
- Carefully place the alcohol meter into it and wait until it locks in one position.
- Evaluate the result obtained.
Watch a video that describes the step-by-step process of measuring alcohol strength:
For different devices, readings must be taken from the top or bottom, so be sure to read the manufacturer’s instructions before taking measurements.
Table of alcohol content and its dependence on temperature:
You might be interested in reading about the famous Lager beer!
Beer
It’s worth saying right away. That a regular alcohol meter, which is designed to determine the strength of alcohol, moonshine or vodka, is not suitable for beer.
You can measure the strength of this alcoholic drink using an optical hydrometer, which is suitable for any alcoholic liquids that contain alcohol, water and other additives.
Procedure:
- Place the device in a vessel with liquid heated to 15 degrees.
- Wait until all gas bubbles disappear.
- Take the obtained measurements.
This procedure must be performed twice. The first time before the start of fermentation, and the second time after its completion.
From the results obtained in the first measurement, the data obtained in the second study are subtracted and the strength of the beer is obtained.
Each manufacturer must indicate on the label or packaging itself the strength of each unit of its alcohol.
Wine
The strength of this alcoholic drink can be measured using two different devices: a capillary wine meter and a device that determines not only the percentage of alcohol in the liquid, but also the percentage of sugar in it.
When using a capillary device, the procedure will be as follows:
- Fill the device funnel halfway full with wine.
- Holding the device in a straight position, wait until 10 drops of liquid come out from its lower part.
- Turn the device over and place it on a flat horizontal surface.
- Carefully follow to the point at which the liquid becomes fixed and stops going down.
The result obtained will be the final strength of the wine.
Using a vinometer-sachometer you must:
- pour the liquid into a sterile container and place it on the table,
- Using rotating, leisurely movements, lower the vinometer into the wine,
- wait until the device stops rotating and moving inside the vessel,
- take the obtained measurement results.
Table of strength of different types of wines:
You can determine the strength of any alcoholic drink quite quickly and easily.
In order to ensure the accuracy of the result obtained during measurements, you can use the hydrometer twice
It is very important that all measurement conditions, including the temperature of the liquid and the environment, are identical
Alcohol meters are easy-to-use devices that must be in the arsenal of any person who produces various alcoholic beverages.
How to use a wine meter correctly
Before you start using the sugar meter, you should check its integrity. Devices that have minor defects in the form of scratches and cracks are not suitable for use and require replacement. You should make sure that the wine meter was stored in its original packaging or in a special case that protects it from shaking and shock. Mechanical impact may affect the accuracy of the measurement. It must be remembered that most instruments are designed to work with liquids whose temperature does not exceed 20 C. If this rule is not observed, the measurement error can reach high values. Also, a pressure of 760 mm Hg is required for the wine meter to work. pillar Other indicators will affect the density of the drink, and the device will again show incorrect results.
Usage algorithm
1. A sample of the drink to be measured is poured into a measuring cylinder. Before starting, you should stir the liquid a little to remove carbon dioxide, which will interfere with the measurement.
2. Wipe the sugar meter dry if calibration has been performed. Before immersing the wort, it must be completely dry.
3. The vinometer is carefully immersed in the liquid. It should not touch the walls.
Note: Be careful not to hit the bottom of the cylinder. The glass body is very fragile and can break easily.
4. Wait until the sugar meter stops “jumping” in the liquid and calms down. We record the testimony.
Note: Most wine meters measure at the lower meniscus of the liquid.
5. Get a sugar meter. Dry. Place in case until next use.
Method for measuring sugar
The amount of sugar in a drink determines its density. The more the sugar meter is immersed in the liquid, the less sugar is in the sample, which indicates that the fermentation process is active or has already completed, and vice versa.
Method for measuring the strength of a drink
It is correct to measure density at the beginning and end of fermentation. The conclusion about the strength of the wort is made based on these indicators. Initial gravity (sugar content) is measured before yeast is added to the wort. For wine it is 10 – 31%. The final density is measured when the sugar content is below 2 - 2.5%, and does not change for two days.
To measure the strength of a drink, you should look at the table for the units of alcohol corresponding to the initial and final gravity, then subtract the smaller from the larger indicator.
Types of household hydrometers
All types of hydrometers operate on the principle of Archimedes' hydrostatic law: the volume of any physical body is equal to the volume of water displaced by this body. The device can be immersed to different depths depending on the density of the liquid.
It looks like a glass flask, the lower part of which is filled with mercury for ballast during diving. In the center there is a float and a scale with gradation of solution density.
The use of hydrometers is necessary in various fields of activity, as well as in a home mini-laboratory. By the name of the devices you can determine exactly where one or another type will be used:
- Alcohol meter. Used to measure the strength of a drink as a percentage. Only it can determine the strength of the finished product and the moment the wort fermentation process stops, which is so necessary for amateur brewers.
- Lactometer. Determines the fat content of milk. You can always check its quality at home. This procedure is especially relevant for people purchasing products in large quantities.
- Salt meter. Useful in the household during the period of preservation of preparations - the concentration of the pickling solution is tested. Also used to determine water hardness and salt content. The device is easy to use. It consists of a housing with a screen and electrodes, and operates on a battery.
- Saccharometer or wine meter. Looks like a glass float with a double scale. One saccharometer scale shows the percentage of sugar, and the other the concentration of ethyl alcohol in the wort.
- Capillary wine meter. Widely used among European winemakers. The device determines the viscosity of dry and sweet wines. How does a capillary vinometer work? The device is a funnel with a calibrated tube at the bottom through which liquid comes out at different speeds depending on the viscosity. It is known that the viscosity of solutions decreases with increasing amount of alcohol in them.
There are many other hydrometers that are used in enterprises, medicine, and laboratories. They test petroleum products, acids and other types of liquids.
Useful videos
Is there a difference between an alcohol meter and a hydrometer? How can you make your own device for measuring the percentage of alcohol in a solution:
A simple and intelligible review of household alcohol meters and professional hydrometers ASP 1 and ASP 3, look:
How accurate are Chinese alcohol hydrometers? We look at the comparison with Russian TSA in the video:
How to correctly measure alcohol content in solutions:
We recommend reading: How to make alcohol at home from various raw materials?
Have some delicious moonshine of the right strength. Like and recommend the article on social networks.
Source: kaksamogon.ru
In the process of preparing moonshine, the most important issues are the quality and strength of the product. How can we determine the strength (degree) of a product? To determine the strength, you can use a device called an alcoholometer, which is a type of hydrometer.
The functional feature of the alcohol meter depends on the purity of the solution obtained during distillation of the mash, i.e. the purer the water + alcohol solution, the more accurate the strength indicator of the resulting product. The most common type of alcoholometer model is made in the form of a glass float, the wide lower part of which is filled with a load of shot (usually lead) and filled with resin (some models use mercury), and the upper narrow part contains a paper scale with divisions. There is a generally accepted division into laboratory and household alcohol meters. Unlike a household alcohol meter, it has a high level of accuracy in determining alcohol strength. A household alcohol meter usually consists of one device that operates in the range of 0-96%. It differs from laboratory analogues in less accuracy. If all measurement conditions are met, the error is up to 0.5%. More suitable for beginner moonshiners.
Let's take a closer look at a laboratory alcohol meter (what is it for and how to use it). In Russia, the most popular alcohol meters of this type, corresponding to GOST 18481-81, are the sets ASP-1 (11 pieces included), ASP-2 (18 pieces), ASP-3 (3 pieces) with different gradations. Most experienced moonshiners use the ASP-3 kit, which has a scale division price of 1%. The set consists of three hydrometers: 0-40%, 40-70% and 70-100%.
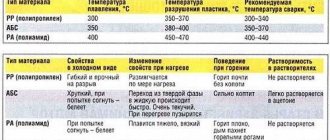
Initial conditions for carrying out measurements 1. The alcohol meter should be stored in its original packaging, without subjecting it to shaking or other mechanical influences that could affect its integrity and accuracy. Glass models are very fragile and break easily. If cracks, scratches or other defects appear, the device is damaged. 2. Most alcohol meters are calibrated to operate in a solution whose temperature is 20°C (deviation of no more than 0.5 degrees is allowed). It is important to remember that at higher temperatures the device begins to overestimate the strength, and at low temperatures it underestimates. Failure to comply with the temperature conditions causes a measurement error of up to 7%. The density of the liquid also depends on atmospheric pressure, the recommended value is 760 mm Hg. Art. How to measure strength with an alcohol meter 1. Dilute alcohol with water, wait 5-10 minutes until the intensity of the chemical reaction decreases (at this time a lot of heat is released). 2. Wipe the alcohol meter with a dry, clean cloth so that no greasy or dirty stains remain. The device must be completely dry before immersion in liquid. 3. Bring the solution temperature to the recommended one – 20°C. An approximate correction of alcohol meter readings depending on the temperature of the alcohol is shown in the table.
| Range (strength) | 5°C | 10°C | 15°C | 20°C | 25°C | 30°C | 35°C |
| 20-60% | +6% | +4% | +2% | — | -2% | -4% | -6% |
| 65-80% | +5% | +3% | +2% | — | -1% | -3% | -5% |
| 85%+ | +4% | +3% | +1% | — | -1% | -3% | -4% |
4. Pour the alcohol-containing liquid into a tall, narrow container of small volume (measuring flask, cylinder or beaker). 5. Lower the alcohol meter with its wide bottom part into the liquid in the middle of the vessel. If you throw it too quickly, the device may hit the bottom and break. The alcohol meter must not touch the walls of the vessel!
6. Wait for the alcohol meter to stabilize at the same level. If it sank, it means it is faulty or not designed for this strength. For example, the device operates in the range of 0-40%, but is dipped in 70% alcohol. 7. View the result. Depending on the design of the alcohol meter, readings are taken from the upper edge of the meniscus (red arrow) or from the lower edge (green arrow). This point must be indicated in the instructions. 8. Remove the alcohol meter from the volumetric flask, wipe it, and put it in the original storage case.
Source: samogonok.ru
How accurate is the vinometer?
Using a household appliance, it is impossible to determine the amount of alcohol in homemade wine with an accuracy of one degree. Only optical alcohol meters, which are used only by professionals, can establish the truth without errors. But experienced artisanal winemakers argue that, in the end, the organoleptic characteristics of the drink are much more important, rather than the digital ones.
It is possible to obtain more accurate data, if such a need arises, with the help of additional calculations. For example, you prepared a tincture with 70% alcohol - you took a liter - and added dried ginger root to it. It has little effect on the process of reducing the strength. Then you diluted the resulting alcohol with water - half a liter.
The tincture has become less high-proof - 47-48%. Next you used syrup, which took another 6-7 degrees. And as a result, the strength of the tincture became 40-41%. If we are talking about fruit and berry homemade alcohol, then everything is more complicated, because fresh ingredients contain water, which significantly reduces the degree - on average by 10-15%.
Gift alcohol meter
Existing instrument models
There are several varieties that differ in functionality and price. In addition, not all of them are intended for artisanal alcohol production.
Household alcohol meter with measurement scale 0-96
Laboratory-type hydrometer - can be used both in industrial production and at home. Among those who make alcoholic drinks on their own, the most popular is the ASP-3 model, which is created in accordance with GOST. Designed for measuring alcohol in the range from 40% to 70%.
Hydrometer ASP-3
A glass alcoholometer is designed to measure the contents of tasting containers. That is, it can be used to determine the strength of the alcohol you are about to drink. It has an extremely large error, and therefore is rarely used.
Shot alcohol meter
The digital model is the most modern option, which gives the most accurate readings without any additional calculations. It is very convenient to use directly during the distillation process. The only, but significant, disadvantage is the high price.
Electronic alcohol meter
An optical hydrometer is a professional device that is not used at home.
Optical alcoholometer
Wine alcoholometer or wine meter - used to determine the strength level in tinctures, liqueurs, homemade wines, that is, in alcoholic drinks that contain a lot of impurities. It has a scale with a small range of values - 0-12. At the same time, it can measure the sugar level in finished alcohol and in mash.
Measuring degrees in wine. Wine meter.
Optional equipment
The stores offer a wide selection of hydrometers of various directions and gradations. For ease of use, additional equipment is offered
. Basically, this is a thermometer for measuring the temperature of a drink, on which the accuracy of the result depends. A graduated cylinder made of glass or plastic, of various volumes. As well as a special probe designed for sampling mash, wine and other drinks.
Hydrometer classifications:
- Laboratory - designed to measure the volume of alcohol in mixtures from which various household products are made. Such a device is quite accurate, so it is usually used for professional determination of the strength of a solution. It works with very high precision. This type of hydrometer has three varieties - determining the percentage of alcohol from 0% to 40%, from 40% to 70% and from 70% to 100%.
- Household - used to determine the percentage of alcohol in liquids at home. It is a glass vessel with mercury in the lower part. At the top there is a scale that immediately shows the percentage of alcohol content in the liquid. When using it, certain conditions must be observed. Firstly, the solution temperature should be 20 degrees! Secondly, besides water, there should be no impurities in the liquid! Thirdly, the hydrometer should not touch the walls of the container in which the measurement is being made!
- Electronic (digital) is good because its indicators are much more accurate than a regular hydrometer with a scale. However, the cost of this option will be slightly more expensive. Electronic is characterized by stable operation and fast sensor response.
- Optical - used to determine the concentration of ethyl alcohol in a water-containing mixture or multicomponent solution. And also to account for alcohol during its production. The amount of alcohol in this device is calculated according to a specific algorithm embedded in the microprocessor program. The temperature range of measured liquids in an optical alcoholometer is wider (than in a household one), it ranges from plus 5 and inclusive to plus 40 degrees.
- Universal is an unpretentious and convenient device for determining the strength of any liquid containing alcohol. The scale of such a hydrometer has a scale from 0 to 96 degrees.
- A glass hydrometer is a compact hydrometer for determining strength in a small vessel, for example, a glass. The scale available in such a device (0-80 g) allows you to determine the alcohol content in the liquid with maximum accuracy.
- A wine meter is a type of alcoholometer that is used to determine the strength of wines, as well as the amount of sugar in the drink. This device is used in everyday life and is an invariable companion of any winemaker.
How to use an alcohol meter
The most important thing to remember when working with an alcohol meter is the need to control the temperature of the product and the environment. The standard for measurement is 20 °C
If possible, it should be followed, otherwise a special correction table or our calculator should be used.
Atmospheric pressure also affects the density of the drink (although not so noticeably); if possible, it should be close to 760 mm Hg. Art. The influence of other factors on the accuracy of readings can be ignored.
To measure strength, you need:
- Pour the alcohol into a narrow glass vessel (about 100 ml in volume). In principle, you can take measurements directly in the jar, but this is not very convenient.
- Place the alcohol meter into the drink, making sure that it floats freely in the liquid and does not touch the walls of the container. If the device sinks, you should take the option for a higher strength, if it floats to the surface - for a lower one (when it comes to ASP).
- Wait until the vibrations subside and take readings. If necessary, adjust the value taking into account the temperature.
When the device is immersed, a kind of funnel is formed around it due to the tension of the liquid. To determine which line to take measurements on (lower or upper), you should refer to the instructions for the device.
If temperature and other recommendations are strictly followed, the measurement error will be minimal.
Significant deviations are possible if there are many impurities in the drink or the device is dirty. The alcohol meter should be thoroughly wiped and washed before use. But this must be done delicately so as not to damage or break the fragile instrument. For the same reason, it is better to store it in a box.
Found a mistake or have something to add? Select the text and press CTRL + ENTER or click here. Thank you for your contribution to the development of the site!
Everything you need to know about using an alcohol meter
Alcohol meters come in various models, but most often this device is a cone sealed on both sides, the lower wide part of which contains a weighting agent, and the narrow upper part contains a scale with markings. The main varieties include the following:
- Laboratory. This device is used by professionals, setting the level of liquid strength with fairly high accuracy;
- A digital, also known as electronic, hydrometer quickly and accurately takes the necessary readings, but is expensive;
- If you need to find out about the strength of a liquid, where there are other components in addition to alcohol and water, an optical device is used. This device will show results in a range of up to 40 degrees and provide information about the amount of sugar in the drink. It is usually used by producers of wine and various liqueurs;
- Ryumochny. As the name suggests, this compact specimen is convenient to use for checking liquids for alcohol content in small containers. However, its accuracy leaves much to be desired;
- A wine alcohol meter is used exclusively to determine the sugar content of alcohol (up to 25%) and alcohol content (up to 12%).
Using an alcohol meter correctly
For maximum measurement accuracy, there are instructions on how to use an alcohol meter. Compliance with these points is mandatory:
- If you have just diluted alcohol with water, then you need to wait until this chemical reaction is completed, during which the temperature of the solution rises. This usually takes no more than 10 minutes;
- Before immersing the device in liquid, you need to make sure that it is absolutely clean and dry. Wipe it gently with a soft cloth;
- It is better if the temperature of the alcohol-containing liquid is 20C°;
- For the most comfortable use of the device, it is better to pour the test liquid into a narrow and oblong container;
- Immerse the hydrometer slowly and strictly in the middle, without touching the edge of the container and its walls;
Homemade alcohol meter
If you accidentally break this fragile glass device, and you need to measure the alcohol content in the liquid right now, then you can try making an alcohol meter with your own hands.
The main components of a homemade meter are a transparent plastic body from a ballpoint pen and a plastic drop bottle
It is important that the body (length - 14 cm) fits tightly into the neck. We cut off the edge of the body a little, but on the other side we leave the part with the cap
Screw the bottom part into the bottle (to make the connection tighter, the bottle can be preheated in hot water)
We cut off the edge of the body a little, but on the other side we leave the part with the cap. Screw the bottom part into the bottle (to make the connection tighter, the bottle can be preheated in hot water).
To apply the correct markings, you need to lower our workpiece into water at room temperature and carefully place pieces of wire or small shot inside.
As soon as the device drops one and a half to two centimeters from the upper border of the bubble, you need to pour glue inside with a pipette (this is necessary to secure the weighting agent) and screw on the cap.
A notch made according to the water level will be considered 0.
Then, when you dip it in a container of vodka purchased from an official store (40 degrees), you will notice that it sinks deeper. Make a new mark and mark from 0 to 40 units.
Once you learn how to make an alcohol meter at home, you can easily measure the amount of alcohol. In addition, for more convenient use, you can arrange the notches in increments of 5 units.
Check for accuracy
If you are going to test an alcoholic drink for alcohol content, then keep in mind that the accuracy of the indicators may be affected by impurities included in the composition. The result of testing liqueurs, fruit liqueurs and other products will not be objective, since during production, factory devices are tested only in solutions of alcohol in water.
There is also an error due to temperature. If you were unable to meet the required indicator for the liquid being assessed at 20C°, then the indicators will not correspond to reality. The strength of a cold drink will be lower, and that of a warmer drink will be higher. Interestingly, these data are also affected by atmospheric pressure.
DIY making
However, if there is no opportunity or desire to buy such a device, then you can make it yourself. And we can say with confidence that homemade alcohol meters are not much inferior to factory instruments.
From a ballpoint pen
To make such a device you will need:
- a ballpoint pen case (the simplest one) no more than 14 centimeters in length;
- a plastic container for nasal drops and small shot (you can also use finely chopped steel wire or finely chopped lead for weight).
The following is done:
- The lower part of the handle is cut off by half a centimeter.
- To make it easier for the pen case to fit into the neck of the drop bottle, you need to hold it in hot water.
- The pen case is carefully screwed into the neck of the bottle.
- The workpiece is lowered into a container with warm water and a weighting agent is loaded through the upper hole until it is immersed in water one and a half to two centimeters from the neck. A mark is made on the case (it will be 0).
- Carefully bury the glue inside to fix the weighting material and screw the cap tightly.
- The alcohol meter is immersed in a container with 40-degree vodka. Mark 40.
- Use a ruler to measure the distance from 0 to 40 and divide by 40. This reading will correspond to one degree.
- Using the data obtained, a scale is formed. The alcohol meter is ready.
To make an alcohol meter from a fishing float you need:
- Take a float with a long pole. If necessary, attach a weight to the lower part to lower the float to the desired level.
- Place it in water at room temperature, put a mark that will be equal to zero.
- Pour 40 degrees vodka into a deep container, lower the float there and also put a mark. And, using the principle of an alcohol meter, form a scale from a ballpoint pen.
- test tube;
- weighting agent;
- test tube stopper and wooden rod 12–15 centimeters.
The next steps are:
- It is necessary to load the weighting agent into the test tube so that it is completely immersed in the liquid, but does not sink to the bottom, but floats near the surface.
- Secure the weighting agent with glue.
- Close the test tube with a stopper and insert a wooden rod into the stopper.
- According to the manufacturing principle of the above instruments, apply a scale to the rod.
Making a simple alcoholometer with your own hands is not as difficult as it might seem. Of course, you shouldn’t use it all the time, because it’s unlikely that you’ll be able to achieve accurate readings, but if the distillation process is already underway, and you’ve just broken the alcohol meter, then it can be built in 15-20 minutes. Take:
- a regular ballpoint pen;
- a plastic bottle for drops in the nose or eyes;
- shot or finely chopped wire;
- glue.
Now you can start getting creative:
- Unscrew the pen and remove the writing unit.
- Cut the handle cylinder to 1.5 cm and insert it tightly into the drop bottle. You can dip the neck of the bottle into boiling water, then quickly insert the handle into it, the connection will be tight and impermeable. But you can use, for example, a glue gun.
- Place the workpiece, bubble side down, into the water. The device will lie on the water.
- Carefully pour shot or wires through the body of the pen until the bubble drops and the water level is about 1.5 cm above it.
- Now, also carefully, drop glue into the bottle through the cylinder of the handle.
- Screw the cap on the pen.
- We do the first o, that is, we mark on the handle the place to which the device is immersed in water.
- Take it out of the water, pat it dry and dip it in store-bought vodka. We make the next mark – 40°.
- Divide the distance from 0 to 40 into 4 lines. Each corresponds to 10 degrees.
It is not difficult to calibrate a homemade alcohol meter even more accurately if you have several strong drinks (moonshine), the strength of which you know exactly. But you should not rely on the accuracy of such a hydrometer. Although it will help to roughly navigate the strength of what was kicked out.