Painting by spraying has advantages over working with a brush or even a roller. If everything is done correctly, the surfaces will look as if they were manufactured industrially. But before you paint with a spray gun, you need to study the rules for preparing surfaces and materials, as well as painting technology.
- Preparing the spray gun for work
- Working on surfaces before painting
- Dilution of the tool composition
- Safety requirements
- How to test spray
- Aerosol painting technology
- Walls and vertical surfaces
- Floor and ceiling
- Complex figures
Preparing the spray gun for work
When selecting and setting up a tool, you should take into account the type of material to be painted. The accompanying manuals list recommended paints and varnishes that the spray gun can handle effectively.
For a sprayer without a replaceable nozzle or without the ability to adjust its size, the optimal diameter is 1.5 mm.
It is important to correctly determine the volume of the paint container, which can range from 800 to 1500 ml. Larger tanks cost more. In addition, when filled, they will add extra weight, which you will have to hold in your raised hand all the time. But this disadvantage is compensated by the ability to paint longer without being distracted by replenishing liquid.
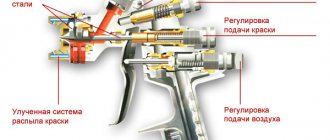
To figure out how to paint with a spray gun correctly, before use you need to carefully study the principle of its operation and the settings of the control screws.
Various models may have the following setting drives:
- flow direction – horizontal or vertical, changes by turning the nozzle on the tip;
- torch diameter - the width and density of the strip, which can be adjusted depending on the type of paint and the size of the product;
- air supply level, which increases or decreases the jet speed (available in air-based spray guns);
- pressure adjustment – controls the flow of paint.
The devices are sold unassembled; instructions for assembly are included.
Pneumatic sprayers can have a paint reservoir either on the top of the gun or on the bottom. The bottom location eases the load on the hand, the top refill economically consumes paint.
Working on surfaces before painting
The peculiarity of spray painting is that the smallest particles of paint distributed over the surface will highlight any defects and irregularities. Therefore, if we are talking about walls or ceilings, careful alignment “under the lantern” with the light directed at an angle is required before painting.
The next mandatory requirement is a primer. It will ensure an even application, prevent subsequent swelling, and get rid of spots, streaks and shadows.
When priming the ceiling and walls, fillets, if they are not made of gypsum, are glued last before painting. Otherwise, smudges will appear on polystyrene and other polymer coatings during the priming process, which will be clearly visible when painting.
When painting metal parts with sandpaper, carefully remove all layers of rust or old paint.
If it is intended to varnish or paint wooden products, then the first layer is applied with antiseptic impregnation. This is especially important for wood that will be outdoors and exposed to sudden temperature fluctuations.
Dilution of the tool composition
The polymer liquid that will be used for spray painting must be diluted to increase its fluidity. Any paint should first be passed through a filter, gauze or fine sieve.
Using a viscometer (some companies provide paint with this device) will speed up the preparation of the solution. The viscosimeter is a cup with a volume of about 100 ml with a hole. When the solution is poured into it, the time for complete flow out is recorded in seconds.
Professional manufacturers mark their products and the acceptable time for use in the spray gun.
| Coverage type | Flow time |
| Varnish | 20-50 |
| Enamel | 25-40 |
| Primer | 30-45 |
| Oil paint | 25-40 |
If the time for complete flow of the paint and varnish composition is longer than that established by the standard, then it is diluted with the product indicated on the label. Wood stains and sealants are not diluted.
We recommend: TOP 8 spray guns from AliExpress - how to buy the best
Safety requirements
At high operating speeds, spray technology also has a number of disadvantages. First of all, this is contamination of surrounding objects, because... Even the best quality appliances will create splashes.
When working in enclosed spaces, it is important to follow the rules below.
- All surfaces that are not to be painted must be wrapped in film and sealed with paper tape. Even small open areas can absorb the colored “fog” that is formed from tiny particles during the spraying process.
- Clothing must completely cover all parts of the body, eyes are protected with goggles, mouth and nose - with a respirator. It's not just about dirt that can be washed away. The main danger is the chemicals in paint and varnish products, which can cause allergies or poisoning.
- The room in which the work will be carried out must be well ventilated and illuminated at right angles, otherwise the quality of the layers will be poorly visible. When working outdoors, you will have to take the wind into account. The painting area should not be exposed to dust.
- After completing the process, you must immediately remove the tape that covered the boundaries between different colors or protected the surfaces. The tape, wet from paint, will be easily removed and will not leave damage to the textured surface. If you leave the protection for at least a day, then when removing the dried material, you can damage the top layer of plaster.
How to test spray
To understand how to use the spray gun, you need to test run the device with the prepared solution.
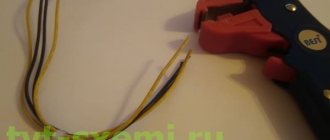
The test can be done on a piece of cardboard or plywood. To begin with, the regulators are set to the minimum value and a test run is done. If the paint lies in a compact spot, then the nozzle regulator and torch must be expanded to increase the spray diameter.
The same steps are performed if the test spot leaks.
When adjusting the regulators, it is worth making several vertical and horizontal stripes to assess whether the paint is flowing evenly and whether the pressure and power need to be changed.
It is important to do a dry spray away from the work surface after each replenishment of liquid. When the device stops working, drops accumulate in the nozzle, which will be “spitted out” after the process resumes.
Aerosol painting technology
Proper use of the spray gun requires continuity and smoothness of movement. The distance from the gun to the working area should be the same (from 15 to 25 cm).
When working with oil paint, each subsequent stripe should partially (15-20%!) overlap the previous one for uniform color distribution.
Spraying should be carried out in the same movements vertically or horizontally. The second layer is applied perpendicular to the first.
Walls and vertical surfaces
First of all, the surface is leveled and primed. The base coat is allowed to dry for several hours to ensure adhesion to the finish coat. After this, the sprayer is adjusted to a wide flow, adjusting the power and the torch.
Start painting around the perimeter. It is advisable to do this in one continuous movement. As soon as the outline is ready, begin to apply vertical stripes with a slight capture of the previous painted layer.
High-quality paint can provide good coverage after the first time. If the color is not saturated enough, then apply a second layer, this time horizontally.
Floor and ceiling
Processing horizontal surfaces with an industrial mechanism will make it easier to work at heights and in hard-to-reach places.
To figure out how to use a spray gun with a compressor, you need to know that pneumatic models require matching pressure and air volume. Therefore, the best material for tanks and pistols is metal.
Pneumatic spray guns differ in markings and power.
The improved type hvlp can be used with all types of paint and varnish coatings, gives a more even layer, but requires a more powerful compressor. This mechanism can provide high-quality treatment to any surface, including varnishing wooden or parquet floors. When working with a wooden surface, the main thing is to apply the sprayed material in the direction of the saw grain.
Complex figures
Uneven and complex structures that require accuracy and precision are best handled with the most expensive pneumatic spray gun labeled lvlp.
It operates at reduced pressure and air, minimizing losses of material in the form of suspension and fine dust (no more than 20%!). The feed occurs in the form of a narrow beam. Requires high spray speed.
Despite the variety of technologies and auxiliary tools, light and simple electric spray guns are considered the most popular for household needs. The top sellers are German-made samples.
Preparing to paint a car
To fully appreciate the properties of a spray gun for painting, you should prepare the machine well. Often, an uneven paint layer is not caused by a bad tool, but by an insufficiently prepared surface. There are several stages of preparation:
- Wash the car, blow out dust from under the trunk and hood and other openings. It is advisable to use special detergents and shampoos. All contaminants should be removed.
- Degrease the work surface. A special degreaser works well, but 646 solvent can also be used.
- Remove old paint layer and corroded areas by sanding
- Carry out primary and secondary priming, which will create a good anti-corrosion coating. At this stage, you will have some free time to prepare the spray gun for work and thin the paint or varnish, since the drying time for the primer is from 2 to 4 hours. Of course, this period can be shortened by placing the car in a specialized box with infrared drying, where the process is reduced to 10-15 minutes. Which, in fact, is what specialized services use.
- Apply paint material using a spray gun. You need to choose the right equipment for yourself. This can be a high pressure, low pressure, or one of the universal models. Let us remind you that painting the car itself takes only a tenth of the time, the rest is spent preparing the surface.
If the first four stages are completed well, then you can immediately proceed to the last one - painting the car. But here a question arises for a non-professional: “How to paint correctly with a spray gun?” If you want the result to please you, then you need to correctly select the diameter of the tool nozzle and the composition of the paint and varnish material.
You can't paint everything with the same tool. For example, if the viscosity of the paint and varnish material is 18-22 seconds, it is advisable to choose a spray gun with a nozzle of 1.3-1.4 mm. Although if the viscosity varies between 30 and 35 seconds, a nozzle size of 1.6-1.8 mm is ideal.
Before painting the entire car body, you need to decide on the material. In general, coatings can be divided into two groups: matte and metallic. If you want the car body to be matte, then single-layer paint coatings are suitable for you. To achieve a “shimmering” effect, choose two-layer systems with metallic or even mother-of-pearl. Difficulties may arise if it is necessary to paint not the entire car, but only a small area of the body. You should choose the tone of the paint so that transitions are not visible later. This task is quite difficult.
It’s better, of course, to let specialists choose the paint tone if you don’t want to make “patches” on your car. There is no need to skimp on this procedure, otherwise there is a high probability that the end result will not suit you and will lead to the car being repainted. And these are additional costs.
How to use a spray bottle?
Painting a car is not a difficult task, but the result directly depends on the ability to use a spray gun, the main tool of a car painter. There are several rules that will help you figure out how to paint with this tool:
- Check the nozzle and set it to the required spray parameters. To do this, you need to open the screw that controls the air flow, which will adjust the spray torch to spray the solution horizontally. Then use another screw to adjust the flow of paint material. If we are talking about large surfaces, then it is advisable to open the paint supply screw completely. But with the goal of reducing time, we can say that the wider the spray gun’s torch, the fewer spray passes the painter needs to make, and, accordingly, the more uniform the coating will be. Initially, you should practice on another surface, for example, on a sheet of cardboard, to be sure that the parameters you set are correct.
- When adjusting the spray gun, it is necessary to take into account the size of the surface to be painted. If it is necessary to paint a narrow part of the body, for example, a glass pillar, you should set the spray gun to a narrow torch shape. And, accordingly, if it is necessary to paint a wide area, the hood, for example, install a wider spray torch on the spray gun.
- The equipment should be kept at a distance of approximately 18 cm from the work surface. If we are talking about spray guns with high spray pressure, then it is necessary to increase the distance to 20-25 cm. The tool must be held perpendicular to the car body to be painted and apply paint in uniform circular movements with a radius of approximately 8 cm. The average speed of movement of your hand with the spray gun should be equal to 40-50 cm/s. That is, simply put, one pass with a spray gun from one edge to the other should take you about 2 seconds. Of course, this indicator is rather advisory in nature. The main criterion should be to achieve a certain thickness of the paint layer.
- In order not to forget about the most inconspicuous small areas, you can start with them, moving on to the main areas. When operating the spray gun, keep your other hand away from the spray torch, as there is a high probability of non-uniform spraying.
- You need to start painting from the top, sequentially moving to lower areas: hood, trunk, etc. Do not try to make long spray movements in one direction. You will achieve the best result when painting locally using circular movements. This technique will allow you to obtain a thin, even layer, the quality of which largely depends on the skill of the car painter. We advise you to carry out several test sprays on any other smooth surface to once again ensure the quality of the applied material and to practice your hand. If the technique of applying paint with a spray gun is violated, you will end up with an unevenly applied layer of paint on the working surface, vaguely reminiscent of an orange peel. To avoid this, it is necessary to apply the mixture evenly, without jerking, while maintaining a constant distance between the spray gun and the working surface. If you are painting a car metallic, work with a spray gun from top to bottom, only then you will get an even coat. The faster you cover the previous layer with the next one, the better coverage you will get. If you want to achieve a transition effect, moving the spray gun over the body should resemble working with a brush on paper. The gun trigger should be released at the end of each pass. It is advisable to cover with the next layer from 1/2 to 1/3 of the previous layer.
Read also: Products from recycled plastic bottles
Don't forget that you need to apply at least three coats of paint. On average, the interval between their application is 15-30 minutes. Apply the first coat and wait until it dries completely. This is the thinnest layer, it practically does not cover defects. The next two passes should be applied with enamel of a different composition, more liquid. But at the same time, use materials from the same manufacturer.
Apply paint sequentially, do not return to an already painted area, you may create smudges. To give your car a glossy finish, you need to use varnish. In this case, you will get a more impressive car with deep and rich color. Before applying the final, finishing coat, make sure that the base coat has a uniform structure and is completely dry.
All car painting processes are interconnected. The selected enamel, the size of the torch and the speed of material supply, the speed of movement of the spray gun - each of these parameters has its own significance for the future coating of the car. We can also say that each car painter adheres to his own methodology, sometimes, perhaps, not coinciding with the requirements of any instructions, but this is exactly what he came to over a long time of work. He developed it for himself through his own trial and error.
When increased demands are placed on painting, an example would be car body repair, the use of a spray gun is a must. In general, a spray gun for painting a car is a simple thing that looks like a pistol. Having learned a few rules for its operation, you will easily carry out this part of the body repair of your car yourself, and there will be no trace of previous scratches, chips, or rust.
To evenly paint surfaces made of different materials, including walls, cars, furniture, you should know how to properly paint with a spray gun. To make the coating truly smooth and uniform, you need to have some knowledge of the process technology.
The spray gun is used mainly for painting large areas with various paint compositions. But small parts can also be painted using the unit, especially if the elements are located in a hard-to-reach place and it is quite problematic to reach them with a brush.
Principle of operation
An electric spray gun functions by converting electricity into pneumatic energy. The paint, under the influence of increased pressure, is directed from the tank to the sprayer, which distributes it over the surface.
Design of the operation of an electric spray gun
The container for the paint and varnish composition is located either above the device (drain) or below it (suction). As a result of pressing the lever, the airbrush passes compressed air through itself. If you press harder, the needle will shift and the flow of paint will decrease. In other words, the higher the air pressure, the less intensely the paint material leaves the spray gun.
There are separate types of paint sprayers for different paint consistencies. For example, for thick paints, devices with a larger outlet are used than for liquid ones. The volume of paint supplied is controlled using the so-called spray torch. The operating pressure also depends on the type of paint and varnish material. The air supply is regulated thanks to a special screw.
Any spray gun is equipped with a so-called pistol. This device, using a nozzle, forms a torch as a result of mixing the following components:
- High pressure air supplied from a compressor.
- A working composition (varnish, primer or paint) that meets the permissible viscosity parameters.
In the inside of the gun, the air is divided into two streams, one of which is directed centrally, and the second along the periphery. All electric spray guns are equipped with three controllers that allow you to set the required operating mode:
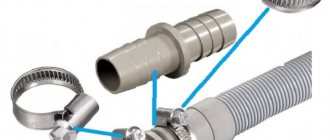
Structural elements of an electric spray gun with a hose
- Adjusting the total air supply makes it possible to maintain a balance between the volume of paint supplied and its application form at a certain speed. If the expected paint consumption is small, the tap is closed. After this, the flow rate will decrease and the paint will be sprayed more accurately.
- The pressure on the side jets on the periphery is controlled by a separate screw. The air flow determines the shape of the spray of paint and varnish: the stronger the air supply, the wider the perimeter. If you stop pressing the side jets, the feed shape will become round. However, this is an extreme option, since in this case the coverage of the paint will greatly increase, which will lead to drips.
- The consumption of paint and varnish material is determined by the volume of air supplied through the center of the electric spray gun. To make the flow less abundant, you should slightly close the tap.
Taps can be located in different places, depending on the modification of the device, but the most common are two schemes:
- The paint supply adjustment valve is located on the side of the gun. Somewhat lower is the general air supply valve.
- The general air supply tap is located at the end of the handle, near the inlet pipe. The tap that regulates the width of the jet is located in the same place as in the first case - on the side of the gun.
Paint containers can not only be of different sizes, but are often installed in different places. They usually take their place in the area of the front of the barrel, which improves the suction parameter. There are two methods of supplying paint and varnish material:
- By gravity. In this case, the composition rushes down under the pressure of its mass. It is difficult to control the flow rate in this case, since it entirely depends on the diameter of the outlet from the container.
- The use of the vacuum effect is more common. With this effect, a rapidly moving air stream creates negative pressure under the paint tank, as a result of which the composition is sucked in.
Note! The main difference between an electric spray gun and a pneumatic one is the presence of a built-in compressor. The advantage of such a device is that it is impossible to overload the compressor
Electrostatic painting
Separately, it is worth mentioning the electrostatic method of surface painting. During operation, the paint and varnish composition, upon contact with the electrode installed in the spray gun, receives a negative discharge (up to 100 kW). After spraying the paint, its particles flow along the force field exclusively towards the structure being painted. The advantages of the technology are obvious: reduced paint consumption and more accurate spraying.
Preparatory work
When painting with a spray gun, you must use safety glasses and a respirator with a reinforced double filter. You will also need special workplace equipment. A chamber equipped with a hood is best suited. Although when using water-based paint, it is quite possible to simply work in a well-ventilated area.
You should also remember the role of lighting. To prevent smudges and sagging from drying out, the lighting should be at an acute angle relative to the surface being painted.
Surface
Before you start painting the surface, you need to carefully level it. It should be treated with fine-grained sandpaper, and then carefully remove all dust. The fact is that when applying paintwork with a spray gun, all existing irregularities will become more obvious. If wooden furniture is being prepared for painting, it should also be sanded and freed from the old coating.
Coloring materials
The paint also needs to be properly prepared:
- Check for viscosity.
- To ensure that there are no lumps left in the substance, it must be passed through a filter.
- If necessary, dilute the ready-to-use paint with a solvent.
It’s easy to check the density. It is enough to stir a small amount of it with a wooden stick and, lifting it above the container, watch how the drops flow. At high viscosity, the paint slides off slowly, in a thick stream. In this case, it should be diluted.
Information about the amount of solvent is contained on the packaging of paints and varnishes. After dilution, you need to check the density again. At normal viscosity, drops flow from the stick approximately one every second.
Next, the paint must be filtered. You can use a ready-made filter for this or make it yourself by stretching a nylon mesh over a clean container. Only after this, making sure that all foreign lumps and inclusions have been removed, will the paint be ready for use.
Test staining
Now you can pour the paint into the spray gun and try to spray it on a small surface. This should be done so that air and paint flow evenly. Only in this case the coating will be smooth. The instructions indicate how to use the spray gun. It has special levers for adjusting the supply of paint and air. By controlling them in a trial process, the flow mixture is adjusted.
Pros and cons of using a paint gun
To renovate an apartment or private house, purchasing a manual spray gun is completely justified, because it:
- is inexpensive;
- does not require special painting skills to work with it;
- allows you to quickly and evenly, without drips, paint any surface;
- The simplicity of the design means that the spray gun rarely breaks, and if a breakdown does occur, it is easy to fix it yourself.
The disadvantages include:
- Inconvenient manual pumping. Beginners cannot yet feel the intensity of the jet escaping without a nozzle, and without timely pumping of air, the pressure when applying paint may drop.
- Possibility to use only water-based compositions. But this is not a very big inconvenience: in residential areas you can use a hand-held spray gun to whitewash or paint walls, ceilings or floors with water-based dyes. As a rule, these are water-based acrylic paints, which are environmentally friendly and very durable. Painting with a spray gun using various water-based dyes allows you to carry out interior and exterior work using a paint gun.
- Formation of “fog” during operation. It is difficult to combat this drawback, since during operation of the sprayer a suspension of small paint particles is formed around the nozzle, which settles not only on the object to be painted, but also on other objects. To avoid unnecessary contamination, all items that cannot be painted must be covered with unnecessary materials. If water-based solutions come into contact with surfaces that have not been prepared for this, the stains must be washed off with water. Water-based compositions harden quickly, and after some time it will be very difficult to remove them.
Device selection
The spray gun is chosen based on the principle of its operation. It can function mechanically or be driven by a compressor. The spray gun can also be electric. This type of equipment is very suitable for car painting. But paint should be applied to the car with an electric spray gun selectively - only on small shaped parts, and not on horizontal flat surfaces.
Diagram of the spray gun device
It is also indispensable when painting small parts in hard-to-reach places or fragments with an uneven decorated surface. Furniture elements, wood parts, interior surfaces of a car - all these are areas of application for an electric spray gun.
But this type of spray gun is not suitable for painting large horizontal or vertical surfaces, walls, ceilings, external elements of a car, flat large pieces of furniture.
Which type of device is best?
Paint consumption when using any type of device is less than when painting with a roller or brush.
Main elements of the device:
- spray head;
- trigger;
- nozzle.
Mechanical hand spray guns
The device consists of a pump, a reservoir into which paint is poured, and a hose with an attached sprayer. To create working pressure in the tank, air is pumped in manually, and constant pumping is necessary during operation. The device will not have enough power when working with thick paints and varnishes; its nozzle will become clogged.
Choose a manual spray gun for the home for:
- rough repairs that do not require great care;
- spraying plants in the garden;
- spraying disinfectants.
The device is designed simply, so it rarely breaks down.
Pneumatic equipment
The main working element of a pneumatic spray gun is a compressor, which pumps air to the pressure specified in the settings. Pneumatic devices are equipped with nozzles of different diameters, suitable for working with materials of different grain sizes and viscosities.
Equipment Features:
- high power and performance;
- high quality painting;
- large weight and size;
- All types of paints can be used.
In many models, you can adjust the air and paint flow rate. The container with paint can be placed at the top, bottom of the spray gun or separately from it with forced supply of material.
Electric sprayers
There are the following types of designs for electrical models:
- with a remote compressor - in it the paint is sprayed using vacuum;
- with a built-in compressor that pumps up to 8 atm, the paint breaks down into dust and is pushed out through the nozzles.
When sprayed under air pressure, the paint lays down in a thin layer due to its low viscosity. When flying out of the nozzle under low pressure, not all of the paintwork reaches the surface to be painted, forming fog. An air spray gun is suitable if the paint can be thinned to make it liquid.
Airless spray guns
In such a device, the spray gun is equipped with a nozzle with a cross-section several times smaller than for air spraying. The paintwork material enters it through a hose under high pressure (up to 530 bar). When spraying, a powerful stream of paint particles overcomes air resistance and reaches the surface to be painted without turbulence. Those. the paint transfer coefficient is higher.
Airless spray guns are chosen for their high performance. Good quality painting can be achieved by carefully selecting nozzles and adjusting the pressure.
Features of working with equipment of this type:
- you can use viscous paints;
- on products of complex design, the paint applies unevenly, forming sagging on convex areas;
- if the nozzle is chosen incorrectly or the pressure is too high, the paint bounces off the surface, it is difficult for the artist to keep up with the speed of its spraying, and it lies unevenly, forming drips.
Surface painting works
After this, they begin to apply paint to the surface. The choice of method depends on the specific surface. If you plan to paint horizontal parts of the house, for example, the ceiling, you should start from the perimeter, gradually approaching the center. Apply paint to the surface using uniform transverse movements so that the next layer overlaps slightly with the previous one. The same technique should be used when painting car parts, regardless of their position - horizontal or vertical.
- You need to carefully ensure that the junctions of the layers are not too dense, otherwise they will stand out against the general background of the paint.
- The distance from the device to the surface to be painted must be the same all the time.
- The sprayer does not need to be tilted or otherwise repositioned.
- The speed of movement of the spray gun should also be the same.
This way you can avoid errors when applying paint, the surface will be smooth, with an equal layer of paint and a uniform shade of color.
Painting the ceiling with a spray gun is very convenient compared to using a roller or brush. The spray gun allows you to apply paint in a thin, even layer. You don’t need a stepladder to get closer to the ceiling surface; in addition, paint consumption is significantly reduced when working with a spray gun.
Read also: Wood cutters for hand drill
General tips for work progress
The device should be held strictly perpendicular to the working surface, maintaining a distance of 5-10 cm. The greater the load and power of the spray gun, the further you can retreat, but also a portion of the paint will be wasted. How to use a spray gun correctly to get an even coating? Movements when painting should be smooth up and down and from left to right. Possible gaps should be covered with small overlaps of up to 5 cm. It is important to take into account that as you move away from the center of the spray to the edges, the flow saturation decreases, so coverage compensation should be carried out in transition areas. Also, do not ignore the possibilities for adjusting the flow force - different surface treatment modes will make the process more efficient and effective.
Application of hammer paint
Hammer paint is usually used to paint metal parts. It helps protect the surface from rust and hide unevenness. In addition, when applying hammer paint, a decorative pattern is obtained, which can give the product the appearance of a decorative element.
Hammer paint is easy to use and dries very quickly, which makes its use advantageous for uneven or old metal surfaces. It is often used to decorate car elements and metal furniture parts. When finishing work on wood surfaces with metal parts, hammer enamel is also used.
Although experts recommend using a roller to work with hammer paint, a spray gun can also be used. In this case, there will be no textured pattern, which is quite suitable for painting rusty car parts.
Painting surfaces of different textures
Vertical walls should be painted from top to bottom. The paint must be applied across the wall using horizontal movements.
When painting wooden furniture, it is quite possible to use different types of paint. If you want to give furniture parts a decorated look, you can use hammer enamel. Do not forget that wood, especially old wood, is quite hygroscopic, so you need to apply paint to wooden furniture in several stages, waiting until it dries completely. In addition, furniture is painted along the location of the wood fibers. This way the paint will lie flat and blend into the natural fabric and grain of the wood.
The most common use of a spray gun is painting walls, ceilings and other large, flat areas. Painting them with a brush or roller takes a long time, is difficult and not always evenly and efficiently. Therefore, painting such surfaces is most often done with a spray gun. It is also convenient to use a spray gun for painting furniture, especially figured and carved ones.
Possible tool malfunctions
Although outwardly the spray gun looks quite simple, during the work several important processes are implemented that are sensitive to even minor mistakes of the painter. In particular, using paint that is too thick can lead to clogging of the device, so preliminary dilution of the composition is often required - by 10-15%. The formation of too thick “fog” also indicates a problem. Again, this means either damage to the nozzle with the supply nozzle, or failure to maintain the required distance to the painting surface. To eliminate these and other troubles, you should regularly clean the device, check the fastening points of its parts and do not forget about the instructions for use for a specific model.
Preparing for coloring
On the walls and ceiling, you need to carry out preparatory work to level them:
- If there are seams or uneven spots on the ceiling, they are plastered and the previous whitewash is washed off.
- Primer is applied to the walls, and unnecessary holes are eliminated using putty. This applies to concrete or brick walls and ceilings. If the surfaces are made of wood, then they are pre-sanded.
- Car surfaces are also cleaned and primed. The car parts are cleaned of old paint, preparation is done, and only then the even areas of the car are painted with a spray gun.
After painting, you should carefully inspect the area under oblique lighting to see possible unevenness, drips, and sagging. If any are found, they should be immediately leveled by applying additional layers of paint. This must be done under installed side lighting in order to immediately see and evaluate the thickness of the new leveling layer.
Safety precautions when working
Safety precautions should always be taken. When painting ceilings with a spray gun, you need to use a mask, and not just a respirator, since the ceiling is located above the master, and finely sprayed paint can get into your eyes. But when painting a car, you can do without a mask, since almost all the parts are located vertically or horizontally. The room in which spray painting work is carried out must be well ventilated.
If the exterior surfaces of the house are painted, such work should be carried out in calm and dry weather. If a car is painted indoors, then it is also necessary to provide access to fresh air and use a professional respirator with a filter and a mask, since car paints contain toxic substances that, when sprayed finely, can easily get into the eyes and respiratory tract.
In preparation for painting, it is necessary to wash the car and carefully inspect it. You need to pay attention to the bottom, fenders, sills, and pillars for damage. These may be scratches or dents, which must be removed before painting. Particular attention should also be paid to possible rust.
It is also necessary to check whether the car has rotten places, which after painting can make themselves known. It is best to open problem areas with a grinder, and then apply patches on top using a welding machine. If you find rust bubbles, press them with a hard object. Experts, when asked: how to paint a car, recommend starting with inspection and preparation for painting.
After a thorough inspection of the car, it is necessary to remove from it all unnecessary parts that may accidentally become painted. These are glasses, headlights, handles, as well as tuning elements. In some cases, craftsmen do not remove them, hiding them with special tape and newspapers.
Any recommendation that indicates how to properly paint a car pays special attention to preparation for painting. Particular attention should be paid to bumpers, which, as a rule, have the most damage.
Operating principle and scope of application
The device is designed for uniform application and distribution of primers, mixtures, liquid rubber, enamel, paints and other materials on different surfaces. The main function of the spray gun is to split liquid solutions for their fine spraying in a thin, even layer with a minimum amount of smudges and bubbles.
For more than a hundred years, which is exactly how much time has passed since the appearance of the spray gun, it has changed, modernized, and become much more productive and convenient. The principle of operation of spray guns (both electric and pneumatic) is the creation of a kind of aerosol from liquid material in the form of tiny droplets, which is directed towards the desired surface. Based on this, we can identify the main components of the devices:
- Spray gun with on/off trigger.
- Tank for paints and varnishes.
- Paint and air supply pressure regulator.
- Air cap and spray head with nozzle (nozzle).
- Filter and nozzle for paint.
It is worth noting that in an electric device, the paint is broken by a moving elastic membrane, and the mixture is blown out by a pump (built-in). In pneumatic equipment, the driving force is a powerful stream of compressed air, which is pumped by a compressor and, entering the spray gun, breaks the liquid down to the smallest possible particles.
To achieve the most uniform spraying, it is necessary to select and set the material-air balance in the optimal ratio. As a rule, the manufacturer indicates inlet pressure parameters that are normal for a particular device model.
To choose the right spray gun, it is important to know not only the operating principle of the unit and its design, but also to have an idea of the scope of application and the specific purpose of use. Knowing the exact object to be painted - a car, doors or ceiling - will greatly facilitate and narrow down the search for the right model. There are two main types of devices, electric and pneumatic, and they can be used for:
There are two main types of devices, electric and pneumatic, and they can be used for:
- Painting of metal structures.
- Whitewashing of premises.
- Applying primer to walls.
- Painting ceilings and walls in buildings for various purposes.
- Fight bacteria and fungi by applying an antiseptic to the surface.
- Treatment of metal parts with anti-gravel.
- Simplifying the work of cleaning walls from outdated wallpaper.
- Painting of automobile bodies and parts.
- Spraying green spaces against pests.
- Coating with varnish, paint or stain on wooden surfaces.
- Painting small elements, hard-to-reach or embossed places and corners.
- Confectionery decorations.
Preparing and painting a car with a spray gun
Parts must be sealed with newspapers and masking tape very carefully so that the aerosol does not get on the headlights or glass. The newspaper should cover the parts very tightly from painting. If during the inspection of the car shallow or deep dents or cracks are revealed, then the problem areas must be straightened.
If your own personal experience is not enough, then it is better to seek help from a specialist who will answer questions about how to properly paint a car. Straightening is carried out using extraction devices, as well as special straightening hammers and supports, which are included in the kit.
In order to answer the question: how to paint a car correctly, it is necessary to take into account that painting a car will be successful only if great attention is paid to thoroughly preparing the car for painting. Preparation takes up 84% of the entire painting process.
After the dents have been removed, you can clean and smooth out chips, welds, and matte old paint. To do this, use a special plane, a grinding machine and a set of sandpaper. It is necessary to remove rust to its base, to the metal.
After this, degrease the surface and fill any uneven areas. It is best not to waste time on cleaning and degreasing the surface, because these are the problem areas that become the main sources of corrosion.
There are several stages in preparing a car for painting with a spray gun:
After removing the old coating, it is necessary to level the surface. This can be done by straightening and without putty. The putty should be applied with a special spatula in two thin layers. It is best to use a two-component, universal putty.
Any master who is ready to answer the question: how to paint a car correctly will recommend applying a thick layer of putty during preparation for painting, because otherwise it will definitely come off and crack. Preparing a car takes much longer than painting it.
Read also: Gas soldering of copper tubes
After the putty has been applied, it is necessary to sand the surface. Before painting, the surface must be perfectly correct, smooth, and free from even the smallest damage or irregularities that may appear after painting.
Before fully or partially painting a car, it is necessary to remove bad paint, if any. Smooth areas are washed with water, wiping the tape with Brite.
Do-it-yourself car painting with a spray gun
A spray gun is the main tool for painting a vehicle. A spray gun is used to spray small particles of paint onto a surface under compressed air pressure. Choosing the right spray gun for repairing and painting a car in the garage requires special attention.
car bumper painting
Car body painting can be partial or complete, i.e. when the car body is completely repainted. Painting a car yourself with partial disassembly of the interior is quite difficult, and it is not always possible to perform this procedure correctly in a garage environment.
In auto repair shops, before painting a car, it is washed and dried in a chamber several times. It is impossible to do this in a garage environment, so when painting a car in a garage environment, it is best to use “dry” technologies rather than wet ones.
The main thing is cleanliness
Many car painters who can answer the question: how to paint a car recommend painting in a perfectly clean box, free of dirt and dust. To do this, the floor of the box is moistened with water.
Before fully or partially painting a car, you need to check the operating pressure of the compressor and the correct operation of the spray gun. No oil should leak from the receiver. To clean the receiver, they pump air into it, and then slowly release it.
In order for the paint to be of good quality when it comes out, you need to filter it using a stocking or special filters, which can be found in any auto store. Also, a filter must be installed on the compressor at the outlet to prevent oil from accidentally getting into the paint.
Under no circumstances should you try preliminary operation of the spray gun on water, because... water differs significantly in viscosity level from paint.
Before painting the surface, wipe the car with a soft cloth moistened with silicone remover. This product does an excellent job of removing greasy stains from tape, and also destroys dirt and cleans the surface.
Let us remind you that in car painting only special masking or automotive tape is used to protect the surface from paint. Protective coatings, newspapers, stencils are removed only after the vehicle has been completely painted and the painting work has been completed. Remove the stencils when the last layers of paint have dried.
Assembling and setting up the instrument
First you need to decide on the choice of a suitable nozzle. Some models come with a range of different caliber nozzles, while others are designed with adjustable nozzles. For example, there are special flat jet nozzles for spot finishing that provide targeted coloring of small objects. The nozzle is installed together with the mixture supply screw, after which the nuts are tightened. In terms of settings, it is important to correctly correlate the optimal pressure indicators for the gun. How to use a spray gun so that it can withstand sufficient load when working with solvents and viscous mixtures? To do this, you need to use the appropriate fittings - for example, for sufficient resistance to solvents, it is recommended to use a compressor hose that can withstand up to 10 atm. At the final stage, the tank is connected. It is also advisable to integrate special filters for oil and moisture separation into the adapter assembly of the fitting.
Putty determines the tone
In order to find out how to paint a car, you need to consult with salespeople at a car store, who can easily choose the right tone for your car. If a door or fender is being repainted, it is necessary to match the new color to the existing one. As a rule, the technical documentation for the vehicle contains the paint number.
Otherwise, you will have to choose it yourself. This is quite difficult, especially if Xeralic was used in the varnishing. Sellers will also be able to tell you what software you need to use to repaint your particular car. Only special acrylic primers are suitable for acrylic paint, and your own for synthetics.
If the car is colored, that is, not black or white, then a special putty is used, which, like a cover, allows the color to match the original color of the body. Otherwise, the separately painted part will stand out and have a different color tone.
If the old paint in some places does not require removal, then it is simply matted, partially removing the varnish layer. The main thing is that during painting and the paint gets on the surface, it has good adhesion and does not flow.
spray gun
Before applying a layer of paint to the surface, it is necessary to blow off all dust from the surface with a special blow gun. The paint must be applied in an even layer, gradually painting the entire surface, with a thickness of 1 to 3 mm. After applying each layer, it is left on average for 10–30 minutes. It depends on the season when painting is carried out.
It is better to paint in southern latitudes in the morning. In the evening, the smell of paint can attract midges, which, of course, land on the painted surface.
It is recommended to repeat the operation several times until the surface becomes shiny. The paint must be applied very carefully. The hose is released behind the back. Press the spray gun further outside the part to be painted to avoid stains and smudges. Apply paint quickly 3 times.
How to use an electric spray gun?
An electric motor sprayer has several advantages that explain its popularity in the household sphere. Firstly, such devices are inexpensive, and secondly, they require minimal organizational effort to operate. After assembling and refueling the tool, it will be enough to connect it to the network to start working. And here the first drawback of such models comes to light in the form of dependence on the outlet. On average, 3-5 m is the standard cord length. Today there are also battery-powered models for street use, but the presence of a battery in the gun makes the already heavy design heavier.
As for the work process itself, key attention is paid to the safety of the electric spray gun. How to use the tool correctly to eliminate the risk of damage to electrical components? Such sprayers are afraid of moisture, volatile and flammable substances. It is also not recommended to use the device in dusty places. In general, when working with electric spray guns, you should not expect high quality surface treatment. These are solutions especially for infrequent work in the household, in the country or in the garage.
Spray painting a car at home
In order to learn how to paint a car yourself, you need to understand that preparing the car takes much longer than painting itself. Materials today are quite expensive, so a mistake in painting is quite expensive.
First of all, before applying paint to the surface of the car, you must:
- Check that the spray gun is working correctly (this can be done by blowing the solvent, then the paint on a piece of cardboard or white paper);
- Disassemble the spray gun in case of problems (the paint should be finely dusted);
- Close the box, turn on the bright light and hood;
- Wear a mask (necessarily with carbon cartridges);
- You need to apply the paint quickly, without stopping in one place, to avoid drips or unnecessary shagreen.
Many car painters, answering the question: how to properly paint a car yourself, recommend that when painting, connecting the spray gun to the compressor, using a special long fishing rod, connect 2 hoses shortened to each other, using a special threaded connector with a rubber gasket.
Next, one part is unscrewed from the longer one, and that part is screwed into the bullet gun. This allows you to maintain the tightness of the connections. The pressure should not drop in the compressor throughout the entire painting job. If the pressure drops, the spray gun may spit on the surface.
To avoid problems with pressure, it is necessary that the compressor has a receiver volume of at least 100 liters and a working pressure of 360 liters per minute. You should also check the presence of oil in the compressor using a special red mark. After each work you need to bleed the air. This is especially important in the cold season.
Cleaning the spray gun, checking operation
If you need to test the spray gun before starting painting work, then at the end you need to disassemble it and wash all the parts. After this, it is reassembled and purged with solvent. It is best to leave a little solvent in the spray bottle.
Most likely, after painting, shagreen or dust particles will be found. It doesn't depend on skill level. Even experienced painters can have shagreen. Smudges and shagreen marks are removed by polishing the surface using a machine.
>