Purpose and structure of the structure
Wells in the sewer system are designed to collect domestic wastewater. Depending on the design, they are divided into several types:
- Storage device.
- Cesspool.
- Septic tank with several cleaning chambers.
Each structure can have individual dimensions and shape. The design contains the following parts:
- A neck that is closed with a lid or hatch.
- Working chamber.
- Drainage or sealed bottom.
Installation of sewer well (septic tank)
Storage tanks or “sewage wells” are mounted from concrete and plastic rings.
To equip wastewater containers you will need
- Rings
- Bottom
- Lid
- Sand
- Crushed stone
Concrete and plastic rings for wells are available in different diameters.
The choice of ring size depends on the volume of the septic tank.
The more people live in the house, the larger the storage capacity should be.
The volume is calculated based on statistics. 200 liters of water per resident per day. If a family of 4 lives in a house, the size of the septic tank is 800 l + 1/3 = 1200 l.
The volume increases by 1/3 in order to prevent the septic tank from overflowing in the spring and in case of excessive water consumption (arrival of guests)
Attention! This formula only works for single-chamber drives that are subject to regular pumping.
If you plan to install a multi-chamber septic tank with a biological filter, then the size of the septic tank increases threefold.
Since according to SNiP, water must be treated for biological treatment for at least 14 days.
Manufacturing materials
When choosing a material for the construction of a sewage storage tank, several factors must be taken into account:
- Firstly, it is worth studying the climatic conditions, temperature values, and amount of precipitation.
- Secondly, you need to know the characteristics of the soil, the location of groundwater, and the level of soil freezing.
- Thirdly, the terrain is of great importance.
Self-installation of sewer wells is carried out using the following materials:
- Brick or cobblestone.
- Concrete.
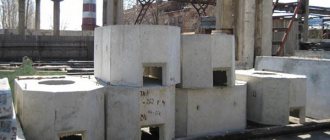
- Reinforced concrete rings.
- Plastic containers.
- Car tires.
Types of sewer wells
Before installing a sewer well with your own hands, you should become more familiar with their main types and installation features. According to their functional purpose, all sewer mines are divided into five types:
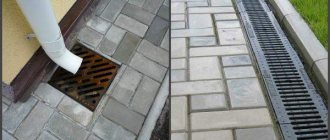
- Inspection points are structures located directly above the main pipe of the outlet main. They are designed to monitor the performance of the sewer system. If necessary, pipes are cleared of blockages through inspection shafts. According to their functional purpose, inspection wells are divided into the following types:
- Linear. Installed exclusively on straight sections of the pipeline;
- Nodal. Special large-diameter chambers that connect the outlet line to several incoming pipes;
- Tests. Can be installed only in places where private sewerage is connected to the main one;
- Rotary. They are installed in places where the direction of the pipeline changes, which prevents hydraulic resistance in the system (the rotation angle between the outgoing and incoming pipes must be at least 90 degrees).
- Drop shafts are shafts designed to connect sewer pipes in the event of a decrease in the depth of the ditch for the wastewater disposal system. Drop wells have a fairly simple device with sewage drainage in the lower part and inlet in the upper part;
- Rotary wells - wells of small diameter, which are installed exclusively in those sections of the water supply system where a sharp turn of the waste line is necessary;
- Filtration structures are structures that have a complex structure. They are designed to separate impurities and separate denser masses from liquids. Filtration shafts can be either closed or open. First, as the container is filled with sewage waste, floating particles are “redirected” to the upper channels for waste disposal. Sedimentary layers are discharged through a system of pipes connected to the bottom of the filtration shaft. And the latter are constructed from perforated reinforced concrete blocks, which allows water to quickly drain into the ground;
- Storage wells are wells that operate on the principle of a cesspool. As sewage accumulates, it is removed using a sewer truck. Using special equipment, sewage waste is simply pumped out.
Placement
When choosing a place for construction, you need to adhere to sanitary and construction standards. Installation of sewer wells is carried out:
- No closer than 3 meters from beds, fruit trees and shrubs.
- More than 5 meters from the boundary of the foundation of the main buildings.
- At a distance of 5 meters from the road and underground communications.
- Wells with drinking water should not be closer than 30 meters.
Planning stage
The construction of sewer mines always begins with the development of an appropriate construction diagram, which must comply with SNiP standards. At the first stage, the installation of sewer wells involves the following work:
- Determining the future location of the structure. According to SNiP standards, it should be located slightly below the level of residential buildings;
- Drawing up cost estimates. It is advisable to begin the construction of treatment facilities by calculating the financial costs of materials and necessary equipment. A detailed estimate will help optimize cost items for certain types of work, purchase of materials, etc.;
- Selection of a construction team. If the construction plan and estimate are drawn up correctly, they begin to select a team of contractors. You can install a sewer well yourself. However, without compliance with the standards set out in the relevant articles of SNiP, it is unlikely that wastewater will flow by gravity. In this case, the use of a sewerage system will simply be impossible.
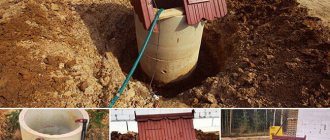
Installation work
Installation of sewer wells is carried out in several stages. For example, we can consider a structure made of reinforced concrete rings.
Stage 1. Excavation work.
A sewer well made of any material is installed in a pre-dug pit. Its volume depends on the size of the structure. You can dig a small hole with your own hands; a larger pit can be dug with an excavator.
At the same stage, the bottom of the pit is prepared. For the storage facility, work is carried out according to the following scheme:
- Pour a layer of crushed stone 15-20 cm thick and compact it well.
- Concrete mortar is poured over the pillow.
In the case of a drainage bottom, cement mortar is poured into the area around the perimeter of the casing ring.
Stage 2. Assembling the working chamber.
Before installation, holes are made in reinforced concrete rings. They will include pipes that carry sewer waste away from household appliances and plumbing fixtures.
The first ring is installed using concrete grade M100. Sewer pipes are inserted into the prepared holes and the resulting voids are filled with concrete. Next, they install the casing rings one by one, filling the cracks with cement mortar.
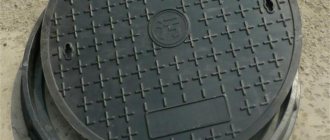
Stage 3. Installation of the hatch.
The hatch is one of the important parts of the sewer well. Through the inspection hole under the hatch, sewage is pumped out or internal pipes are inspected. To install the hatch, perform the following work:
- After installing the last casing ring, the entire structure is covered with a reinforced concrete slab. An inspection hole is first made in it.
- The edges of the hole are protected from mechanical influences by a metal rim.
- A cast iron hatch is installed in the hole.
Stage 4. Laying the sewer pipe.
Proper installation of sewer wells requires correctly located sewer pipes:
- The outlet pipe is buried at least 0.7 meters.
- The correct slope of sewer pipes is 2 cm per 1 meter.
- The pipeline through which the waste enters the well must be located above the outlet pipe.
Stage 5. Sealing of structures.
One of the criteria for high-quality installation work is the absence of unpleasant odors. In addition, groundwater does not penetrate into the sealed structure, which can speed up the filling of the well with sewage.
The drive is sealed according to the following rules:
- Areas to be sealed are cleaned of dirt and dust.
- The surface is moistened with water to increase adhesion.
- To waterproof a sewer well, moisture-resistant mastics are used.
How to properly install a drainage well ↑
Before installing a sewer well near a private house, it is necessary to develop a project with the exact location of each element of the system. A simple plan on a piece of paper is not enough. The design must be carried out by a qualified specialist who will immediately take into account all the nuances and rules.
Installation of input into a plastic well
A simplified well installation process looks like this:
- Preparation of a pit according to the dimensions of the selected structure with a depth below the soil freezing level.
- Forming a gravel cushion 20–30 cm thick at the bottom for a sealed tank and 40–50 cm for a septic tank drainage chamber.
- Laying a concrete base slab on gravel.
- Installation of concrete rings or plastic structures.
- Pipe connection.
- Closing the well with a lid with a hatch and a ventilation pipe.
- Backfilling of pits and pipeline trenches.
When using bricks or reinforced concrete rings, special attention during installation should be given to sealing the well from the inside. All joints and seams must be coated with cement mortar and bitumen. Chambers with drainage do not need tightness at all. The more holes there are in them at the bottom and sides, the faster the drainage into the ground will occur.
Important! Well structures made of plastic need a heavy “anchor”, otherwise they can be squeezed out of the soil during floods. Most often, this clamp is made in the form of a concrete slab, which has a special hook for attaching a plastic well.
Sewage well connection diagram
It is imperative to install a water trap in the filtration and differential well, which will dampen the energy of the water flow and will not allow it to destroy the body or drainage cushion.
The ventilation pipe should rise 0.6–0.7 meters above the ground. This is the only way it will function correctly and prevent the accumulation of explosive gases formed during the decomposition of organic matter inside.
To avoid freezing, the well must be covered with a layer of soil at least half a meter thick at the end of installation. If pouring such a cover from the ground is problematic, then you will have to insulate the structure with polystyrene foam.
Everything is quite simple, the work can be done even alone. But if the sewerage system is long and the septic tank is far from the house, then it is better to use an excavator to speed up the excavation.
Well construction
We begin the construction of a well by digging a hole. Moreover, its diameter should be half a meter larger than the diameter of the rings. This is necessary to install a compacting backfill of sand and gravel around the perimeter of the structure.
Attention: it is better to start digging a well in late summer and autumn. At this time, groundwater is at its maximum depth. If you start working in the spring, when there is a lot of perched water, you will quickly stumble upon it, and then in the summer your well will dry up.
Rings with a diameter of 100 cm and a height of 25-50 cm are considered optimal for a mine structure. Larger structures are difficult to lower and turn independently (without the use of equipment). To make digging and constructing a well easier, a tripod is installed above the pit. With its help, it is convenient to raise the earth and lower concrete rings.
Do-it-yourself Abyssinian well: well construction and drilling video
Digging the trunk and installing the rings
The work is carried out in this order:
- It is more convenient to dig a hole with a shovel with a short handle, since the space is very tight. Having dug a hole 50 cm deep, install the first ring. A winch is used to raise and lower it. The ring will gradually sag under its weight.
- Having dug another 25 cm deep, install the next ring. The rings are connected to each other with metal brackets.
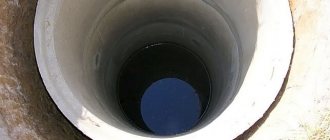
- Thus, they continue to work on digging a hole and installing rings until they reach the aquifer - the bottom of the hole begins to fill with muddy water. This usually takes from 5 to 7 days.
Advice: do not first dig a hole and then install all the rings. Without proper experience and knowledge, this can lead to ground collapse.
Construction of a water intake and filter
According to SNiP, all wells must be equipped with a filter. This will effectively purify the water and make it suitable for drinking. To install a bottom filter, do the following:
- Pump out muddy water from the bottom of the well.
- Deepen the bottom of the pit by 150 mm. Level the surface well and remove dirt.
- Then clean river sand is poured onto the bottom. The layer height is 250 mm.
- On top, make a layer of crushed stone or gravel washed with a solution of bleach, 200 mm high.
- The last layer will be large washed crushed stone. Its height is 200 mm.
Tip: if the bottom of the hole fills with water too quickly, you can lay a deck of loosely laid boards on the bottom before backfilling. After this, all layers of backfill are made.
Waterproofing
SNiP requirements provide for the mandatory installation of external and internal waterproofing of the shaft of a mine well.
To seal the seams between reinforced concrete rings, you can use special compounds, liquid glass, or prepare a mixture of PVA glue and cement. For better penetration of the mixture, first coat all seams with a liquid glue solution, and then apply a thicker mixture using a spatula.
Advice: in order not to spoil the taste of water, do not use bitumen mastics to waterproof joints.
External waterproofing is needed to protect against the ingress of melt water, precipitation and high water. The outer surface of the concrete rings is treated with penetrating waterproofing. Sometimes two layers of roofing felt coated with mastic are used for these purposes. Some craftsmen use polyethylene film for external insulation. It is wrapped around the head of the structure.
A trench 1.5-2 m deep and 50 cm wide is left around the upper rings, into which the clay is compacted tightly. Having risen to the level of the ground surface, a clay castle is built with a slope from the walls of the well. This will prevent precipitation from collecting near the structure. For more effective waterproofing, a blind area is concreted around the head.
Heading
According to SNiP, the head of the well must be at least half a meter high. Usually it is made from the same concrete rings, but to increase the aesthetic appeal the structure is lined with stone, brick, plastered or sheathed with timber.
When installing the head, do not forget about these important points:
- To keep the water clean, install a roof with a good overhang.
- It is better to put a lock on the door in the roof. This will protect your curious children from falling into the well.
It is important to know: after constructing a well, the water is pumped out several times during the first 2-3 weeks to clean it. The pumped water can be used for household purposes. After complete purification of water, it can be drunk only after receiving confirmation of the safety of the composition from the laboratory.
features and construction materials
What could the walls of the well be like?
Reinforced concrete
The walls of wells for servicing apartment buildings are much more often made from it. But, private owners also build cement wells; but if rectangular or square monolithic structures are more often built to bring water into a personal home (they require simpler formwork), then organizations adhere to a more technologically advanced scheme, using ready-made rings .
It’s interesting: in the appendices to regulatory documents it is possible to find estimated standards for work and basic materials. For example, the estimate table for water wells numbered 22-04-003, attached to GESN-2001-22, contains a complete list of materials and work for constructing a prefabricated monolithic well with a volume of 10 cubic meters.
What does independent construction look like? Absolutely true, just like when constructing a cement septic tank or cellar.
The only problem is that the formwork design must provide openings for input trays and routes.
- A pit is opened, the size of which exceeds the future size of the well.
- The bottom is filled with approximately 20 centimeters of crushed stone or sand. The bedding will become the basis for the wall and perform the function of drainage.
- The walls of the pit are covered with waterproofing material - roofing felt or polyethylene. It, among other things, will not allow cement laitance to filter into the ground, thereby reducing the strength of the structure.
- A reinforced frame is being constructed. Perfectly, corrugated reinforcement is knitted with annealed wire, but it is possible to use a ready-made mesh or scraps of metal products.
- The formwork is being built. Material - boards, OSB, DSP or plywood.
- The formwork is filled in layers with M200 concrete or a self-prepared mortar. Composition: 1 part cement, 3 parts sand and 3 parts crushed stone. Every 20-25 centimeters, the concrete is bayoneted with reinforcement.
- The finished slab with the head of the well hatch is laid on top.
Brick
The construction of brick walls is not much more difficult; but the size of the pit in this case will be larger. The circumstance is that external waterproofing is very desirable for brickwork. It is performed with bitumen mastic in a couple of layers .
Attention: only red clay bricks are used for masonry. Silicate quickly collapses in a wet environment.
The masonry itself is completely traditional: half a brick, with horizontal sequences interlaced for at least a quarter of the brick length. Cement-sand mortar in a ratio of 1:3 is used as a binder; the sand is pre-sifted. The seam thickness is standard 12 millimeters.
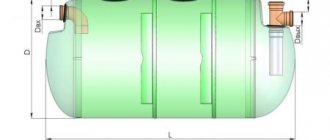
Plastic
Plastic sewer and water supply wells are advantageous in that they can significantly save time. Their walls are, in most cases, a thick corrugated pipe made of polyethylene or polypropylene with outlets for trays and sealing rings .
The price of these products, however, exceeds the cost of building materials for independent construction from concrete or brick. A well two meters high and 70 cm in diameter will cost approximately 15-17 thousand rubles.
How is a plastic water well installed?
- A pit of steam larger than the size of the well comes off. The size margin should be approximately 20 centimeters in all directions.
- A sand bedding is formed.
- The plastic structure is lowered to the bottom of the pit.
- If there is a loading chamber (a weighting agent, a container that prevents plastic from floating in wet soil), it is filled with concrete.
- All communications are installed: shut-off valves, a crude well filter and a water meter are connected to the highway branch.
- Backfilling in progress. For wells of increased rigidity (with a corrugated surface), previously removed soil is used with a tamper every 20 centimeters. For structures with smooth walls, backfilling is done with a cement-sand mixture in a ratio of 1:5.
Regulations
The distance from a well, cesspool, sewer system, residential building, neighbors’ own and private housing construction, well of a neighboring plot, fence - all these are distances that are strictly regulated in SNiP. They have been verified based on many years of scientific research by sanitary and epidemiological institutions.
Near a house in the countryside
In 2021, in order to draw up a site development plan, you need to know the established SanPiN standards. You should also check other legislative documents and obtain permission to build a house from supervisory authorities.
This undoubtedly makes life easier not only for the private developer on the individual housing construction site.
According to the law on dachas, which came into force in January 2019, residential buildings (houses) can also be equipped on the territory of SNT. This means the possibility of installing a water supply system on the site and installing a sewerage system.
Drinking water well in the city
All this requires a thorough knowledge of Regulations, SNiP and their updated edition in the form of construction rules, SanPiN, and Codes of the Russian Federation. These documents deal with issues of land improvement and liability for violation of current regulations.
Subtleties of indentation from a residential building
This year, it is necessary to determine the distance between the well and a residential building and other equally important distances in accordance with the requirements and standards of the following documents that have legislative status in the territory of the Russian Federation:
- Code of Administrative Offences, Land and Town Planning Code, which are in charge of aspects of waste disposal, equipment of a water supply source, construction of water supply and sewerage facilities, correct and justified development of land holdings of various types.
- The minimum distance from the house to various objects, including the placement of wells, can be found in SP 53.13330.2011 “Planning and development of territories.” This document has not lost its relevance even after the construction of a permanent residential building on a summer cottage site became permitted.
- SNiP 30-02-97, as amended for 2021, provides for strict compliance of the development plan submitted for permission, which now must be presented to obtain permission for any structures. The undoubted advantage of this moment is receiving a professionally conducted examination. This will allow you to avoid common mistakes in maintaining the distance from each other of sanitation and hygiene facilities. And also find out at what distance such buildings should be placed.
- Distancing of various structures when creating a local water supply and sewerage network is regulated in SP 31.13330.2012 (formerly SNiP 2.04.03-85) “Sewerage. External networks and structures.” In it you can find out such an important parameter as the installation of a sewer well, as well as other distance standards necessary in planning the territory of a land plot.
Near a private house in the village
When searching for a place to drill, you need information about the location of water sources among your neighbors. If the mine is placed incorrectly, water may escape from the neighboring building, and this may lead to quite logical discontent among the owners living nearby.