How it all began…
Germany in the 30s of the twentieth century was a leader in the field of thermite welding technologies.
The technology received its rapid development primarily in crucible welding - now connecting two parts of a railway rail is not difficult.
In short, the welding fixture consists of:
- Crucible;
- Thermite mixture;
- Rails;
- Split fireproof mold
Intermediate casting method (before, during and after casting)
Invention of the pencil
Ultimately, these technologies led to the birth of the idea of a compact welding tool in the shape of a pencil rod.
However, when bringing the idea to life, the “pioneers” faced failure. The fact is that when the mixture cools quickly in the weld pool after the pencil stops burning, the slag and metal mix and the material becomes brittle.
As a result, mixtures based on aluminum thermite did not give a positive result both in the professional environment and in the literature, the “pencil” model was recognized as “not feasible” and for a long time no one dealt with this issue until a professor, Doctor of Technical Sciences appeared, Academician Lebedev Vladimir Georgievich.
Having accidentally become acquainted with the idea, he first calculated a mathematical model, and then implemented a chemical one, based on copper thermite, in which the metal-slag pair is separated in the process of forming a solder-alloy.
Open publications by V.G. Lebedev in Russian publications became the basis for the creation of several welding tools present on the Russian market.
Welding pencils Shkval and Oksal are produced in St. Petersburg and are used for welding, soldering and cutting without the use of any special gas welding or electric welding equipment.
Autonomous mobile welding – pencil SK-1, Moscow
Stages of welding work
Welding a fence requires special tools, protective equipment and skills. To preserve life and health, it is strictly prohibited to carry out welding work without observing safety precautions.
You need to weld the joists correctly using a level and a vice. Thanks to a reliable clamp, the structure will remain level, without distortions, and the seam will be stronger. You can take an assistant who will support the crossbars during welding.
READ ALSO: Show Different Fences What They're Made Of
When installing fences, manual arc welding is most often used. This old but universal method has not ceased to be in demand today. Its principle is quite simple.
Due to the short circuit, the electrode and the surface of the welding material begin to melt, mixing in the welding pool. The result is a strong seam.
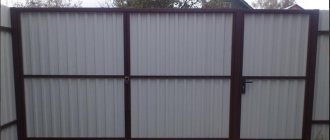
When welding the frame, it is necessary to take into account the presence of stiffeners, which will add strength to the structure and will not allow the corrugated sheet to deform from a strong wind flow.
All that remains is to properly weld the fastening on which the corrugated sheets will be held. After welding is completed, the pipes must be carefully coated with anti-corrosion enamel or paint to protect them from moisture.
The top of the supports made of profile pipes is closed with a plug to prevent the ingress of drops of water and snow . The frame is ready, you can begin installing the corrugated sheets.
When installing the fence, corrugated sheeting with a thickness of at least 0.5 mm is used. This thickness will provide the required rigidity of the structure. The sheets are fastened using roofing screws; the sheets are overlapped. Also, the leaf itself must be at a height of at least 1 cm from the ground.
After completing welding and installation, it is worth reviewing all seams and joints of the fence, checking for strength and painting over open elements, if any remain.
TEC Torch Promotion
Tech Torch - a laser sword from "Star Wars" - as it was dubbed in the USA
There is also a foreign analogue (startup in the USA) TEC Torch Promotion - a thermite cutting device with a replaceable cartridge (the device costs $300; the cartridge costs $50).
In America, TEC Torch is used as a compact tool that can be used by American law enforcement agencies, military personnel, and emergency services in their work. TEC Torch can open any door in a matter of seconds, which can save the lives of people caught in force majeure circumstances.
Thermite cutter in action
The combustion time of the cartridge is only a few seconds - the optimal time for surgical intervention. The Rod Cutter cartridge can burn through a rod up to 2cm in diameter (whether it's hardened, mild steel or stainless steel), and the Plate Penetrator cartridge can cut a hole up to 1cm in a metal plate up to 1.3cm thick. Complex tasks may require multiple cartridges or a combination of cartridges.
One thought on “Welding without welding – welding pencil”
Add a comment Cancel reply
You must be logged in to post a comment.
Is it worth BUYING, reviews from welders:
- Welding transformer PATRIOT 200AC 102.00 RUR
- Charger GreenWorks G24C RUB 2,490.00
- Voltage stabilizer PRORAB DVR 1000 2597.22 RUR
- Stabilizer Resanta ASN-2000 N/1-C Lux 3610.00 ₽
- Voltage stabilizer Stavr SN-2000 3920.00 RUR
- Welding machine BauMaster AW-79161 3990.00 RUR
- Hitachi AB17 charger RUB 4,076.87
Method of performing welding work without welding equipment
Many people have summer cottages, collective garages, etc. without electricity, and if there is one, not every owner has welding equipment; in our time it is very difficult without it. You can, of course, make or purchase ready-made welding equipment yourself; there is plenty of it on the market today, but purchasing a finished product will require considerable financial costs.
The proposed field welding method does not require large investments and is accessible to many. For example, imagine a situation: you and your friends went to the seaside on vacation in several cars, and as very often happens, the car broke down. Without welding work, further movement and towing of the vehicle is impossible. What to do? Call technical assistance (tow truck)? Where to look for it when your mobile phone is out of reach. You will have a spoiled mood, large financial costs and a bunch of other problems.
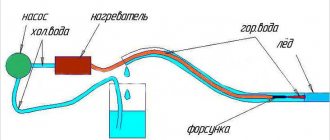
In this and other cases, there is a simple, unique and repeatedly tested method for performing welding work without welding equipment , namely battery-powered welding (see Fig. 1). At the same time, the quality of the weld exceeds the quality of the seam obtained using almost any other welding equipment, since in this case, in fact, an ideal chemical source of direct current is used.
Bracket design
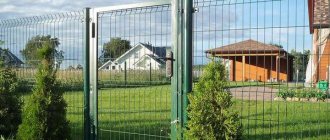
Not everyone has welding skills, which is why fences without welding are gaining more and more popularity. Installation of such fences takes place in several stages. Fundamentally, it is not very different from the welding method, but with a caveat to the method of fastening.
If, in the case of welding, the integrity of the structure is maintained by seams, then fastening the elements using self-tapping screws, bolts and brackets comes to the rescue.
To install a corrugated fence with your own hands without welding, start with supports for the future structure. In the profile pipes that will serve as supports, it is better to drill holes in advance for future mounting of the bracket.
As practice shows, it is much easier to do this on a horizontally lying pipe than on a vertically installed one. After drilling, the supports are placed in holes 1 m deep, 70 cm of which are filled with concrete and allowed to dry. Then the remaining 30 cm is densely covered with soil.
For support pillars, as in the case of welding, a profile with a square cross-section with a wall thickness of at least 2 mm is better suited. More is possible, but a thinner profile can have a detrimental effect on the strength of the fence, making it a victim of harsh weather conditions.
What is a welding inverter and how does it work
An inverter is a modern piece of equipment that is used to connect metal parts. The principle of welding with an inverter is similar to other welding machines. The device produces a current of maximum strength, due to which an electric arc appears. Subsequently, it is maintained due to powerful voltage and allows the metal to be heated. In the case of an inverter, an arc appears between the surface being treated and the electrode. Its difference is that in standard models, powerful voltage is generated using a transformer. The inverter has a different system.
To create a powerful voltage, the 220V input current passes through a special rectifier. There it is converted into a permanent one. Next, the direct current is converted into alternating current with a frequency of up to 100 kHz. At the last stage, the flow is straightened and subsequently used in welding work. It is important to know how to weld pieces together and what is needed to achieve a strong structure.
How to solder aluminum
Until recently, I didn't know how easy it was to solder aluminum with a propane torch. The torch I use has a wide flame, so it's probably not as effective at heating up a specific area to weld. A torch with more points will be better. Either way, if you have a propane torch and soldering rods, you can weld aluminum. These can all be found at your local hardware store.
Step 1: Buy the Right Aluminum Soldering Rod
In the same place where everything is designed for arc welding, you will find aluminum brazing. My rod has an operating temperature of 370 to 400 degrees Celsius. A propane torch burns hot enough to get the job done.
Step 2: Clean the parts at the joint
Any time metal is fused, it is always best that you clean it. I use a wire brush on both surfaces. Now the parts are ready for the heat.
Step 3: Soldering Aluminum
Apply the flame to the joint until it is hot enough to melt the rod. When you swipe the tip of the rod, it should melt. If not, heat the joint again and check it. You want the metal to melt the rod, not the flame. Once everything has cooled, you will have a strong connection. Look at the last picture where I tried to break the connection in a vice. The metal bent before the rupture occurred. Source
Design and advantages of inverter welding machines
Before buying inverter-type welding equipment, it is advisable to familiarize yourself with its structure and strengths.
The inverter design consists of 4 key parts:
- Transformer. In inverter-type models, this element is no larger in size than a cigarette pack. It is designed to reduce high frequency alternating voltage.
- High frequency rectifier. This element equalizes the alternating current coming from the general network. After it, the current enters the high-frequency filter and exits in a constant flow.
- Filter. It consists of a capacitor and a choke. Designed to smooth out rectified current.
- Rectifier. A diode that receives the initial current flow from the general network.
All elements are placed in a metal or plastic case on which the device control system is located.
- The efficiency of such devices can reach 90%. Almost all the energy that the equipment consumes goes to creating and maintaining the arc.
- Power consumption is lower than models with a larger transformer.
- Small dimensions. Low weight. Thanks to this, the welding machine can be used in hard-to-reach places.
- Minimum amount of molten metal splashes during operation.
- Minimum load level on the general electrical system.
- Possibility to select electrodes of the required characteristics.
The inverter is easy to work with. For a person without experience, it is enough to try welding parts together 2-3 times in order to understand how to make a seam correctly.
Preparing for work
Before welding metal with an inverter, you need to prepare a workplace, electrodes, and equipment. To learn how to weld using electric welding, you don’t need to look for professional tools and workbenches. A small metal table is a good place to start. The main thing is that all the tools, welding machine and workpieces can be freely placed on it.
It is important to prepare high-quality lighting and ventilation in the room. When welding metals, harmful fumes are released. In addition to lighting and ventilation, it is necessary to remove flammable materials and liquids as far as possible. The welder needs to stand on a material that does not conduct electricity.
Electrodes are selected depending on what metals need to be welded and how thick they are. The packaging of consumables indicates what material they are intended for.
Welded construction
To install a fence from a profile pipe, you can use welding or fastening to brackets and screws. Each of these methods has its own advantages and disadvantages.
The most traditional is welding a metal fence. Before starting welding work, a material is selected. To create the frame, profile pipes are usually used.
Unlike ordinary ones, they have not a round, but a rectangular or square cross-section. This shape makes it possible to join them during welding without much effort and attach additional elements to the surface.
For support pillars, you can take round pipes or a square profile 50 by 50 mm. For horizontal elements, sometimes called joists, a 40 by 20 mm profile pipe is suitable. Fences up to 1.7 m high are equipped with two parallel logs; if the fence is higher, then 3 logs are used.
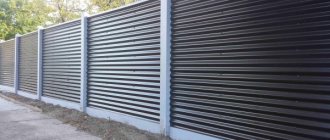
The material for the fencing is corrugated board. Thanks to its low price, good anti-corrosion properties and high availability, it will cope with its task perfectly.
You can also use a steel strip instead of corrugated sheeting. Such fences allow you to freely view the territory.
Necessary tools for structural assembly and welding:
- shovel (for digging holes for supports);
- grinder (for cutting protruding elements);
- welding machine and electrodes;
- level and tape measure (to comply with the calculated dimensions of the fence).
At the preparation stage, it is necessary to dig holes, install support pillars in them and fill them with cement. Next, you need to clean the pipes from grease and rust, build a fence frame from corrugated sheets and attach the main elements by welding. Only after this the profile sheet is screwed on.
Working as an inverter
Before turning on the device, it is advisable to familiarize yourself with how to cook using inverter welding. Instructions are included with the purchased equipment. The main stages of the work will be described below.
Ignition of the arc
First of all, you need to ignite the arc. Two methods are used for this:
- Strike - the welder begins to move the electrode along the workpiece being processed, and then rises above it until a spark is formed.
- Tapping is a more popular option for igniting an arc. The welder taps the end of the electrode on the site of future welding until a spark appears.
The method of igniting the arc is selected depending on comfort and convenience.
Electrode movement
To properly weld part to part, you need to know how to move the electrode. Beginners think that it is enough to light an arc and slowly move the electrode over the contact point of the parts to get an even seam. It is important to correctly select the constant angle of movement of the electrode and the speed of movement of the working part of the equipment. Driving the electrode straight at a right angle is acceptable for thin sheet metal.
Arc gap control
Another important point when welding with an inverter is the distance between the end of the electrode and the metal surface. If the distance is about 2 mm, the welding will be shallow and the seam will not be strong. When the arc is larger than 4mm, it becomes unstable. Metal spatter increases and weld accuracy decreases. It is advisable to place the working part of the inverter apparatus at a distance of 3 mm from the metal surface.
Rules for creating smooth seams
To properly weld metal and make smooth seams, you need to take into account some features:
- Selecting the welding angle. The optimal range of angles is from 30 to 40 degrees.
- Laying the seam requires longitudinal and transverse movements. There are various schemes on the Internet by which you can train the movements of applying a seam.
The speed is selected depending on the chosen method of working with the electrode. If you move the electrode slowly, you can overheat the surface. When done quickly, the seam is not strong.
Equipment and safety
You can carry out not only welding, but also metal cutting with a welding inverter. When carrying out work with welding equipment, it is necessary to take into account the safety rules:
- The equipment must be checked for defects and breakdowns.
- The welding process is harmful to health. To protect your eyes, you need to use a special welder's mask. It is equipped with light filters that protect your eyesight.
- In addition to the mask, the welder needs protective gloves, overalls, and shoes.
The place in which the welder works must be equipped with a special curtain that protects the vision of strangers.
Installation of crossbars
After the concrete has hardened, you can proceed to installing the frame fence rails. They use the same square profile, but smaller in size (40x20).
READ ALSO: How to Install Fence Posts by Butting
The length of the crossbar must be no less than the length of the span; this will allow the logs to be joined directly to the support tube and will add reliability to the structure. If the logs are longer than the span, the excess metal can be cut off with a grinder.
The crossbars are fixed using brackets and bolts. The fence bracket without welding performs its function perfectly. A metal that resists oxidation well and does not rust, or is coated with an anti-corrosion substance, is better suited for fastening.
To install corrugated sheets, roofing screws are used. The sheet thickness must be at least 0.5 mm, and the wave height must not be more than 20 mm. If thinner sheets are used for the fence, it is necessary to install additional rigidity logs.