Blog articles Beekeeping
Beekeeping
Economics of beekeeping
Beekeeping news in Russia
Beekeeping news in the world
Honey
Propolis
Bee bread
Zabrus
Royal jelly
In the world about bees
Apiary
Bees
News from honey fairs
From the history of beekeeping
- Wax - what is it?
- What is it for and why is it used in beekeeping?
- Types of foundation
- Technology and principle of foundation production
- Manufacturing methods: matrix, rollers, pressing, casting
- How to make wax with your own hands
- Making wax on an industrial scale in a workshop
- Safety rules when working with liquid wax
- GOST requirements
- Cell sizes for foundation used in Russia
- Rules, conditions and storage periods for foundation
- How to determine the naturalness of wax in foundation?
- Recommendations and rules for choosing foundation by the buyer
- Conclusion
Foundation is one of the key elements for successful beekeeping. Especially when bees are kept for commercial purposes. Buying it in a store or making it yourself is everyone’s choice. Making your own will save you money, but will require a little effort and time. In this article we will look at the types of foundation and the principles of their production.
What is wax?
In the spring, bees begin preparing for the summer season. Before they start collecting nectar, they need to equip special honeycombs. They consist of hundreds of cells used for different needs. One of them is nectar storage. This preparation takes quite a lot of time.
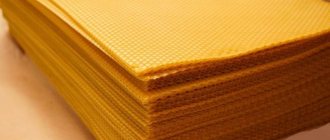
Foundation sheets are layers of wax that already have characteristic hexagonal cells. This is a ready-made “platform” for the work and life of bees. Due to this, there is a significant saving of time and effort. The bees themselves will “finish” the new honeycombs, rebuild the cells and quickly begin collecting nectar.
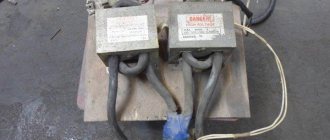
Foundation press
This is a fairly simple device with which you can obtain a limited amount of the finished product (the average productivity of a hand press is no more than 10 sheets per hour). Therefore, in large apiaries, the use of a press is impractical. The principle of operation of the device is similar to a waffle iron - the press consists of two halves with grooved internal parts. The factory press consists of two heavy plates, usually made of aluminum. They are connected to each other with a small gap, which is equal to the thickness of the sheet - from 0.2 to 0.6 mm. Sometimes beekeepers manage to convert old waffle irons into foundation presses, fixing silicone matrices for foundation inside.
Press for making foundation with your own hands
Despite its modest productivity, this type of foundation production machine is still consistently popular among beekeepers. Unfortunately, there are no domestically produced presses for sale, and the price of foreign tools goes through the roof for 50,000 rubles. For this money you can buy good rollers from a Russian or Ukrainian manufacturer. A simple press can be assembled independently without any problems or costs. For this you will need:
- Beeswax.
- Silicone for the mold. Any non-toxic variety of silicone or synthetic raw material used to make molds will do.
- Two wooden plates, fastening elements for the plates.
- Foundation sheet – 1 piece.
First of all, take one wooden plate and a ready-made sheet of foundation, and apply a layer of silicone to it. The silicone must be very carefully smoothed over the surface of the wax sheet so that all the cells are filled. Then silicone is applied to the plate itself and smoothed out thoroughly. Next, the foundation sheet is covered with a second layer of silicone, smoothed out, and connected to a wooden plate with the silicone-coated side.
As a result, the reverse side of the sheet remains clean, as does the second wooden plate. They are also treated with silicone in the same way.
The first layer of silicone is carefully smoothed over the surface, after applying the second layer, both wooden plates are connected to each other so that the wax sheet is between them.
Now you can attach metal loops to the wood-wax “sandwich” and wait until the silicone hardens completely. You can speed up this process by placing the structure in the oven and keeping it for some time at a temperature of 70-100 °C. Once the silicone is sufficiently strong, you can open the plates, attach the handle and additional side limit plates. For ease of use, you also need a tank into which excess wax will drain.
How to make wax on your press yourself
Working with the press is very simple: first, melted wax is evenly poured onto the lower wooden plate with a grooved silicone surface and pressed with the upper plate.
Important! There is no need to try to accurately calculate the amount of wax, its excess will flow into the tank and can be reused.
The remaining frozen wax on the edges of the plates can be cut off with a spatula. After this, the plates are unclenched, wait until the wax has completely hardened, and carefully remove the finished sheet.
To prevent the wax from sticking to the silicone, it is recommended to lubricate the matrix with a solution of laundry soap. However, as practice shows, sometimes bees build very poorly on foundation sheets that have traces of soap solution on them.
Use of the drug Lozeval for bees
Important! Instead of a soap solution, it is recommended to use honey diluted in warm water as a lubricant for the silicone matrix (honey is full).
The result is a light, translucent corrugated sheet of fairly high quality. The only possible drawback of this design is that the edges of the hexagonal cells may be slightly less pronounced, which has virtually no effect on the construction of honeycombs by bees. Of course, this description of the wax production process is very superficial. In fact, every good beekeeper has his own secrets for making high-quality wax: special preparation of the wax, its repeated melting in a wax melter and in a water bath, dehydration, heating the press plates to a certain temperature, etc.
It is also worth considering the process of manufacturing plastic foundation in a press. In fact, it is not much different from making wax from natural material. You will need:
- Silicone (as a plastic substitute) and hardener for silicone.
- Spatula, tape.
- Actually, the press.
The workflow is as follows:
In a separate container, silicone and hardener are mixed in the required proportions. Using a spatula or knife, silicone is applied in an even layer to the matrix, after which it is pressed tightly on top with the press lid. After the silicone has hardened, the finished sheet is removed from the press and kept for some time until the artificial foundation has completely hardened.
Important! Before installing a plastic product in a frame, the surface must be covered with a thin layer of natural wax, since bees are very reluctant to build honeycombs on pure silicone.
Melt wax is applied to the silicone with a soft brush or roller. You can also dip the artificial foundation into melted wax - it will be faster.
Products made from silicone and other form-forming synthetic substances last quite a long time, and silicone matrices in a homemade press will last more than one season. The only condition is not to overheat the mold. Thus, using a press of even such a primitive design, it is possible to provide a small apiary with the necessary amount of natural, high-quality foundation.
What is it for and why is it used in beekeeping?
So, let’s repeat, the first reason is saving time. The beekeeping season lasts only a few months, and the bees have more than enough work. For example, just one insect a day flies over 1000 plants to collect the required amount of pollen. Secondly, life resources are also limited. A “equipped” hive with honeycombs made of foundation will allow you not to waste energy once again.
This leads to the third reason, beneficial to the beekeepers themselves. This is an increase in the volume of honey produced. But don't forget about safety. The main manufacturing principle is sterility. The wax is subjected to heat treatment. This prevents the entry of harmful bacteria.
Advantages of plastic foundation
Plastic foundation is an artificial type; it is characterized by a number of positive aspects:
- Plastic foundation can be used for a long time, no less than 10 years.
- The waxing process is not needed; the foundation can be inserted into the grooves or a plastic frame can be used.
- There is no need to waste time searching and preparing natural-looking foundation.
- Plastic foundation does not lend itself to deformation.
Disadvantages of plastic foundation
- It is little used, there is practically no information about it, beekeepers are often interested in the question of how the queen perceives the material and whether she can lay eggs in it.
- It is impossible to find accurate information on how bees build honeycombs on plastic.
- Plastic foundation needs constant special treatment with chemicals, up to three times a year, to protect against various diseases. In natural wax only the frames are processed.
- To begin with, you will need a little wax to apply to the frames, because of this you have to spend a little money, it is difficult for the beekeeper to work with it at first.
- Wood is a natural material, plastic is an artificial type.
- You can make a wooden frame yourself, you will have to buy a plastic one, which cannot be repaired.
Technology and principle of foundation production
The procedure in the workshop is as follows:
- melt the wax;
- let it settle and filter;
- create plates using rollers;
- compress (the sheet must have a thickness of at least 4 mm);
- make indentations (the basis of future honeycombs);
- Divide the sheets into required sizes and dry.
Making your own wax base yourself follows the same principle, but with some nuances that depend on the chosen method.
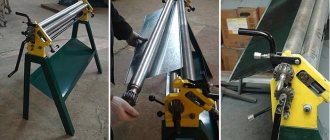
Foundation machine
Beekeepers use two methods for production, using:
- electric press;
- hand rollers.
The most popular rollers for manufacturing are manual ones. They have an engraved surface. By rolling sheets of warm wax through them, you get foundation of the required thickness. Before starting production, it is necessary to prepare a clean, high-quality material free of impurities, waste and traces of dirt.
Manufacturing methods: matrix, engraving rollers, pressing, casting
There are four main methods. However, some of them are only possible in production conditions. Let's take a closer look:
- Pressing. For this, a special machine is used, the plates of which have a relief corresponding to the shape of the cells. Liquid raw materials are poured into plates and kept under pressure until they harden;
- Rollers. Two embossed shafts are used through which a sheet of wax passes;
- Casting is the most popular method in a workshop environment. The wax is cast in special molds and then passed through several machines, achieving a suitable thickness and relief;
- Matrix. It consists of two plates, between which the raw material is placed and rolled out inside. There are special shapes on the surfaces of the plates, which form a honeycomb in the wax.
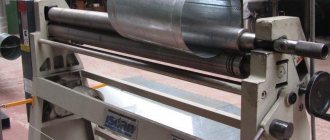
Foundation production using rollers
The production of foundation using special rollers is a very effective method that allows you to quickly and without significant waste produce this material in the required quantities. It is this simple device that is most often used by those beekeepers who are not interested in purchasing ready-made material, but in making foundation at home or even in an off-site apiary. At the same time, using rollers is much more convenient and easier than using a press.
Special equipment for wax production consists of two parts: tape-forming and wax-rolling
Typical elements of the design of rollers, which are produced by many modern enterprises, are:
- two engraved rollers, the working surfaces of which form the relief of the foundation (rollers, as a rule, are made of hardened steel, and their corrugated surface, so that softened wax or its artificial analogue does not stick to it, is coated with a special polymer composition);
- two gears, with the help of which the rollers are given rotation relative to each other;
- adjusting bolts, which are necessary in order to establish the required distance between the rollers;
- the base on which all structural elements of the device are attached.
An important characteristic of the rollers with which foundation is produced is the angle of the hexagonal protrusions engraved on their working part. Manufacturers try to make this angle as close as possible to the angles of the honeycomb cells that the bees themselves build (it is 120º).
The surface of wax rollers consists of regular hexagons, the width of which ranges from 5.12 to 5.69 mm
As mentioned above, to make foundation, you need to pass a thin sheet of wax or an artificial analogue of such material through rollers. Do-it-yourself foundation can be made either from ready-made sheets, which can be purchased separately, or from sheet material produced independently.
Several methods can be used to make sheets from wax or other material.
- Glass or smooth plywood is immersed in a bath of molten wax or its equivalent. After the material has completely hardened and cooled, the sheet can be easily separated from the base. As a rule, it is necessary to form a sheet of a certain thickness, for which a glass or plywood template is immersed in a bath of molten material three to four times.
- A more advanced and productive method for making sheets for foundation involves the use of a special device, the main element of which is a drum. The latter, rotating with a handle, passes through a bath of molten material. The drum of such a device has a large diameter, which is necessary so that the wax layer formed on its surface has time to completely harden and cool before it is removed.
- You can also obtain a sheet of wax or other material from which the foundation will be made by rolling a heated ingot of material through smooth rollers.
- You can make a sheet for the production of foundation in a simpler way, without using any special devices for this. You will need gauze and a tray containing wax or its equivalent. A piece of gauze, which plays the role of a reinforcing element of the future sheet, is dipped into a bath of liquid material, and then laid on a flat and smooth surface to completely harden and cool. Finished sheets of wax or other material should be kept in the open air at room temperature so that they acquire the required strength. This exposure is necessary in order to make foundation from the resulting sheets with a minimum amount of waste.
How to make a trap (swarmer) for wild bees with your own hands
Silicone matrix for foundation
The main components of the device include the foundation matrix. It is a frame that holds a fragile mechanism made from natural beekeeping products.
The design is characterized by:
- strength;
- shiny surface;
- first-class texture without harmful impurities.
Non-compliance with the rules is responsible for harm to the well-being of Hymenoptera and defects in beekeeping honey products that are stored and matured in prepared honeycombs.
Many beekeepers use a silicone matrix for foundation.
Some beekeepers believe that the distinctive features of silicone products are softness and instability.
This problem is solved by adding building ceramics to the matrix in a small volume. They increase the service life of the matrix and give a pleasant appearance, thanks to car paint for additional coverage.
It is appropriate to use varnishes instead of car paint. They are applied to the matrix with a brush or spray can, spraying evenly over the surface.
Silicone matrices are like rubber. It is useful to adhere to the dimensions of the device so that the sheets of wax with cells fit tightly inside the structure. In addition, the size of the matrix must correspond to the hive where the installation is planned to avoid damage during use by bees.
Technological process
To make a matrix with your own hands you will need:
- 600 ml silicone;
- putty knife;
- 40 g catalyst;
- scotch;
- natural or artificial wax.
First, the base is placed on a hard, flat surface. Scotch tape will help out when making a bead that will protect the silicone from leaking. Then the catalyst is mixed in and poured into the mold. When hardened, remove the finished product with a spatula.
Today, manufacturers offer matrices of different sizes. In addition, the matrix for the foundation is cast with your own hands at home, taking into account individual properties.
To install the frame in the hive, wax is heated and applied in a small amount over the equipment. When the shelf life of the product expires, it is melted with a special wax melter.
Beekeeping cannot be imagined without foundation. Wax sheets increase the efficiency and health of bee colonies. Making wax sheets at home is easy to implement. You will need basic special equipment, time, and experience.
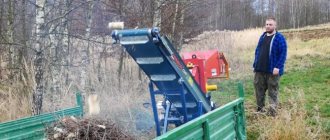
Making wax on an industrial scale in a workshop
The main tools required for production are automatic belt and rollers. They allow us to produce large volumes of material in a short time. You will also need an autoclave to clean the raw materials. The latter is the most important unit, which is often neglected by unscrupulous companies.
In general, the process looks similar to the previous point. First, the raw materials are sterilized. This is the most important point. Honeycombs contaminated with bacteria will not benefit the seller, the buyer, or the bees. Then the blank is formed by melting the wax. The honeycomb is applied using the relief of the shafts.
Workshop technical equipment
After studying the technological processes, equipment, tools, and materials for the production of foundation are purchased. Main mechanisms and devices: sterilizer, mechanized belt, rollers.
The last element included in the machine for the production of high-quality foundation is the basis of the technological process. Rollers require careful selection, since the result depends on them. They are mechanical and automated.
Each equipment manufacturer has different forms of production. Silicone matrices are widespread and have high quality, extended service life and convenience. If you don’t have the funds to buy an expensive device, then a plastic or cement matrix will do.
Safety rules when working with liquid wax
The production of foundation occurs under the influence of high temperatures. Therefore, the main rule is not to forget about fire safety techniques:
- Be careful when melting wax. Do not leave the process without personal control. The resulting mixture is fire hazardous;
- Do not extinguish the mixture with water. It is better to block its access to oxygen - cover it with non-flammable material;
- Use tools - potholders, gloves, knives, tongs. It is better to protect yourself from direct contact with a liquid substance.
Advancement
What is the waxing procedure? This is a direct attachment of the resulting structure to the frame of the hive.
The process of spreading will not present much difficulty for an experienced apiary farm owner. But do not forget to stock up on all the necessary components before starting work:
- the workpiece itself;
- frame;
- wire;
- roller;
- disks.
An experienced beekeeper knows well what all these devices are needed for. But beginning craftsmen will most likely have to read educational literature and watch special videos in order to understand all the nuances of this issue.
For example, a roller is needed to move your workpiece to the base of the frame. And special discs with teeth are needed in order to attach the wire to the workpiece.
By the way, the wire must be tinned and thin. The recommended diameter is 0.4-0.5 millimeters. And discs with teeth are also known as a special spur. In addition, you will definitely need a support board or pattern in your work.
You may also need a special hole punch for your work. You will need to create holes as you stretch the wire. A special reel seat will make the process of working with wire more convenient for you. With proper skill, the entire waxing process can take just a few seconds.
But before that, you need to make the device itself. What needs to be done for this?
First of all, you need to get a smooth sheet from the wax. It must have specified parameters for width, length and thickness.
You can get it using several basic methods. For example, dipping a sheet of plywood into pre-melted wax.
Of course, here you need to follow some nuances and rules that will allow you to achieve a good result in your work.
For example, the original bee products can be absorbed into the plywood mass. To prevent this from happening, do not forget to first soak the plywood sheet in a solution prepared on the basis of table salt.
This procedure will take you several hours. But in order to achieve good results, there is no need to rush.
You will also need cold water, into which you will need to periodically dip the plywood sheet. Be sure to remove excess liquid before dipping the workpiece into the container of melted wax.
Don’t forget to purchase the necessary supplies and equipment that will greatly facilitate the process of your work. For example, you will definitely need smooth rollers.
Although some craftsmen can do without rollers. However, this makes the process of working on the final product a little more complicated.
The rollers also need to be wetted during operation. For this, not water is used, but a solution based on laundry soap.
You can also use detergents that you use daily for household purposes instead of this product. However, in fact, not all beekeepers are ready to do this: after all, competent owners of apiary farms remember that bees react quite sensitively to environmental factors.
These hardworking insects love maximum naturalness and natural conditions. And synthetic detergents are unlikely to be among the factors that bees are accustomed to in the wild.
GOST requirements
Modern requirements for foundation are specified in the current GOST 21180-2012 “Foundation. Technical conditions". The most important thing is the material of manufacture and its processing. It must be natural, which is thoroughly sterilized. It is necessary to control the moisture content of the material at the stage of its preparation (no more than 2%). The class of the finished product directly depends on this indicator.
GOST provides, by agreement between the manufacturer and the consumer, to produce “thicker” foundation for a frame measuring 435×300 mm with the number of sheets per 1 kg from 11 to 13 pcs., for a frame 435×230 mm - from 15 to 18 pcs. Also, according to the current GOST, production with cells of enlarged sizes is applicable (up to 5.60 mm for bees of the Central Russian breed in the regions of Siberia).
New GOST dimensions and rules for foundation production
To improve product quality, new indicators were introduced. The wax is made from a mixture of beeswax and artificial wax. Please note that if the foundation contains a large amount of water, it will be cloudy and fragile. Then problems will begin when using it. The foundation will break along with the combs that contain honey, beebread, and brood. GOST stipulates that it is necessary to determine the wax moisture content as quickly as possible so that the entire technological process can be kept under control, with the help of which the quality will improve.
GOST provides for special preparation of foundation; it must undergo thorough sterilization so that insects are protected from foulbrood, ascospherosis, and meet all sanitary and hygienic standards. The dimensions of the sheet have been changed; the length is 410/400 mm.
Rules, conditions and storage periods for foundation
It is much easier to store it in sheets. It must be protected from moisture (for example, wrapped in paper) and predatory rodents. A possible option is to put it in an insulated box or box. The most suitable room for storage is a room with a slightly above-zero air temperature. From hypothermia (or vice versa, heating) the material may burst. This is especially true for foundation in frames. It must be stored vertically.
Foundation can be transported by all types of transport in covered vehicles in compliance with sanitary rules. It is necessary to protect packaging from exposure to precipitation, at temperatures not lower than 0°C and not higher than 30°C.
The foundation is stored in its original packaging in layers no more than 60 cm high. It is recommended to store it on shelves or in containers in rooms without foreign odors and without access to mice. When stored at subzero temperatures (below -20°C), due to the fragility of wax sheets, it is strictly forbidden to move the packages or rearrange them from one place to another.
The shelf life according to GOST is no more than two years. In real life, some beekeepers, on the contrary, like to “wait a deadline” before placing them in a hive. Each beekeeper chooses for himself what to follow.
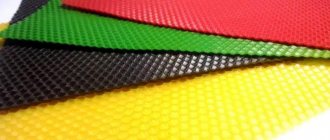
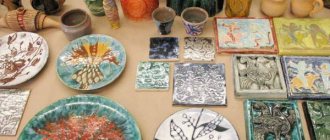
Types of foundation
Most beekeepers prefer to deal with natural wax; fortunately, there is no shortage of wax in a good apiary. Beeswax is absolutely environmentally friendly; insects consider its smell “theirs” and willingly begin to develop a new frame.
When making semi-artificial wax, paraffin and other substitutes are added to the composition. Such plates are less durable, bend less well and begin to melt earlier.
The melting point of natural wax is 62–68 °, of different types of paraffin – from 45 to 65 °. On a hot afternoon, honeycomb substitutes made from paraffin with a low melting point can become severely deformed or become completely unusable.
In retail outlets you can find artificial foundation made from plastic. It is durable, bends easily, can be stored without problems, and the shelf life of artificial foundation reaches 10 years. But beekeepers are in no hurry to take advantage of it. Plastic has its own smell, which insects may not like. This problem is solved by covering the plate with a layer of wax. Also, thin plastic breaks easily, and unlike wax, it is impossible to melt it at home.
Toxic fumes from low-quality material used in the manufacture of artificial foundation can cause the death of an entire bee colony.
How to determine the naturalness of wax in foundation?
Unfortunately, some manufacturers use non-natural ingredients in order to reduce their costs. It is quite difficult to determine their availability when purchasing. Try to smell the product. An unnatural smell may indicate the content of paraffin, rosin or other substances. If the foundation is too brittle, this also indicates the addition of third-party substances (it also works in the opposite direction - excessive wear resistance is also not natural).
It’s easier to determine naturalness at home. Traditional method: place a piece of material in 44° alcohol. The natural component will definitely go to the bottom. A fake will remain floating on the surface.
How to make wax with your own hands
Making honeycomb frames yourself is rare. However, starting a line at home for the production of foundation is quite simple.
Necessary equipment
You don't have to buy expensive equipment to create wax plates. It is possible to purchase hand rollers and a press. Rules for choosing devices:
- materials meet quality and safety requirements;
- rollers and working area made of aluminum coated with thin layers of nickel and tin;
- acquisition of ready-made production forms;
- additional purchase of a cooling system to preserve the cellular structure;
- The principle of operation of the assembled machine is a waffle iron, that is, compression of melted wax between two plates with matrices.
Press for wax production
With the correct selection of equipment, the technological process will minimize the time required to produce each wax sheet.
Preparation
Preparation of containers used for hot water, melted wax and the finished specimen. The stencil is created from available materials: wood, rubber. Silicone templates are most often purchased. Equipment parts must be treated with drying oil.
Stencil for foundation
Production begins with calculating the amount of wax required to produce a set number of plates. Calculations are performed individually.
Manufacturing
Step-by-step implementation of technological processes for producing plates at home:
- Melt the wax, clean the liquid mass from visible impurities and contaminants.
- Determine humidity. If it is above 2%, then evaporate the water by putting it on low heat.
- Melt over steam using two containers. Pull out the finished sheet and throw it over the edge of the bath.
- Pass the sheet between the rollers. They are pre-cooled to prevent the wax from sticking.
- Dry the finished foundation plates in natural conditions.
The disadvantage of independent production is that it wastes the beekeeper’s time, which distracts him from pressing matters in the apiary. However, when automating your own mini-shop, the wax processing time is noticeably reduced.
Recommendations and rules for choosing foundation by the buyer
We recommend:
- contact only verified retail outlets. Experienced stores pay great attention to the sterilization of raw materials. New companies may sell a product contaminated with bacteria.
- Check out the handicrafts offered by private sellers as well;
- check the material for durability. Try tearing a small piece;
- study the dimensions: the cells should be the same from 5.35 to 5.45 mm. Standard parameters of plates: For “Dadan”, length 400±2.0 mm with width 260±2.0 mm; for "Ruth" - length 400±2.0 mm, sheet width 207±2.0 mm;
- the plates should be slightly transparent in the light;
- exclude the presence of defects. The plates should look perfect. Free from dirt, dents and scuffs;
- evaluate the elasticity of the material. Extend your arm forward with your palm facing up. Place a sheet on top. It should bend slightly where it hangs in the air. If it doesn’t bend at all or sags too much, the material is not of high quality.
Guide to making foundation on rollers
Preface
https://www.youtube.com/watch?v=_03-izP0kfI
Making foundation on rollers is divided into two parts:
- Making smooth wax sheets;
- Pulling smooth sheets on rollers.
The sheets can be prepared in two ways. By dipping a wet wooden plank into melted wax and casting thick layers of wax, followed by rolling them on special smooth rollers. The second method is more productive and perfect. But the first one does not require smooth rollers, which means the equipment costs will be lower.
First, let's get acquainted with the first method, and then with the second.
The wax for foundation must be solid, without impurities and of high quality. Honey punch (dead wax) is so soft and weak that it is not at all suitable for making foundation from it.
Rice. 1
The wax is melted in a steam wax melter. In Fig. 1 shows its structure and application. It consists of a separate steam generator and a vessel with double walls, between which steam circulates and the wax melts inside. The steam generator is placed on the stove (Fig. 2) and connected by a tube using two special rubber couplings with a wax furnace.
The wax melter is placed on a stool or some other stand. Two holes are made in the stool, corresponding to two tubes at the bottom of the wax melter. One of them is central, intended for releasing dirty wax, and the other for releasing steam. A vessel is placed under this tube to collect the water flowing out with the steam.
rice. 2
The water in the steam generator must always be no lower than 45 mm from the bottom and no higher than 2/3 of its height from the bottom to the upper arch. During operation, the amount of water is determined by weight. The steam generator rises above the stove and, based on its gravity, determines the approximate amount of water. To avoid burns, make sure that the tubes are connected tightly.
The wax is placed in the wax melter, avoiding hitting the walls with pieces of wax. Thanks to the original features of the wax refiner, the wax melts and settles at the same time. When it is all melted, almost all the dirt and water will collect at the bottom of the wax furnace and the wax can already go to work. If there is no particular rush in the work, then it is better to let the wax stand for two hours in a molten form.
Makalnitsa
The settled wax is carefully removed from the top with a mug and strained through a fine strainer into a bucket. From there it is poured into a dipping bowl. The bowl is a stainless steel vessel. To reduce the cooling of the wax, it is sheathed in a wooden casing. Wet wooden planks are dipped into a dipping bowl filled with wax.
Rice. 3
3 - 5 hours before starting work, the boards must be steamed in hot water. There should be four of them. Two are immersed in melted wax, and from the other two (in warm water) the worker removes oriental sheets. The boards are dipped in wax 3 to 5 times, depending on the temperature of the wax and the required thickness of the sheet.
The wax in the dipping bowl during operation should have a temperature of approximately 75°C. Therefore, the wax that was just poured into the dipping bowl had a temperature of up to 88°C. As the wax is scooped out of the drip tray by immersing the boards in it, a sufficient amount of wax will have time to melt again and settle in the wax melter during this time.
The top layer is drained and the dipping bowl is topped up with it. And so on until all the clean wax comes out of the wax mill. The remaining dirty wax is poured into something where it settles and hardens. When it cools, the dirty thin layer is cut off, and clean wax goes back into the wax mill. When the dirty wax is removed from the wax refinery, the layer of dirty wax adhering to the bottom and sides of the wax refinery is washed off with hot water.
Wax burner
When the proper temperature is reached, begin pouring the wax into the molds. These molds are made of galvanized iron (preferably stainless steel or silicone) measuring 356X267 mm with a height of 22 mm. These molds, which we will call boxes, must be clean and well moistened with water before use, which is done by hand.
It is very useful to first put them in cold water for half an hour. Excess water is washed away. Place them on a strictly horizontal surface. A mug (of a certain volume) is filled with wax from a bucket through a spout (the empty bucket is filled with wax from a vessel) and poured into boxes through a fine strainer.
For this operation, the best room temperature is between 12° and 20° C. Drafts, especially cold drafts, must be avoided. Without allowing the wax to harden too much, the boxes are thrown over and emptied by light tapping. The layers, 16 mm thick, are placed in cold water with ice. They lie there until one o'clock. They are then taken out and placed in piles.
We invite you to familiarize yourself with Artificial burrows for rabbits
I'll tell you why there are failures. If the boxes are dirty or dry, poorly wetted (it must be borne in mind that zinc, in general, is poorly wetted), the wax is hot, the room temperature is high, or the wax in the boxes is very hardened, sticking often occurs. But a light coating of wax covering the boxes during operation does not harm the work and there is no need to clean it off.
On the contrary, an attempt to clean off this plaque with hot water will spoil the matter. causing strong adhesion. In addition, when the wax is hot or in a draft, it happens that the sheets burst. If the wax is cold, then the layer is not intact, with cracks and patterns on the bottom. Keeping the sheets after removal from the boxes in cold water for 1/2-1 hour is necessary so that the layers are completely cooled.
The resulting sheets are taken to a cold place for aging, which with this method, in a sufficiently cold room, lasts 3-4 days. The longer it is, the better. Before rolling, the sheets must be heated in a bath.
The water must meet the same rules as for dipped ones, but the sheets should not turn white. Up to 45° C. at 46-48 they already turn white. Water should cover the sheets on all sides. To do this, they are placed in the bath on a long edge, pressing down on top with several sheets so that they do not rise. Close with the lids that come with each bath.
The rollers are pre-lubricated with soap half an hour beforehand and set to a thickness of 2.5-4 mm.
When passing the layer, it is pressed forward a little, as if helping the rollers to capture the layer. The rollers rotate completely freely and a person, having rolled 20 sheets, should not feel much fatigue.
Having stretched out 10 - 12 sheets, they are cut while they are still soft with a large round knife and across into separate sheets 22 mm wider than the height of the frame on which the foundation is made. The resulting rolled sheets can be stacked and used within 3 days. If they are taken out into the cold, then with sufficient cooling they can be used the next day.
The rollers heat up as they work, but while the new batch of sheets is steaming, the rollers will have time to cool down. When you force work, you need to have 2 baths: while one is steaming, the other is rolling. Then cooling is achieved by watering the rollers with cold water while the sheets are cut and the rollers are standing.
The resulting sheets are put into engraved rollers not with the cut edge, but with the edge (the side perpendicular to the cut line). Accordingly, with practice, the thickness of the leaves is determined. Only in the extreme case of an order that is inconvenient in size can you deviate from this rule and pull it forward with the sawn-off edge.
The rollers are sent by me completely installed and tested for the tasks that I assign to my rollers, with a test sheet and manual attached. But the beekeeper often has to install the rollers himself, which can be crimped from work or, out of curiosity, upset by the beekeeper himself. The entire procedure for completely installing disassembled rollers requires so much knowledge and experience that I will not even talk about it, but will only limit myself to those cases that may arise in the practice of a beekeeper.
Every incorrect installation is primarily reflected in the foundation. Therefore, we will learn to read installation errors on the foundation. The foundation is examined in the light and, moreover, in the position in which it comes out from under the rollers. To prevent any mistakes, you need to look for an imprinted inscription on the foundation (the customer’s name is engraved on the rollers). If we accidentally confused which side the sheet was on, then by looking at the inscription we would immediately find what was lost.
The foundation sheet is taken by hand so that it can be read. The side facing us, i.e., which was near the front pillar (where the gears are), will be called the leading edge of the blade. The opposite one, i.e., which is near the rear pillar, is the rear edge of the foundation cloth. Having carefully examined the foundation in the light, we can distinguish the lower cells, corresponding to the cones of the lower roller, and the upper cells, corresponding to the cones of the upper roller.
It is necessary to firmly be able to distinguish the lower cells from the upper ones. With practice, this difference is noticed at first glance. This difference is as follows: the bottom of the cell has three edges, two vertical and one horizontal, in the cells of the lower roller the horizontal edge is at the bottom, and in the cells of the top roller it is at the top.
Foundation for bees at home
The machine that produces foundation is called a roller. The tool can be found in retail outlets or built with your own hands. The complexity of the mechanism lies in the relief surface: the dimensions of the cells must match the dimensions of the honeycombs that bees make.
The main components of the design include:
- 2 engraved drums that are coated with a polymer composition to prevent wax sticking;
- adjustable bolts that allow you to reduce or increase the interval between shafts;
- 2 gears that give the rollers forward rotation;
- a base that serves as a mount for other pieces of equipment.
Attention! The quality parameter of honeycombs is compliance with equal dimensions of cell angles of 120°. Only the fulfillment of this condition on the convex surface of the rollers will allow the production of high-quality foundation.
The initial stage when rolling sheets of wax is the release of blanks.
There are two main methods:
- Pouring into pre-prepared forms. The cleaned and dissolved wax is poured into prepared molds with wooden sides, which are moistened with water ahead of time. The finished sheet, after hardening, is put through the machine. At the output, the workpiece is thicker than the specified value, so the sheet is similar to tape, which is later brought to the standard.
- Coating the sheet with wax. The moistened plywood sheet is placed several times in liquid wax. When they want to get a thin sheet - two, if thicker - more. The two sheets are removed after cooling and run through the rollers. Such a workpiece comes out thinner: based on the size of the mold, the dimensions of the final product are adjusted. Minimum cuttings are obtained.
On a note. For the production of sheets, rollers with a flat surface are used only. The working surfaces (convex and smooth) are treated in advance with a release mixture. Honey or a suspension is used as a solution: glycerin (2 tsp) and unscented liquid soap (100 g) are mixed into 1 liter of liquid.
Equipment
Do-it-yourself foundation and its creation will not require purchasing expensive special equipment. You can buy a press and hand rollers.
Requirements for selecting devices:
- the texture is high quality and safe;
- aluminum rollers and workspace are coated with tin and nickel;
- purchase of prepared forms;
- purchasing a cooling system to preserve the cellular structure;
- The operating principle of a waxing machine is a waffle iron: pressing molten wax between two strips with dies.
The correct choice of design affects the technological process: it reduces the time for producing each sheet of wax.
Production begins with the calculation of the wax required for the production of plates. Calculations are carried out individually.
Production
Technological processes for producing plates are carried out step by step at home:
- Melt the wax, filter the liquid mass from impurities and debris.
- Set humidity. When the indicator is more than 2%, the liquid is evaporated over low heat.
- Melt over steam using two containers. Pull out the prepared sheet and throw it over the side of the bath.
- Pass the sheet between the rollers. Wax sticking is prevented by pre-cooling.
- It’s time to dry the foundation plates under normal conditions.
Functions of foundation
- A simple increase in the cellular field of the nest.
- Loading a young bee with work.
- Stimulating the secretion of wax in bees for the purpose of its preparation.
- Regular cell updates.
The honeycombs in the nest accumulate dangerous viruses and bacteria that can harm the bees. In addition, over time, the diameter of the bee cells decreases, and full-fledged brood cannot be hatched in them. For these reasons, the honeycombs in the nests need to be updated regularly. Foundation allows this to be done as quickly as possible for the beekeeper and with minimal costs for the bees.